2004 NISSAN SENTRA instrument panel
[x] Cancel search: instrument panelPage 96 of 248

Type A
The trunk lid opener lever is located on the out-
side of the driver’s seat. To open the trunk lid, pull
up the opener lever
s1. To close, push the trunk
lid down securely.Type B
The trunk lid release is located on the instrument
panel. To open the trunk, push the release in the
direction indicated in the illustrations1. To close
the trunk lid, push it down securely.
Cancel lever
When the lever is in the cancel position, the trunk
lid cannot be opened with the trunk lid opener
lever. It can be opened only with the key.
WPD0118WPD0198WPD0021
3-12Pre-driving checks and adjustments
ZREVIEW COPY:Ð2004 Sentra(b15)
Owners Manual(owners)ÐUSA English(nna)
03/18/04Ðtbrooks
X
Page 130 of 248

If the shift selector lever cannot be moved out of
P (Park) , have a NISSAN dealer check the auto-
matic transmission system as soon as possible.
Accelerator downshift
— in D position —
For passing or hill climbing, depress the accel-
erator pedal to the floor. This shifts the transmis-
sion down into a lower gear, depending on the
vehicle speed.
Overdrive switch
Each time your vehicle is started, the transmis-
sion is automatically “reset” to overdrive ON.
ON: With the engine running and the
shift selector lever in the D (Drive)
position, the transmission upshifts
into Overdrive as vehicle speed
increases.
Overdrive does not engage until the engine
has reached operating temperature.
OFF: For driving up and down long
slopes where engine braking is nec-
essary push the Overdrive switch
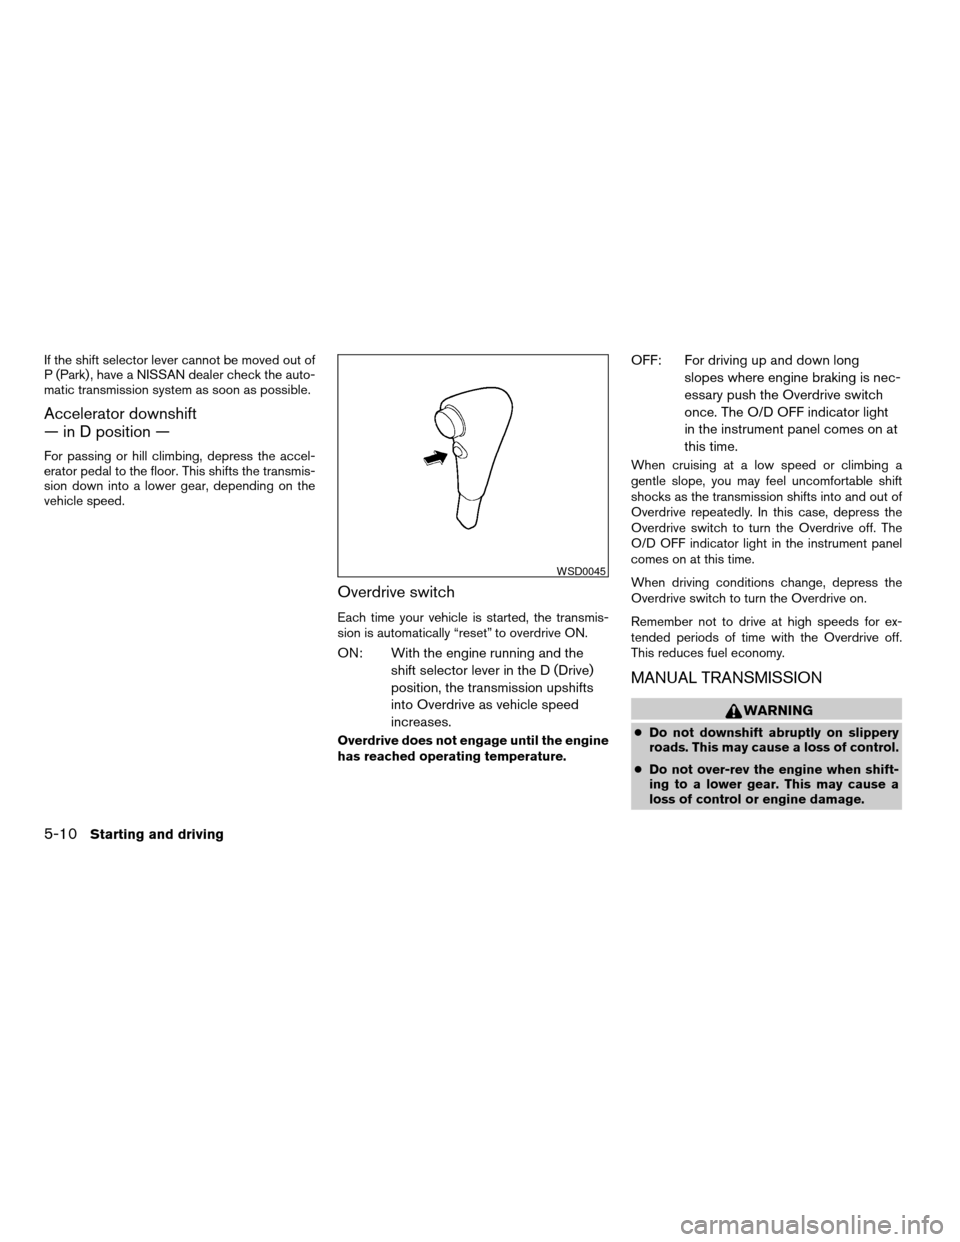
once. The O/D OFF indicator light
in the instrument panel comes on at
this time.
When cruising at a low speed or climbing a
gentle slope, you may feel uncomfortable shift
shocks as the transmission shifts into and out of
Overdrive repeatedly. In this case, depress the
Overdrive switch to turn the Overdrive off. The
O/D OFF indicator light in the instrument panel
comes on at this time.
When driving conditions change, depress the
Overdrive switch to turn the Overdrive on.
Remember not to drive at high speeds for ex-
tended periods of time with the Overdrive off.
This reduces fuel economy.
MANUAL TRANSMISSION
WARNING
cDo not downshift abruptly on slippery
roads. This may cause a loss of control.
cDo not over-rev the engine when shift-
ing to a lower gear. This may cause a
loss of control or engine damage.
WSD0045
5-10Starting and driving
ZREVIEW COPY:Ð2004 Sentra(b15)
Owners Manual(owners)ÐUSA English(nna)
03/18/04Ðtbrooks
X
Page 134 of 248

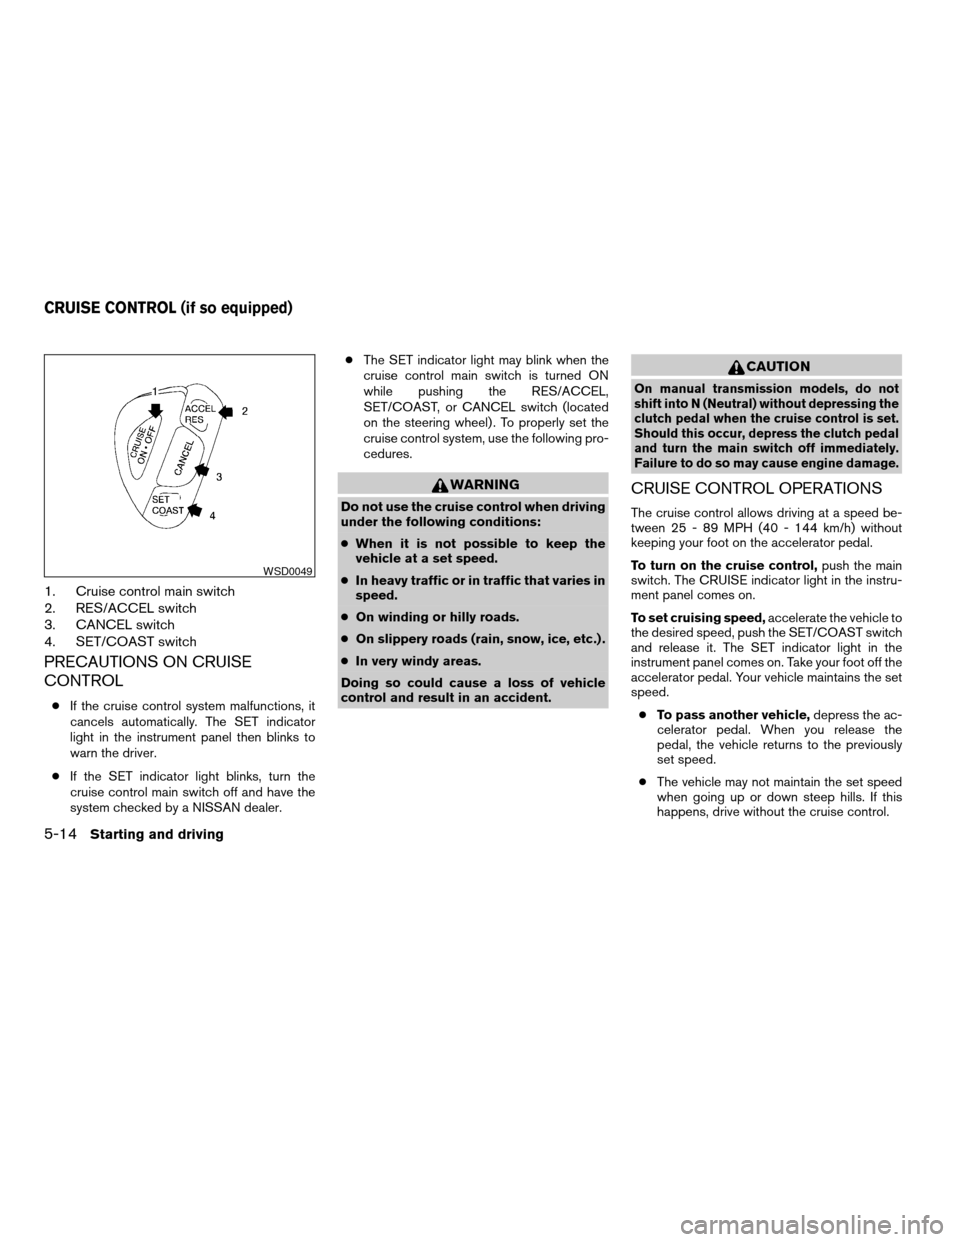
1. Cruise control main switch
2. RES/ACCEL switch
3. CANCEL switch
4. SET/COAST switch
PRECAUTIONS ON CRUISE
CONTROL
cIf the cruise control system malfunctions, it
cancels automatically. The SET indicator
light in the instrument panel then blinks to
warn the driver.
cIf the SET indicator light blinks, turn the
cruise control main switch off and have the
system checked by a NISSAN dealer.cThe SET indicator light may blink when the
cruise control main switch is turned ON
while pushing the RES/ACCEL,
SET/COAST, or CANCEL switch (located
on the steering wheel) . To properly set the
cruise control system, use the following pro-
cedures.
WARNING
Do not use the cruise control when driving
under the following conditions:
cWhen it is not possible to keep the
vehicle at a set speed.
cIn heavy traffic or in traffic that varies in
speed.
cOn winding or hilly roads.
cOn slippery roads (rain, snow, ice, etc.) .
cIn very windy areas.
Doing so could cause a loss of vehicle
control and result in an accident.
CAUTION
On manual transmission models, do not
shift into N (Neutral) without depressing the
clutch pedal when the cruise control is set.
Should this occur, depress the clutch pedal
and turn the main switch off immediately.
Failure to do so may cause engine damage.
CRUISE CONTROL OPERATIONS
The cruise control allows driving at a speed be-
tween 25 - 89 MPH (40 - 144 km/h) without
keeping your foot on the accelerator pedal.
To turn on the cruise control,push the main
switch. The CRUISE indicator light in the instru-
ment panel comes on.
To set cruising speed,accelerate the vehicle to
the desired speed, push the SET/COAST switch
and release it. The SET indicator light in the
instrument panel comes on. Take your foot off the
accelerator pedal. Your vehicle maintains the set
speed.
cTo pass another vehicle,depress the ac-
celerator pedal. When you release the
pedal, the vehicle returns to the previously
set speed.
cThe vehicle may not maintain the set speed
when going up or down steep hills. If this
happens, drive without the cruise control.
WSD0049
CRUISE CONTROL (if so equipped)
5-14Starting and driving
ZREVIEW COPY:Ð2004 Sentra(b15)
Owners Manual(owners)ÐUSA English(nna)
03/18/04Ðtbrooks
X
Page 135 of 248

To cancel the preset speed,use one of the
following three methods.
cPush the CANCEL button; the SET indicator
light in the instrument panel goes out.
cTap the brake pedal; the SET indicator light
goes out.
cTurn the main switch off. Both the CRUISE
indicator light and SET indicator light in the
instrument panel go out.
The cruise control is automatically canceled and
the SET light in the instrument panel goes out if:
cyou depress the brake pedal while pushing
the ACCEL/RES or SET/COAST switch.
The preset speed is deleted from memory.
cthe vehicle slows down more than 8 MPH
(13 km/h) below the set speed.
cyou depress the clutch pedal (manual trans-
mission) , or move the shift selector lever to N
(Neutral) (automatic transmission) .
To reset at a faster cruising speed,use one
of the following three methods.
cDepress the accelerator pedal. When the
vehicle attains the desired speed, push and
release the SET/COAST switch.cPush and hold the RES/ACCEL switch.
When the vehicle attains the speed you de-
sire, release the switch.
cPush and release the RES/ACCEL switch.
Each time you do this, the set speed in-
creases by about 1 MPH (1.6 km/h) .
To reset at a slower cruising speed,use one
of the following three methods.
cLightly tap the brake pedal. When the ve-
hicle attains the desired speed, push the
COAST/SET switch and release it.
cPush and hold the SET/COAST switch. Re-
lease the switch when the vehicle slows to
the desired speed.
cPush and release the SET/COAST switch.
Each time you do this, the set speed de-
creases by about 1 MPH (1.6 km/h) .
To resume the preset speed,push and re-
lease the RES/ACCEL switch. The vehicle re-
turns to the last set cruising speed when the
vehicle speed is over 25 MPH (40 km/h) .CAUTION
During the first 1,200 miles (2,000 km) ,
follow these recommendations to obtain
maximum engine performance and en-
sure the future reliability and economy of
your new vehicle. Failure to follow these
recommendations may result in short-
ened engine life and reduced engine
performance.
cAvoid driving for long periods at constant
speed, either fast or slow, and do not run the
engine over 4,000 rpm.
cDo not accelerate at full throttle in any gear.
cAvoid quick starts.
cAvoid hard braking as much as possible.
cDo not tow a trailer for the first 500 miles
(800 km) . Your engine, axle or other parts
could be damaged.
BREAK-IN SCHEDULE
Starting and driving5-15
ZREVIEW COPY:Ð2004 Sentra(b15)
Owners Manual(owners)ÐUSA English(nna)
03/18/04Ðtbrooks
X
Page 139 of 248

WARNING
cWhile driving on a slippery surface, be
careful when braking, accelerating or
downshifting. Abrupt braking or accel-
erating could cause the wheels to skid
and result in an accident.
cIf the engine is not running or is turned
off while driving, the power assist for
the brakes will not work. Braking will be
harder.
Wet brakes
When the vehicle is washed or driven through
water, the brakes may get wet. As a result, your
braking distance will be longer and the vehicle
may pull to one side during braking.
To dry the brakes, drive the vehicle at a safe
speed while lightly pressing the brake pedal to
heat up the brakes. Do this until the brakes return
to normal. Avoid driving the vehicle at high
speeds until the brakes function correctly.
ANTI-LOCK BRAKE SYSTEM (ABS)
(if so equipped)
The anti-lock brake system controls the brakes so
the wheels do not lock when braking abruptly or
when braking on slippery surfaces. The system
detects the rotation speed at each wheel andvaries the brake fluid pressure to prevent each
wheel from locking and sliding. By preventing
wheel lockup, the system helps the driver main-
tain steering control and helps to minimize swerv-
ing and spinning on slippery surfaces.
Using the system
Depress the brake pedal and hold it down.
WARNING
Do not pump the brake pedal. Doing so
may result in increased stopping
distances.
Normal operation
The anti-lock brake system does not operate at
speeds below3-6MPH(5-10km/h) . (The
speeds vary according to road conditions.)
When driving, the anti-lock brake system con-
trols the wheels so they will not lock when brak-
ing abruptly or when braking on a slippery road.
Thus, difficult steering and swerving of the ve-
hicle due to locked wheels is minimized. The
system detects the wheel rotation rate and elec-
tronically controls the pressure applied to each
brake. Slight vibration on the brake pedal accom-
panied by noise usually occurs while the ABS
system is operating. Such vibration and noise
encountered during abrupt braking is not a prob-lem, but indicates that the system is functioning
properly. However, the pulsation may indicate
that road conditions are hazardous and extra care
is required while driving.
Self-test feature
The anti-lock brake system consists of electronic
sensors and hydraulic solenoids controlled by a
computer. The computer has a built-in diagnostic
feature that tests the system each time you start
the engine and move the vehicle at a low speed in
forward or reverse. When the self-test occurs,
you may hear a ‘‘clunk’’ noise and/or feel a pulsa-
tion in the brake pedal. This is normal and is not
an indication of any malfunction. If the computer
senses any malfunction, it switches the anti-lock
brake system off and turns on the ABS brake
warning light on the instrument panel. The brake
system then operates normally, but without anti-
lock assistance.
If a malfunction occurs in the system, the anti-
lock function will not operate, but the standard
vehicle brake system will continue to operate
normally. The ABS brake warning light will then
come on.
If the light comes on during the self-test or while
driving, take the vehicle to a NISSAN dealer for
repair.
Starting and driving5-19
ZREVIEW COPY:Ð2004 Sentra(b15)
Owners Manual(owners)ÐUSA English(nna)
03/18/04Ðtbrooks
X
Page 186 of 248

IN-CABIN MICROFILTER (if so
equipped)
The in-cabin microfilter restricts the entry of air-
borne dust and pollen particles and reduces
some objectionable outside odors. The filter is
located behind the glove box. Refer to the
“NISSAN Service and Maintenance Guide” for
change intervals.
To change the filter, perform the following proce-
dure:
1. Remove the glove box door by removing the
two lower hinge pins.2. Remove the two screws securing the glove
box frame.
3. Remove the two screws securing the glove
box door latch. Remove the latch by pulling it
down.
4. Remove the glove box frame by pulling it
away from the instrument panel to disen-
gage the retaining clips.
LDI0139LDI0140
8-24Maintenance and do-it-yourself
ZREVIEW COPY:Ð2004 Sentra(b15)
Owners Manual(owners)ÐUSA English(nna)
03/18/04Ðtbrooks
X
Page 237 of 248

10 Index
A
Air bag (See supplemental restraint
system)......................1-6
Air bag warning light...........1-17, 2-11
Air cleaner housing filter............8-23
Air conditioner
Air conditioner operation...........4-5
Air conditioner service............4-9
Air conditioner specification label.....9-11
Air conditioner system refrigerant and
lubrication recommendations........9-6
Heater and air conditioner controls.....4-2
Servicing air conditioner...........4-9
Air flow charts..................4-6
Alarm system (See vehicle security system). .2-13
Anchor point locations.............1-35
Antenna.....................4-17
Anti-lock brake system (ABS).........5-19
Anti-lock brake warning light..........2-9
Audible reminders................2-12
Audio system..................4-10
Compact disc (CD) player.........4-15
FM-AM radio with compact disc (CD)
player....................4-13
Radio....................4-10
Automatic
Automatic power window switch.....2-27
Automatic transmission fluid (ATF). . . .8-14
Driving with automatic transmission.....5-7
Transmission selector lever lock release . .5-9B
Battery......................8-19
Charge warning light............2-10
Battery replacement
(See remote keyless entry system). . . .3-9, 8-32
Before starting the engine............5-6
Belts (See drive belts).............8-21
Brake
Anti-lock brake system (ABS).......5-19
Brake booster................8-29
Brake fluid..................8-17
Brake light (See stop light).........8-36
Brake pedal.................8-28
Brake system................5-18
Brake warning light..............2-9
Brake wear indicators........2-12, 8-29
Parking brake check............8-28
Parking brake operation..........5-13
Self-adjusting brakes............8-29
Break-in schedule................5-15
Brightness control
Instrument panel..............2-19
Bulb check/instrument panel..........2-9
Bulb replacement................8-36C
Capacities and recommended
fuel/lubricants...................9-2
Car phone or CB radio.............4-17
Cargo (See vehicle loading information) . . .9-12
CD care and cleaning.............4-16
CD player (See audio system).........4-15
Check engine indicator light
(See malfunction indicator lamp).......2-11
Child restraint with top tether strap......1-34
Child restraints.......1-20, 1-21, 1-26, 1-33
Precautions on child restraints.......1-26
Top tether strap anchor point locations . .1-35
Child safety rear door lock............3-5
Chimes, audible reminders...........2-12
Cigarette lighter.................2-22
Cleaning exterior and interior..........7-2
Clock......................4-14
Clutch
Clutch fluid.................8-18
Coin box.....................2-25
Cold weather driving..............5-20
Compact disc (CD) player...........4-15
Console box...................2-25
Controls
Heater and air conditioner controls.....4-2
Coolant
Capacities and recommended
fuel/lubricants.................9-2
Changing engine coolant..........8-9
ZREVIEW COPY:Ð2004 Sentra(b15)
Owners Manual(owners)ÐUSA English(nna)
04/02/04Ðdebbie
X
Page 239 of 248

Heater
Heater and air conditioner controls.....4-2
Heater operation...............4-4
Hood release..................3-11
Horn.......................2-21
I
Ignition switch..................5-4
Immobilizer system..........2-13, 3-2, 5-5
Important vehicle information label.......9-10
In-cabin microfilter...............8-24
Increasing fuel economy............5-16
Indicator lights and audible reminders
(See warning/indicator lights and audible
reminders).....................2-9
Inside mirror...................3-16
Instrument brightness control.........2-19
Instrument panel.................2-2
Interior light...................2-29
Interior trunk lid release.............3-13
ISOFIX child restraints.............1-33
J
Jump starting...................6-7
K
Key ........................3-2
Keyless entry system
(See remote keyless entry system).......3-5L
Labels
Air conditioner specification label.....9-11
Emission control information label.....9-11
Engine serial number............9-10
F.M.V.S.S. certification label........9-10
Vehicle identification number (VIN) plate . .9-9
Warning labels (for SRS)..........1-16
LATCH (Lower Anchors and Tethers for CHildren)
System......................1-33
License plate
Installing the license plate.........9-12
Light
Air bag warning light.........1-17, 2-11
Brake light (See stop light).........8-36
Bulb check/instrument panel........2-9
Bulb replacement..............8-36
Charge warning light............2-10
Fog light switch...............2-20
Headlight aiming adjustment........8-34
Headlight and turn signal switch......2-18
Headlights..................8-34
Interior light.................2-29
Light bulbs..................8-34
Low washer fluid warning light.......2-10
Spotlights (See map light).........2-30
Trunk light..................2-30
Warning/indicator lights and audible
reminders...................2-9
Lights
Map lights..................2-30
Lock
Child safety rear door lock..........3-5
Door locks..................3-3Fuel filler lid lock opener lever.......3-14
Power door locks...............3-4
Trunk lid lock opener lever.........3-11
Low fuel warning light.............2-10
Low washer fluid warning light.........2-10
Luggage (See vehicle loading information) . .9-12
M
Maintenance
General maintenance............8-2
Inside the vehicle...............8-3
Maintenance precautions..........8-5
Outside the vehicle..............8-2
Seat belt maintenance...........1-25
Under the hood and vehicle.........8-4
Malfunction indicator lamp (MIL)........2-11
Manual front seat adjustment..........1-2
Manual windows................2-28
Map lights....................2-30
Meters and gauges................2-3
Instrument brightness control.......2-19
Mirror
Inside mirror.................3-16
Outside mirrors...............3-16
Vanity mirror.................3-16
Multi-remote control system
(See remote keyless entry system).......3-5
N
Nissan vehicle immobilizer system
(NVIS).................2-13, 3-2, 5-5
10-3
ZREVIEW COPY:Ð2004 Sentra(b15)
Owners Manual(owners)ÐUSA English(nna)
04/02/04Ðdebbie
X