Page 70 of 320
Anchor point locations
Anchor points are located on the floor behind the
front passenger seat (2 passenger cargo van
only) , on the back of the 2nd row captain’s chairs
and the back of the center seat position on the
3rd row bench seat as shown.
If you have any questions when installing a
top strap child restraint on the rear seat,
consult your NISSAN dealer for details.
The front passenger seat and 2nd row captain’s
chair anchor point locations are marked with the
label shown.
Front passenger seat
(2 passenger cargo van only)
LRS0322
Label
WRS0210
2nd row captain’s chairs
LRS0307
1-54Safety—Seats, seat belts and supplemental air bags
ZREVIEW COPY:Ð2004 Quest(van)
Owners Manual(owners)ÐUSA English(nna)
10/08/03Ðtbrooks
X
Page 71 of 320
1. Pull strap
2. Top tether anchor pointINSTALLATION ON FRONT
PASSENGER SEAT
WARNING
cNever install a rear-facing child re-
straint in the front passenger seat.
Supplemental front air bags inflate with
great force. A rear-facing child restraint
could be struck by the supplemental
front air bag in a crash and could seri-
ously injure or kill your child.cNISSAN recommends that child re-
straints be installed in the rear seat.
However, if you must install a forward-
facing child restraint in the front pas-
senger seat, move the passenger seat
to the rearmost position. Also, be sure
the front passenger air bag status light
is illuminated to indicate the passenger
air bag is OFF. See “Front passenger air
bag and status light” earlier in this sec-
tion for details.
3rd row bench
WRS0319WRS0256WRS0378
Safety—Seats, seat belts and supplemental air bags1-55
ZREVIEW COPY:Ð2004 Quest(van)
Owners Manual(owners)ÐUSA English(nna)
10/08/03Ðtbrooks
X
Page 72 of 320

cA child restraint with a top tether strap
should not be used in the front passen-
ger seat unless the vehicle is the 2 pas-
senger cargo van only.
cThe three-point seat belt in your vehicle
is equipped with an automatic locking
mode retractor which must be used
when installing a child restraint.
cFailure to use the retractor’s locking
mode will result in the child restraint
not being properly secured. The re-
straint could tip over or otherwise be
unsecured and cause injury to the child
in a sudden stop or collision.
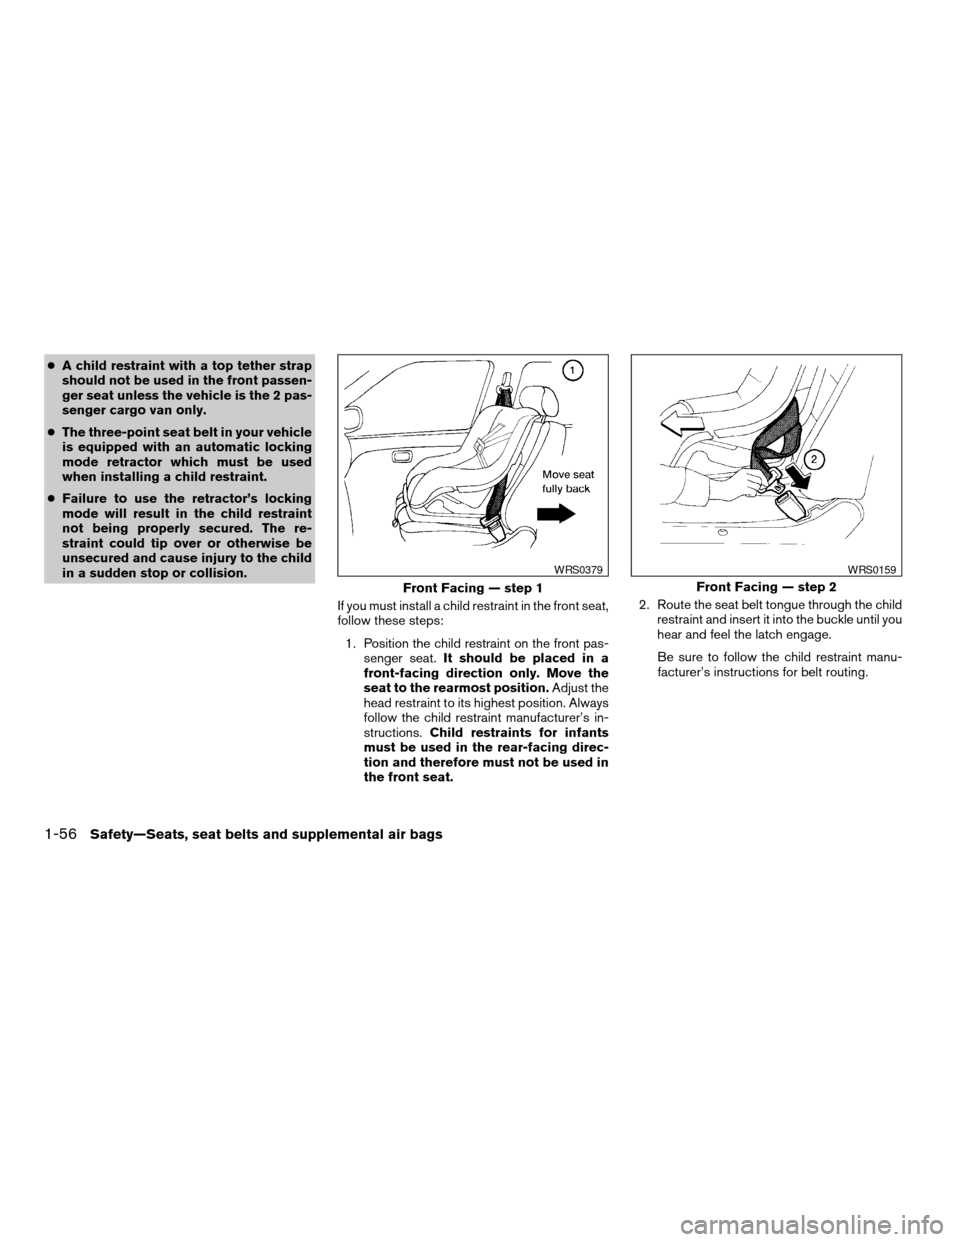
If you must install a child restraint in the front seat,
follow these steps:
1. Position the child restraint on the front pas-
senger seat.It should be placed in a
front-facing direction only. Move the
seat to the rearmost position.Adjust the
head restraint to its highest position. Always
follow the child restraint manufacturer’s in-
structions.Child restraints for infants
must be used in the rear-facing direc-
tion and therefore must not be used in
the front seat.2. Route the seat belt tongue through the child
restraint and insert it into the buckle until you
hear and feel the latch engage.
Be sure to follow the child restraint manu-
facturer’s instructions for belt routing.
Front Facing — step 1
WRS0379
Front Facing — step 2
WRS0159
1-56Safety—Seats, seat belts and supplemental air bags
ZREVIEW COPY:Ð2004 Quest(van)
Owners Manual(owners)ÐUSA English(nna)
10/08/03Ðtbrooks
X
Page 73 of 320

3. Pull on the shoulder belt until all of the belt is
fully extended. At this time, the seat belt
retractor is in the automatic locking mode
(child restraint mode) . It reverts to emer-
gency locking mode when the seat belt is
fully retracted.4. Allow the seat belt to retract slightly. Pull up
on the shoulder belt to remove any slack in
the belt.5. Before placing the child in the child restraint,
use force to tilt the child restraint from side
to side, and tug it forward to make sure that
it is securely held in place. It should not move
more than 1 inch.
6. Check that the retractor is in the automatic
locking mode by trying to pull more seat belt
out of the retractor. If you cannot pull any
more belt webbing out of the retractor, the
retractor is in the automatic locking mode.
Front Facing — step 3
WRS0160
Front Facing — step 4
WRS0161
Front Facing — step 5
WRS0380
Safety—Seats, seat belts and supplemental air bags1-57
ZREVIEW COPY:Ð2004 Quest(van)
Owners Manual(owners)ÐUSA English(nna)
10/08/03Ðtbrooks
X
Page 74 of 320
7. Check to make sure the child restraint is
properly secured prior to each use. If the
seat belt is not locked, repeat steps 3
through 6.
8. Turn the ignition to the ON position. The
passenger air bag status light should say
“PASS AIR BAG OFF”
or.If
this light is not illuminated it may indicate a
malfunction.Move the child restraint to
another seating position.Have the sys-
tem checked by a NISSAN dealer.
After the child restraint is removed and the seat
belt is fully retracted, the automatic locking mode
(child restraint mode) is canceled.
1-58Safety—Seats, seat belts and supplemental air bags
ZREVIEW COPY:Ð2004 Quest(van)
Owners Manual(owners)ÐUSA English(nna)
10/08/03Ðtbrooks
X
Page 75 of 320
Safety—Seats, seat belts and supplemental air bags1-59
MEMO
Page 85 of 320

CAUTION
cThe low tire pressure warning system is
not a substitute for the regular tire pres-
sure check. Be sure to check the tire
pressure regularly.
cIf the vehicle is being driven at speeds
of less than 20 MPH (32 km/h) , the low
tire pressure warning system may not
operate correctly.
cBe sure to install the specified size of
tires to the 4 wheels correctly.
Low windshield washer fluid
warning light
This light comes on when the windshield washer
fluid is at a low level. Add windshield washer fluid
as necessary. See the “Maintenance and do-it-
yourself” section of this manual.
Seat belt warning light and
chime
The light and chime remind you to fasten your
seat belts. The light illuminates whenever the
ignition key is turned to the ON or START position
and remains illuminated until the driver’s seat belt
is fastened. At the same time, the chime sounds
for about 7 seconds unless the driver’s seat belt
is securely fastened.Refer to “Seat belts” in the “Safety—Seats, seat
belts and supplemental air bags” section for pre-
cautions on seat belt usage.
Supplemental air bag warning
light
When the ignition key is in the ON or START
position, the supplemental air bag warning light
illuminates for about 7 seconds and then turns
off. This means the system is operational.
If any of the following conditions occur, the
supplemental front air bag, supplemental side air
bag (if so equipped) , curtain side-impact air
bags, and pre-tensioner seat belt systems need
servicing and your vehicle must be taken to a
NISSAN dealer:
cThe supplemental air bag warning light re-
mains on after approximately 7 seconds.
cThe supplemental air bag warning light
flashes intermittently.
cThe supplemental air bag warning light does
not come on at all.
Unless checked and repaired, the supplemental
restraint system (air bag system) and/or the pre-
tensioner seat belts may not function properly.
For additional details see “Supplemental restraint
system” in the “Safety—Seats, seat belts and
supplemental air bags” section of this manual.
WARNING
If the supplemental air bag warning light
is on, it could mean that the supplemental
front air bag, supplemental side air bag,
curtain side-impact air bag systems (if so
equipped) and/or pre-tensioner seat belt
systems will not operate in an accident.
INDICATOR LIGHTS
Automatic transmission posi-
tion indicator light
When the ignition key is turned to the ON posi-
tion, the indicator in the tachometer shows the
automatic transmission selector lever position.
See “Driving the vehicle” in the “Starting and
driving” section of this manual.
Cruise main switch indicator
light
The light comes on when the cruise control main
switch is pushed. The light goes out when the
main switch is pushed again. When the cruise
main switch indicator light comes on, the cruise
control system is operational.
Instruments and controls2-9
ZREVIEW COPY:Ð2004 Quest(van)
Owners Manual(owners)ÐUSA English(nna)
10/08/03Ðtbrooks
X
Page 87 of 320

For front passenger air bag status light operation,
see “Front passenger air bag and status light” in
the “Safety — Seats, seat belts and supplemental
air bags” section of this manual.
Security indicator light (NVIS)
This light blinks whenever the ignition switch is in
the LOCK, OFF or ACC position. This function
indicates the security system equipped on the
vehicle is operational.
For additional information, see “Security system”
later in this section.
Slip indicator light
This indicator light will blink when the traction
control system is limiting wheel spin. Slippery
road conditions may exist if the slip indicator
blinks on. If this happens, adjust your driving
accordingly.
The slip indicator light also comes on when you
turn the ignition key to the ON position. The light
will turn off after about 2 seconds if the system is
operational. If the light does not come on or go
off, have the traction control system checked by a
NISSAN dealer.The system operates in all transmission shift lever
positions, but the system can upshift the trans-
mission only as high as the indicated shift lever
position.
Traction control system off
indicator light (if so equipped)
This indicator light comes on when the traction
control off switch is pushed to OFF. This indi-
cates the traction control system is not operating.
Push the traction control off switch again or re-
start the engine and the system will operate nor-
mally. See “Traction control system (TCS)” in the
“Starting and driving” section of this manual.
The traction control light also comes on when you
turn the ignition key to the ON position. The light
will turn off after about 2 seconds if the traction
control system (TCS) is operational. If the light
stays on or comes on along with the SLIP indica-
tor light while you are driving, have the traction
control system checked by a NISSAN dealer.
While the traction control system is operating,
you might feel slight vibration or hear the system
working when starting the vehicle or accelerat-
ing, but this is normal.
Turn signal/hazard indicator
lights
The appropriate light flashes when the turn signal
switch is activated.
Both lights flash when the hazard switch is turned
on.
Vehicle dynamic control off
indicator light (if so equipped)
This indicator light comes on when the vehicle
dynamic control off switch is pushed to OFF. This
indicates the vehicle dynamic control system is
not operating.
Push the vehicle dynamic control off switch again
or restart the engine and the system will operate
normally. See “Vehicle dynamic control (VDC)
system” in the “Starting and driving” section of
this manual.
The vehicle dynamic control light also comes on
when you turn the ignition key to the ON position.
The light will turn off after about 2 seconds if the
system is operational. If the light stays on or
comes on along with the SLIP indicator light
while you are driving, have the vehicle dynamic
control system checked by a NISSAN dealer.
Instruments and controls2-11
ZREVIEW COPY:Ð2004 Quest(van)
Owners Manual(owners)ÐUSA English(nna)
10/08/03Ðtbrooks
X