Page 55 of 579
6 CHECK COMBINATION METER
Refer to EL section.
OK or NG
OKcGO TO 11.
NGcReplace combination meter.
7 CHECK HEADLAMP FUNCTION
1. Start engine.
2. Lighting switch ªONº at 2nd position.
3. Check that headlamp high beams are illuminated.
OK or NG
OKcGO TO 8.
NGcCheck headlamp circuit. Refer to EL section.
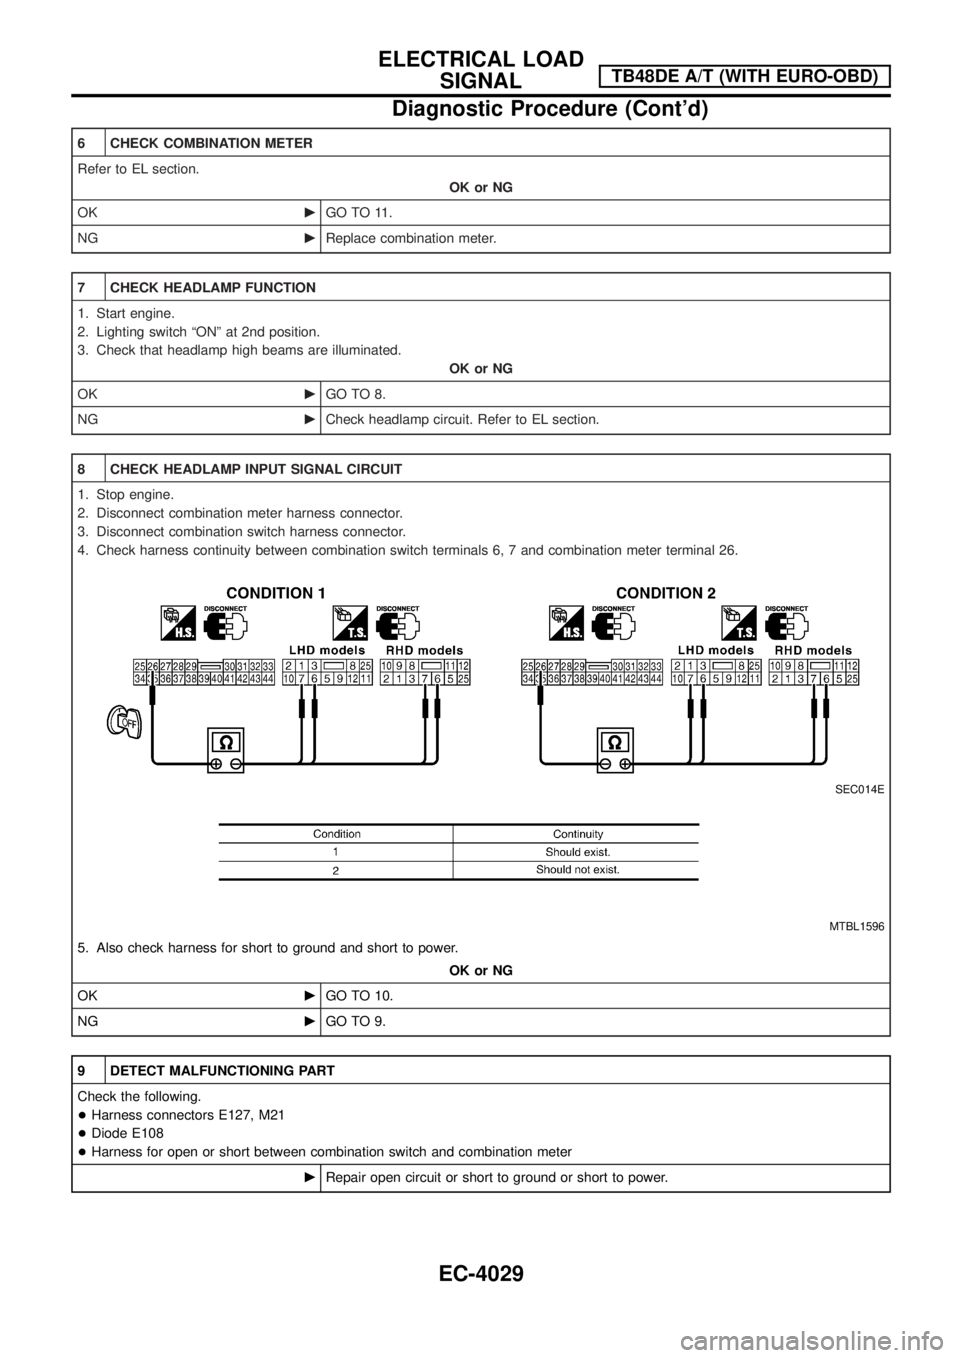
8 CHECK HEADLAMP INPUT SIGNAL CIRCUIT
1. Stop engine.
2. Disconnect combination meter harness connector.
3. Disconnect combination switch harness connector.
4. Check harness continuity between combination switch terminals 6, 7 and combination meter terminal 26.
SEC014E
MTBL1596
5. Also check harness for short to ground and short to power.
OK or NG
OKcGO TO 10.
NGcGO TO 9.
9 DETECT MALFUNCTIONING PART
Check the following.
+Harness connectors E127, M21
+Diode E108
+Harness for open or short between combination switch and combination meter
cRepair open circuit or short to ground or short to power.
ELECTRICAL LOAD SIGNALTB48DE A/T
Diagnostic Procedure (Cont'd)
EC-4020
Page 64 of 579

6 CHECK COMBINATION METER
Refer to EL section.
OK or NG
OKcGO TO 11.
NGcReplace combination meter.
7 CHECK HEADLAMP FUNCTION
1. Start engine.
2. Lighting switch ªONº at 2nd position.
3. Check that headlamp high beams are illuminated.
OK or NG
OKcGO TO 8.
NGcCheck headlamp circuit. Refer to EL section.
8 CHECK HEADLAMP INPUT SIGNAL CIRCUIT
1. Stop engine.
2. Disconnect combination meter harness connector.
3. Disconnect combination switch harness connector.
4. Check harness continuity between combination switch terminals 6, 7 and combination meter terminal 26.
SEC014E
MTBL1596
5. Also check harness for short to ground and short to power.
OK or NG
OKcGO TO 10.
NGcGO TO 9.
9 DETECT MALFUNCTIONING PART
Check the following.
+Harness connectors E127, M21
+Diode E108
+Harness for open or short between combination switch and combination meter
cRepair open circuit or short to ground or short to power.
ELECTRICAL LOAD
SIGNALTB48DE A/T (WITH EURO-OBD)
Diagnostic Procedure (Cont'd)
EC-4029
Page 136 of 579

Bulb Replacement
CAUTION:
+After replacing a new xenon bulb, be sure to make aiming
adjustments.
+ Hold only the plastic base when handling the bulb. Never
touch the glass envelope.
+ Do not leave headlamp re¯ector without bulb for a long
period of time. Dust, moisture, smoke, etc. entering head-
lamp body may affect the performance of the headlamp.
Remove headlamp bulb from the headlamp re¯ector just
before a replacement bulb is installed.
1. Disconnect negative battery cable.
2. Remove side combination lamp and radiator grille.
3. Disconnect headlamp connector.
4. Remove headlamp assembly.
WARNING:
Never service a xenon headlamp with wet hands.
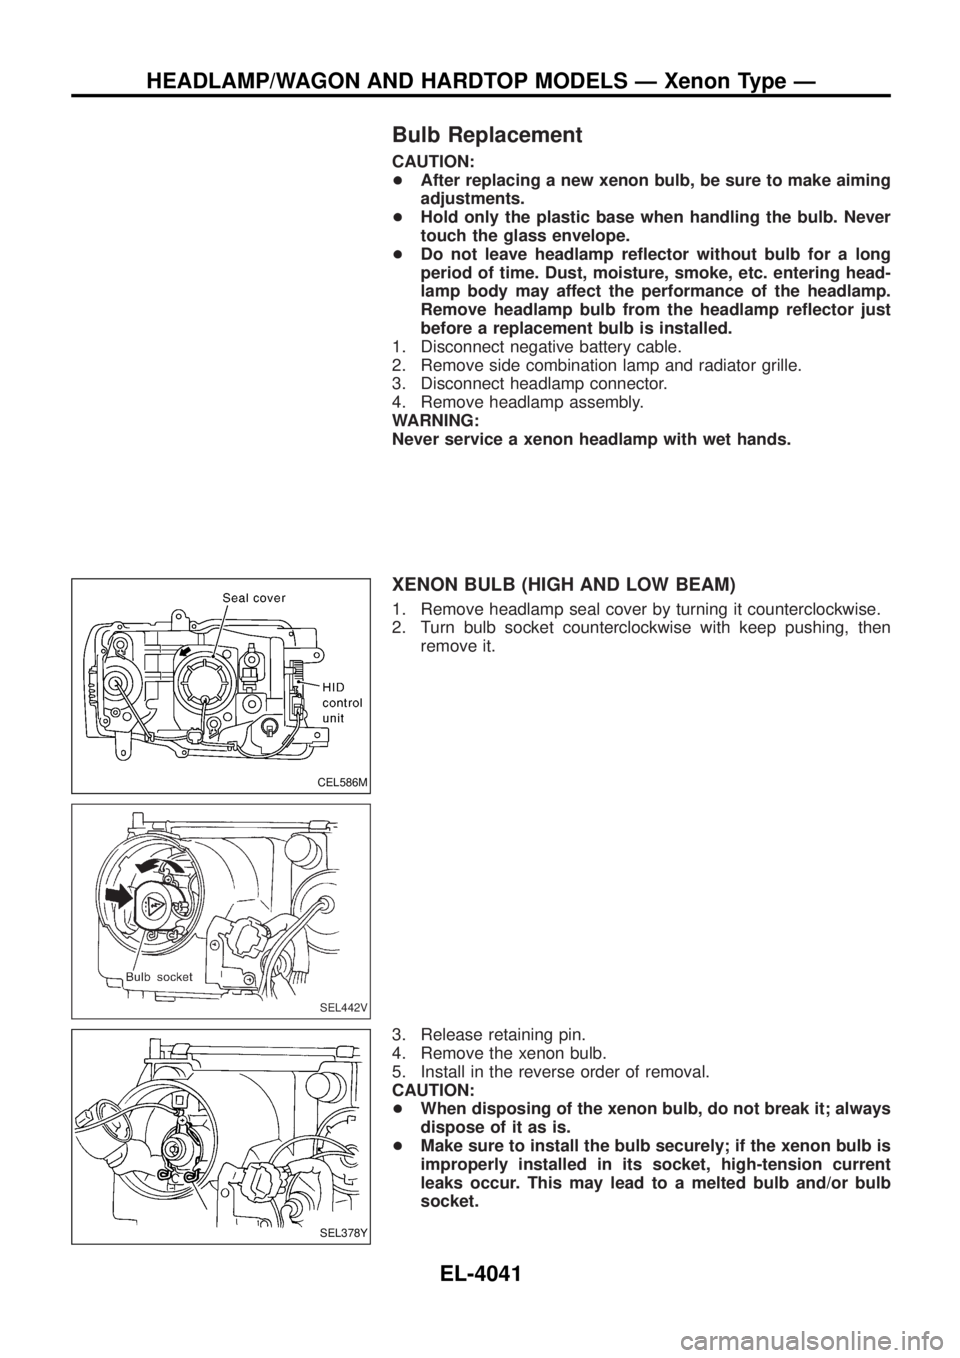
XENON BULB (HIGH AND LOW BEAM)
1. Remove headlamp seal cover by turning it counterclockwise.
2. Turn bulb socket counterclockwise with keep pushing, then remove it.
3. Release retaining pin.
4. Remove the xenon bulb.
5. Install in the reverse order of removal.
CAUTION:
+ When disposing of the xenon bulb, do not break it; always
dispose of it as is.
+ Make sure to install the bulb securely; if the xenon bulb is
improperly installed in its socket, high-tension current
leaks occur. This may lead to a melted bulb and/or bulb
socket.
CEL586M
SEL442V
SEL378Y
HEADLAMP/WAGON AND HARDTOP MODELS Ð Xenon Type Ð
EL-4041