Page 191 of 283
This vehicle is equipped with the low tire pres-
sure warning system, which displays the pres-
sure of each tire independently (except the spare
tire)")
LOW TIRE PRESSURE WARNING
SYSTEM (if so equipped)This vehicle is equipped with the low tire pres-
sure warning system, which displays the pres-
sure of each tire independently (except the spare
tire) on the display screen by sending a signal
from a sensor that is installed in each wheel. If
the vehicle is being driven with low tire pressure
(lower than 27 psi, 190 kPa), the low tire
pressure warning system will activate and warn
you of it by the low tire pressure warning light.
This system will activate only when the vehicle is
driven at speeds above 20 MPH (32 km/h). For
more details, please refer to “Warning/indicator
lights and audible reminders” in the “2. Instru-
ments and controls” section, “Tire pressure in-
formation” in the “4. Display screen, heater, air
conditioner and audio systems” section and
“Low tire pressure warning system” in the “5.
Starting and driving” section.
WARNING
�If the light comes on while driving,
avoid sudden steering maneuvers or
abrupt braking, reduce vehicle speed,
pull off the road to a safe location
and stop the vehicle as soon as pos-sible. Serious vehicle damage could
occur and may lead to an accident
and could result in serious personal
injury. Check the tire pressure for all
four tires. Adjust the tire pressure to
the recommended COLD tire pres-
sure shown on the Tire and Loading
Information label to turn the low tire
pressure warning light OFF. If the
light still comes on while driving after
adjusting the tire pressure, a tire may
be flat. If you have a flat tire, replace
it with a spare tire as soon as pos-
sible.
�When a spare tire is mounted or a
wheel is replaced, the pressure of
that tire will not be indicated or moni-
tored by the low tire pressure warn-
ing system. Contact your NISSAN
dealer as soon as possible for tire
replacement and/or system reset-
ting.
�Do not inject any tire liquid or aerosol
tire sealant into the tires, as this may
cause a malfunction of the tire pres-sure sensors.
CHANGING A FLAT TIREIf you have a flat tire, follow the instructions
below.Stopping the vehicle1. Safely move the vehicle off the road away
from traffic.
2. Turn on the hazard warning flashers.
3. Park on a level surface and apply the parking
brake. Shift the selector lever into P (Park)
position.
4. Turn off the engine.
5. Raise the hood to warn other traffic, and to
signal professional road assistance person-
nel that you need assistance.
6. Have all passengers get out of the vehicle
and stand in a safe place, away from traffic
and clear of the vehicle.
WARNING
�Make sure that the parking brake is
FLAT TIRE6-2
In case of emergency
�
04.4.5/Z50-D/V5.0
�
Page 192 of 283
securely applied and the selector le-
ver is shifted into P (Park).
�Never change tires when the vehicle
is on a slope, ice or slippery areas.
This is hazardous.
�Never change tires if oncoming traffic
is close to your vehicle. Wait for pro-
fessional road assistance.
�When a spare tire is mounted or a
wheel is replaced, the pressure of
that tire will not be indicated and not
be monitored by the low tire pressure
warning system. Contact your
NISSAN dealer as soon as possible
for tire replacement and/or system
resetting. (For models with the low
tire pressure warning system)
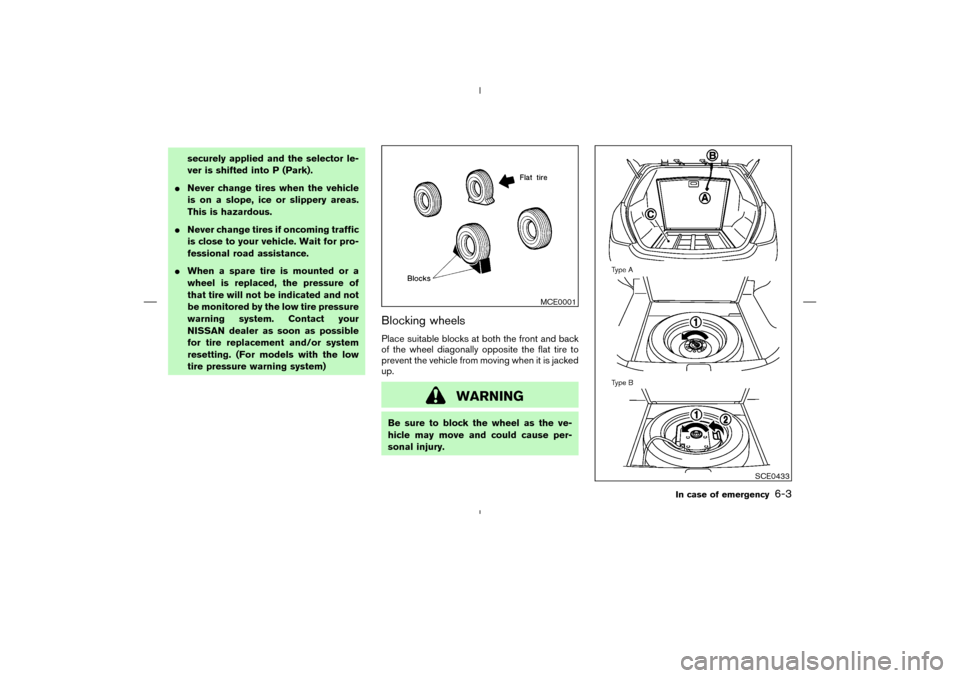
Blocking wheelsPlace suitable blocks at both the front and back
of the wheel diagonally opposite the flat tire to
prevent the vehicle from moving when it is jacked
up.
WARNING
Be sure to block the wheel as the ve-
hicle may move and could cause per-
sonal injury.
MCE0001
SCE0433
In case of emergency
6-3
�
04.4.5/Z50-D/V5.0
�
Page 193 of 283
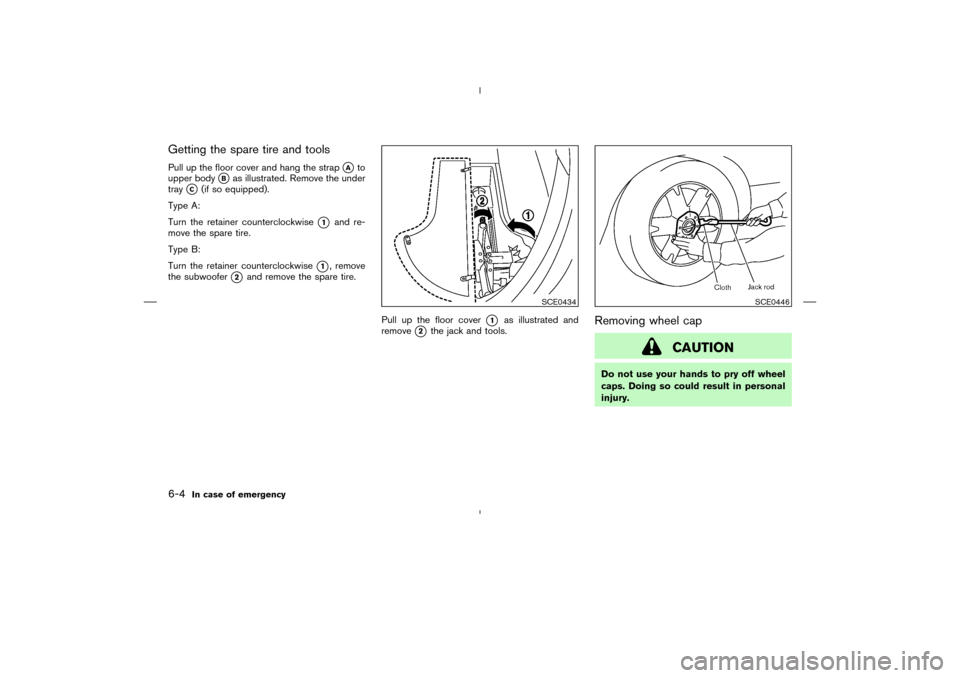
Getting the spare tire and toolsPull up the floor cover and hang the strap
�A
to
upper body
�B
as illustrated. Remove the under
tray
�C
(if so equipped).
Type A:
Turn the retainer counterclockwise
�1
and re-
move the spare tire.
Type B:
Turn the retainer counterclockwise
�1, remove
the subwoofer
�2
and remove the spare tire.
Pull up the floor cover
�1
as illustrated and
remove
�2
the jack and tools.
Removing wheel cap
CAUTION
Do not use your hands to pry off wheel
caps. Doing so could result in personal
injury.
SCE0434
SCE0446
6-4
In case of emergency
�
04.4.5/Z50-D/V5.0
�
Page 194 of 283

Jacking up vehicle and removing the
damaged tireCarefully read the caution label attached to
the jack body and the following instruc-
tions.
1. Place the jack directly under the jack-up point
as illustrated above so that top of the jack
contacts the vehicle at the jack up point.
Align the jack head between the two notches
in the front or the rear as shown. Also fit the
groove of the jack head between the notches
as shown.The jack should be used on level firm
ground.
2. Loosen each wheel nut one or two turns by
turning counterclockwise with the wheel nut
wrench.Do not remove the wheel nuts
until the tire is off the ground.
3. Carefully raise the vehicle until the tire clears
the ground. To lift the vehicle, securely hold
the jack lever and rod with both hands as
shown above. Remove the wheel nuts, and
then remove the tire.
WARNING
�Never get under the vehicle while it is
supported only by the jack.
�Use only the jack provided with your
vehicle to lift the vehicle. Do not use
the jack provided with your vehicle
on other vehicles.
The jack is designed only for lifting
your vehicle during a tire change.
SCE0435
CE1092
In case of emergency
6-5
�
04.4.5/Z50-D/V5.0
�
Page 195 of 283

�Use the correct jack up points; never
use any other part of the vehicle for
jack support.
�Never jack up the vehicle more than
necessary.
�Never use blocks on or under the
jack.
�Do not start or run engine while ve-
hicle is on the jack, as it may cause
the vehicle to move. This is especially
true for vehicles with limited slip dif-
ferential carriers.
�Do not allow passengers to stay in
the vehicle while it is on the jack.
Installing the spare tireThe spare tire is designed for emergency
use. See specific instructions under the
heading “Wheels and tires” in the “8. Main-
tenance and do-it-yourself ” section of this
manual.
1. Clean any mud or dirt from the surface
between the wheel and hub.
2. Carefully put the spare tire on and tighten the
wheel nuts with your fingers.
3. With the wheel nut wrench, tighten wheel
nuts alternately and evenly until they are tight.4. Lower the vehicle slowly until the tire touches
the ground. Then, with the wheel nut wrench,
tighten the wheel nuts securely in the se-
quence illustrated (
�1,�2,�3,�4,�5).
Lower the vehicle completely.
WARNING
�Incorrect wheel nuts or improperly
tightened wheel nuts can cause the
wheel to become loose or come off.
This could cause an accident.
�Do not use oil or grease on the wheel
studs or nuts. This could cause the
nuts to become loose.
Retighten the wheel nuts when the vehicle
has been driven for 600 miles (1,000 km)
(also in cases of a flat tire, etc.).
As soon as possible, tighten the wheel
nuts to the specified torque with a torque
wrench.
Wheel nut tightening torque:
80 ft-lb (108 N⋅m)
The wheel nuts must be kept tightened to
specification at all times. It is recom-
SCE0039
6-6
In case of emergency
�
04.4.5/Z50-D/V5.0
�
Page 196 of 283

mended that wheel nuts be tightened to
specification at each lubrication interval.
Adjust tire pressure to the COLD pressure.
COLD pressure:
After vehicle has been parked for three
hours or more or driven less than 1 mile
(1.6 km).
COLD tire pressures are shown on the Tire
and Loading Information label affixed to
the driver side center pillar.
For models equipped with the low tire
pressure warning system:
After adjusting tire pressure to the COLD tire
pressure, the display of the tire pressure infor-
mation may show higher pressure than the
COLD tire pressure after the vehicle has been
driven more than 1 mile (1.6 km). This is because
the tire pressurizes as the tire temperature rises.
This does not indicate a system malfunction.5. Securely store the flat tire and jacking equip-
ment in the vehicle.
6. Close the floor cover.
WARNING
�Always make sure that the spare tire
and jacking equipment are properly
secured after use. Such items can
become dangerous projectiles in an
accident or sudden stop.�The spare tire is designed for emer-
gency use. See specific instructions
under the heading “Wheels and tires”
in the “8. Maintenance and do-it-
yourself” section of this manual.
SCE0436
In case of emergency
6-7
�
04.4.5/Z50-D/V5.0
�
Page 201 of 283
must be used.
�Always attach safety chains before
towing.
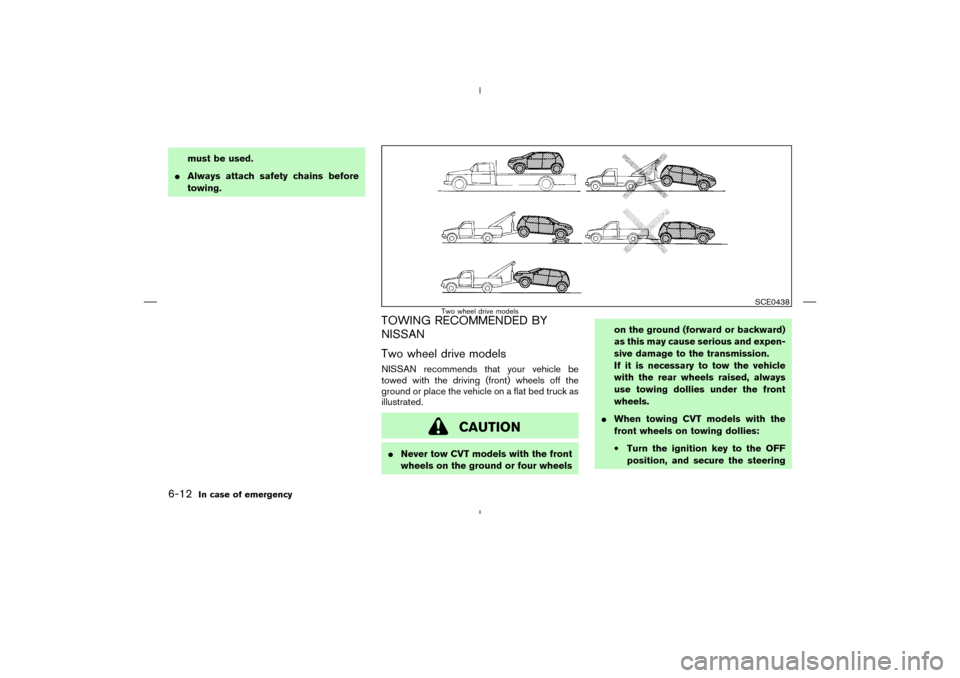
TOWING RECOMMENDED BY
NISSAN
Two wheel drive modelsNISSAN recommends that your vehicle be
towed with the driving (front) wheels off the
ground or place the vehicle on a flat bed truck as
illustrated.
CAUTION
�Never tow CVT models with the front
wheels on the ground or four wheelson the ground (forward or backward)
as this may cause serious and expen-
sive damage to the transmission.
If it is necessary to tow the vehicle
with the rear wheels raised, always
use towing dollies under the front
wheels.
�When towing CVT models with the
front wheels on towing dollies:
•Turn the ignition key to the OFF
position, and secure the steering
SCE0438
Two wheel drive models
6-12
In case of emergency
�
04.4.5/Z50-D/V5.0
�
Page 202 of 283
wheel in a straight ahead position
with a rope or similar device.
Never secure the steering wheel
by turning the ignition key to the
LOCK position. This may damage
the steering lock mechanism.
•Move the selector lever to the N
(Neutral) position.
�When towing two wheel drive CVT
model with the rear wheels on the
ground (if you do not use towing
dollies): Always release the parking
brake.
All wheel drive modelsNISSAN recommends that towing dollies be
used when towing your vehicle or the vehicle be
placed on a flat bed truck as illustrated.
CAUTION
Never tow CVT AWD models with any of
the wheels on the ground as this may
cause serious and expensive damage to
the drive train.
SCE0439
All wheel drive models
In case of emergency
6-13
�
04.4.5/Z50-D/V5.0
�