Page 219 of 283

CHANGING ENGINE OIL1. Park the vehicle on a level surface and apply
the parking brake.
2. Run the engine until it reaches operating
temperature.
3. Turn the engine off andwait more than 10
minutes.
4. Place a large drain pan under the drain plug.
5. Remove the oil filler cap.6. Remove the drain plug with a wrench and
completely drain the oil.
If oil filter is to be changed, remove and
replace it at this time. See later in “Engine oil”
for changing engine oil filter.
CAUTION
Be careful not to burn yourself, as the
engine oil is hot.
�Waste oil must be disposed of properly.
�Check your local regulations.
7. Clean and re-install the drain plug with a new
washer. Securely tighten the drain plug with a
wrench.
Drain plug tightening torque:
22 to 29 ft-lb
(29 to 39 N⋅m)
Do not use excessive force.
8. Refill engine with recommended oil and in-
stall the cap securely.
CAUTION
Never pull out the oil level gauge while
filling engine oil.
See “Capacities and recommended
fuel/lubricants” in the “9. Technical and con-
sumer information” section for drain and refill
capacity. The drain and refill capacity de-
pends on the oil temperature and drain time.
Use these specifications for reference only.
Always use the dipstick to determine the
proper amount of oil in the engine.
9. Start the engine.
Check for leakage around the drain plug.
Correct as required.
10.Turn the engine off andwait more than 10
minutes. Check the oil level with the dip-
stick. Add engine oil if necessary.
11.Dispose of waste oil properly.
WARNING
�Prolonged and repeated contact with
SDI0974
8-10
Maintenance and do-it-yourself
�
04.4.5/Z50-D/V5.0
�
Page 220 of 283

used engine oil may cause skin can-
cer.
�Try to avoid direct skin contact with
used oil. If skin contact is made,
wash thoroughly with soap or hand
cleaner as soon as possible.
�Keep used engine oil out of reach of
children.
CHANGING ENGINE OIL FILTER1. Park the vehicle on a level surface and apply
the parking brake.
2. Turn the engine off.
3. Loosen the oil filter with an oil filter wrench.
Remove the oil filter by turning it by hand.
CAUTION
Be careful not to burn yourself, as the
engine oil may be hot.4. Wipe the engine oil filter mounting surface
with a clean rag.
Be sure to remove any old rubber gasket
remaining on the mounting surface of the
engine.
5. Coat the rubber gasket on the new filter with
clean engine oil.
6. Screw in the oil filter until a slight resistance
is felt, then tighten additionally more than 2/3
turn.
Oil filter tightening torque:
11 to 15 ft-lb (15 to 20 N⋅m)
7. Start the engine and check for leakage
around the oil filter. Correct as required.
8. Turn the engine off and wait several minutes.
Check the oil level. Add engine oil if neces-
sary.
SDI0975
Maintenance and do-it-yourself
8-11
�
04.4.5/Z50-D/V5.0
�
Page 221 of 283

Contact your NISSAN dealer if checking or
replacement is required.
CAUTION
�Use only Genuine NISSAN CVT Fluid
NS-2. Do not mix with other fluids.
�Using transmission fluid other than
Genuine NISSAN CVT Fluid NS-2 will
damage the CVT transmission, which
is not covered by the NISSAN new
vehicle limited warranty.
The specified CVT fluid is also described on
caution labels located in the engine compart-
ment.Check the fluid level in the reservoir tank.
The fluid level should be checked using the HOT
range at fluid temperatures of 122 to 176°F (50
to 80°C) or using the COLD range at fluid
temperatures of 32 to 86°F (0 to 30°C).
CAUTION
�Do not overfill.
�Use Genuine NISSAN PSF or equiva-
lent.Check the fluid level in the reservoir. If the fluid is
below the MIN line or the brake warning light
comes on, add Genuine Nissan Super Heavy
Duty Brake Fluid or equivalentDOT 3(US
FMVSS No. 116) fluid up to the MAX line. If fluid
must be added frequently, the system should be
thoroughly checked by your NISSAN dealer.
WARNING
Use only new fluid. Old, inferior, or con-
taminated fluid may damage the brake
system. The use of improper fluids can
SDI1443
SDI1502
CVT FLUID POWER STEERING FLUID BRAKE FLUID8-12
Maintenance and do-it-yourself
�
04.4.5/Z50-D/V5.0
�
Page 222 of 283
damage the brake system and affect the
vehicle’s stopping ability.
CAUTION
Do not spill the fluid on painted sur-
faces. This will damage the paint. If fluid
is spilled, wash with water.
Add fluid when the low washer fluid warning light
comes on. Add a washer solvent to the water for
better cleaning. In the winter season, add a
windshield washer antifreeze. Follow the manu-
facturer’s instructions for the mixture ratio.
Recommended fluid is Genuine Nissan Wind-
shield Washer Concentrate Cleaner & Anti-
freeze Fluid or equivalent.
WARNING
Antifreeze is poisonous and should be
stored carefully in marked containers
out of the reach of children.
CAUTION
Do not substitute engine antifreeze
coolant for window washer solution.
This may result in damage to the paint.
SDI1494
WINDOW WASHER FLUID
Maintenance and do-it-yourself
8-13
�
04.4.5/Z50-D/V5.0
�
Page 225 of 283

WARNING
Be sure the engine and ignition switch
are off and that the parking brake is
engaged securely.
CAUTION
Be sure to use the correct socket to
remove the spark plugs. An incorrect
socket can damage the spark plugs.
REPLACING SPARK PLUGS
Platinum-tipped spark plugsIt is not necessary to replace the platinum-tipped
spark plugs as frequently as the conventional
type spark plugs since they will last much longer.
Follow the maintenance log, but do not reuse
them by cleaning or regapping.
If replacement is required, see your NISSAN
dealer for servicing.
Always replace with recommended
platinum-tipped spark plugs.To remove the filter from the air cleaner, push
down the lock pins
�1
and pull the unit upward
�2.
The filter element should not be cleaned and
reused. Replace it according to the maintenance
log shown in the separate Service and Mainte-
nance Guide. When replacing the filter, wipe the
inside of the air cleaner housing and the cover
with a damp cloth.
WARNING
�Operating the engine with the air
SDI0145
SDI1495
SPARK PLUGS AIR CLEANER8-16
Maintenance and do-it-yourself
�
04.4.5/Z50-D/V5.0
�
Page 228 of 283
If you wax the surface of the hood, be
careful not to let wax get into the washer
nozzle. This may clog the nozzle
�A
that
could cause improper windshield washer
operation. If wax gets into the nozzle, un-
clog it with a needle or small pin
�B.Contact your NISSAN dealer if checking or
replacement is required.
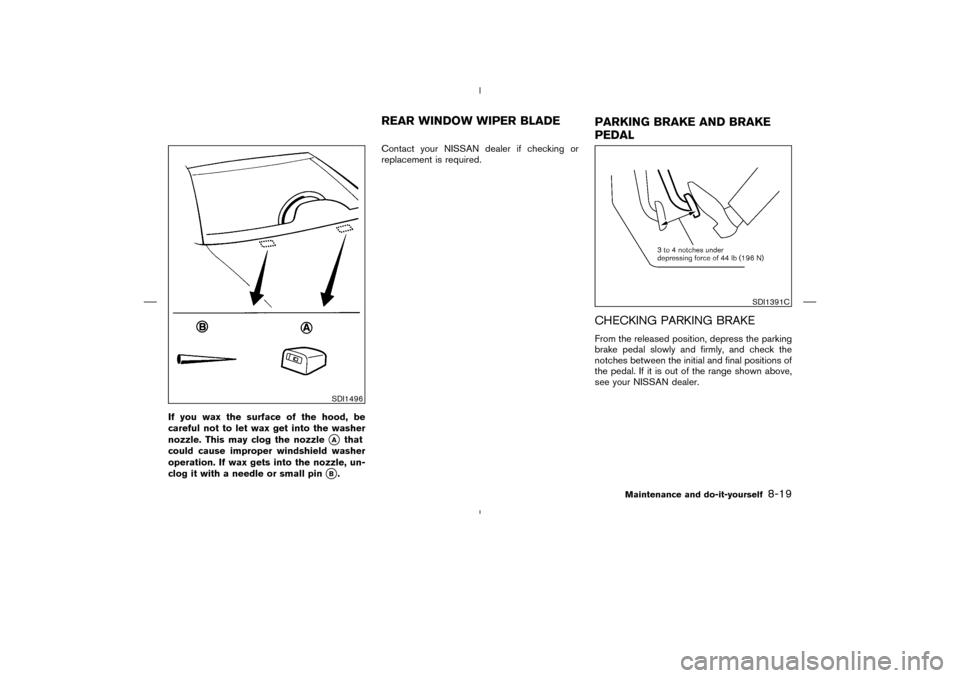
CHECKING PARKING BRAKEFrom the released position, depress the parking
brake pedal slowly and firmly, and check the
notches between the initial and final positions of
the pedal. If it is out of the range shown above,
see your NISSAN dealer.
SDI1496
SDI1391C
REAR WINDOW WIPER BLADE
PARKING BRAKE AND BRAKE
PEDAL
Maintenance and do-it-yourself
8-19
�
04.4.5/Z50-D/V5.0
�
Page 229 of 283

CHECKING BRAKE PEDALWith the engine running, check the distance
between the upper surface of the pedal and the
metal floor. If it is out of the range shown above,
see your NISSAN dealer.Self-adjusting brakesYour vehicle is equipped with self-adjusting
brakes.
The disc-type brakes self-adjust every time the
brake pedal is applied.
WARNING
See your NISSAN dealer and have it
checked if the brake pedal height does
not return to normal.Brake pad wear indicatorsThe disc brake pads on your vehicle have au-
dible wear indicators. When a brake pad re-
quires replacement, it will make a high pitched
scraping or screeching sound when the vehicle
is in motion whether or not the brake pedal is
depressed. Have the brakes checked as soon as
possible if the wear indicator sound is heard.
Under some driving or climate conditions, occa-
sional brake squeak, squeal or other noise may
be heard. Occasional brake noise during light to
moderate stops is normal and does not affect
the function or performance of the brake system.
Proper brake inspection intervals should
be followed.For additional information, see the
separate Service and Maintenance Guide.
BRAKE BOOSTERCheck the brake booster function as follows:
1. With the engine off, press and release the
brake pedal several times. When brake pedal
movement (distance of travel) remains the
same from one pedal application to the next,
continue on to the next step.
2. While depressing the brake pedal, start the
engine. The pedal height should drop a little.
3. With the brake pedal depressed, stop the
engine. Keeping the pedal depressed for
about 30 seconds, the pedal height should
not change.
4. Run the engine for one minute without de-
pressing the brake pedal, then turn it off.
Depress the brake pedal several times. The
pedal travel distance will decrease gradually
with each depression as the vacuum is re-
leased from the booster.
If the brakes do not operate properly, see your
NISSAN dealer.
DI1020MJ
8-20
Maintenance and do-it-yourself
�
04.4.5/Z50-D/V5.0
�
Page 243 of 283

Tire wear and damage
WARNING
�Tires should be periodically in-
spected for wear, cracking, bulging,
or objects caught in the tread. If ex-
cessive wear, cracks, bulging, or
deep cuts are found, the tire should
be replaced.
�The original tires have a built-in tread
wear indicator. When the wearindicator is visible, the tire should be
replaced.
�Improper service for a spare tire may
result in serious personal injury. If it
is necessary to repair the spare tire,
contact your NISSAN dealer.
�For additional information regarding
tires, refer to “Important Tire Safety
Information” (US) or “Tire Safety In-
formation” (Canada) in the Warranty
Information Booklet.
Replacing wheels and tiresWhen replacing a tire, use the same size, tread
design, speed rating and load carrying capacity
as originally equipped. See “Specifications” in
the “9. Technical and consumer information”
section for recommended types and sizes of
tires and wheels.
WARNING
�The use of tires other than those
recommended or the mixed use of
tires of different brands, construction(bias, bias-belted or radial), or tread
patterns can adversely affect the ride,
braking, handling, ground clearance,
body-to-tire clearance, tire chain
clearance, speedometer calibration,
headlight aim and bumper height.
Some of these effects may lead to
accidents and could result in serious
personal injury.
�If the wheels are changed for any
reason, always replace with wheels
which have the same offset dimen-
sion. Wheels of a different offset
could cause premature tire wear, de-
grade vehicle handling characteris-
tics and/or interfere with the brake
discs/drums. Such interference can
lead to decreased braking efficiency
and/or early brake pad/shoe wear.
Refer to “Wheel/tire size” in the
“Technical and consumer informa-
tion” section of this manual for wheel
offset dimensions.
�When a spare tire is mounted or a
wheel is replaced, the pressure of
MDI0004
8-34
Maintenance and do-it-yourself
�
04.4.5/Z50-D/V5.0
�