Page 212 of 283

Lights*:Clean the headlights on a regular basis.
Make sure that the headlights, stop lights, tail
lights, turn signal lights, and other lights are all
operating properly and installed securely. Also
check headlight aim.
Road wheel nuts (lug nuts)*:When checking
the tires, make sure no wheel nuts are missing,
and check for any loose wheel nuts. Tighten if
necessary.
Tire rotation*:Tires should be rotated every
7,500 miles (12,000 km). However, the timing
for tire rotation may vary according to your
driving habits and road surface conditions.
Tires*:Check the pressure with a gauge often
and always prior to long distance trips. If neces-
sary, adjust the pressure in all tires, including the
spare, to the pressure specified. Check carefully
for damage, cuts or excessive wear.
Tire, wheel alignment and balance:If the
vehicle should pull to either side while driving on
a straight and level road, or if you detect uneven
or abnormal tire wear, there may be a need for
wheel alignment.
If the steering wheel or seat vibrates at normal
highway speeds, wheel balancing may be
needed.
For additional information regarding tires, refer to
“Important Tire Safety Information” (US) or “TireSafety Information” (Canada) in the Warranty
Information Booklet.
Windshield:Clean the windshield on a regular
basis. Check the windshield at least every six
months for cracks or other damage. Have a
damaged windshield repaired by a qualified re-
pair facility.
Windshield wiper blades*:Check for cracks
or wear if they do not wipe properly.
Inside the vehicleThe maintenance items listed here should be
checked on a regular basis, such as when
performing periodic maintenance, cleaning the
vehicle, etc.
Accelerator pedal:Check the pedal for
smooth operation and make sure the pedal does
not catch or require uneven effort. Keep the floor
mats away from the pedal.
Brake pedal and booster*:Check the pedal
for smooth operation and make sure it has the
proper distance under it when depressed fully.
Check the brake booster function. Be sure to
keep floor mats away from the pedal.
Brakes:Check that the brakes do not pull the
vehicle to one side when applied.
Continuously Variable Transmission (CVT)
P (Park) position mechanism:On a fairlysteep hill check that the vehicle is held securely
with the selector lever in the P (Park) position
without applying any brakes.
Parking brake*:Check that the lever has the
proper travel and make sure that the vehicle is
held securely on a fairly steep hill when only the
parking brake is applied.
Seat belts:Check that all parts of the seat belt
system (for example, buckles, anchors, adjusters
and retractors) operate properly and smoothly,
and are installed securely. Check the belt web-
bing for cuts, fraying, wear or damage.
Seats:Check seat position controls such as
seat adjusters, seatback recliner, etc. to ensure
they operate smoothly and that all latches lock
securely in every position. Check that the head
restraints move up and down smoothly and that
the locks hold securely in all latched positions.
Steering wheel:Check for changes in the
steering conditions, such as excessive free play,
hard steering or strange noises.
Warning lights and chimes:Make sure that all
warning lights and chimes are operating prop-
erly.
Windshield defroster:Check that the air
comes out of the defroster outlets properly and
in good quantity when operating the heater or air
conditioner.
Maintenance and do-it-yourself
8-3
�
04.4.5/Z50-D/V5.0
�
Page 220 of 283

used engine oil may cause skin can-
cer.
�Try to avoid direct skin contact with
used oil. If skin contact is made,
wash thoroughly with soap or hand
cleaner as soon as possible.
�Keep used engine oil out of reach of
children.
CHANGING ENGINE OIL FILTER1. Park the vehicle on a level surface and apply
the parking brake.
2. Turn the engine off.
3. Loosen the oil filter with an oil filter wrench.
Remove the oil filter by turning it by hand.
CAUTION
Be careful not to burn yourself, as the
engine oil may be hot.4. Wipe the engine oil filter mounting surface
with a clean rag.
Be sure to remove any old rubber gasket
remaining on the mounting surface of the
engine.
5. Coat the rubber gasket on the new filter with
clean engine oil.
6. Screw in the oil filter until a slight resistance
is felt, then tighten additionally more than 2/3
turn.
Oil filter tightening torque:
11 to 15 ft-lb (15 to 20 N⋅m)
7. Start the engine and check for leakage
around the oil filter. Correct as required.
8. Turn the engine off and wait several minutes.
Check the oil level. Add engine oil if neces-
sary.
SDI0975
Maintenance and do-it-yourself
8-11
�
04.4.5/Z50-D/V5.0
�
Page 221 of 283

Contact your NISSAN dealer if checking or
replacement is required.
CAUTION
�Use only Genuine NISSAN CVT Fluid
NS-2. Do not mix with other fluids.
�Using transmission fluid other than
Genuine NISSAN CVT Fluid NS-2 will
damage the CVT transmission, which
is not covered by the NISSAN new
vehicle limited warranty.
The specified CVT fluid is also described on
caution labels located in the engine compart-
ment.Check the fluid level in the reservoir tank.
The fluid level should be checked using the HOT
range at fluid temperatures of 122 to 176°F (50
to 80°C) or using the COLD range at fluid
temperatures of 32 to 86°F (0 to 30°C).
CAUTION
�Do not overfill.
�Use Genuine NISSAN PSF or equiva-
lent.Check the fluid level in the reservoir. If the fluid is
below the MIN line or the brake warning light
comes on, add Genuine Nissan Super Heavy
Duty Brake Fluid or equivalentDOT 3(US
FMVSS No. 116) fluid up to the MAX line. If fluid
must be added frequently, the system should be
thoroughly checked by your NISSAN dealer.
WARNING
Use only new fluid. Old, inferior, or con-
taminated fluid may damage the brake
system. The use of improper fluids can
SDI1443
SDI1502
CVT FLUID POWER STEERING FLUID BRAKE FLUID8-12
Maintenance and do-it-yourself
�
04.4.5/Z50-D/V5.0
�
Page 222 of 283
damage the brake system and affect the
vehicle’s stopping ability.
CAUTION
Do not spill the fluid on painted sur-
faces. This will damage the paint. If fluid
is spilled, wash with water.
Add fluid when the low washer fluid warning light
comes on. Add a washer solvent to the water for
better cleaning. In the winter season, add a
windshield washer antifreeze. Follow the manu-
facturer’s instructions for the mixture ratio.
Recommended fluid is Genuine Nissan Wind-
shield Washer Concentrate Cleaner & Anti-
freeze Fluid or equivalent.
WARNING
Antifreeze is poisonous and should be
stored carefully in marked containers
out of the reach of children.
CAUTION
Do not substitute engine antifreeze
coolant for window washer solution.
This may result in damage to the paint.
SDI1494
WINDOW WASHER FLUID
Maintenance and do-it-yourself
8-13
�
04.4.5/Z50-D/V5.0
�
Page 229 of 283

CHECKING BRAKE PEDALWith the engine running, check the distance
between the upper surface of the pedal and the
metal floor. If it is out of the range shown above,
see your NISSAN dealer.Self-adjusting brakesYour vehicle is equipped with self-adjusting
brakes.
The disc-type brakes self-adjust every time the
brake pedal is applied.
WARNING
See your NISSAN dealer and have it
checked if the brake pedal height does
not return to normal.Brake pad wear indicatorsThe disc brake pads on your vehicle have au-
dible wear indicators. When a brake pad re-
quires replacement, it will make a high pitched
scraping or screeching sound when the vehicle
is in motion whether or not the brake pedal is
depressed. Have the brakes checked as soon as
possible if the wear indicator sound is heard.
Under some driving or climate conditions, occa-
sional brake squeak, squeal or other noise may
be heard. Occasional brake noise during light to
moderate stops is normal and does not affect
the function or performance of the brake system.
Proper brake inspection intervals should
be followed.For additional information, see the
separate Service and Maintenance Guide.
BRAKE BOOSTERCheck the brake booster function as follows:
1. With the engine off, press and release the
brake pedal several times. When brake pedal
movement (distance of travel) remains the
same from one pedal application to the next,
continue on to the next step.
2. While depressing the brake pedal, start the
engine. The pedal height should drop a little.
3. With the brake pedal depressed, stop the
engine. Keeping the pedal depressed for
about 30 seconds, the pedal height should
not change.
4. Run the engine for one minute without de-
pressing the brake pedal, then turn it off.
Depress the brake pedal several times. The
pedal travel distance will decrease gradually
with each depression as the vacuum is re-
leased from the booster.
If the brakes do not operate properly, see your
NISSAN dealer.
DI1020MJ
8-20
Maintenance and do-it-yourself
�
04.4.5/Z50-D/V5.0
�
Page 230 of 283
CAUTION
Never use a fuse of higher or lower
amperage rating than that specified on
the fuse box cover. This could damage
the electrical system or cause a fire.
ENGINE COMPARTMENTIf any electrical equipment does not operate,
check for an open fuse.
1. Be sure the ignition key and headlight switch
are OFF.
2. Open the engine hood.
3. Remove the fusible link cover.
4. Remove the fuse with the fuse puller.
5. If the fuse is open, replace it with a new fuse.
6. If a new fuse also opens, have the electricalsystem checked and repaired by your
NISSAN dealer.
Fusible linksIf any electrical equipment does not operate and
fuses are in good condition, check the fusible
links. If any of these fusible links are melted,
replace only with genuine NISSAN parts.
SDI1504
FUSES
Maintenance and do-it-yourself
8-21
�
04.4.5/Z50-D/V5.0
�
Page 231 of 283
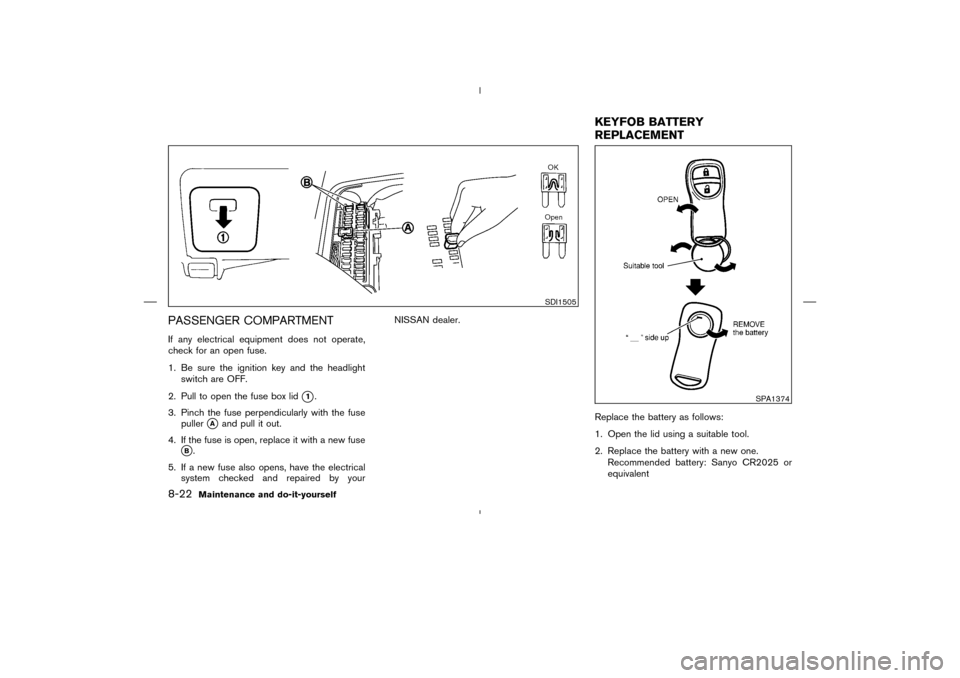
PASSENGER COMPARTMENTIf any electrical equipment does not operate,
check for an open fuse.
1. Be sure the ignition key and the headlight
switch are OFF.
2. Pull to open the fuse box lid
�1.
3. Pinch the fuse perpendicularly with the fuse
puller
�A
and pull it out.
4. If the fuse is open, replace it with a new fuse
�B.
5. If a new fuse also opens, have the electrical
system checked and repaired by yourNISSAN dealer.
Replace the battery as follows:
1. Open the lid using a suitable tool.
2. Replace the battery with a new one.
Recommended battery: Sanyo CR2025 or
equivalent
SDI1505
SPA1374
KEYFOB BATTERY
REPLACEMENT
8-22
Maintenance and do-it-yourself
�
04.4.5/Z50-D/V5.0
�
Page 233 of 283
1. Front turn signal light or front park light
2. Headlight (low-beam, high-beam)
3. Front park light or front turn signal light
4. Map light
5. Ceiling light
6. Rear personal light
7. Front fog light (if so equipped)/Daytime, run-
ning light (for Canada)
8. Front side marker light
9. Step light
10. High-mounted stop light
Rear combination lights
11. Turn signal light (Rear combination lights)
12. Side marker light (Rear combination lights)
13. License plate lights
14. Back-up light
15. Luggage light
16. Stop/tail light (Rear combination lights)
SDI1497
LIGHTS8-24
Maintenance and do-it-yourself
�
04.4.5/Z50-D/V5.0
�


3. Front park light or front turn signal light
4. Map light
5. Ceiling light
6. Rear personal light
7. Front fog light")