2004 NISSAN MAXIMA audio
[x] Cancel search: audioPage 5 of 280
Table of
ContentsIllustrated table of contents
Safety—Seats, seat belts and supplemental air bags
Instruments and controls
Pre-driving checks and adjustments
Display screen, heater, air conditioner and audio systems
Starting and driving
In case of emergency
Appearance and care
Maintenance and do-it-yourself
Technical and consumer information
Index
0
1
2
3
4
5
6
7
8
9
10
Page 12 of 280
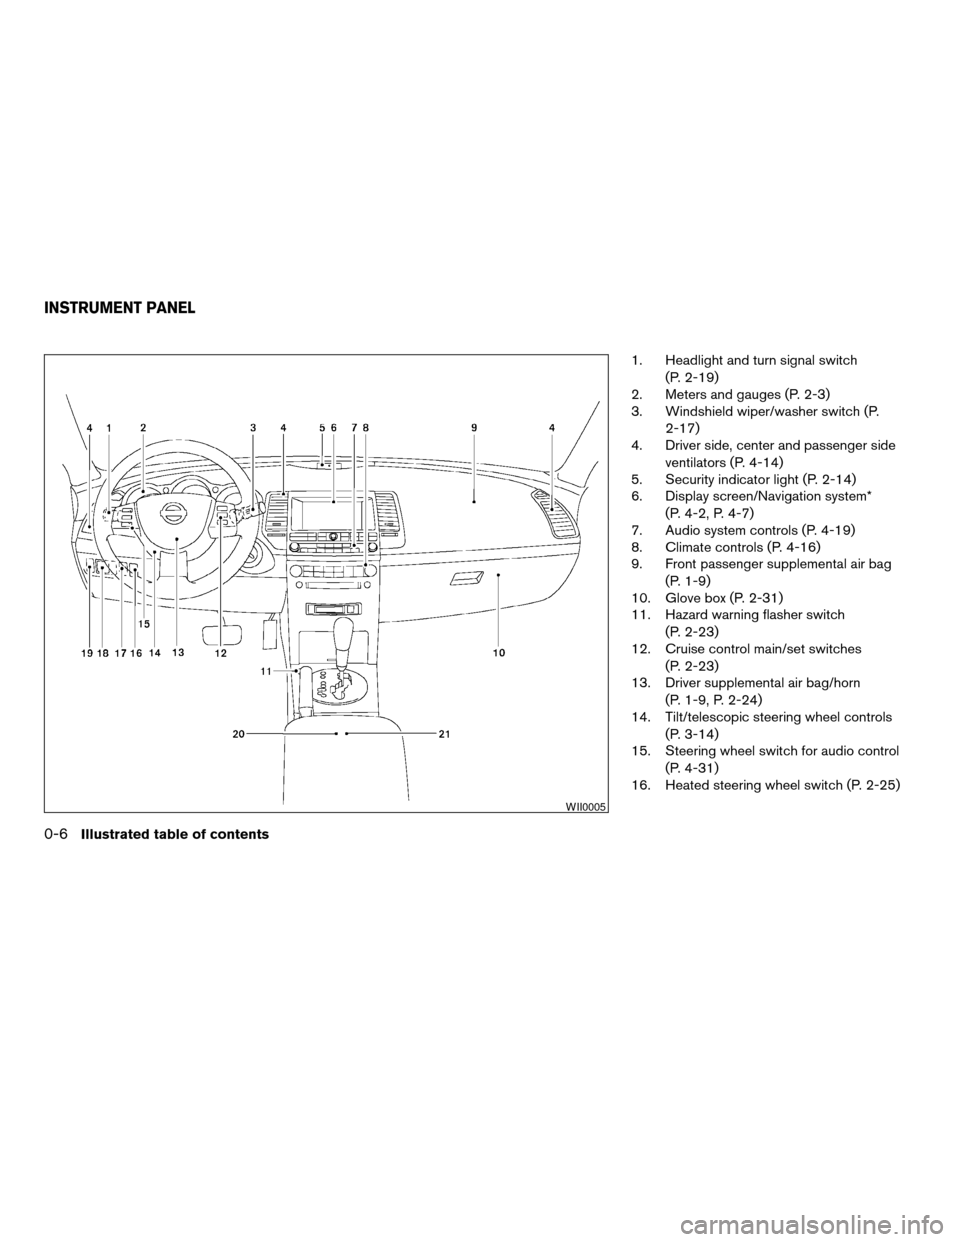
1. Headlight and turn signal switch
(P. 2-19)
2. Meters and gauges (P. 2-3)
3. Windshield wiper/washer switch (P.
2-17)
4. Driver side, center and passenger side
ventilators (P. 4-14)
5. Security indicator light (P. 2-14)
6. Display screen/Navigation system*
(P. 4-2, P. 4-7)
7. Audio system controls (P. 4-19)
8. Climate controls (P. 4-16)
9. Front passenger supplemental air bag
(P. 1-9)
10. Glove box (P. 2-31)
11. Hazard warning flasher switch
(P. 2-23)
12. Cruise control main/set switches
(P. 2-23)
13. Driver supplemental air bag/horn
(P. 1-9, P. 2-24)
14. Tilt/telescopic steering wheel controls
(P. 3-14)
15. Steering wheel switch for audio control
(P. 4-31)
16. Heated steering wheel switch (P. 2-25)
WII0005
INSTRUMENT PANEL
0-6Illustrated table of contents
ZREVIEW COPY:Ð2004 Maxima(max)
Owners Manual(owners)ÐUSA English(nna)
10/20/03Ðarosenma
X
Page 62 of 280
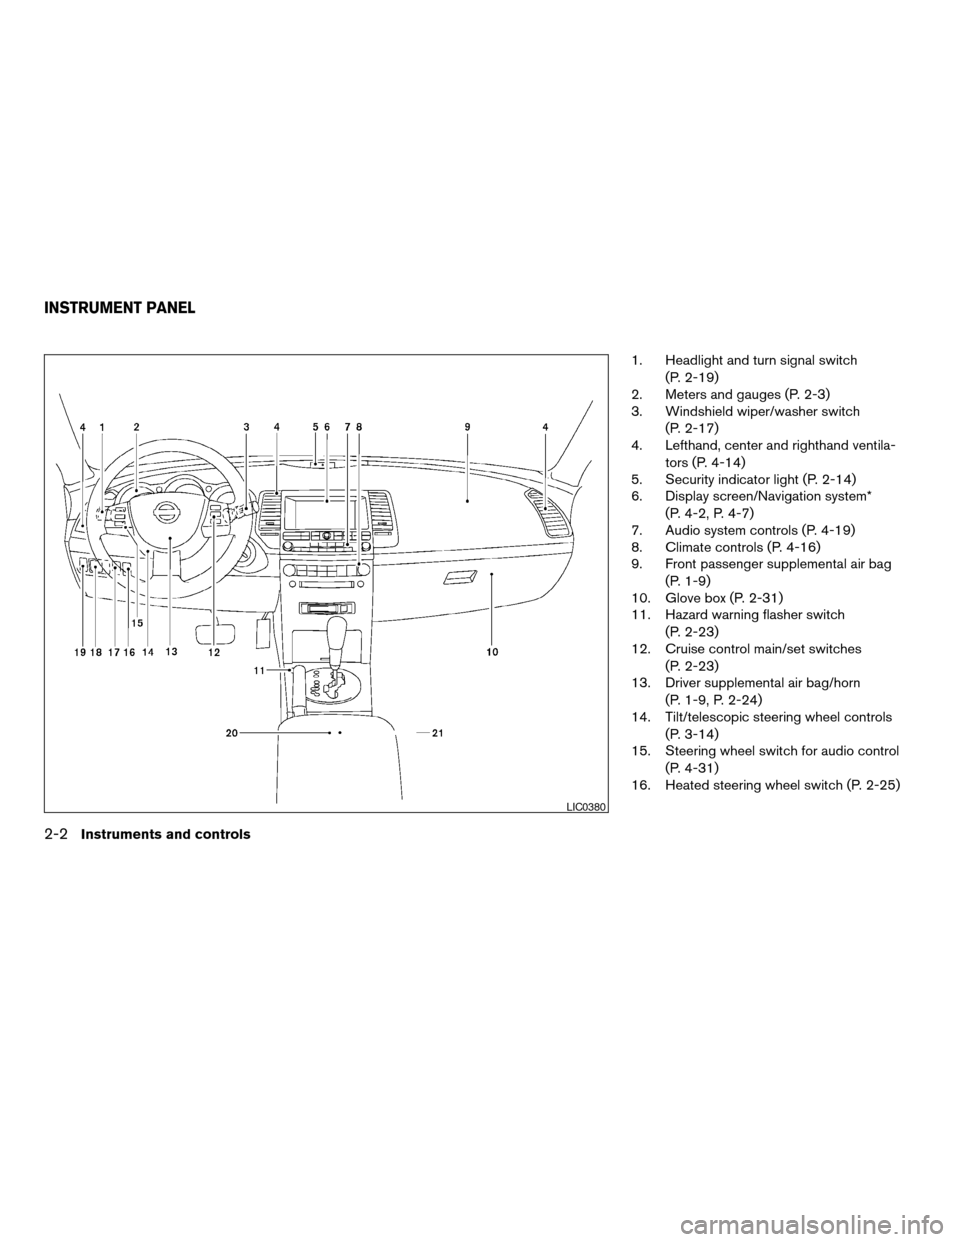
1. Headlight and turn signal switch
(P. 2-19)
2. Meters and gauges (P. 2-3)
3. Windshield wiper/washer switch
(P. 2-17)
4. Lefthand, center and righthand ventila-
tors (P. 4-14)
5. Security indicator light (P. 2-14)
6. Display screen/Navigation system*
(P. 4-2, P. 4-7)
7. Audio system controls (P. 4-19)
8. Climate controls (P. 4-16)
9. Front passenger supplemental air bag
(P. 1-9)
10. Glove box (P. 2-31)
11. Hazard warning flasher switch
(P. 2-23)
12. Cruise control main/set switches
(P. 2-23)
13. Driver supplemental air bag/horn
(P. 1-9, P. 2-24)
14. Tilt/telescopic steering wheel controls
(P. 3-14)
15. Steering wheel switch for audio control
(P. 4-31)
16. Heated steering wheel switch (P. 2-25)
LIC0380
INSTRUMENT PANEL
2-2Instruments and controls
ZREVIEW COPY:Ð2004 Maxima(max)
Owners Manual(owners)ÐUSA English(nna)
10/20/03Ðarosenma
X
Page 74 of 280
AUDIBLE REMINDERS
Brake pad wear warning
The front disc brake pads have audible wear
warnings. When a front brake pad requires re-
placement, it makes a high pitched scraping
sound when the vehicle is in motion, whether or
not the brake pedal is depressed. Have the
brakes checked as soon as possible if the warn-
ing sound is heard.
Key reminder chime
A chime sounds if the driver’s door is opened
while the key is left in the ignition switch. Remove
the key and take it with you when leaving the
vehicle.
Light reminder chime
With the ignition switch in the OFF position, a
chime sounds when the driver’s door is opened if
the headlights or parking lights are on.
Turn the headlight control switch off before leav-
ing the vehicle.Your vehicle has two types of security systems:
cVehicle security system
cNISSAN Vehicle Immobilizer System—NVIS
VEHICLE SECURITY SYSTEM
The vehicle security system provides visual and
audio alarm signals if parts of the vehicle are
disturbed.
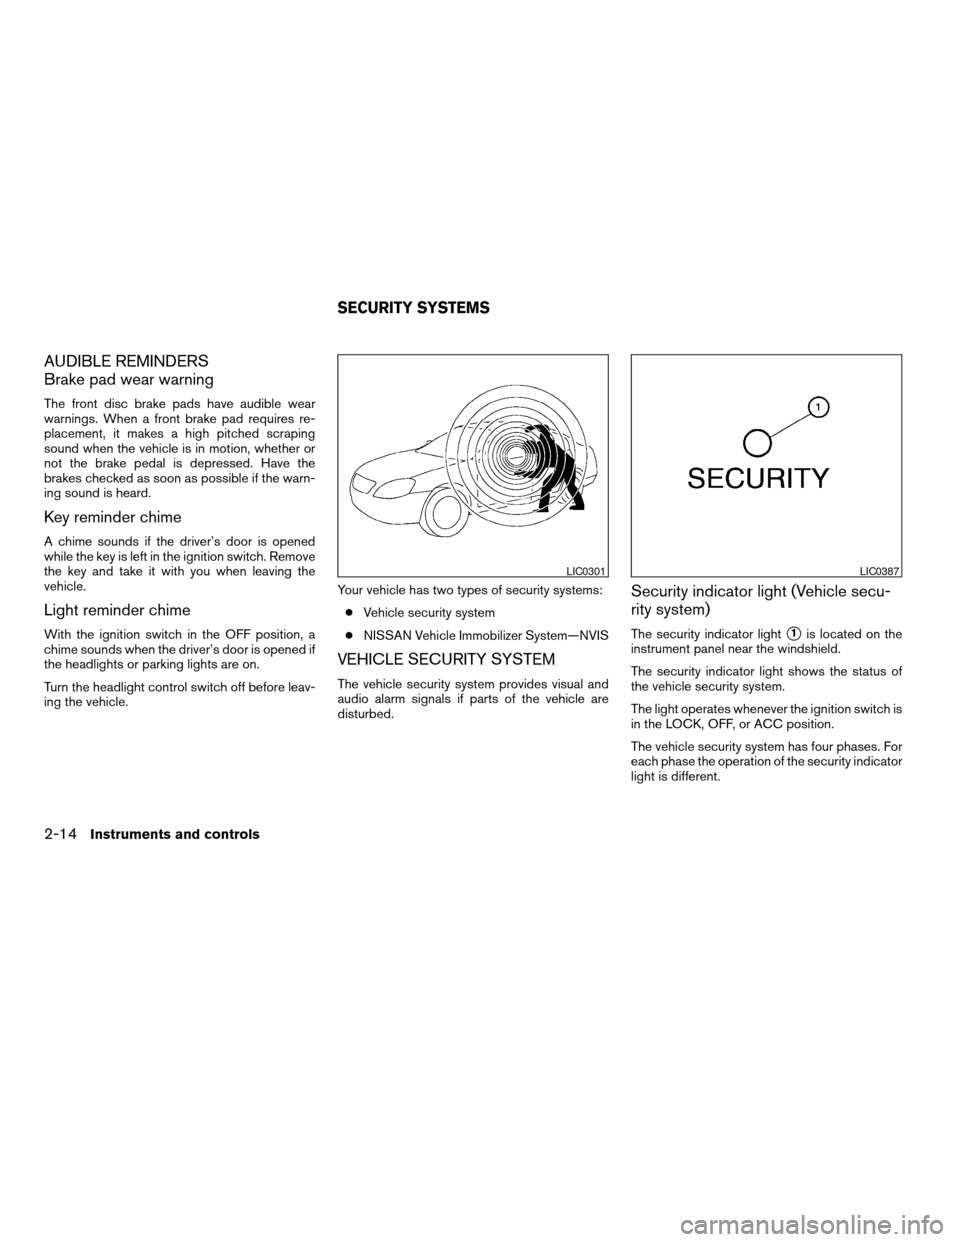
Security indicator light (Vehicle secu-
rity system)
The security indicator lights1is located on the
instrument panel near the windshield.
The security indicator light shows the status of
the vehicle security system.
The light operates whenever the ignition switch is
in the LOCK, OFF, or ACC position.
The vehicle security system has four phases. For
each phase the operation of the security indicator
light is different.
LIC0301LIC0387
SECURITY SYSTEMS
2-14Instruments and controls
ZREVIEW COPY:Ð2004 Maxima(max)
Owners Manual(owners)ÐUSA English(nna)
10/07/03Ðtbrooks
X
Page 75 of 280
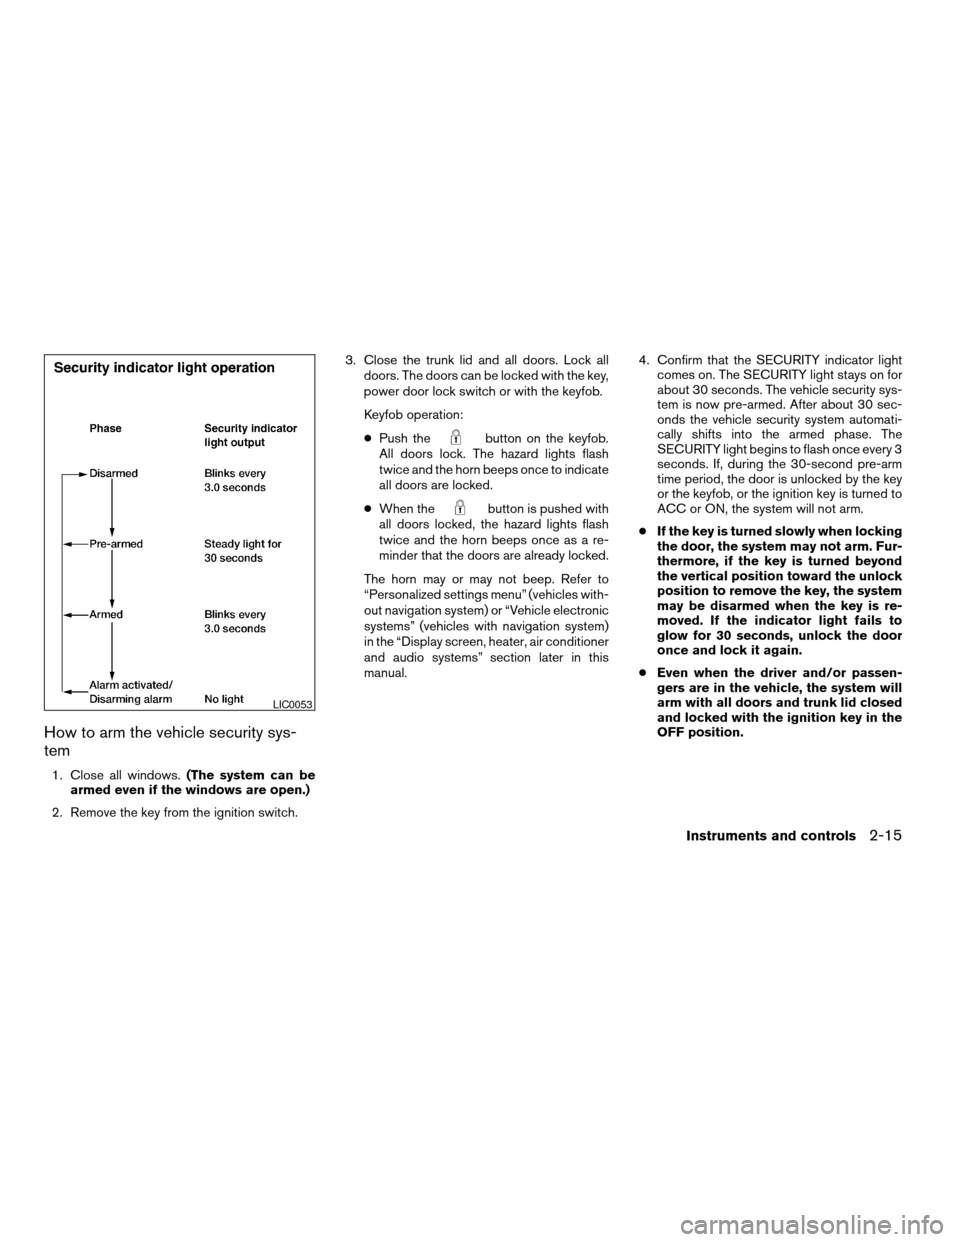
How to arm the vehicle security sys-
tem
1. Close all windows.(The system can be
armed even if the windows are open.)
2. Remove the key from the ignition switch.3. Close the trunk lid and all doors. Lock all
doors. The doors can be locked with the key,
power door lock switch or with the keyfob.
Keyfob operation:
cPush the
button on the keyfob.
All doors lock. The hazard lights flash
twice and the horn beeps once to indicate
all doors are locked.
cWhen the
button is pushed with
all doors locked, the hazard lights flash
twice and the horn beeps once as a re-
minder that the doors are already locked.
The horn may or may not beep. Refer to
“Personalized settings menu” (vehicles with-
out navigation system) or “Vehicle electronic
systems” (vehicles with navigation system)
in the “Display screen, heater, air conditioner
and audio systems” section later in this
manual.4. Confirm that the SECURITY indicator light
comes on. The SECURITY light stays on for
about 30 seconds. The vehicle security sys-
tem is now pre-armed. After about 30 sec-
onds the vehicle security system automati-
cally shifts into the armed phase. The
SECURITY light begins to flash once every 3
seconds. If, during the 30-second pre-arm
time period, the door is unlocked by the key
or the keyfob, or the ignition key is turned to
ACC or ON, the system will not arm.
cIf the key is turned slowly when locking
the door, the system may not arm. Fur-
thermore, if the key is turned beyond
the vertical position toward the unlock
position to remove the key, the system
may be disarmed when the key is re-
moved. If the indicator light fails to
glow for 30 seconds, unlock the door
once and lock it again.
cEven when the driver and/or passen-
gers are in the vehicle, the system will
arm with all doors and trunk lid closed
and locked with the ignition key in the
OFF position.
LIC0053
Instruments and controls2-15
ZREVIEW COPY:Ð2004 Maxima(max)
Owners Manual(owners)ÐUSA English(nna)
10/07/03Ðtbrooks
X
Page 78 of 280
NOTE:
You can turn on or turn off the driving
speed dependent intermittent wiper func-
tion. Refer to “Personalized settings
menu” (vehicles without navigation sys-
tem) or “Vehicle electronic systems” (ve-
hicles with navigation system) in the “Dis-
play screen, heater, air conditioner and
audio systems” section later in this manual.
s2Low — continuous low speed operation
s3High — continuous high speed operation
Push the lever up
s4to have one sweep opera-
tion of the wiper.
Pull the lever toward you
s5to operate the
washer. The wiper will also operate several times.
WARNING
In freezing temperatures the washer solu-
tion may freeze on the windshield and
obscure your vision which may lead to an
accident. Warm the windshield with the
defroster before you wash the windshield.
CAUTION
cDo not operate the washer continu-
ously for more than 30 seconds.cDo not operate the washer if the reser-
voir tank is empty.
cDo not fill the window washer reservoir
tank with washer fluid concentrates at
full strength. Some methyl alcohol
based washer fluid concentrates may
permanently stain the grille if spilled
while filling the window washer reser-
voir tank.
cPre-mix washer fluid concentrates with
water to the manufacturer’s recom-
mended levels before pouring the fluid
into the window washer reservoir tank.
Do not use the window washer reservoir
tank to mix the washer fluid concen-
trate and water.To defrost the rear window glass and outside
mirrors (if so equipped) , start the engine and
push the rear window defroster switch on. The
rear window defroster indicator light on the
switch comes on. Push the switch again to turn
the defroster off.
The rear window defroster automatically turns off
after approximately 15 minutes.
CAUTION
When cleaning the inner side of the rear
window, be careful not to scratch or dam-
age the rear window defroster.
LIC0388
REAR WINDOW AND OUTSIDE
MIRROR (if so equipped)
DEFROSTER SWITCH
2-18Instruments and controls
ZREVIEW COPY:Ð2004 Maxima(max)
Owners Manual(owners)ÐUSA English(nna)
10/07/03Ðtbrooks
X
Page 79 of 280
NOTE:
The top few rows of wires on the rear win-
dow are not part of the rear window de-
froster system. These wires make up the
antenna for the audio system.XENON HEADLIGHTS (if so
equipped)
WARNING
cHIGH VOLTAGE
cWhen xenon headlights are on, they
produce a high voltage. To prevent an
electric shock, never attempt to modify
or disassemble. Always have your xe-
non headlights replaced at a NISSAN
dealer.
cXenon headlights provide considerably
more light than conventional head-
lights. If they are not correctly aimed,
they might temporarily blind an oncom-
ing driver or the driver ahead of you and
cause a serious accident. If headlights
are not aimed correctly, immediately
take your vehicle to a NISSAN dealer
and have the headlights adjusted
correctly.
When the xenon headlight is initially turned on, its
brightness or color varies slightly. However, the
color and brightness will soon stabilize.
cThe life of xenon headlights will be
shortened by frequent on-off opera-
tion. It is generally desirable not to turn
off the headlights for short intervals(for example, when the vehicle stops at
a traffic signal) . Even when the daytime
running lights are active (Canada only) ,
the xenon headlights do not turn on.
This way the life of the xenon head-
lights is not reduced.
cIf the xenon headlight bulb is close to
burning out, the brightness will drasti-
cally decrease, the light will start blink-
ing, or the color of the light will be-
come reddish. If one or more of the
above signs appear, contact a NISSAN
dealer.
HEADLIGHT AND TURN SIGNAL
SWITCH
Instruments and controls2-19
ZREVIEW COPY:Ð2004 Maxima(max)
Owners Manual(owners)ÐUSA English(nna)
10/07/03Ðtbrooks
X
Page 80 of 280
HEADLIGHT CONTROL SWITCH
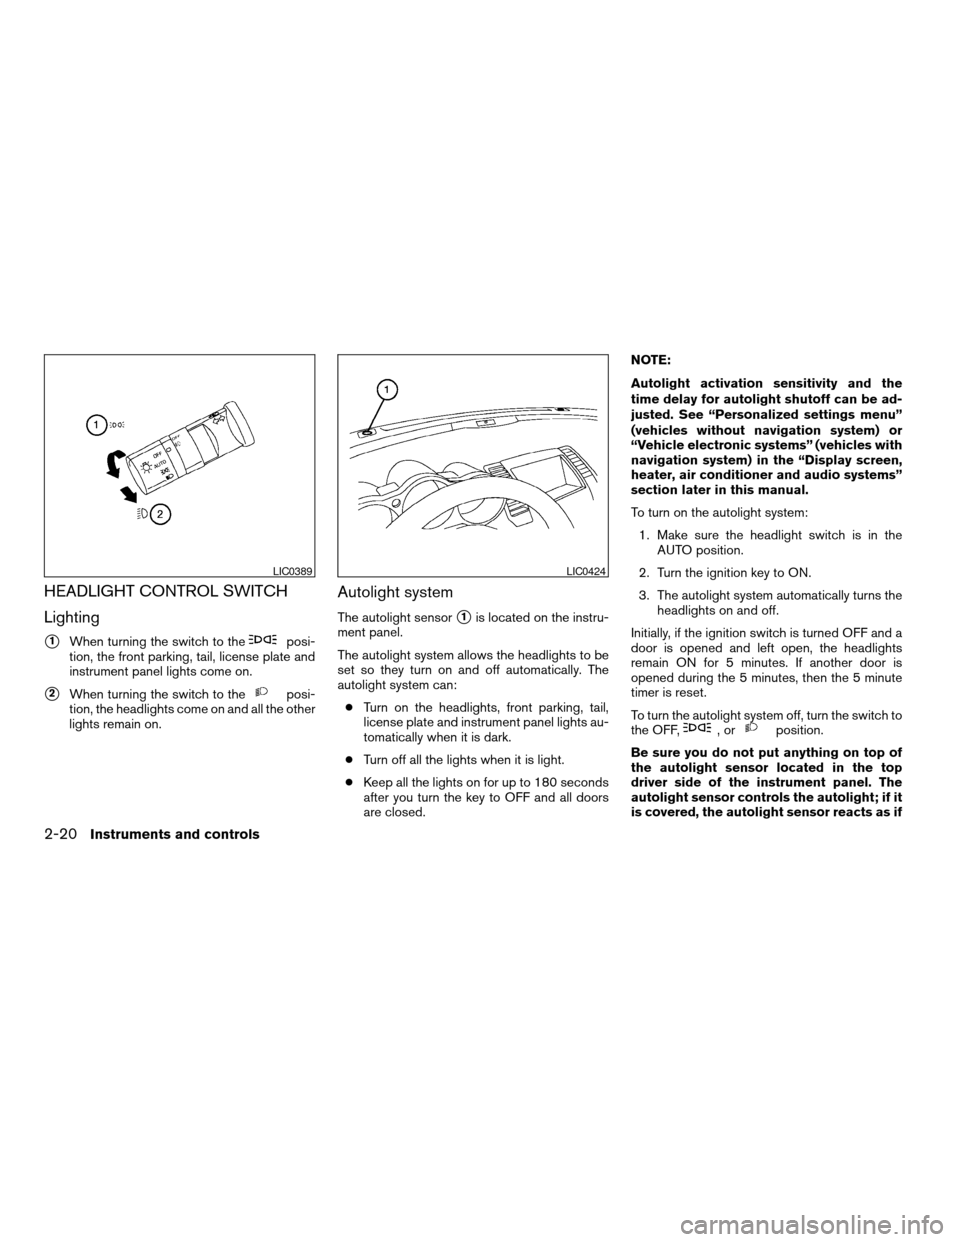
Lighting
s1When turning the switch to theposi-
tion, the front parking, tail, license plate and
instrument panel lights come on.
s2When turning the switch to theposi-
tion, the headlights come on and all the other
lights remain on.
Autolight system
The autolight sensors1is located on the instru-
ment panel.
The autolight system allows the headlights to be
set so they turn on and off automatically. The
autolight system can:
cTurn on the headlights, front parking, tail,
license plate and instrument panel lights au-
tomatically when it is dark.
cTurn off all the lights when it is light.
cKeep all the lights on for up to 180 seconds
after you turn the key to OFF and all doors
are closed.NOTE:
Autolight activation sensitivity and the
time delay for autolight shutoff can be ad-
justed. See “Personalized settings menu”
(vehicles without navigation system) or
“Vehicle electronic systems” (vehicles with
navigation system) in the “Display screen,
heater, air conditioner and audio systems”
section later in this manual.
To turn on the autolight system:
1. Make sure the headlight switch is in the
AUTO position.
2. Turn the ignition key to ON.
3. The autolight system automatically turns the
headlights on and off.
Initially, if the ignition switch is turned OFF and a
door is opened and left open, the headlights
remain ON for 5 minutes. If another door is
opened during the 5 minutes, then the 5 minute
timer is reset.
To turn the autolight system off, turn the switch to
the OFF,
,orposition.
Be sure you do not put anything on top of
the autolight sensor located in the top
driver side of the instrument panel. The
autolight sensor controls the autolight; if it
is covered, the autolight sensor reacts as if
LIC0389LIC0424
2-20Instruments and controls
ZREVIEW COPY:Ð2004 Maxima(max)
Owners Manual(owners)ÐUSA English(nna)
10/07/03Ðtbrooks
X