2004 NISSAN MAXIMA flat tire
[x] Cancel search: flat tirePage 239 of 280
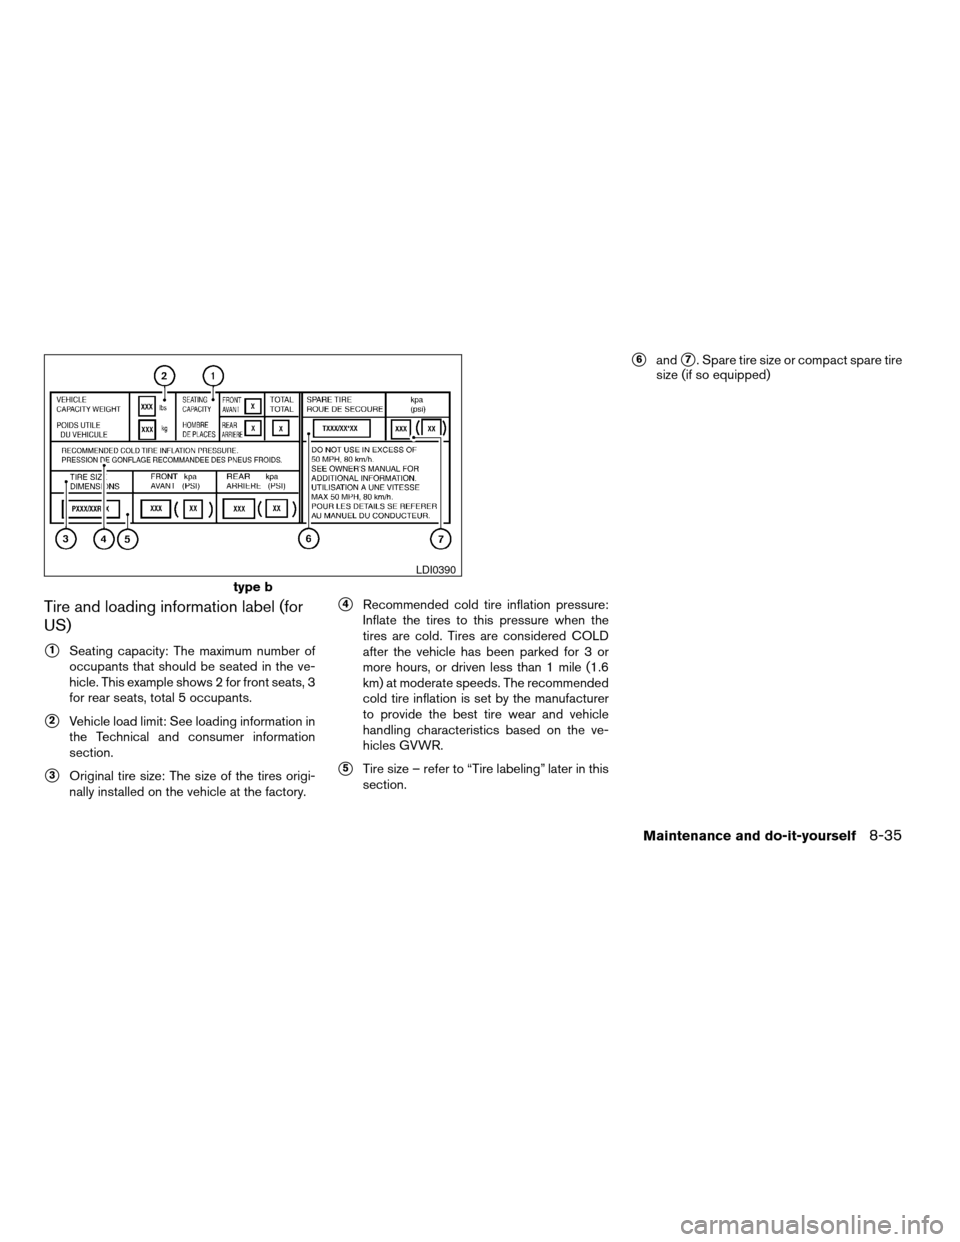
Tire and loading information label (for
US)
s1Seating capacity: The maximum number of
occupants that should be seated in the ve-
hicle. This example shows 2 for front seats, 3
for rear seats, total 5 occupants.
s2Vehicle load limit: See loading information in
the Technical and consumer information
section.
s3Original tire size: The size of the tires origi-
nally installed on the vehicle at the factory.
s4Recommended cold tire inflation pressure:
Inflate the tires to this pressure when the
tires are cold. Tires are considered COLD
after the vehicle has been parked for 3 or
more hours, or driven less than 1 mile (1.6
km) at moderate speeds. The recommended
cold tire inflation is set by the manufacturer
to provide the best tire wear and vehicle
handling characteristics based on the ve-
hicles GVWR.
s5Tire size – refer to “Tire labeling” later in this
section.
s6ands7. Spare tire size or compact spare tire
size (if so equipped)
type b
LDI0390
Maintenance and do-it-yourself8-35
ZREVIEW COPY:Ð2004 Maxima(max)
Owners Manual(owners)ÐUSA English(nna)
10/20/03Ðarosenma
X
Page 242 of 280
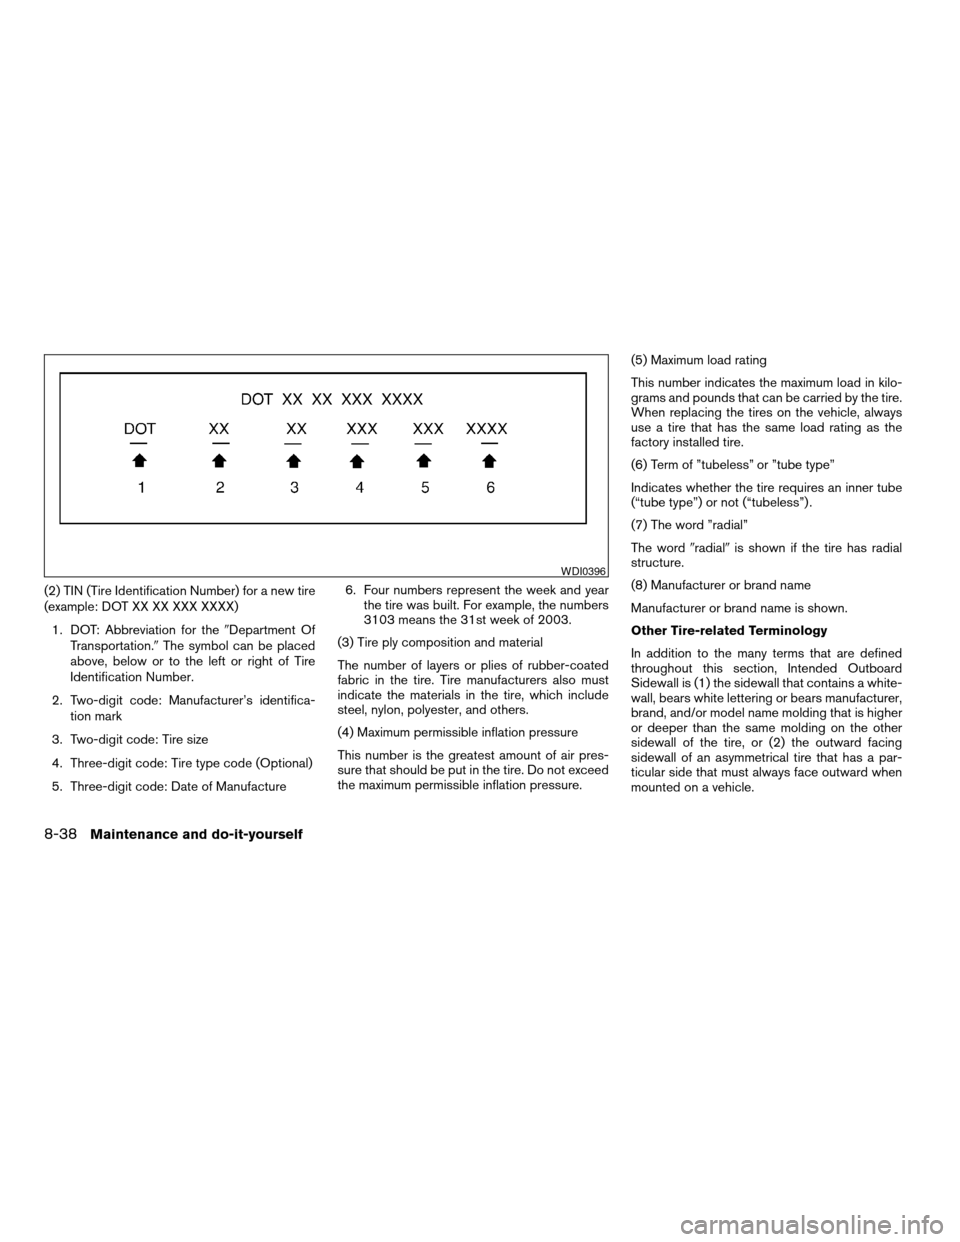
(2) TIN (Tire Identification Number) for a new tire
(example: DOT XX XX XXX XXXX)
1. DOT: Abbreviation for the9Department Of
Transportation.9The symbol can be placed
above, below or to the left or right of Tire
Identification Number.
2. Two-digit code: Manufacturer’s identifica-
tion mark
3. Two-digit code: Tire size
4. Three-digit code: Tire type code (Optional)
5. Three-digit code: Date of Manufacture6. Four numbers represent the week and year
the tire was built. For example, the numbers
3103 means the 31st week of 2003.
(3) Tire ply composition and material
The number of layers or plies of rubber-coated
fabric in the tire. Tire manufacturers also must
indicate the materials in the tire, which include
steel, nylon, polyester, and others.
(4) Maximum permissible inflation pressure
This number is the greatest amount of air pres-
sure that should be put in the tire. Do not exceed
the maximum permissible inflation pressure.(5) Maximum load rating
This number indicates the maximum load in kilo-
grams and pounds that can be carried by the tire.
When replacing the tires on the vehicle, always
use a tire that has the same load rating as the
factory installed tire.
(6) Term of ”tubeless” or ”tube type”
Indicates whether the tire requires an inner tube
(“tube type”) or not (“tubeless”) .
(7) The word ”radial”
The word9radial9is shown if the tire has radial
structure.
(8) Manufacturer or brand name
Manufacturer or brand name is shown.
Other Tire-related Terminology
In addition to the many terms that are defined
throughout this section, Intended Outboard
Sidewall is (1) the sidewall that contains a white-
wall, bears white lettering or bears manufacturer,
brand, and/or model name molding that is higher
or deeper than the same molding on the other
sidewall of the tire, or (2) the outward facing
sidewall of an asymmetrical tire that has a par-
ticular side that must always face outward when
mounted on a vehicle.
WDI0396
8-38Maintenance and do-it-yourself
ZREVIEW COPY:Ð2004 Maxima(max)
Owners Manual(owners)ÐUSA English(nna)
10/20/03Ðarosenma
X
Page 244 of 280
Tire chains must be installed only on the
front wheels and not on the rear wheels.
Never install tire chains on a TEMPORARY USE
ONLY spare tire.
Do not use tire chains on dry roads. Driving with
chains in such conditions can cause damage to
the various mechanisms of the vehicle due to
some overstress.
CHANGING WHEELS AND TIRES
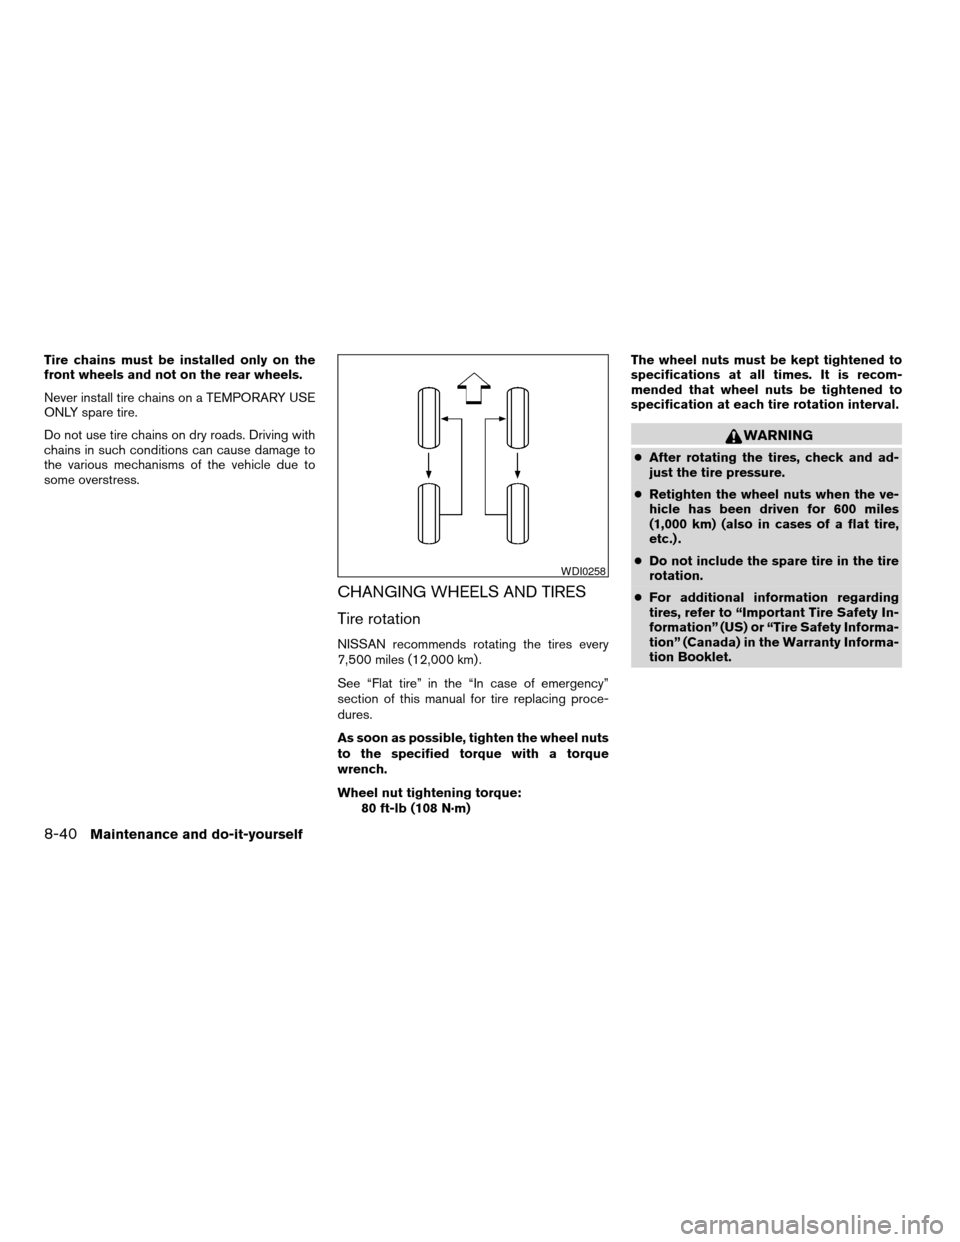
Tire rotation
NISSAN recommends rotating the tires every
7,500 miles (12,000 km) .
See “Flat tire” in the “In case of emergency”
section of this manual for tire replacing proce-
dures.
As soon as possible, tighten the wheel nuts
to the specified torque with a torque
wrench.
Wheel nut tightening torque:
80 ft-lb (108 N·m)The wheel nuts must be kept tightened to
specifications at all times. It is recom-
mended that wheel nuts be tightened to
specification at each tire rotation interval.
WARNING
cAfter rotating the tires, check and ad-
just the tire pressure.
cRetighten the wheel nuts when the ve-
hicle has been driven for 600 miles
(1,000 km) (also in cases of a flat tire,
etc.) .
cDo not include the spare tire in the tire
rotation.
cFor additional information regarding
tires, refer to “Important Tire Safety In-
formation” (US) or “Tire Safety Informa-
tion” (Canada) in the Warranty Informa-
tion Booklet.
WDI0258
8-40Maintenance and do-it-yourself
ZREVIEW COPY:Ð2004 Maxima(max)
Owners Manual(owners)ÐUSA English(nna)
10/20/03Ðarosenma
X
Page 246 of 280
cDo not install a deformed wheel or tire
even if it has been repaired. Such
wheels or tires could have structural
damage and could fail without warning.
cThe use of retread tires is not
recommended.
cFor additional information regarding
tires, refer to “Important Tire Safety In-
formation” (US) or “Tire Safety Informa-
tion” (Canada) in the Warranty Informa-
tion Booklet.
Wheel balance
Unbalanced wheels may affect vehicle handling
and tire life. Even with regular use, wheels can get
out of balance. Therefore, they should be bal-
anced as required.
Wheel balance service should be per-
formed with the wheels off the vehicle.
Spin balancing the wheels on the vehicle
could lead to mechanical damage.
cFor additional information regarding
tires, refer to “Important Tire Safety
Information” (US) or “Tire Safety Infor-
mation” (Canada) in the Warranty In-
formation Booklet .
Care of wheels
cWash the wheels when washing the vehicle
to maintain their appearance.
cClean the inner side of the wheels when the
wheel is changed or the underside of the
vehicle is washed.
cDo not use abrasive cleaners when washing
the wheels.
cInspect wheel rims regularly for dents or
corrosion. Such damage may cause loss of
pressure or poor seal at the tire bead.
cNISSAN recommends waxing the road
wheels to protect against road salt in areas
where it is used during winter.
Spare tire (TEMPORARY USE ONLY
spare tire) (if so equipped)
Observe the following precautions if the TEM-
PORARY USE ONLY spare tire must be used.
Otherwise, your vehicle could be damaged or
involved in an accident:
WARNING
cThe spare tire should be used for emer-
gency use only. It should be replaced
with the standard tire at the first oppor-
tunity to avoid possible tire or differen-
tial damage.
cDrive carefully while the TEMPORARY
USE ONLY spare tire is installed. Avoid
sharp turns and abrupt braking while
driving.
cPeriodically check spare tire inflation
pressure. Always keep the pressure of
the TEMPORARY USE ONLY spare tire
at 60 psi (420 kPa, 4.2 bar) .
cWith the TEMPORARY USE ONLY spare
tire installed do not drive the vehicle at
speeds faster than 50 MPH (80 km/h) .
cWhen driving on roads covered with
snow or ice, the TEMPORARY USE
ONLY spare tire should be used on the
rear wheels and the original tire used
on the front wheels (drive wheels) . Use
tire chains only on the front (original)
tires.
8-42Maintenance and do-it-yourself
ZREVIEW COPY:Ð2004 Maxima(max)
Owners Manual(owners)ÐUSA English(nna)
10/20/03Ðarosenma
X
Page 249 of 280
9 Technical and consumer information
Capacities and recommended fuel/lubricants.........9-2
Fuel recommendation...........................9-3
Engine oil and oil filter recommendation...........9-5
Recommended SAE viscosity number............9-6
Air conditioner system refrigerant and
lubricant recommendations......................9-6
Specifications.....................................9-7
Engine........................................9-7
Wheels and tires...............................9-8
Dimensions and weights........................9-8
When traveling or registering your vehicle in
another country...................................9-9
Vehicle identification...............................9-9
Vehicle identification number (VIN) plate..........9-9
Vehicle identification number
(chassis number)...............................9-9
Engine serial number...........................9-10
F.M.V.S.S. certification label....................9-10
Emission control information label...............9-10Tire placard...................................9-11
Air conditioner specification label................9-11
Installing front license plate........................9-11
Vehicle loading information........................9-12
Terms........................................9-12
Determining vehicle load capacity...............9-12
Loading tips..................................9-13
Towing a trailer...................................9-13
Maximum load limits...........................9-13
Towing load/specification chart.................9-15
Towing safety.................................9-15
Flat towing....................................9-17
Uniform tire quality grading........................9-17
Emission control system warranty..................9-18
Reporting safety defects (US only).................9-19
Readiness for inspection/maintenance (I/M) test.....9-19
Owner’s Manual/Service Manual order information . . . 9-20
In the event of a collision.......................9-21
ZREVIEW COPY:Ð2004 Maxima(max)
Owners Manual(owners)ÐUSA English(nna)
10/20/03Ðarosenma
X
Page 260 of 280
Use the following steps to mount the front license
plate:
Before mounting the license plate, confirm that
the following parts are enclosed in the plastic
bag:
cLicense plate bracket
cLicense plate bracket screws x 2
cLicense plate screws x 2
cScrew grommets x 2
1. Make a shallow hole in the bumper fascia at
the location marks (small dimples) using a
0.39 in (10 mm) drill. To avoid damaging the
area behind the fascia, apply only light pres-
sure to the drill.
2. Insert the grommets into the holes in the
bumper fascia.
3. Insert a small flat-bladed screwdriver into
the grommet hole to turn the threaded part of
the grommet 90°.
4. Mount the license plate bracket using the
two longer screws.
5. Use the two shorter hex head screws to
mount the license plate to the license plate
bracket.WARNING
cIt is extremely dangerous to ride in a
cargo area inside a vehicle. In a colli-
sion, people riding in these areas are
more likely to be seriously injured or
killed.
cDo not allow people to ride in any area
of your vehicle that is not equipped with
seats and seat belts.
cBe sure everyone in your vehicle is in a
seat and using a seat belt properly.
TERMS
It is important to familiarize yourself with the fol-
lowing terms before loading your vehicle:
cCurb Weight (actual weight of your vehicle)
- vehicle weight including: standard and op-
tional equipment, fluids, emergency tools,
and spare tire assembly. This weightdoes
notinclude passengers and cargo.
cGVW (Gross Vehicle Weight) - curb weight
plus the combined weight of passengers
and cargo.
cGVWR (Gross Vehicle Weight Rating) -
maximum total weight (load) limit specified
for the vehicle.cGAWR (Gross Axle Weight Rating) - maxi-
mum weight (load) limit specified for the
front or rear axle.
DETERMINING VEHICLE LOAD
CAPACITY
The load capacity of this vehicle is determined by
weight, not by available cargo space. For ex-
ample, a luggage rack, bike carrier, cartop carrier
or similar equipment does not increase load car-
rying capacity of your vehicle.
To determine vehicle load capacity:
Vehicle weight can be determined by using a
commercial-grade scale, found at places such as
a truck stop, gravel quarry, grain elevator, or a
scrap metal recycling facility.
1. Determine the curb weight of your vehicle.
2. Compare the curb weight amount to the
GVWR specified for your vehicle to deter-
mine how much more weight your vehicle
can carry.
VEHICLE LOADING INFORMATION
9-12Technical and consumer information
ZREVIEW COPY:Ð2004 Maxima(max)
Owners Manual(owners)ÐUSA English(nna)
10/20/03Ðarosenma
X
Page 263 of 280
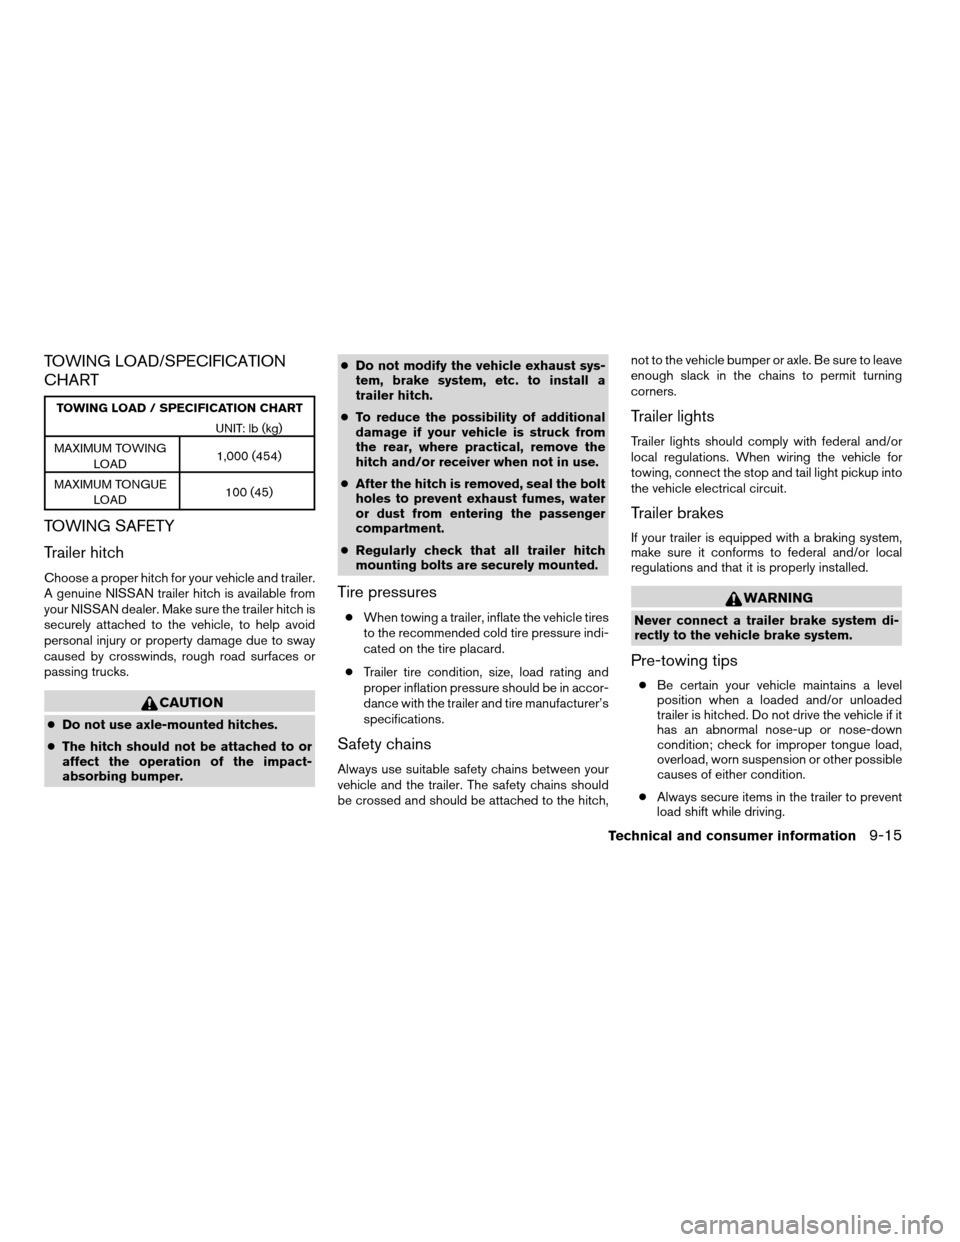
TOWING LOAD/SPECIFICATION
CHART
TOWING LOAD / SPECIFICATION CHART
UNIT: lb (kg)
MAXIMUM TOWING
LOAD1,000 (454)
MAXIMUM TONGUE
LOAD100 (45)
TOWING SAFETY
Trailer hitch
Choose a proper hitch for your vehicle and trailer.
A genuine NISSAN trailer hitch is available from
your NISSAN dealer. Make sure the trailer hitch is
securely attached to the vehicle, to help avoid
personal injury or property damage due to sway
caused by crosswinds, rough road surfaces or
passing trucks.
CAUTION
cDo not use axle-mounted hitches.
cThe hitch should not be attached to or
affect the operation of the impact-
absorbing bumper.cDo not modify the vehicle exhaust sys-
tem, brake system, etc. to install a
trailer hitch.
cTo reduce the possibility of additional
damage if your vehicle is struck from
the rear, where practical, remove the
hitch and/or receiver when not in use.
cAfter the hitch is removed, seal the bolt
holes to prevent exhaust fumes, water
or dust from entering the passenger
compartment.
cRegularly check that all trailer hitch
mounting bolts are securely mounted.
Tire pressures
cWhen towing a trailer, inflate the vehicle tires
to the recommended cold tire pressure indi-
cated on the tire placard.
cTrailer tire condition, size, load rating and
proper inflation pressure should be in accor-
dance with the trailer and tire manufacturer’s
specifications.
Safety chains
Always use suitable safety chains between your
vehicle and the trailer. The safety chains should
be crossed and should be attached to the hitch,not to the vehicle bumper or axle. Be sure to leave
enough slack in the chains to permit turning
corners.
Trailer lights
Trailer lights should comply with federal and/or
local regulations. When wiring the vehicle for
towing, connect the stop and tail light pickup into
the vehicle electrical circuit.
Trailer brakes
If your trailer is equipped with a braking system,
make sure it conforms to federal and/or local
regulations and that it is properly installed.
WARNING
Never connect a trailer brake system di-
rectly to the vehicle brake system.
Pre-towing tips
cBe certain your vehicle maintains a level
position when a loaded and/or unloaded
trailer is hitched. Do not drive the vehicle if it
has an abnormal nose-up or nose-down
condition; check for improper tongue load,
overload, worn suspension or other possible
causes of either condition.
cAlways secure items in the trailer to prevent
load shift while driving.
Technical and consumer information9-15
ZREVIEW COPY:Ð2004 Maxima(max)
Owners Manual(owners)ÐUSA English(nna)
10/20/03Ðarosenma
X
Page 265 of 280
quently. For additional information, see the
“Maintenance and do-it-yourself” section
earlier in this manual.
FLAT TOWING
Towing your vehicle with all four wheels on the
ground is sometimes called flat towing. This
method is sometimes used when towing a vehicle
behind a recreational vehicle, such as a motor
home.
CAUTION
cFailure to follow these guidelines can
result in severe transmission damage.
cWhenever flat towing your vehicle, al-
ways tow forward, never backward.
cDO NOT tow any automatic transmis-
sion vehicle with all four wheels on the
ground (flat towing) . Doing so WILL
DAMAGE internal transmission parts
due to lack of transmission lubrication.
cFor emergency towing procedures refer
to “Towing recommended by NISSAN”
in the “In case of emergency” section of
this manual.
Automatic Transmission
To tow a vehicle equipped with an automatic
transmission, an appropriate vehicle dollyMUST
be placed under the towed vehicle’s drive
wheels.Alwaysfollow the dolly manufacturer’s
recommendations when using their product.
Manual Transmission
cAlways tow with the manual transmission in
Neutral.
cAfter towing 500 miles, start and idle the
engine with the transmission in Neutral for
two minutes. Failure to idle the engine after
every 500 miles of towing may cause dam-
age to internal transmission parts.DOT (Department of Transportation) Quality
Grades: All passenger car tires must conform to
federal safety requirements in addition to these
grades.
Quality grades can be found where applicable on
the tire sidewall between tread shoulder and
maximum section width. For example:
Treadwear 200 Traction AA Temperature A
Treadwear
Treadwear grade is a comparative rating based
on tire wear rate when tested under controlled
conditions on specified government test courses.
For example, a tire graded 150 would wear one
and a half (1-1/2) times as well on the govern-
ment course as a tire graded 100. However,
relative tire performance depends on actual driv-
ing conditions, and may vary significantly due to
variations in driving habits, service practices and
differences in road characteristics and climate.
Traction AA, A, B and C
The traction grades, from highest to lowest, are
AA, A, B, and C. Those grades represent the
tire’s ability to stop on wet pavement as mea-
sured under controlled conditions on specified
government test surfaces of asphalt and con-
crete. A tire marked C may have poor traction
performance.
UNIFORM TIRE QUALITY GRADING
Technical and consumer information9-17
ZREVIEW COPY:Ð2004 Maxima(max)
Owners Manual(owners)ÐUSA English(nna)
10/20/03Ðarosenma
X