2004 NISSAN FRONTIER run flat
[x] Cancel search: run flatPage 79 of 296
2. If the brake fluid level is correct, have the
brake system checked by a NISSAN dealer.
WARNING
cYour brake system may not be working
properly if the warning light is on. Driv-
ing could be dangerous. If you judge it
to be safe, drive carefully to the nearest
service station for repairs. Otherwise,
have your vehicle towed because driv-
ing it could be dangerous.
cPressing the brake pedal with the en-
gine stopped and/or a low brake fluid
level may increase your stopping dis-
tance and braking will require greater
pedal effort as well as pedal travel.
cIf the brake fluid level is below the
MINIMUM or MIN mark on the brake
fluid reservoir, do not drive until the
brake system has been checked at a
NISSAN dealer.
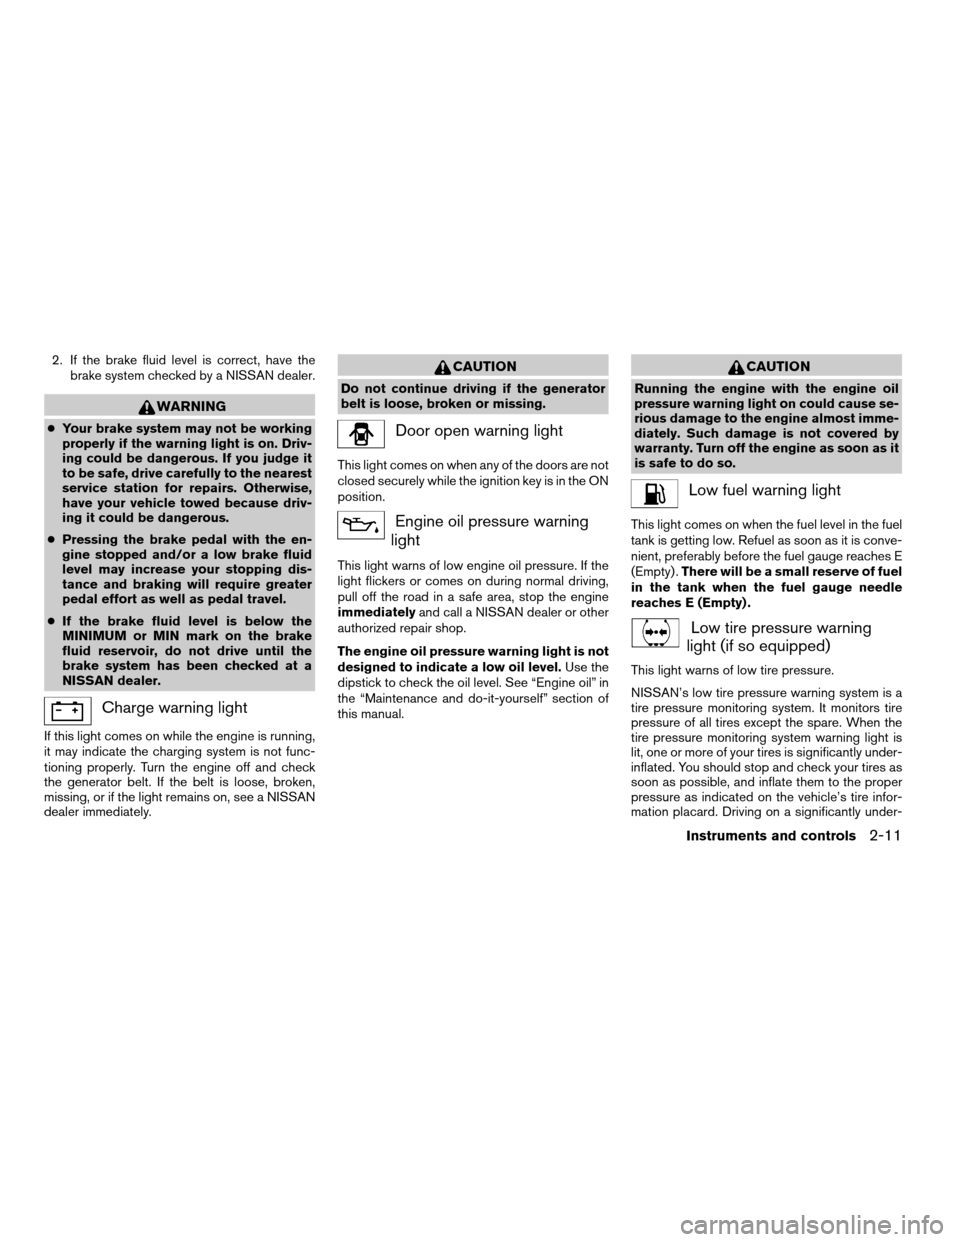
Charge warning light
If this light comes on while the engine is running,
it may indicate the charging system is not func-
tioning properly. Turn the engine off and check
the generator belt. If the belt is loose, broken,
missing, or if the light remains on, see a NISSAN
dealer immediately.
CAUTION
Do not continue driving if the generator
belt is loose, broken or missing.
Door open warning light
This light comes on when any of the doors are not
closed securely while the ignition key is in the ON
position.
Engine oil pressure warning
light
This light warns of low engine oil pressure. If the
light flickers or comes on during normal driving,
pull off the road in a safe area, stop the engine
immediatelyand call a NISSAN dealer or other
authorized repair shop.
The engine oil pressure warning light is not
designed to indicate a low oil level.Use the
dipstick to check the oil level. See “Engine oil” in
the “Maintenance and do-it-yourself” section of
this manual.
CAUTION
Running the engine with the engine oil
pressure warning light on could cause se-
rious damage to the engine almost imme-
diately. Such damage is not covered by
warranty. Turn off the engine as soon as it
is safe to do so.
Low fuel warning light
This light comes on when the fuel level in the fuel
tank is getting low. Refuel as soon as it is conve-
nient, preferably before the fuel gauge reaches E
(Empty) .There will be a small reserve of fuel
in the tank when the fuel gauge needle
reaches E (Empty) .
Low tire pressure warning
light (if so equipped)
This light warns of low tire pressure.
NISSAN’s low tire pressure warning system is a
tire pressure monitoring system. It monitors tire
pressure of all tires except the spare. When the
tire pressure monitoring system warning light is
lit, one or more of your tires is significantly under-
inflated. You should stop and check your tires as
soon as possible, and inflate them to the proper
pressure as indicated on the vehicle’s tire infor-
mation placard. Driving on a significantly under-
Instruments and controls2-11
ZREVIEW COPY:Ð2004 Truck/Frontier(d22)
Owners Manual(owners)ÐUSA English(nna)
11/24/03Ðtmchalpi
X
Page 81 of 296
turned to the OFF position, the passenger
supplemental air bag is disabled and will not
inflate in a frontal collision. The passenger
supplemental air bag OFF indicator light on the
instrument panel illuminates when the passenger
supplemental air bag ON/OFF switch is turned to
the OFF position. The driver’s side supplemental
air bag always remains enabled and is not af-
fected by the passenger supplemental air bag
ON/OFF switch. The key for the passenger
supplemental air bag ON/OFF switch should not
be left in the switch. Remove the key after turning
the switch in the desired position. Do not leave a
key in the switch. See “Passenger supplemental
air bag ON/OFF switch and light” in the “Seats,
restraints and supplemental air bag systems”
section for details.
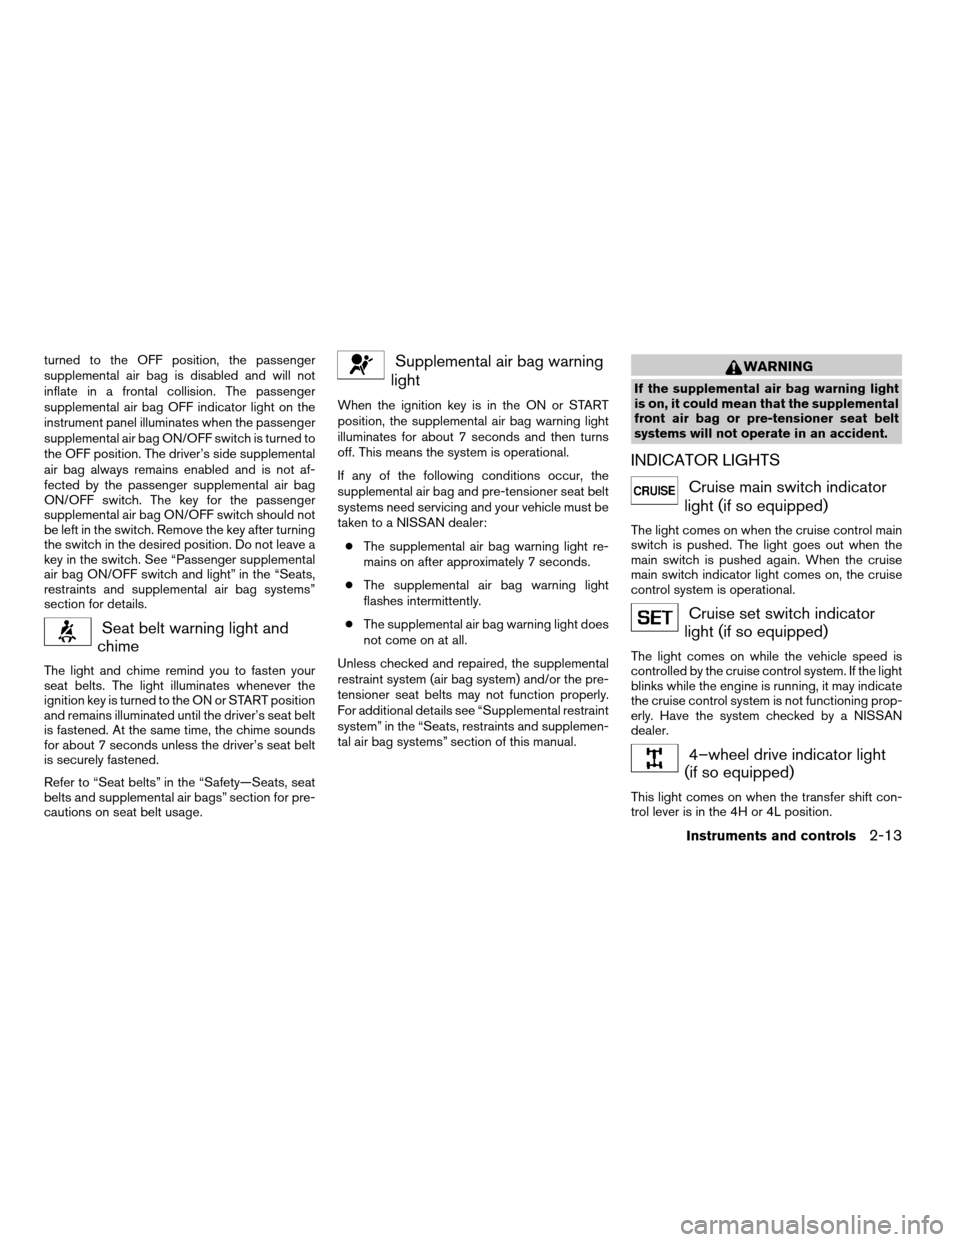
Seat belt warning light and
chime
The light and chime remind you to fasten your
seat belts. The light illuminates whenever the
ignition key is turned to the ON or START position
and remains illuminated until the driver’s seat belt
is fastened. At the same time, the chime sounds
for about 7 seconds unless the driver’s seat belt
is securely fastened.
Refer to “Seat belts” in the “Safety—Seats, seat
belts and supplemental air bags” section for pre-
cautions on seat belt usage.
Supplemental air bag warning
light
When the ignition key is in the ON or START
position, the supplemental air bag warning light
illuminates for about 7 seconds and then turns
off. This means the system is operational.
If any of the following conditions occur, the
supplemental air bag and pre-tensioner seat belt
systems need servicing and your vehicle must be
taken to a NISSAN dealer:
cThe supplemental air bag warning light re-
mains on after approximately 7 seconds.
cThe supplemental air bag warning light
flashes intermittently.
cThe supplemental air bag warning light does
not come on at all.
Unless checked and repaired, the supplemental
restraint system (air bag system) and/or the pre-
tensioner seat belts may not function properly.
For additional details see “Supplemental restraint
system” in the “Seats, restraints and supplemen-
tal air bag systems” section of this manual.
WARNING
If the supplemental air bag warning light
is on, it could mean that the supplemental
front air bag or pre-tensioner seat belt
systems will not operate in an accident.
INDICATOR LIGHTS
Cruise main switch indicator
light (if so equipped)
The light comes on when the cruise control main
switch is pushed. The light goes out when the
main switch is pushed again. When the cruise
main switch indicator light comes on, the cruise
control system is operational.
Cruise set switch indicator
light (if so equipped)
The light comes on while the vehicle speed is
controlled by the cruise control system. If the light
blinks while the engine is running, it may indicate
the cruise control system is not functioning prop-
erly. Have the system checked by a NISSAN
dealer.
4–wheel drive indicator light
(if so equipped)
This light comes on when the transfer shift con-
trol lever is in the 4H or 4L position.
Instruments and controls2-13
ZREVIEW COPY:Ð2004 Truck/Frontier(d22)
Owners Manual(owners)ÐUSA English(nna)
11/21/03Ðdebbie
X
Page 155 of 296

cKeep your engine tuned up. Malfunc-
tions in the ignition, fuel injection, or
electrical systems can cause overrich
fuel flow into the three-way catalyst,
causing it to overheat. Do not keep driv-
ing if the engine misfires, or if notice-
able loss of performance or other un-
usual operating conditions are
detected. Have the vehicle inspected
promptly by a NISSAN dealer.
cAvoid driving with an extremely low fuel
level. Running out of fuel could cause
the engine to misfire, damaging the
three-way catalyst.
cDo not race the engine while warming it
up.
cDo not push or tow your vehicle to start
the engine.
LOW TIRE PRESSURE WARNING
SYSTEM
The low tire pressure warning system monitors
tire pressure of all tires (except the spare tire) .
The low tire pressure warning system will activate
only when the vehicle is driven at speeds above
20 MPH (32 km/h) . Also, this system may not
detect a sudden drop in tire pressure (for ex-
ample a flat tire while driving) .Tire pressure rises and falls depending on the
heat caused by the vehicle’s operation and the
outside temperature. Low outside temperature
can lower the temperature of the air inside the tire
which can cause a lower tire inflation pressure.
This may cause the low tire pressure warning
light to illuminate.
If the warning light illuminates in low ambient
temperature as described above, check the tire
pressure for all four tires. Adjust the tire pressure
to the recommended COLD tire pressure shown
on the tire placard to turn the low tire pressure
warning light OFF.
Frequently check the tire pressure and adjust
pressure of each tire properly.
Low tire pressure warning
If the vehicle is being driven with very low tire
pressure (lower than 28 psi, 193 kPa) , the low
tire pressure warning light comes on and the
chime sounds for about 10 seconds.
For additional information regarding the above
warning, see “Warning/indicator lights and au-
dible reminders” in the “Instruments and con-
trols” section.
WARNING
cIf the low tire pressure warning light
flashes while driving, avoid sudden
steering maneuvers or abrupt braking,
reduce vehicle speed, pull off the road
to a safe location and stop the vehicle
as soon as possible. Serious vehicle
damage could occur and may lead to an
accident and could result in serious
personal injury. Check the tire pressure
for all four tires. Adjust the tire pressure
to the recommended COLD tire pres-
sure shown on the tire placard to turn
the low tire pressure warning light OFF.
If you have a flat tire, replace it with a
spare tire as soon as possible. (See
“Flat tire” in the “In case of emergency”
section for changing a flat tire.)
cWhen a spare tire is mounted or a wheel
is replaced, tire pressure will not be
indicated and the low tire pressure
warning system will not function. Con-
tact your NISSAN dealer as soon as
possible for tire replacement and/or
system resetting.
cDo not inject any tire liquid or aerosol
tire sealant into the tires, as this may
cause a malfunction of the tire pressure
sensors.
Starting and driving5-3
ZREVIEW COPY:Ð2004 Truck/Frontier(d22)
Owners Manual(owners)ÐUSA English(nna)
11/21/03Ðdebbie
X
Page 161 of 296
cMake sure the area around the vehicle is
clear.
cCheck fluid levels such as engine oil, cool-
ant, brake and clutch fluid, and window
washer fluid as frequently as possible, or at
least whenever you refuel.
cCheck that all windows and lights are clean.
cVisually inspect tires for their appearance
and condition. Also check tires for proper
inflation.
cLock all doors.
cPosition seat and adjust head restraints.
cAdjust inside and outside mirrors.
cFasten seat belts and ask all passengers to
do likewise.
cCheck the operation of warning lights when
the key is turned to the ON (3) position. See
“Warning/indicator lights and audible re-
minders” in the “Instruments and controls”
section of this manual.1. Apply the parking brake.
2.Automatic transmission:
Move the shift selector lever to P (Park) or N
(Neutral) . P (Park) is recommended.
The shift selector lever cannot be
moved out of P (Park) and into any of
the other gear positions if the ignition
key is turned to the OFF position or if
the key is removed from the ignition
switch.
The starter is designed not to operate if
the shift selector lever is in any of the
driving positions.
Manual transmission:
Move the shift lever to N (Neutral) . Depress
the clutch pedal to the floor while cranking
the engine.
The starter is designed not to operate
unless the clutch pedal is fully de-
pressed.
3. Crank the enginewith your foot off the
accelerator pedalby turning the ignition
key to START. Release the key when the
engine starts. If the engine starts, but fails to
run, repeat the above procedure.cIf the engine is very hard to start in ex-
tremely cold weather or when restarting,
depress the accelerator pedal a little (ap-
proximately 1/3 to the floor) and hold it
and then crank the engine. Release the
key and the accelerator pedal when the
engine starts.
cIf the engine is very hard to start because
it is flooded, depress the accelerator
pedal all the way to the floor and hold it.
Crank the engine for 5-6 seconds. After
cranking the engine, release the accel-
erator pedal. Crank the enginewith your
foot off the accelerator pedalby turn-
ing the ignition key to START. Release the
key when the engine starts. If the engine
starts, but fails to run, repeat the above
procedure.
CAUTION
Do not operate the starter for more than
15 seconds at a time. If the engine does
not start, turn the key off and wait 10
seconds before cranking again, otherwise
the starter could be damaged.
BEFORE STARTING THE ENGINE STARTING THE ENGINE
Starting and driving5-9
ZREVIEW COPY:Ð2004 Truck/Frontier(d22)
Owners Manual(owners)ÐUSA English(nna)
11/21/03Ðdebbie
X
Page 173 of 296
cPush and hold the RES/ACCEL switch.
When the vehicle attains the speed you de-
sire, release the switch.
cPush and release the RES/ACCEL switch.
Each time you do this, the set speed in-
creases by about 1 MPH (1.6 km/h) .
To reset at a slower cruising speed,use one
of the following three methods.
cLightly tap the brake pedal. When the ve-
hicle attains the desired speed, push the
COAST/SET switch and release it.
cPush and hold the COAST/SET switch. Re-
lease the switch when the vehicle slows to
the desired speed.
cPush and release the COAST/SET switch.
Each time you do this, the set speed de-
creases by about 1 MPH (1.6 km/h) .
To resume the preset speed,push and re-
lease the RES/ACCEL switch. The vehicle re-
turns to the last set cruising speed when the
vehicle speed is over 25 MPH (40 km/h) .CAUTION
During the first 1,200 miles (2,000 km) ,
follow these recommendations to obtain
maximum engine performance and en-
sure the future reliability and economy of
your new vehicle. Failure to follow these
recommendations may result in short-
ened engine life and reduced engine
performance.
cAvoid driving for long periods at constant
speed, either fast or slow, and do not run the
engine over 4,000 rpm.
cDo not accelerate at full throttle in any gear.
cAvoid quick starts.
cAvoid hard braking as much as possible.
cDo not tow a trailer for the first 500 miles
(800 km) . Your engine, axle or other parts
could be damaged.cAccelerate slowly and smoothly. Maintain
cruising speeds with a constant accelerator
position.
cDrive at moderate speeds on the highway.
Driving at high speed lowers fuel economy.
cAvoid unnecessary stopping and braking.
Maintain a safe distance behind other ve-
hicles.
cUse a proper gear range which suits road
conditions. On level roads, shift into high
gear as soon as possible.
cAvoid unnecessary engine idling.
cKeep your engine tuned up.
cFollow the recommended periodic mainte-
nance schedule.
cKeep the tires inflated to the correct pres-
sure. Low tire pressure increases tire wear
and lowers fuel economy.
cKeep the front wheels in correct alignment.
Improper alignment increases tire wear and
lowers fuel economy.
cAir conditioner operation lowers fuel
economy. Use the air conditioner only when
necessary.
BREAK-IN SCHEDULE INCREASING FUEL ECONOMY
Starting and driving5-21
ZREVIEW COPY:Ð2004 Truck/Frontier(d22)
Owners Manual(owners)ÐUSA English(nna)
11/21/03Ðdebbie
X
Page 200 of 296
cIf you have to tow manual transmission
models with the rear wheels on the
ground (if you do not use towing dol-
lies) or four wheels on the ground:
cAlways release the parking brake.
cMove the transmission shift lever to
the N (Neutral) position.
cObserve the following restricted tow-
ing speeds and distances for manual
transmission models only:
Speed: Below 60 MPH (97 km/h)
Distance: Less than 500 miles (805
km)
If the speed or distance must necessarily be
greater, remove the propeller shaft before towing
to prevent damage to the transmission.
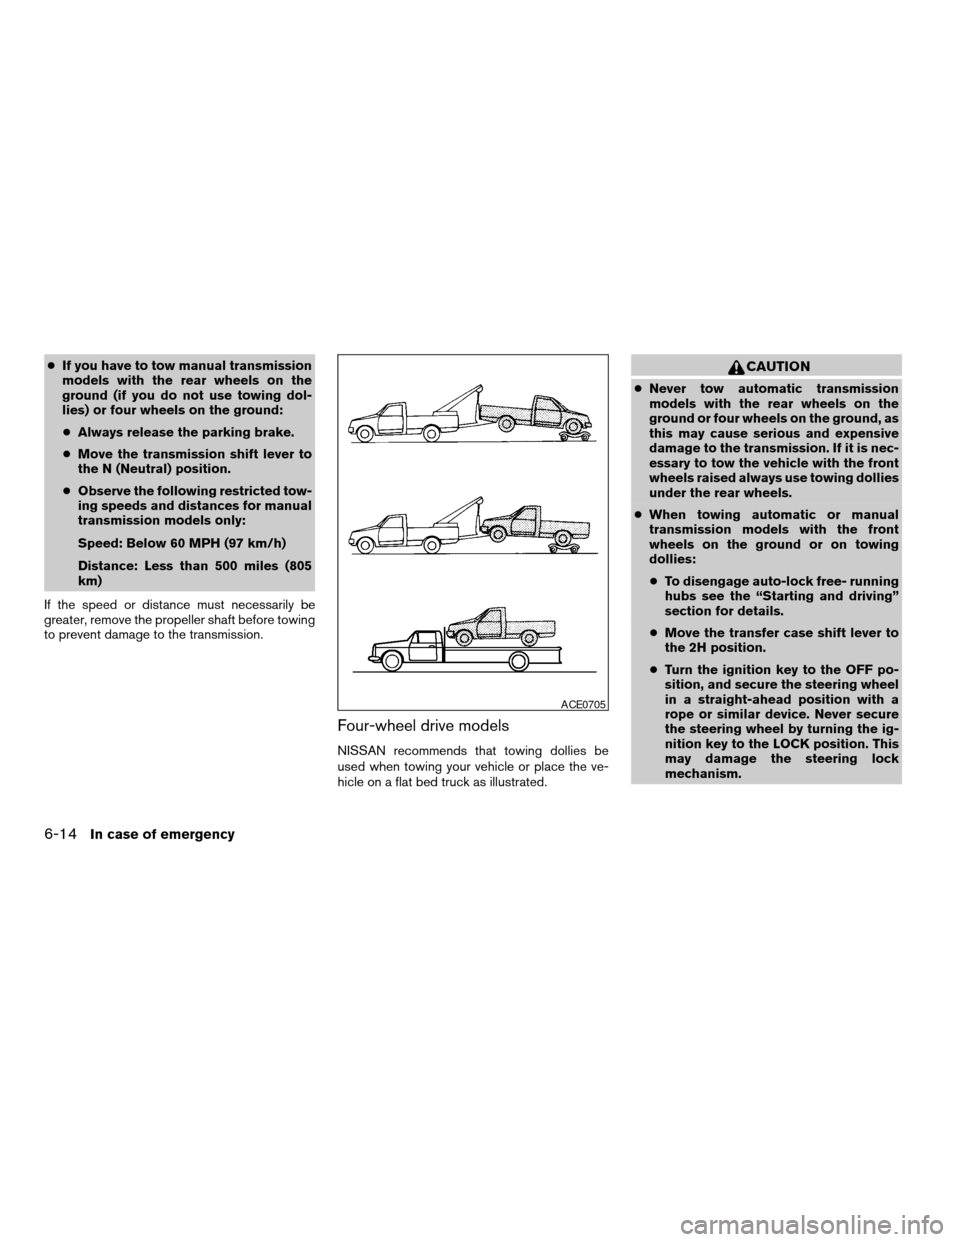
Four-wheel drive models
NISSAN recommends that towing dollies be
used when towing your vehicle or place the ve-
hicle on a flat bed truck as illustrated.
CAUTION
cNever tow automatic transmission
models with the rear wheels on the
ground or four wheels on the ground, as
this may cause serious and expensive
damage to the transmission. If it is nec-
essary to tow the vehicle with the front
wheels raised always use towing dollies
under the rear wheels.
cWhen towing automatic or manual
transmission models with the front
wheels on the ground or on towing
dollies:
cTo disengage auto-lock free- running
hubs see the “Starting and driving”
section for details.
cMove the transfer case shift lever to
the 2H position.
cTurn the ignition key to the OFF po-
sition, and secure the steering wheel
in a straight-ahead position with a
rope or similar device. Never secure
the steering wheel by turning the ig-
nition key to the LOCK position. This
may damage the steering lock
mechanism.
ACE0705
6-14In case of emergency
ZREVIEW COPY:Ð2004 Truck/Frontier(d22)
Owners Manual(owners)ÐUSA English(nna)
11/21/03Ðdebbie
X
Page 284 of 296

Heater and air conditioner controls.....4-2
Coolant
Capacities and recommended
fuel/lubricants.................9-2
Changing engine coolant..........8-10
Checking engine coolant level........8-9
Engine coolant temperature gauge.....2-5
Corrosion protection...............7-5
Cruise control..................5-19
Cup holders...................2-27
D
Daytime running light system
(Canada only)..................2-21
Defogger switch
Rear window defogger switch.......2-19
Dimensions and weights.............9-9
Door locks....................3-2
Door open warning light............2-11
Drive belts....................8-20
Driving
Auto-lock free-running hubs........5-23
Cold weather driving............5-31
Driving with automatic transmission. . . .5-10
Driving with manual transmission.....5-16
Precautions when starting and driving . . .5-2
Dual 12 volt power outlets...........2-25
E
Economy - fuel.................5-21
Emission control information label.......9-12
Emission control system warranty.......9-24Engine
Before starting the engine..........5-9
Capacities and recommended
fuel/lubricants.................9-2
Changing engine coolant..........8-10
Changing engine oil............8-11
Changing engine oil filter..........8-13
Checking engine coolant level........8-9
Checking engine oil level..........8-10
Engine compartment check locations. . . .8-9
Engine coolant temperature gauge.....2-5
Engine cooling system............8-9
Engine oil..................8-10
Engine oil and oil filter recommendation . .9-5
Engine oil viscosity..............9-5
Engine serial number............9-11
Engine specifications.............9-7
Starting the engine..............5-9
Engine oil pressure low/engine coolant
temperature high warning light.........2-11
Exhaust gas (Carbon monoxide)........5-2
F
First aid kit....................6-2
Flashers
(See hazard warning flasher switch)......2-22
Flat tire......................6-2
Floor mat positioning aid.............7-4
Fluid
Automatic transmission fluid (ATF). . . .8-14
Brake fluid..................8-16
Capacities and recommended
fuel/lubricants.................9-2
Clutch fluid.................8-17Engine coolant................8-9
Engine oil..................8-10
Power steering fluid.............8-16
Window washer fluid............8-18
F.M.V.S.S. certification label..........9-11
Fog light switch.................2-22
Front seats....................1-2
Fuel
Capacities and recommended
fuel/lubricants.................9-2
Fuel economy................5-21
Fuel filler cap................3-11
Fuel filler lid.................3-11
Fuel filler lid and cap............3-11
Fuel gauge..................2-6
Fuel octane rating..............9-4
Fuel recommendation............9-3
Fuses......................8-29
G
Gascap.....................3-11
Gauge
Engine coolant temperature gauge.....2-5
Fuel gauge..................2-6
Odometer...................2-3
Speedometer.................2-3
Tachometer..................2-5
General maintenance..............8-2
Glove box....................2-28
Glove box lock.................2-28
10-2
ZREVIEW COPY:Ð2004 Truck/Frontier(d22)
Owners Manual(owners)ÐUSA English(nna)
11/21/03Ðdebbie
X