2004 NISSAN FRONTIER lock
[x] Cancel search: lockPage 62 of 296
cNISSAN recommends that the child re-
straint be installed in the rear seat
(Crew Cab models) . However, if you
must install a forward-facing child re-
straint in the front passenger seat,
move the passenger seat to the rear-
most position.
cNever install a rear facing child restraint
in the front seating position of Crew
Cab models. Install a rear-facing child
restraint in the rear seat only. The force
of the inflating air bag could cause se-
rious injury or kill the child in the child
restraint.
cThe three-point seat belt in your vehicle
is equipped with an automatic locking
mode retractor which must be used
when installing a child restraint.
cFailure to use the retractor’s locking
mode will result in the child restraint
not being properly secured. The re-
straint could tip over or otherwise be
unsecured and cause injury to the child
in a sudden stop or collision.cIf the supplemental air bag warning
light located in the instrument panel
next to the speedometer comes on
when the passenger supplemental air
bag OFF indicator light is also illumi-
nated, something may be wrong with
the supplemental air bag system. Do
not use a child restraint in the front
passenger seat until the system is
checked by your NISSAN dealer.
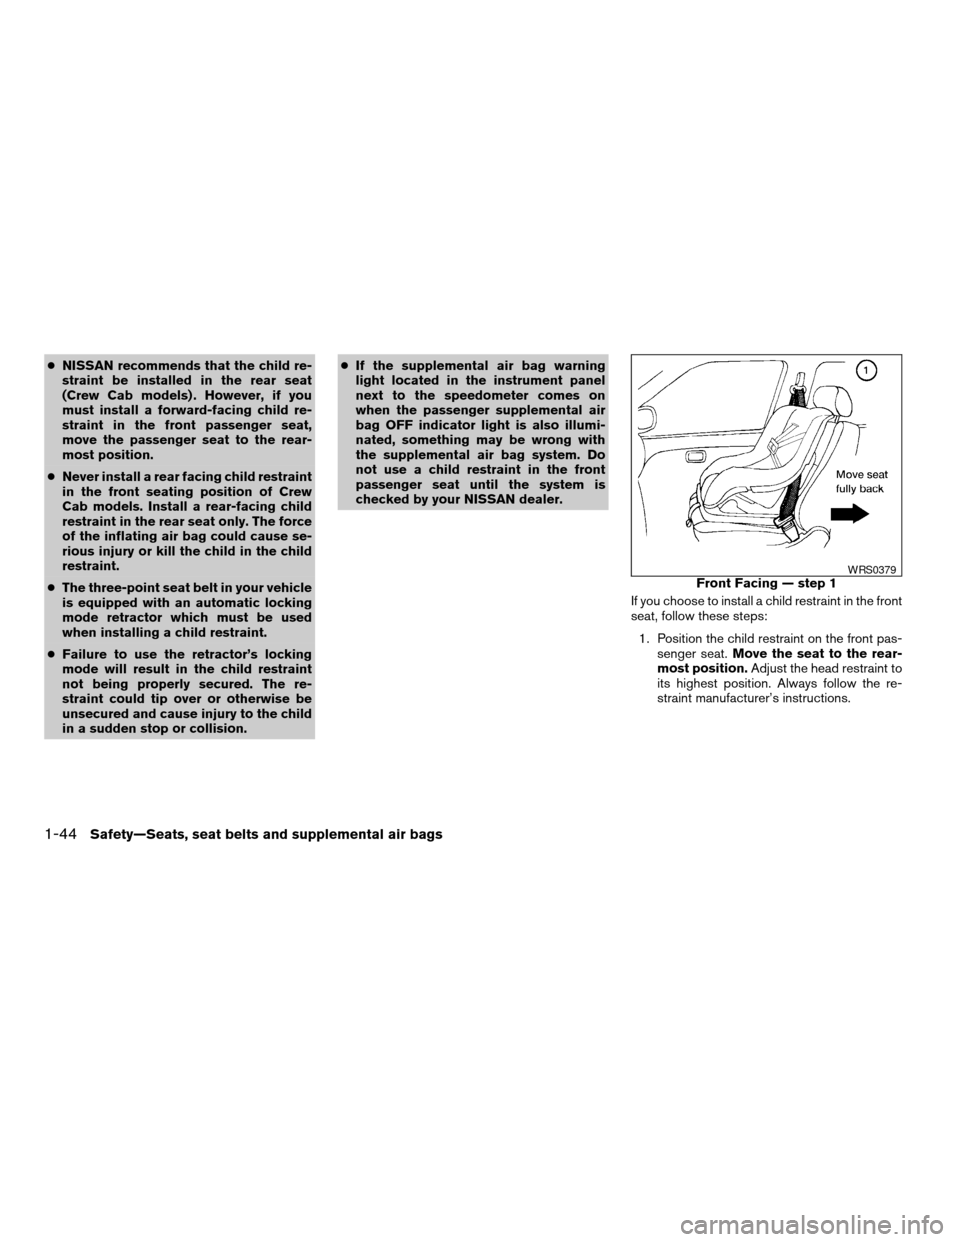
If you choose to install a child restraint in the front
seat, follow these steps:
1. Position the child restraint on the front pas-
senger seat.Move the seat to the rear-
most position.Adjust the head restraint to
its highest position. Always follow the re-
straint manufacturer’s instructions.
Front Facing — step 1WRS0379
1-44Safety—Seats, seat belts and supplemental air bags
ZREVIEW COPY:Ð2004 Truck/Frontier(d22)
Owners Manual(owners)ÐUSA English(nna)
11/21/03Ðdebbie
X
Page 63 of 296

2. Route the seat belt tongue through the child
restraint and insert it into the buckle until you
hear and feel the latch engage.
Be sure to follow the child restraint manu-
facturer’s instructions for belt routing.3. Pull on the shoulder belt until all of the belt is
fully extended. At this time, the seat belt
retractor is in the automatic locking mode
(child restraint mode) . It reverts to emer-
gency locking mode when the seat belt is
fully retracted.4. Allow the seat belt to retract slightly. Pull up
on the shoulder belt to remove any slack in
the belt.
If necessary to ensure the child restraint is
secure, pull the shoulder belt through the
seat belt tongue beyond the stitching in the
belt.
After the seat belt is fully retracted and the child
restraint is removed from the seat, the stitching
on the shoulder belt can be pulled back through
the seat belt tongue. The stitching locates the
seat belt tongue near the top of the seat back for
easy access for passengers.
Front Facing — step 2
WRS0159
Front Facing — step 3
WRS0160
Front Facing — step 4
WRS0161
Safety—Seats, seat belts and supplemental air bags1-45
ZREVIEW COPY:Ð2004 Truck/Frontier(d22)
Owners Manual(owners)ÐUSA English(nna)
11/21/03Ðdebbie
X
Page 64 of 296
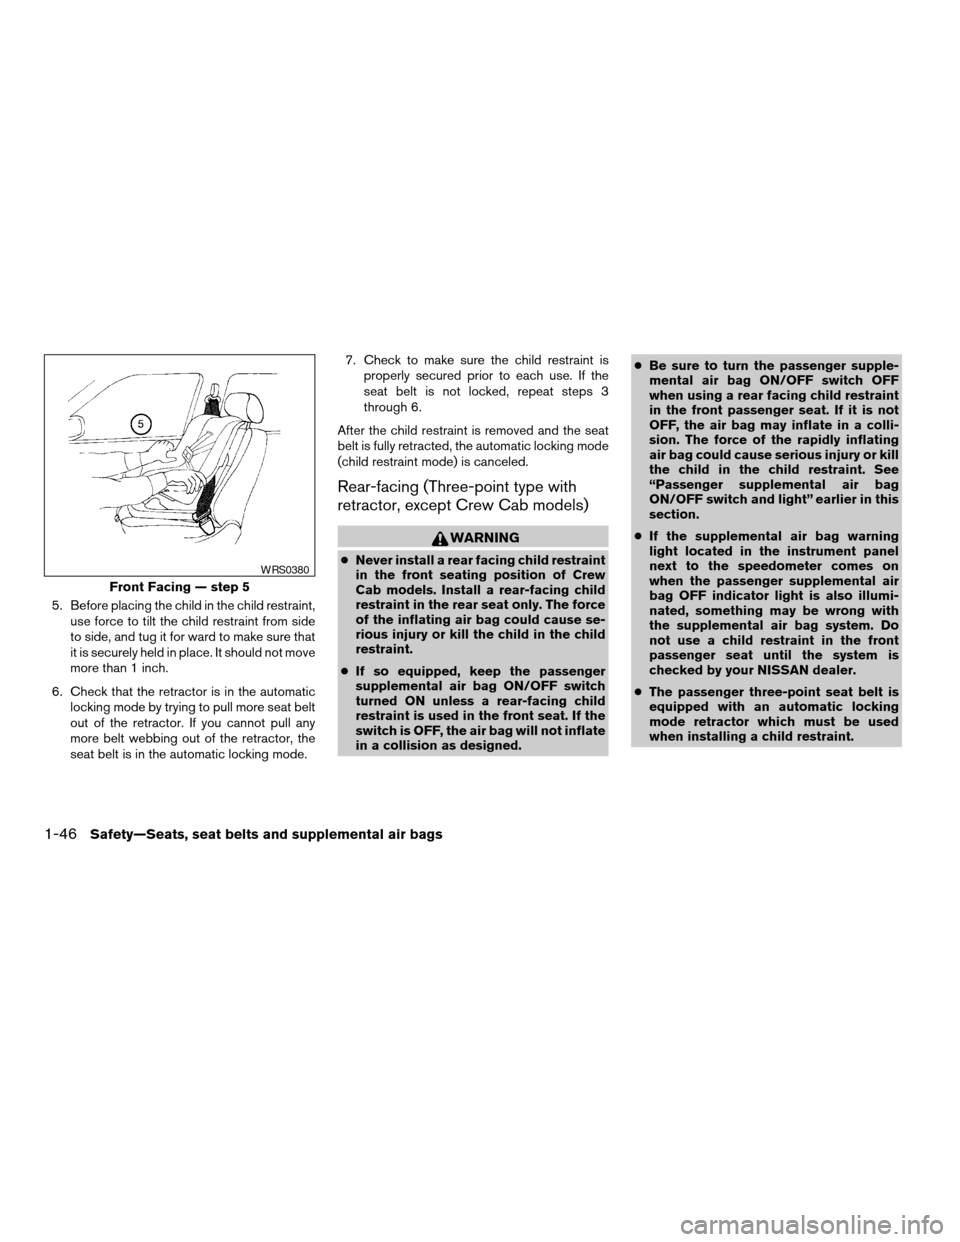
5. Before placing the child in the child restraint,
use force to tilt the child restraint from side
to side, and tug it for ward to make sure that
it is securely held in place. It should not move
more than 1 inch.
6. Check that the retractor is in the automatic
locking mode by trying to pull more seat belt
out of the retractor. If you cannot pull any
more belt webbing out of the retractor, the
seat belt is in the automatic locking mode.7. Check to make sure the child restraint is
properly secured prior to each use. If the
seat belt is not locked, repeat steps 3
through 6.
After the child restraint is removed and the seat
belt is fully retracted, the automatic locking mode
(child restraint mode) is canceled.
Rear-facing (Three-point type with
retractor, except Crew Cab models)
WARNING
cNever install a rear facing child restraint
in the front seating position of Crew
Cab models. Install a rear-facing child
restraint in the rear seat only. The force
of the inflating air bag could cause se-
rious injury or kill the child in the child
restraint.
cIf so equipped, keep the passenger
supplemental air bag ON/OFF switch
turned ON unless a rear-facing child
restraint is used in the front seat. If the
switch is OFF, the air bag will not inflate
in a collision as designed.cBe sure to turn the passenger supple-
mental air bag ON/OFF switch OFF
when using a rear facing child restraint
in the front passenger seat. If it is not
OFF, the air bag may inflate in a colli-
sion. The force of the rapidly inflating
air bag could cause serious injury or kill
the child in the child restraint. See
“Passenger supplemental air bag
ON/OFF switch and light” earlier in this
section.
cIf the supplemental air bag warning
light located in the instrument panel
next to the speedometer comes on
when the passenger supplemental air
bag OFF indicator light is also illumi-
nated, something may be wrong with
the supplemental air bag system. Do
not use a child restraint in the front
passenger seat until the system is
checked by your NISSAN dealer.
cThe passenger three-point seat belt is
equipped with an automatic locking
mode retractor which must be used
when installing a child restraint.
Front Facing — step 5
WRS0380
1-46Safety—Seats, seat belts and supplemental air bags
ZREVIEW COPY:Ð2004 Truck/Frontier(d22)
Owners Manual(owners)ÐUSA English(nna)
11/21/03Ðdebbie
X
Page 65 of 296
cFailure to use the automatic locking
mode will result in the child restraint
not being properly secured. The re-
straint could tip over or otherwise be
unsecured and cause injury to the child
in a sudden stop or collision.
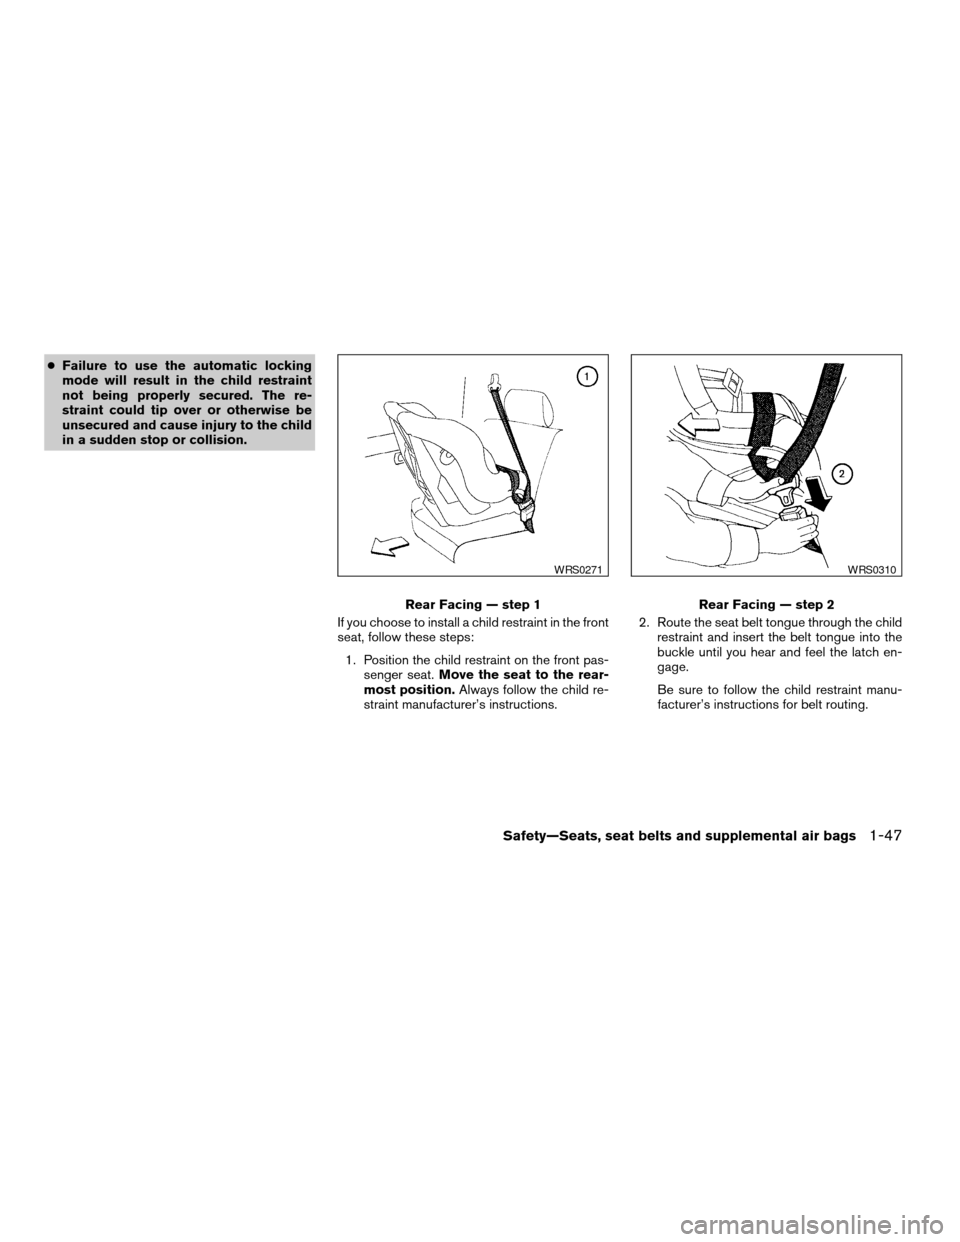
If you choose to install a child restraint in the front
seat, follow these steps:
1. Position the child restraint on the front pas-
senger seat.Move the seat to the rear-
most position.Always follow the child re-
straint manufacturer’s instructions.2. Route the seat belt tongue through the child
restraint and insert the belt tongue into the
buckle until you hear and feel the latch en-
gage.
Be sure to follow the child restraint manu-
facturer’s instructions for belt routing.
Rear Facing — step 1
WRS0271
Rear Facing — step 2
WRS0310
Safety—Seats, seat belts and supplemental air bags1-47
ZREVIEW COPY:Ð2004 Truck/Frontier(d22)
Owners Manual(owners)ÐUSA English(nna)
11/21/03Ðdebbie
X
Page 66 of 296
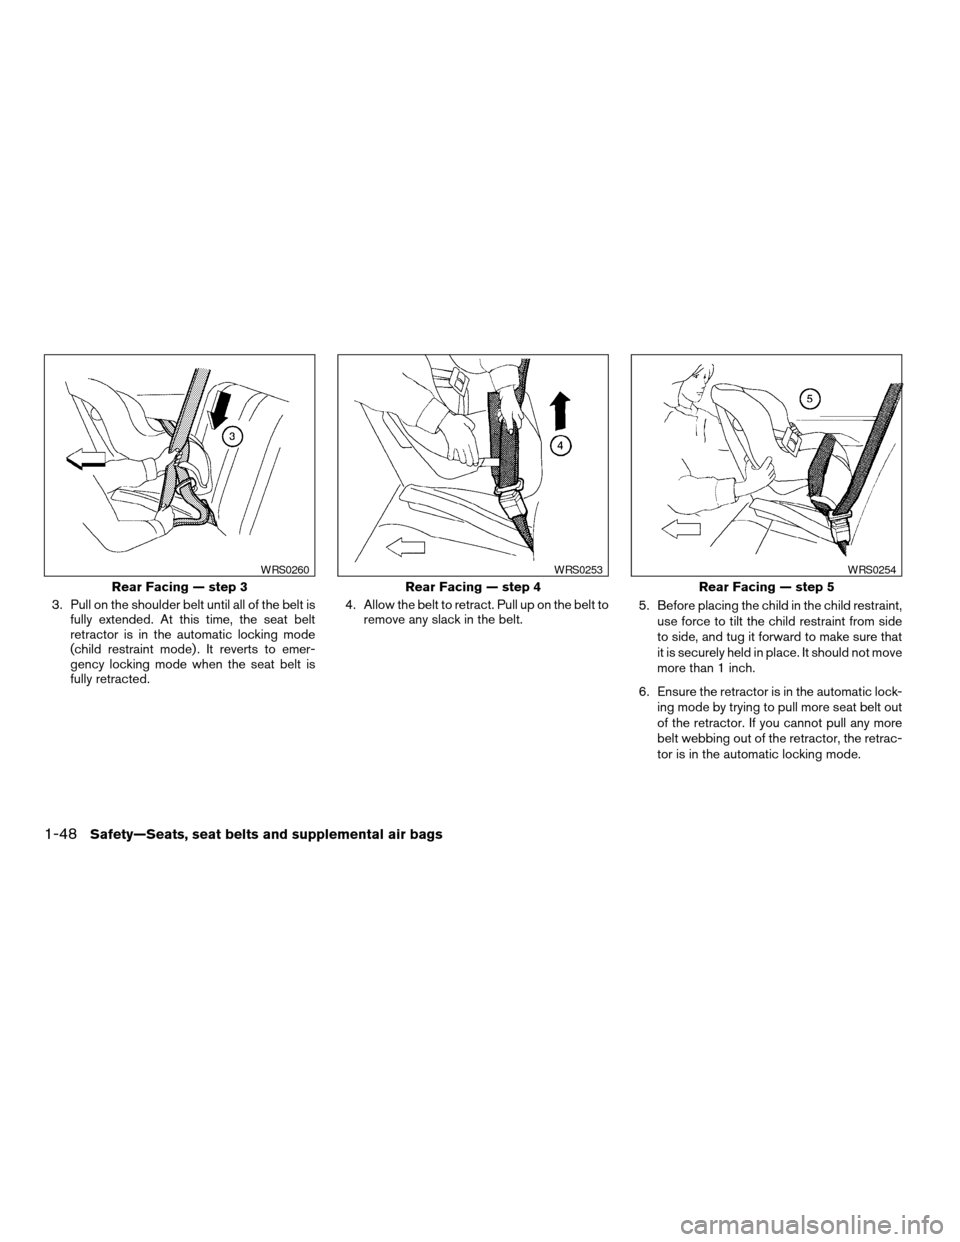
3. Pull on the shoulder belt until all of the belt is
fully extended. At this time, the seat belt
retractor is in the automatic locking mode
(child restraint mode) . It reverts to emer-
gency locking mode when the seat belt is
fully retracted.4. Allow the belt to retract. Pull up on the belt to
remove any slack in the belt.5. Before placing the child in the child restraint,
use force to tilt the child restraint from side
to side, and tug it forward to make sure that
it is securely held in place. It should not move
more than 1 inch.
6. Ensure the retractor is in the automatic lock-
ing mode by trying to pull more seat belt out
of the retractor. If you cannot pull any more
belt webbing out of the retractor, the retrac-
tor is in the automatic locking mode.
Rear Facing — step 3
WRS0260
Rear Facing — step 4
WRS0253
Rear Facing — step 5
WRS0254
1-48Safety—Seats, seat belts and supplemental air bags
ZREVIEW COPY:Ð2004 Truck/Frontier(d22)
Owners Manual(owners)ÐUSA English(nna)
11/21/03Ðdebbie
X
Page 67 of 296

7. Check to make sure the child restraint is
properly secured prior to each use. If the lap
belt is not locked, repeat steps 3 through 6.
After the child restraint is removed and the seat
belt is fully retracted the automatic locking mode
(child restraint mode) is canceled.
Safety—Seats, seat belts and supplemental air bags1-49
ZREVIEW COPY:Ð2004 Truck/Frontier(d22)
Owners Manual(owners)ÐUSA English(nna)
11/21/03Ðdebbie
X
Page 77 of 296

orAnti-lock brake warning lightLow tire pressure warning light (if so equipped)4-wheel drive indicator light (if so equipped)
Automatic transmission oil temperature warn-
ing light (model)Low windshield washer fluid warning light (if so
equipped)High beam indicator light (Blue)
Automatic transmission park warning light
(model)Passenger supplemental air bag OFF indicator
light (except Crew Cab models)Malfunction indicator lamp (MIL)
orBrake warning lightSeat belt warning light and chimeOverdrive off indicator light (automatic trans-
mission only)
Charge warning lightSupplemental air bag warning lightSlip indicator light (if so equipped)
Door open warning lightCRUISE main switch indicator light (if so
equipped)Turn signal/hazard indicator lights
Engine oil pressure warning lightCruise SET switch indicator light (if so
equipped)Vehicle dynamic control off indicator light (if so
equipped)
Low fuel warning light
CHECKING BULBS
With all doors closed, apply the parking brake
and turn the ignition key to the ON position
without starting the engine. The following lights
will come on:
,or,,,
If the driver’s seat belt is fastened before the
ignition key is turned to the ON position,
the
light will not come on.
The following lights come on briefly and then go
off:
or,,,,,,,
If any light fails to come on, it may indicate
a burned-out bulb or an open circuit in the
electrical system. Have the system repaired
promptly.
WARNING/INDICATOR LIGHTS AND
AUDIBLE REMINDERS
Instruments and controls2-9
ZREVIEW COPY:Ð2004 Truck/Frontier(d22)
Owners Manual(owners)ÐUSA English(nna)
11/21/03Ðdebbie
X
Page 78 of 296
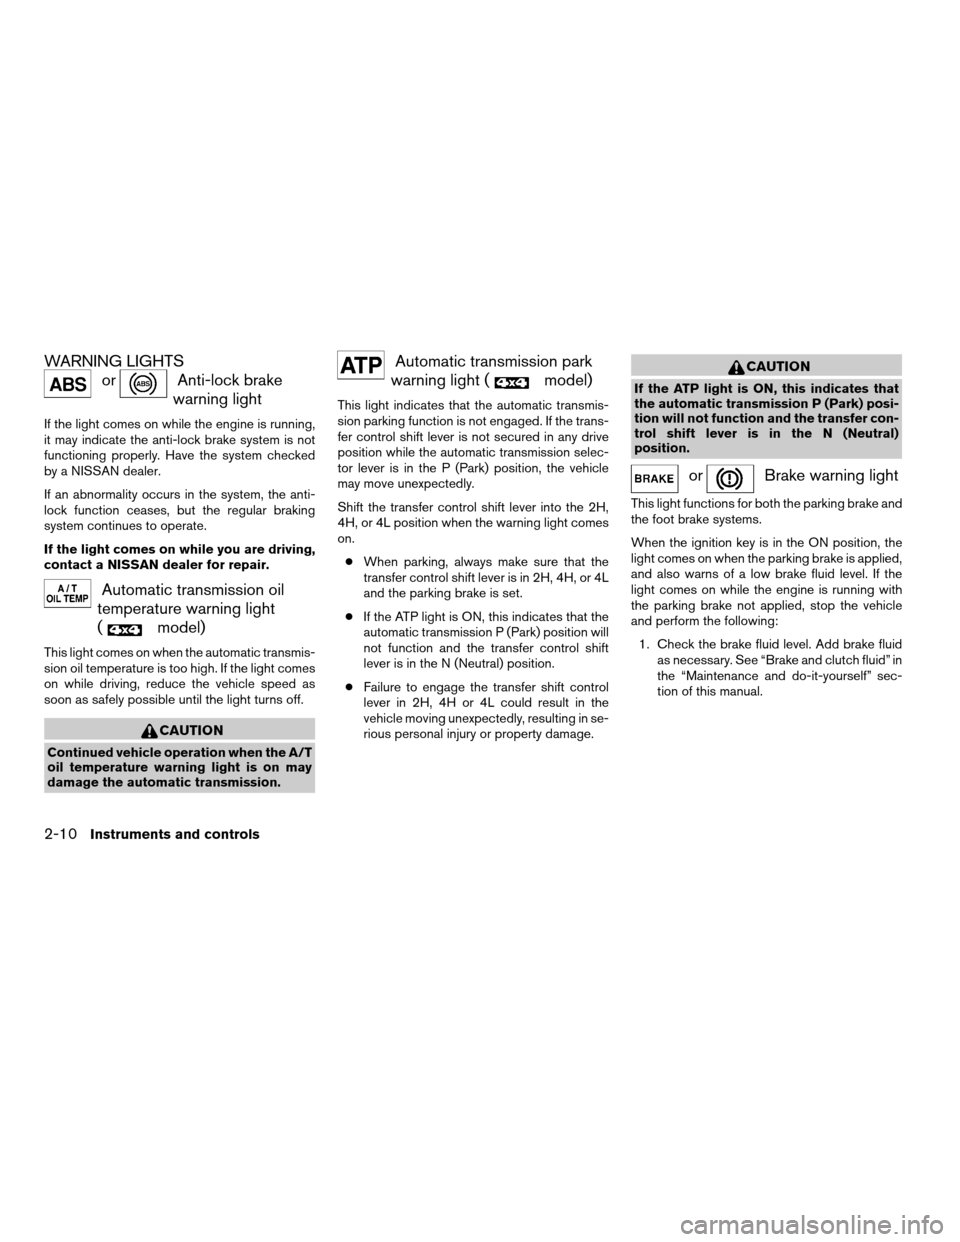
WARNING LIGHTS
orAnti-lock brake
warning light
If the light comes on while the engine is running,
it may indicate the anti-lock brake system is not
functioning properly. Have the system checked
by a NISSAN dealer.
If an abnormality occurs in the system, the anti-
lock function ceases, but the regular braking
system continues to operate.
If the light comes on while you are driving,
contact a NISSAN dealer for repair.
Automatic transmission oil
temperature warning light
(
model)
This light comes on when the automatic transmis-
sion oil temperature is too high. If the light comes
on while driving, reduce the vehicle speed as
soon as safely possible until the light turns off.
CAUTION
Continued vehicle operation when the A/T
oil temperature warning light is on may
damage the automatic transmission.
Automatic transmission park
warning light (
model)
This light indicates that the automatic transmis-
sion parking function is not engaged. If the trans-
fer control shift lever is not secured in any drive
position while the automatic transmission selec-
tor lever is in the P (Park) position, the vehicle
may move unexpectedly.
Shift the transfer control shift lever into the 2H,
4H, or 4L position when the warning light comes
on.
cWhen parking, always make sure that the
transfer control shift lever is in 2H, 4H, or 4L
and the parking brake is set.
cIf the ATP light is ON, this indicates that the
automatic transmission P (Park) position will
not function and the transfer control shift
lever is in the N (Neutral) position.
cFailure to engage the transfer shift control
lever in 2H, 4H or 4L could result in the
vehicle moving unexpectedly, resulting in se-
rious personal injury or property damage.
CAUTION
If the ATP light is ON, this indicates that
the automatic transmission P (Park) posi-
tion will not function and the transfer con-
trol shift lever is in the N (Neutral)
position.
orBrake warning light
This light functions for both the parking brake and
the foot brake systems.
When the ignition key is in the ON position, the
light comes on when the parking brake is applied,
and also warns of a low brake fluid level. If the
light comes on while the engine is running with
the parking brake not applied, stop the vehicle
and perform the following:
1. Check the brake fluid level. Add brake fluid
as necessary. See “Brake and clutch fluid” in
the “Maintenance and do-it-yourself” sec-
tion of this manual.
2-10Instruments and controls
ZREVIEW COPY:Ð2004 Truck/Frontier(d22)
Owners Manual(owners)ÐUSA English(nna)
11/24/03Ðtmchalpi
X