2004 NISSAN FRONTIER remove seats
[x] Cancel search: remove seatsPage 57 of 296

After the child restraint is removed and the seat
belt is fully retracted, the automatic locking mode
(child restraint mode) is canceled.
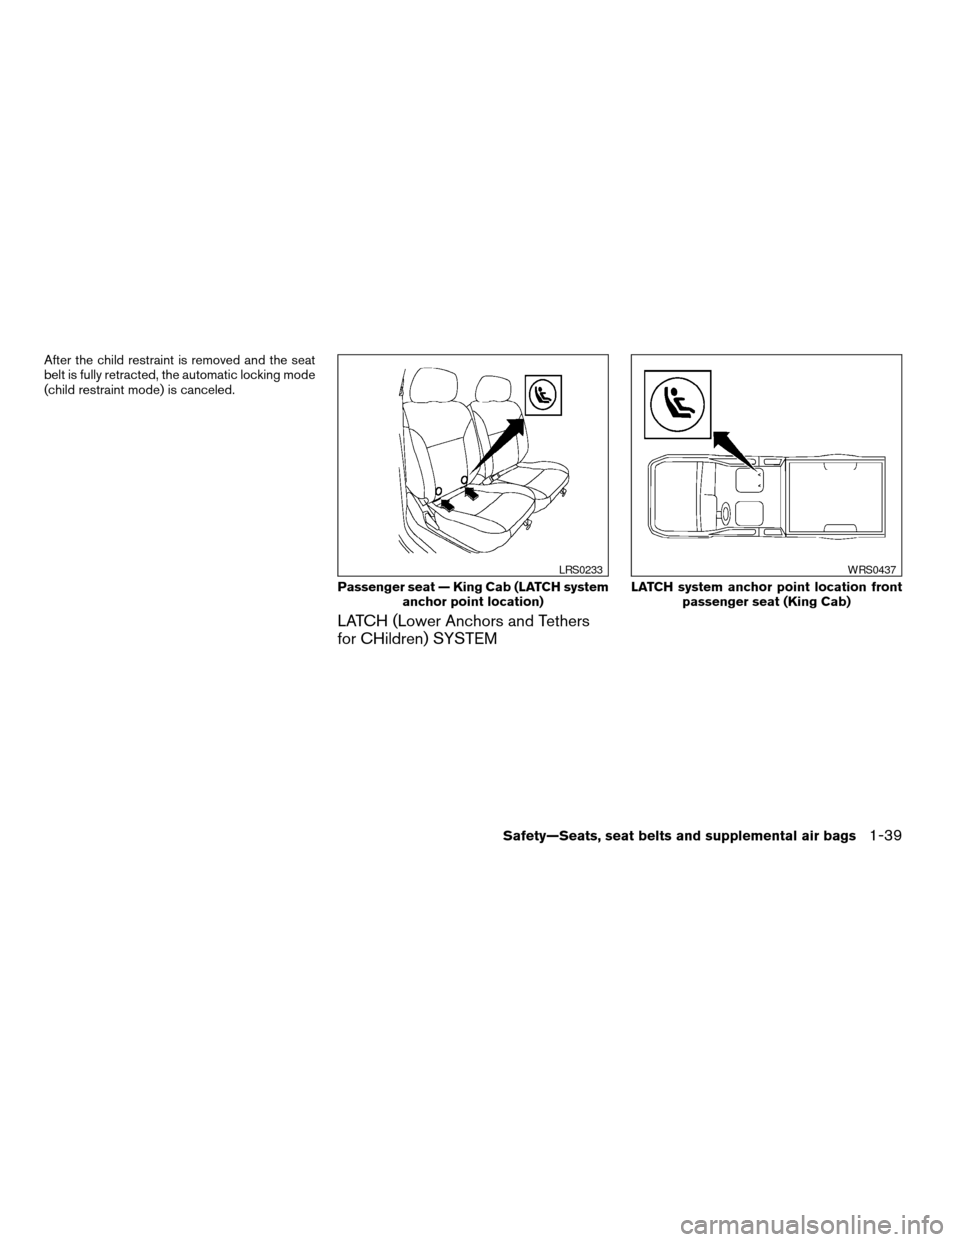
LATCH (Lower Anchors and Tethers
for CHildren) SYSTEM
Passenger seat — King Cab (LATCH system
anchor point location)
LRS0233
LATCH system anchor point location front
passenger seat (King Cab)
WRS0437
Safety—Seats, seat belts and supplemental air bags1-39
ZREVIEW COPY:Ð2004 Truck/Frontier(d22)
Owners Manual(owners)ÐUSA English(nna)
11/21/03Ðdebbie
X
Page 59 of 296

When you install a LATCH system compatible
child restraint to the lower anchor attachments,
follow these steps:
WARNING
Inspect the lower anchors by inserting
your fingers into the lower anchor area
and feeling to make sure there are no
obstructions over the LATCH system an-
chors, such as seat belt webbing or seat
cushion material. The child restraint will
not be secured properly if the LATCH sys-
tem anchors are obstructed.
1. To install the LATCH system compatible
child restraint, insert the child restraint
LATCH system anchor attachments into the
anchor points on the seat. If the child re-
straint is equipped with a top tether, see
“Top tether strap child restraint” later in this
section for installation instructions.
2. After attaching the child restraint and before
placing the child in it, use force to tilt the
child restraint from side to side and tug it
forward to make sure that the child restraint
is securely held in place. It should not move
more than 1 inch.
3. Check to make sure that the child restraint is
properly secured prior to each use.
TOP TETHER STRAP CHILD
RESTRAINT
If your child restraint has a top tether strap, it must
be secured to the provided anchor point. Secure
the child restraint with a seat belt. Secure the top
tether strap to the anchor bracket which provides
the straightest installation of the tether strap.
Tighten the strap according to the manufactur-
er’s instructions to remove any slack.
WARNING
Child restraint anchor points are designed
to withstand only those loads imposed by
correctly fitted child restraints. Under no
circumstances are they to be used for
adult seat belts or harnesses.
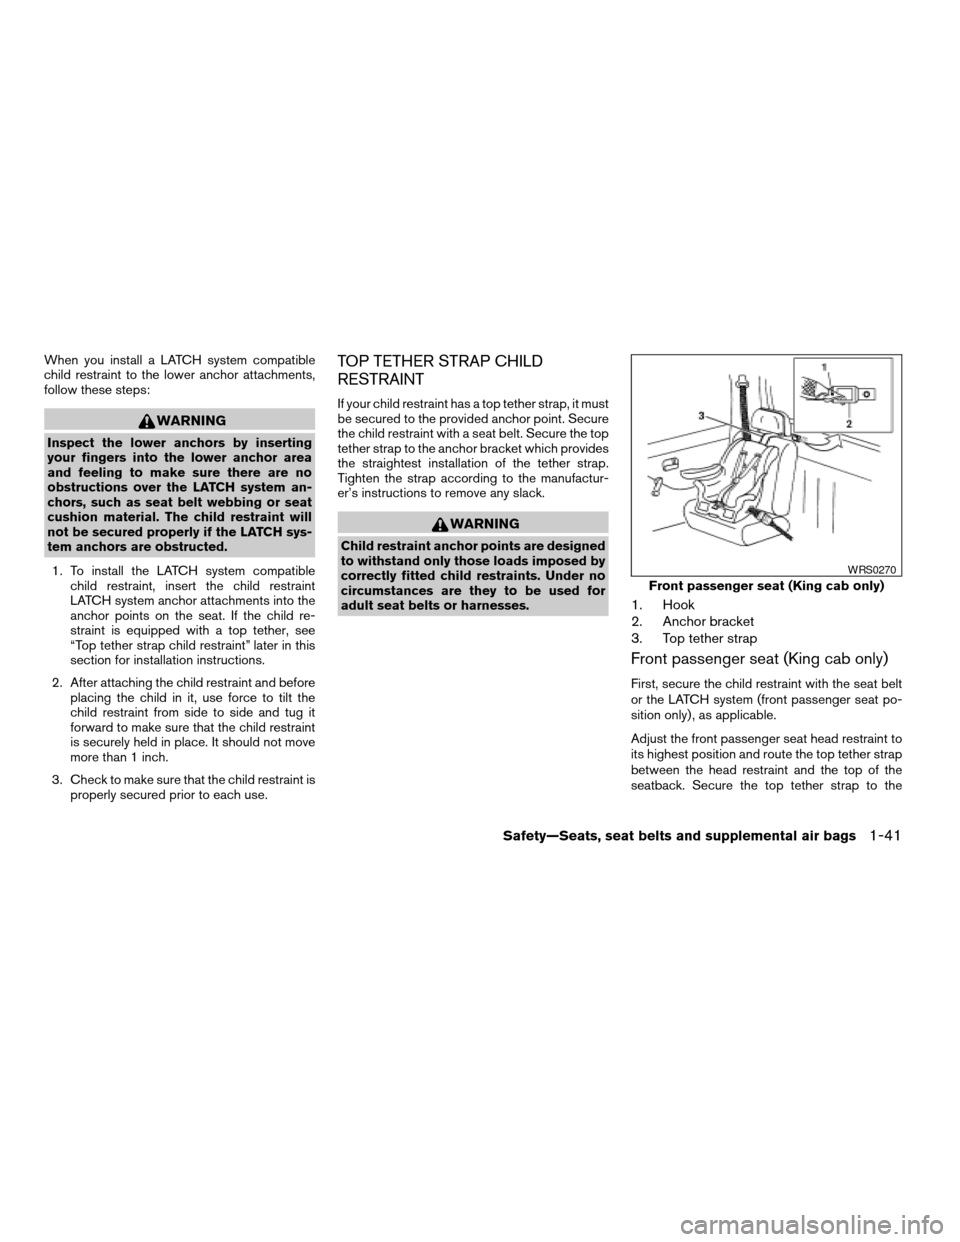
1. Hook
2. Anchor bracket
3. Top tether strap
Front passenger seat (King cab only)
First, secure the child restraint with the seat belt
or the LATCH system (front passenger seat po-
sition only) , as applicable.
Adjust the front passenger seat head restraint to
its highest position and route the top tether strap
between the head restraint and the top of the
seatback. Secure the top tether strap to the
Front passenger seat (King cab only)
WRS0270
Safety—Seats, seat belts and supplemental air bags1-41
ZREVIEW COPY:Ð2004 Truck/Frontier(d22)
Owners Manual(owners)ÐUSA English(nna)
11/21/03Ðdebbie
X
Page 60 of 296

anchor point which provides the straightest in-
stallation of the tether strap as shown later in this
section.
Tighten the tether strap according to the manu-
facturer’s instructions to remove any slack.
For best child restraint fit, see the child restraint
installation instructions in this section and the
child restraint manufacturer’s instructions.
1. Top tether strap
2. Hook
3. Anchor bracket
Rear bench seat (Crew cab only)
First, secure the child restraint with the seat belt
or the LATCH system (rear bench seat outboard
positions only) , as applicable.
Position the top tether strap over the head re-
straint and secure it to the tether anchor bracket
that provides the straightest installation.
Tighten the strap according to the manufactur-
er’s instructions to remove any slack.
Anchor point locations
Anchor points are located under the rear window.
King Cab vehicles will only have the outer anchor
point. Crew Cab vehicles will have all 3 anchor
points.
If you have any questions when installing a
top strap child restraint on the rear seat,
consult your NISSAN dealer for details.
WRS0441
Rear bench seat (Crew cab only)King Cab
WRS0223
1-42Safety—Seats, seat belts and supplemental air bags
ZREVIEW COPY:Ð2004 Truck/Frontier(d22)
Owners Manual(owners)ÐUSA English(nna)
12/02/03Ðmarlene
X
Page 63 of 296

2. Route the seat belt tongue through the child
restraint and insert it into the buckle until you
hear and feel the latch engage.
Be sure to follow the child restraint manu-
facturer’s instructions for belt routing.3. Pull on the shoulder belt until all of the belt is
fully extended. At this time, the seat belt
retractor is in the automatic locking mode
(child restraint mode) . It reverts to emer-
gency locking mode when the seat belt is
fully retracted.4. Allow the seat belt to retract slightly. Pull up
on the shoulder belt to remove any slack in
the belt.
If necessary to ensure the child restraint is
secure, pull the shoulder belt through the
seat belt tongue beyond the stitching in the
belt.
After the seat belt is fully retracted and the child
restraint is removed from the seat, the stitching
on the shoulder belt can be pulled back through
the seat belt tongue. The stitching locates the
seat belt tongue near the top of the seat back for
easy access for passengers.
Front Facing — step 2
WRS0159
Front Facing — step 3
WRS0160
Front Facing — step 4
WRS0161
Safety—Seats, seat belts and supplemental air bags1-45
ZREVIEW COPY:Ð2004 Truck/Frontier(d22)
Owners Manual(owners)ÐUSA English(nna)
11/21/03Ðdebbie
X
Page 64 of 296

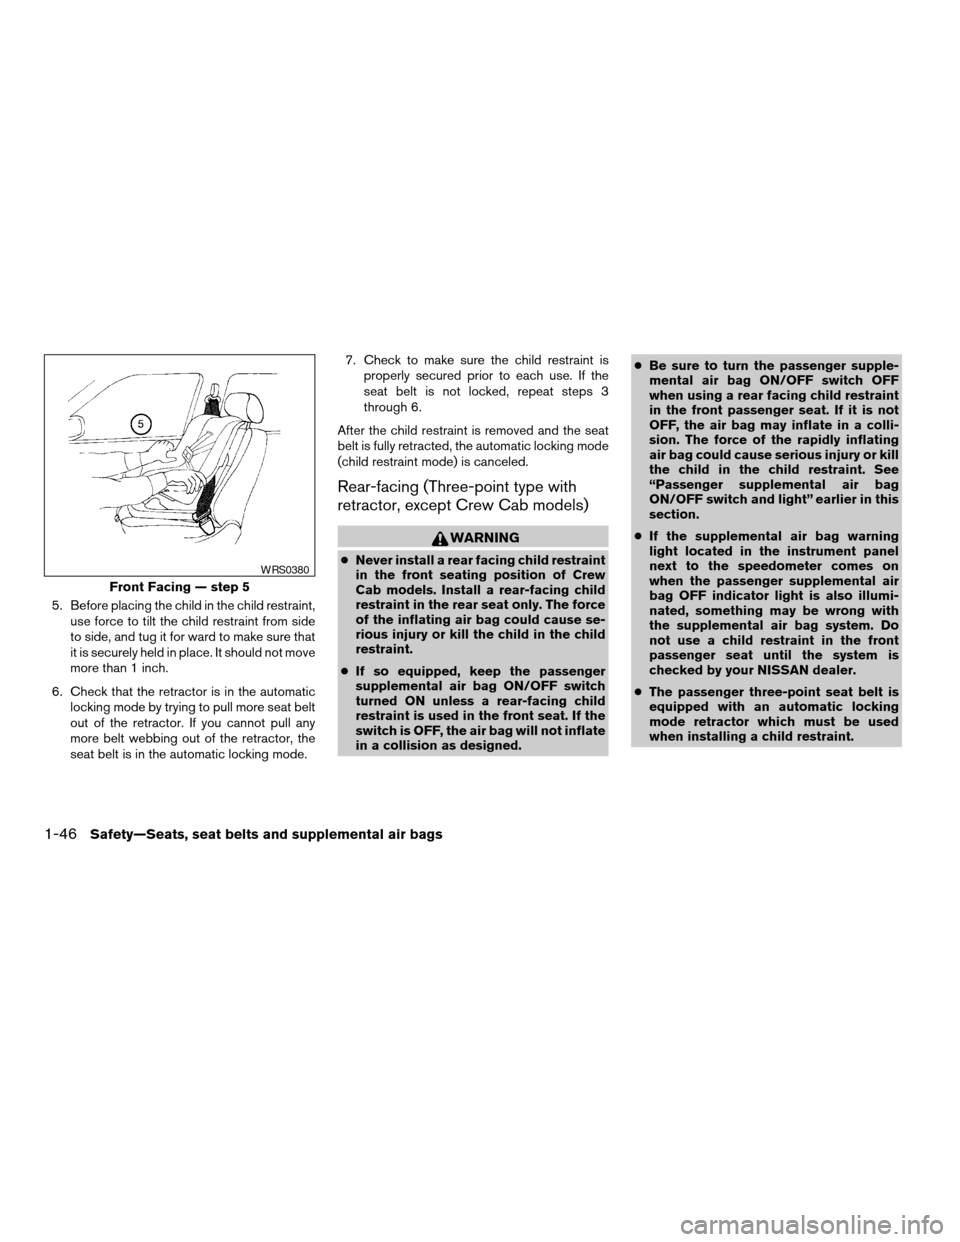
5. Before placing the child in the child restraint,
use force to tilt the child restraint from side
to side, and tug it for ward to make sure that
it is securely held in place. It should not move
more than 1 inch.
6. Check that the retractor is in the automatic
locking mode by trying to pull more seat belt
out of the retractor. If you cannot pull any
more belt webbing out of the retractor, the
seat belt is in the automatic locking mode.7. Check to make sure the child restraint is
properly secured prior to each use. If the
seat belt is not locked, repeat steps 3
through 6.
After the child restraint is removed and the seat
belt is fully retracted, the automatic locking mode
(child restraint mode) is canceled.
Rear-facing (Three-point type with
retractor, except Crew Cab models)
WARNING
cNever install a rear facing child restraint
in the front seating position of Crew
Cab models. Install a rear-facing child
restraint in the rear seat only. The force
of the inflating air bag could cause se-
rious injury or kill the child in the child
restraint.
cIf so equipped, keep the passenger
supplemental air bag ON/OFF switch
turned ON unless a rear-facing child
restraint is used in the front seat. If the
switch is OFF, the air bag will not inflate
in a collision as designed.cBe sure to turn the passenger supple-
mental air bag ON/OFF switch OFF
when using a rear facing child restraint
in the front passenger seat. If it is not
OFF, the air bag may inflate in a colli-
sion. The force of the rapidly inflating
air bag could cause serious injury or kill
the child in the child restraint. See
“Passenger supplemental air bag
ON/OFF switch and light” earlier in this
section.
cIf the supplemental air bag warning
light located in the instrument panel
next to the speedometer comes on
when the passenger supplemental air
bag OFF indicator light is also illumi-
nated, something may be wrong with
the supplemental air bag system. Do
not use a child restraint in the front
passenger seat until the system is
checked by your NISSAN dealer.
cThe passenger three-point seat belt is
equipped with an automatic locking
mode retractor which must be used
when installing a child restraint.
Front Facing — step 5
WRS0380
1-46Safety—Seats, seat belts and supplemental air bags
ZREVIEW COPY:Ð2004 Truck/Frontier(d22)
Owners Manual(owners)ÐUSA English(nna)
11/21/03Ðdebbie
X
Page 66 of 296

3. Pull on the shoulder belt until all of the belt is
fully extended. At this time, the seat belt
retractor is in the automatic locking mode
(child restraint mode) . It reverts to emer-
gency locking mode when the seat belt is
fully retracted.4. Allow the belt to retract. Pull up on the belt to
remove any slack in the belt.5. Before placing the child in the child restraint,
use force to tilt the child restraint from side
to side, and tug it forward to make sure that
it is securely held in place. It should not move
more than 1 inch.
6. Ensure the retractor is in the automatic lock-
ing mode by trying to pull more seat belt out
of the retractor. If you cannot pull any more
belt webbing out of the retractor, the retrac-
tor is in the automatic locking mode.
Rear Facing — step 3
WRS0260
Rear Facing — step 4
WRS0253
Rear Facing — step 5
WRS0254
1-48Safety—Seats, seat belts and supplemental air bags
ZREVIEW COPY:Ð2004 Truck/Frontier(d22)
Owners Manual(owners)ÐUSA English(nna)
11/21/03Ðdebbie
X
Page 67 of 296

7. Check to make sure the child restraint is
properly secured prior to each use. If the lap
belt is not locked, repeat steps 3 through 6.
After the child restraint is removed and the seat
belt is fully retracted the automatic locking mode
(child restraint mode) is canceled.
Safety—Seats, seat belts and supplemental air bags1-49
ZREVIEW COPY:Ð2004 Truck/Frontier(d22)
Owners Manual(owners)ÐUSA English(nna)
11/21/03Ðdebbie
X
Page 81 of 296

turned to the OFF position, the passenger
supplemental air bag is disabled and will not
inflate in a frontal collision. The passenger
supplemental air bag OFF indicator light on the
instrument panel illuminates when the passenger
supplemental air bag ON/OFF switch is turned to
the OFF position. The driver’s side supplemental
air bag always remains enabled and is not af-
fected by the passenger supplemental air bag
ON/OFF switch. The key for the passenger
supplemental air bag ON/OFF switch should not
be left in the switch. Remove the key after turning
the switch in the desired position. Do not leave a
key in the switch. See “Passenger supplemental
air bag ON/OFF switch and light” in the “Seats,
restraints and supplemental air bag systems”
section for details.
Seat belt warning light and
chime
The light and chime remind you to fasten your
seat belts. The light illuminates whenever the
ignition key is turned to the ON or START position
and remains illuminated until the driver’s seat belt
is fastened. At the same time, the chime sounds
for about 7 seconds unless the driver’s seat belt
is securely fastened.
Refer to “Seat belts” in the “Safety—Seats, seat
belts and supplemental air bags” section for pre-
cautions on seat belt usage.
Supplemental air bag warning
light
When the ignition key is in the ON or START
position, the supplemental air bag warning light
illuminates for about 7 seconds and then turns
off. This means the system is operational.
If any of the following conditions occur, the
supplemental air bag and pre-tensioner seat belt
systems need servicing and your vehicle must be
taken to a NISSAN dealer:
cThe supplemental air bag warning light re-
mains on after approximately 7 seconds.
cThe supplemental air bag warning light
flashes intermittently.
cThe supplemental air bag warning light does
not come on at all.
Unless checked and repaired, the supplemental
restraint system (air bag system) and/or the pre-
tensioner seat belts may not function properly.
For additional details see “Supplemental restraint
system” in the “Seats, restraints and supplemen-
tal air bag systems” section of this manual.
WARNING
If the supplemental air bag warning light
is on, it could mean that the supplemental
front air bag or pre-tensioner seat belt
systems will not operate in an accident.
INDICATOR LIGHTS
Cruise main switch indicator
light (if so equipped)
The light comes on when the cruise control main
switch is pushed. The light goes out when the
main switch is pushed again. When the cruise
main switch indicator light comes on, the cruise
control system is operational.
Cruise set switch indicator
light (if so equipped)
The light comes on while the vehicle speed is
controlled by the cruise control system. If the light
blinks while the engine is running, it may indicate
the cruise control system is not functioning prop-
erly. Have the system checked by a NISSAN
dealer.
4–wheel drive indicator light
(if so equipped)
This light comes on when the transfer shift con-
trol lever is in the 4H or 4L position.
Instruments and controls2-13
ZREVIEW COPY:Ð2004 Truck/Frontier(d22)
Owners Manual(owners)ÐUSA English(nna)
11/21/03Ðdebbie
X