2004 NISSAN ARMADA child restraint
[x] Cancel search: child restraintPage 78 of 344
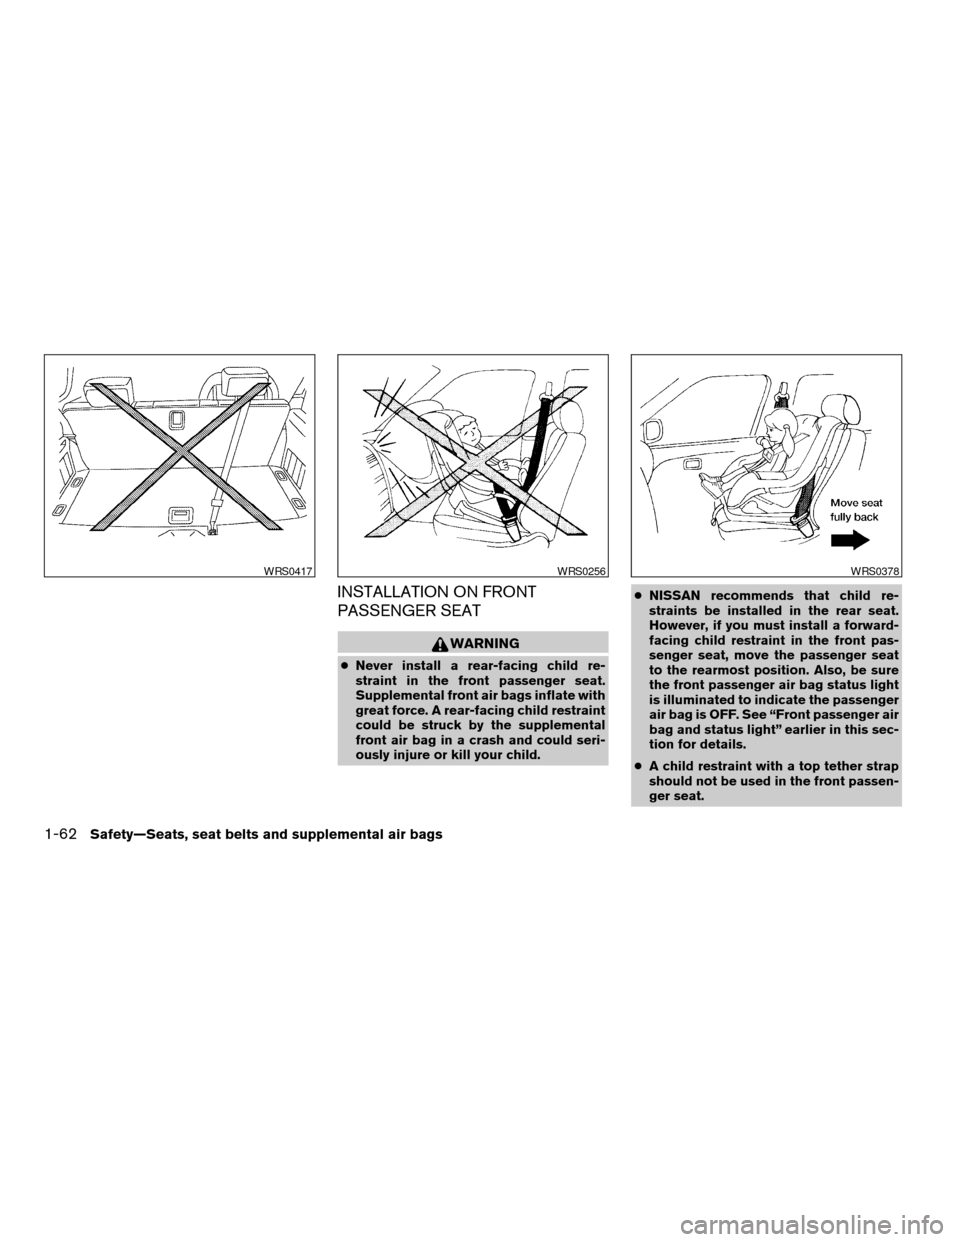
INSTALLATION ON FRONT
PASSENGER SEAT
WARNING
cNever install a rear-facing child re-
straint in the front passenger seat.
Supplemental front air bags inflate with
great force. A rear-facing child restraint
could be struck by the supplemental
front air bag in a crash and could seri-
ously injure or kill your child.cNISSAN recommends that child re-
straints be installed in the rear seat.
However, if you must install a forward-
facing child restraint in the front pas-
senger seat, move the passenger seat
to the rearmost position. Also, be sure
the front passenger air bag status light
is illuminated to indicate the passenger
air bag is OFF. See “Front passenger air
bag and status light” earlier in this sec-
tion for details.
cA child restraint with a top tether strap
should not be used in the front passen-
ger seat.
WRS0417WRS0256WRS0378
1-62Safety—Seats, seat belts and supplemental air bags
ZREVIEW COPY:Ð2004 Pathfinder Armada
(wzw)
Owners Manual(owners)ÐUSA English(nna)
01/14/04Ðtbrooks
X
Page 79 of 344
cThe three-point seat belt in your vehicle
is equipped with an automatic locking
mode retractor which must be used
when installing a child restraint.
cFailure to use the retractor’s locking
mode will result in the child restraint
not being properly secured. The re-
straint could tip over or otherwise be
unsecured and cause injury to the child
in a sudden stop or collision. Also, it can
change the operation of the front pas-
senger air bag. See “Front passenger
air bag and status light” earlier in this
section.
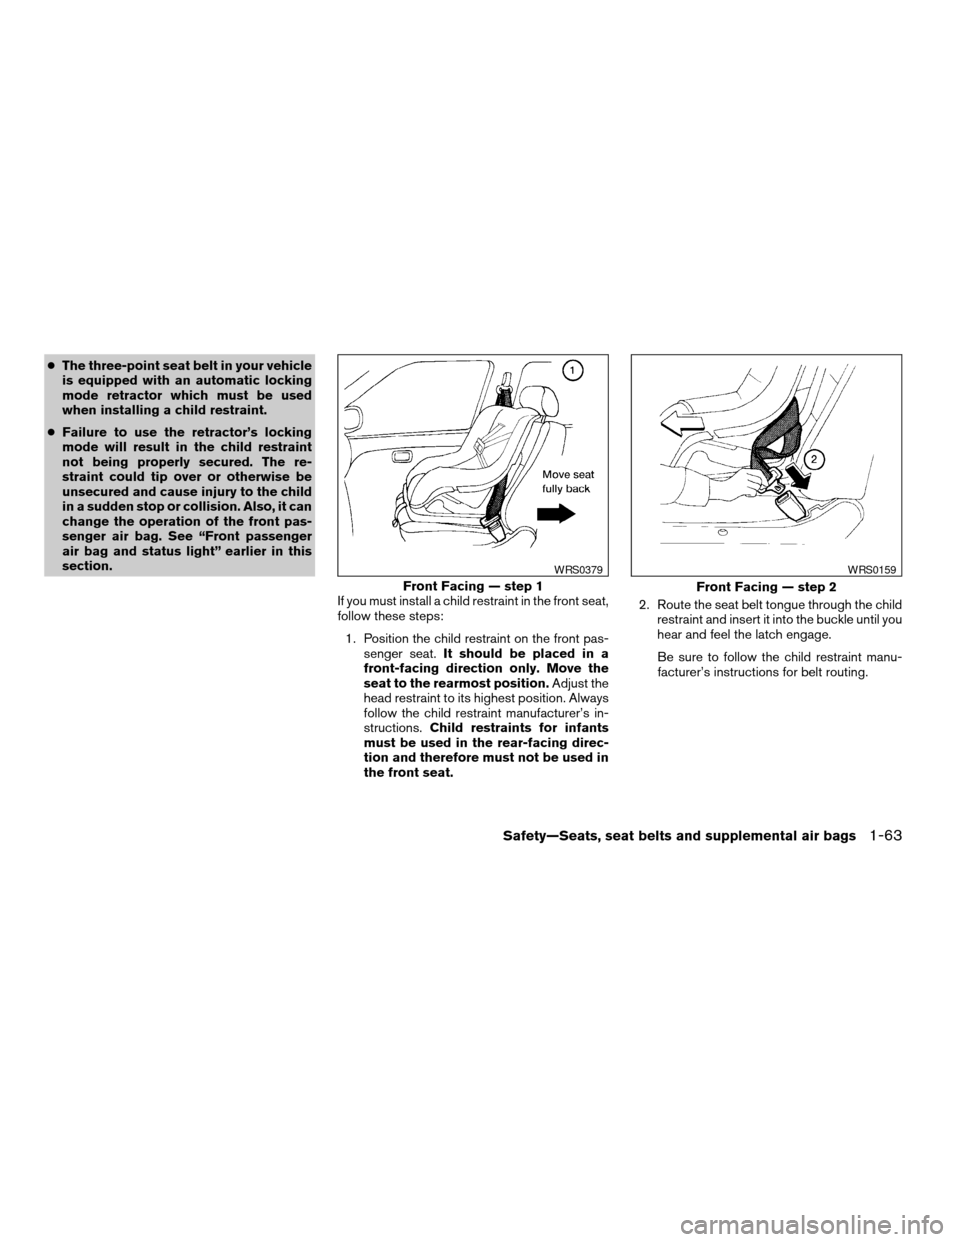
If you must install a child restraint in the front seat,
follow these steps:
1. Position the child restraint on the front pas-
senger seat.It should be placed in a
front-facing direction only. Move the
seat to the rearmost position.Adjust the
head restraint to its highest position. Always
follow the child restraint manufacturer’s in-
structions.Child restraints for infants
must be used in the rear-facing direc-
tion and therefore must not be used in
the front seat.2. Route the seat belt tongue through the child
restraint and insert it into the buckle until you
hear and feel the latch engage.
Be sure to follow the child restraint manu-
facturer’s instructions for belt routing.
Front Facing — step 1
WRS0379
Front Facing — step 2
WRS0159
Safety—Seats, seat belts and supplemental air bags1-63
ZREVIEW COPY:Ð2004 Pathfinder Armada
(wzw)
Owners Manual(owners)ÐUSA English(nna)
01/14/04Ðtbrooks
X
Page 80 of 344

3. Pull on the shoulder belt until all of the belt is
fully extended. At this time, the seat belt
retractor is in the automatic locking mode
(child restraint mode) . It reverts to emer-
gency locking mode when the seat belt is
fully retracted.4. Allow the seat belt to retract slightly. Pull up
on the shoulder belt to remove any slack in
the belt.5. Before placing the child in the child restraint,
use force to tilt the child restraint from side
to side, and tug it forward to make sure that
it is securely held in place. It should not move
more than 1 inch.
6. Check that the retractor is in the automatic
locking mode by trying to pull more seat belt
out of the retractor. If you cannot pull any
more belt webbing out of the retractor, the
retractor is in the automatic locking mode.
Front Facing — step 3
WRS0160
Front Facing — step 4
WRS0161
Front Facing — step 5
WRS0380
1-64Safety—Seats, seat belts and supplemental air bags
ZREVIEW COPY:Ð2004 Pathfinder Armada
(wzw)
Owners Manual(owners)ÐUSA English(nna)
01/14/04Ðtbrooks
X
Page 81 of 344

7. Check to make sure the child restraint is
properly secured prior to each use. If the
seat belt is not locked, repeat steps 3
through 6.
8. Turn the ignition to the ON position. The
passenger air bag status light should say
“OFF”
or. If this light is not illu-
minated it may indicate a malfunction.Move
the child restraint to another seating
position.Have the system checked by a
NISSAN dealer.
After the child restraint is removed and the seat
belt is fully retracted, the automatic locking mode
(child restraint mode) is canceled.
Safety—Seats, seat belts and supplemental air bags1-65
ZREVIEW COPY:Ð2004 Pathfinder Armada
(wzw)
Owners Manual(owners)ÐUSA English(nna)
01/14/04Ðtbrooks
X
Page 132 of 344
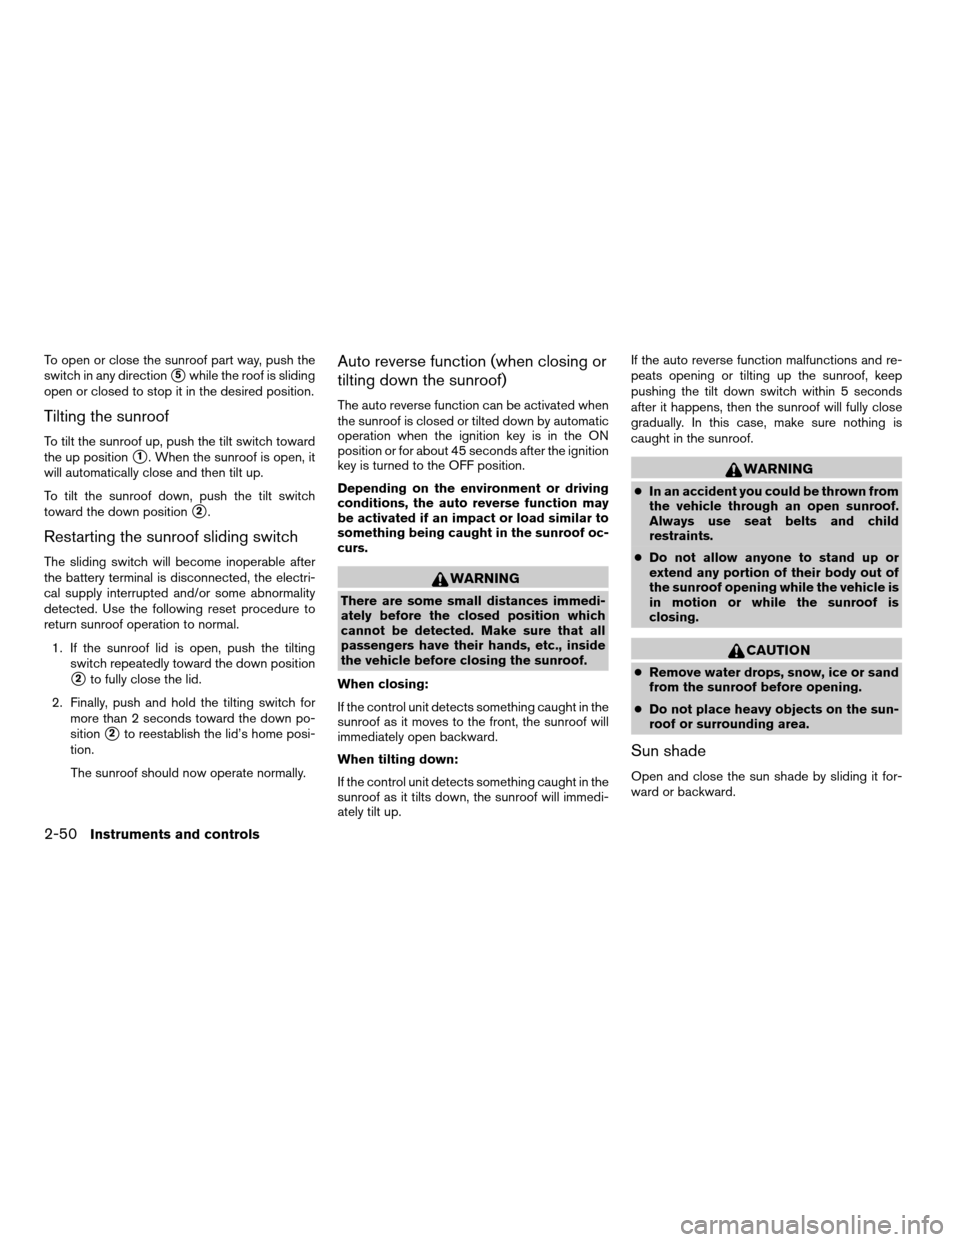
To open or close the sunroof part way, push the
switch in any direction
s5while the roof is sliding
open or closed to stop it in the desired position.
Tilting the sunroof
To tilt the sunroof up, push the tilt switch toward
the up position
s1. When the sunroof is open, it
will automatically close and then tilt up.
To tilt the sunroof down, push the tilt switch
toward the down position
s2.
Restarting the sunroof sliding switch
The sliding switch will become inoperable after
the battery terminal is disconnected, the electri-
cal supply interrupted and/or some abnormality
detected. Use the following reset procedure to
return sunroof operation to normal.
1. If the sunroof lid is open, push the tilting
switch repeatedly toward the down position
s2to fully close the lid.
2. Finally, push and hold the tilting switch for
more than 2 seconds toward the down po-
sition
s2to reestablish the lid’s home posi-
tion.
The sunroof should now operate normally.
Auto reverse function (when closing or
tilting down the sunroof)
The auto reverse function can be activated when
the sunroof is closed or tilted down by automatic
operation when the ignition key is in the ON
position or for about 45 seconds after the ignition
key is turned to the OFF position.
Depending on the environment or driving
conditions, the auto reverse function may
be activated if an impact or load similar to
something being caught in the sunroof oc-
curs.
WARNING
There are some small distances immedi-
ately before the closed position which
cannot be detected. Make sure that all
passengers have their hands, etc., inside
the vehicle before closing the sunroof.
When closing:
If the control unit detects something caught in the
sunroof as it moves to the front, the sunroof will
immediately open backward.
When tilting down:
If the control unit detects something caught in the
sunroof as it tilts down, the sunroof will immedi-
ately tilt up.If the auto reverse function malfunctions and re-
peats opening or tilting up the sunroof, keep
pushing the tilt down switch within 5 seconds
after it happens, then the sunroof will fully close
gradually. In this case, make sure nothing is
caught in the sunroof.
WARNING
cIn an accident you could be thrown from
the vehicle through an open sunroof.
Always use seat belts and child
restraints.
cDo not allow anyone to stand up or
extend any portion of their body out of
the sunroof opening while the vehicle is
in motion or while the sunroof is
closing.
CAUTION
cRemove water drops, snow, ice or sand
from the sunroof before opening.
cDo not place heavy objects on the sun-
roof or surrounding area.
Sun shade
Open and close the sun shade by sliding it for-
ward or backward.
2-50Instruments and controls
ZREVIEW COPY:Ð2004 Pathfinder Armada
(wzw)
Owners Manual(owners)ÐUSA English(nna)
01/14/04Ðtbrooks
X
Page 332 of 344

Check engine indicator light
(See malfunction indicator lamp).......2-17
Child restraint with top tether strap......1-59
Child restraints.......1-34, 1-35, 1-41, 1-57
Precautions on child restraints.......1-41
Top tether strap anchor point locations . .1-59
Child safety rear door lock............3-5
Chimes, audible reminders...........2-19
Cigarette lighter.................2-33
Cleaning exterior and interior..........7-2
Clock...................4-28, 4-33
(models with navigation system)......4-9
Cold weather driving..............5-28
Compact disc (CD) player...........4-30
Compass display.................2-8
Console box...............2-34, 2-41
Control panel buttons..............4-2
Controls
Audio controls (steering wheel)......4-38
Heater and air conditioner
controls................4-12, 4-21
Rear audio controls.............4-40
Rear seat air conditioner..........4-23
Coolant
Capacities and recommended
fuel/lubricants.................9-2
Changing engine coolant..........8-8
Checking engine coolant level........8-7
Engine coolant temperature gauge.....2-5
Corrosion protection...............7-5
Cruise control..................5-14
Cup holders...................2-38
Curtain side-impact and rollover air bag . . .1-27D
Daytime running light system
(Canada only)..................2-27
Defroster switch
Rear window and outside mirror defroster
switch....................2-24
Digital video disc DVD.............4-41
Dimensions and weights.............9-8
Door locks....................3-3
Door open warning light............2-14
Drive belts....................8-14
Drive positioner, Automatic...........3-20
Driving
Cold weather driving............5-28
Driving with automatic transmission.....5-9
Precautions when starting and driving . . .5-2
E
Economy - fuel.................5-16
Emission control information label.......9-10
Emission control system warranty.......9-25
Engine
Before starting the engine..........5-8
Capacities and recommended
fuel/lubricants.................9-2
Changing engine coolant..........8-8
Changing engine oil.............8-9
Changing engine oil filter..........8-10
Checking engine coolant level........8-7
Checking engine oil level..........8-8
Engine compartment check locations. . . .8-7
Engine coolant temperature gauge.....2-5Engine cooling system............8-7
Engine oil...................8-8
Engine oil and oil filter recommendation . .9-4
Engine oil viscosity..............9-5
Engine serial number............9-10
Engine specifications.............9-7
Starting the engine..............5-9
Engine oil pressure gauge............2-6
Exhaust gas (Carbon monoxide)........5-2
Eyeglass case..................2-36
F
Flashers
(See hazard warning flasher switch)......2-28
Flat tire......................6-2
Floor mat positioning aid.............7-4
Fluid
Brake fluid..................8-11
Capacities and recommended
fuel/lubricants.................9-2
Engine coolant................8-7
Engine oil...................8-8
Power steering fluid.............8-11
Window washer fluid............8-12
F.M.V.S.S. certification label..........9-10
Fog light switch.................2-28
Front air bag system
(See supplemental restraint system).....1-22
Front seats....................1-2
Fuel
Capacities and recommended
fuel/lubricants.................9-2
Fuel economy................5-16
Fuel filler cap................3-15
10-2
ZREVIEW COPY:Ð2004 Pathfinder Armada
(wzw)
Owners Manual(owners)ÐUSA English(nna)
01/21/04Ðtbrooks
X
Page 333 of 344
Fuel filler lid.................3-15
Fuel filler lid and cap............3-15
Fuel gauge..................2-6
Fuel octane rating..............9-3
Fuel recommendation............9-3
Fuses......................8-22
Fusible links...................8-23
G
Garage door opener, HomeLinkTUniversal
Transceiver...................2-53
Gascap.....................3-15
Gauge
Automatic transmission fluid temperature
gauge.....................2-7
Engine coolant temperature gauge.....2-5
Engine oil pressure gauge..........2-6
Fuel gauge..................2-6
Odometer...................2-4
Speedometer.................2-4
Tachometer..................2-5
Trip odometer.................2-4
Voltmeter...................2-7
General maintenance..............8-2
Glass hatch...................3-15
Glove box....................2-36
H
Hazard warning flasher switch.........2-28
Head restraints..................1-8
Headlight and turn signal switch........2-25Headphones (See NISSAN mobile
entertainment system).............4-44
Heated seats..................2-29
Heater
Heater and air conditioner
controls................4-12, 4-21
Heater operation...........4-13, 4-22
Rear seat air conditioner..........4-23
HomeLinkTUniversal Transceiver.......2-53
Hood release..................3-10
Hook
Luggage hook................2-42
Horn.......................2-29
I
Ignition switch..................5-7
Immobilizer system..........2-21, 3-2, 5-8
Important vehicle information label.......9-10
In-cabin microfilter...............8-16
Increasing fuel economy............5-16
Indicator lights and audible reminders
(See warning/indicator lights and audible
reminders)....................2-12
Inside automatic anti-glare mirror.......3-18
Instrument brightness control.........2-27
Instrument panel.................2-2
Interior light...................2-51
ISOFIX child restraints.............1-57
J
Jump starting...................6-7K
Key ........................3-2
Keyless entry system
(See remote keyless entry system).......3-5
L
Labels
Air conditioner specification label.....9-11
Emission control information label.....9-10
Engine serial number............9-10
F.M.V.S.S. certification label........9-10
Vehicle identification number (VIN) plate . .9-9
Warning labels (for SRS)..........1-30
LATCH (Lower Anchors and Tethers for CHildren)
System......................1-57
License plate
Installing the license plate.........9-11
Light
Air bag warning light.........1-30, 2-16
Brake light (See stop light).........8-26
Bulb check/instrument panel........2-12
Bulb replacement..............8-26
Charge warning light............2-14
Fog light switch...............2-28
Headlight and turn signal switch......2-25
Interior light.................2-51
Light bulbs..................8-25
Low tire pressure warning light......2-15
Low washer fluid warning light.......2-16
Passenger air bag and status light .1-24, 2-18
Personal lights...............2-52
Security indicator light........1-24, 2-18
10-3
ZREVIEW COPY:Ð2004 Pathfinder Armada
(wzw)
Owners Manual(owners)ÐUSA English(nna)
01/21/04Ðtbrooks
X
Page 334 of 344
Warning/indicator lights and audible
reminders..................2-12
Lights
Map lights..................2-53
Lock
Back door release.............3-14
Child safety rear door lock..........3-5
Door locks..................3-3
Power door locks...............3-4
Low fuel warning light.............2-15
Low tire pressure warning light........2-15
Low tire pressure warning system........5-3
Low washer fluid warning light.........2-16
Luggage hook..................2-42
Luggage rack (see roof rack).........2-45
Luggage (See vehicle loading information) . .9-12
Luggage storage
(see vehicle loading information)........2-42
M
Maintenance
General maintenance............8-2
Inside the vehicle...............8-3
Maintenance precautions..........8-5
Outside the vehicle..............8-2
Seat belt maintenance...........1-41
Under the hood and vehicle.........8-4
Malfunction indicator lamp (MIL)........2-17
Manual front seat adjustment..........1-2
Manual vent windows..............2-49
Map lights....................2-53
Map pocket...................2-37
Meters and gauges................2-3
Instrument brightness control.......2-27Mirror
Automatic anti-glare inside mirror.....3-18
Outside mirror control...........3-19
Outside mirrors...............3-19
Vanity mirror.................3-18
N
NISSAN mobile entertainment system
(MES)......................4-41
Nissan vehicle immobilizer system
(NVIS).................2-21, 3-2, 5-8
O
Octane rating (See fuel octane rating).....9-3
Odometer.....................2-4
Oil
Capacities and recommended
fuel/lubricants.................9-2
Changing engine oil.............8-9
Changing engine oil filter..........8-10
Checking engine oil level..........8-8
Engine oil...................8-8
Engine oil and oil filter recommendation . .9-4
Engine oil viscosity..............9-5
Outside mirror control.............3-19
Outside mirrors.................3-19
Overheat
If your vehicle overheats...........6-9
Owner’s manual order form..........9-27
Owner’s manual/service manual order
information....................9-27P
Parking
Parking brake check............8-21
Parking brake operation..........5-14
Parking/parking on hills...........5-23
Pedal position adjustment...........3-17
Personal lights.................2-52
Power
Power door locks...............3-4
Power outlet.................2-32
Power rear windows............2-47
Power steering fluid.............8-11
Power steering system...........5-24
Power vent windows............2-48
Power windows...............2-46
Rear power windows............2-47
Precautions
Maintenance precautions..........8-5
On-pavement and off-road driving
precautions..................5-3
Precautions on child restraints.......1-41
Precautions on seat belt usage......1-32
Precautions on supplemental restraint
system....................1-14
Precautions when starting and driving . . .5-2
Pre-tensioner seat belt system.........1-28
Push starting...................6-9
R
Radio
Car phone or CB radio...........4-50
Compact Disc (CD) changer.......4-35
10-4
ZREVIEW COPY:Ð2004 Pathfinder Armada
(wzw)
Owners Manual(owners)ÐUSA English(nna)
01/21/04Ðtbrooks
X