2004 NISSAN ARMADA remote control
[x] Cancel search: remote controlPage 157 of 344

For information on HomeLinkTUniversal Trans-
ceiver operation, see the “HomeLinkTUniversal
Transceiver” in the “Instrument and controls” sec-
tion of this manual.
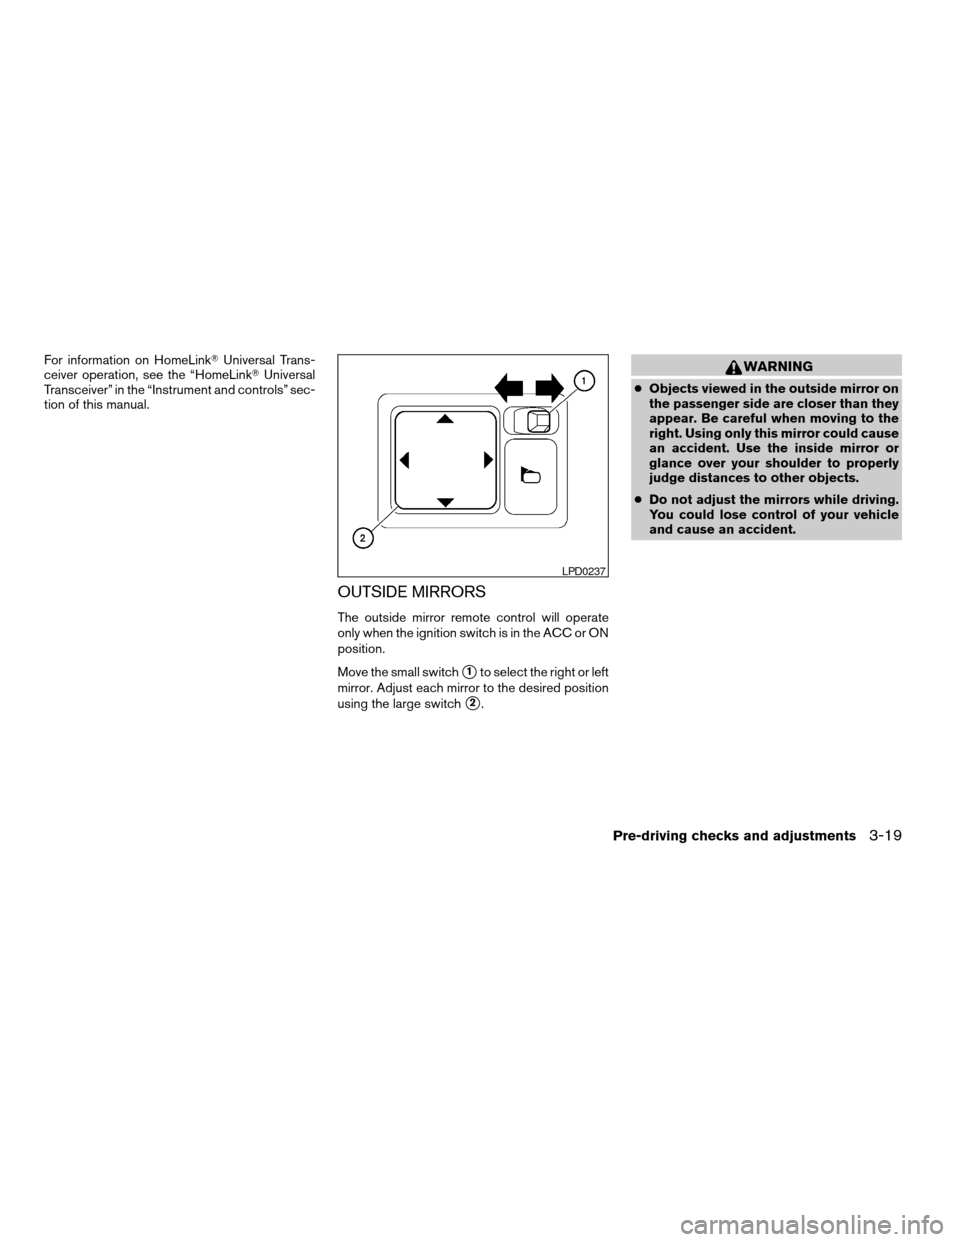
OUTSIDE MIRRORS
The outside mirror remote control will operate
only when the ignition switch is in the ACC or ON
position.
Move the small switch
s1to select the right or left
mirror. Adjust each mirror to the desired position
using the large switch
s2.
WARNING
cObjects viewed in the outside mirror on
the passenger side are closer than they
appear. Be careful when moving to the
right. Using only this mirror could cause
an accident. Use the inside mirror or
glance over your shoulder to properly
judge distances to other objects.
cDo not adjust the mirrors while driving.
You could lose control of your vehicle
and cause an accident.
LPD0237
Pre-driving checks and adjustments3-19
ZREVIEW COPY:Ð2004 Pathfinder Armada
(wzw)
Owners Manual(owners)ÐUSA English(nna)
01/14/04Ðtbrooks
X
Page 161 of 344

4 Display screen, heater, air conditioner
and audio systems
Control panel buttons (if so equipped)...............4-2
Names of the components.......................4-3
How to use joystick and “ENTER” button..........4-3
How to use “PREV” button......................4-3
Setting up the start-up screen...................4-3
How to use the “TRIP” button....................4-4
How to use the “SETTING” button................4-6
button..................................4-11
Ventilators.......................................4-11
Heater and air conditioner (manual).................4-12
Controls......................................4-12
Heater operation..............................4-13
Air conditioner operation.......................4-15
Air flow charts.................................4-16
Heater and air conditioner (automatic)
(if so equipped)..................................4-21
Automatic operation...........................4-21
Manual operation..............................4-22
Rear control button............................4-23
Operating tips.................................4-23
Rear seat air conditioner..........................4-23
Controls......................................4-24
Servicing air conditioner...........................4-24Audio system....................................4-24
Radio........................................4-24
FM radio reception............................4-25
AM radio reception............................4-25
Satellite radio reception (if so equipped).........4-25
Audio operation precautions....................4-26
FM-AM radio with compact disc (CD) player
(if so equipped)...............................4-27
FM-AM-SAT radio with compact disc
changer (Type A and B) (if so equipped).........4-32
CD care and cleaning..........................4-38
Steering wheel switch for audio control
(if so equipped)...............................4-38
Rear audio controls (if so equipped).............4-40
Antenna......................................4-41
NISSAN mobile entertainment system (MES)
(if so equipped)..................................4-41
Digital video disc (DVD) player controls..........4-42
Remote control................................4-43
Flip-down screen..............................4-43
Playing a digital video disc (DVD)...............4-45
Care and maintenance.........................4-48
How to handle the DVD........................4-49
Car phone or CB radio............................4-50
ZREVIEW COPY:Ð2004 Pathfinder Armada
(wzw)
Owners Manual(owners)ÐUSA English(nna)
01/14/04Ðtbrooks
X
Page 168 of 344

Adjust driver seat when exiting vehicle:
With this option ON, the driver’s seat automati-
cally moves back and returns to the original po-
sition for ease of exit and entry.
Remote unlock driver’s door first:
This option allows you to select which doors will
unlock first during an unlocking operation:
Only the driver’s doorÃ!All the doors
Keyless remote response — horn:
This key allows you to change the horn chirp
mode that occurs when pressing the LOCK or
UNLOCK button on the keyfob.
NOTE:
If you change the horn beep or the lamp
flash feature with the keyfob, the mode will
not be changed with the display. Use the
keyfob to return to the previous mode and
re-enable the display control.
Keyless remote response — lights:
This key allows you to change the hazard indica-
tor flash mode that occurs when pressing the
LOCK or UNLOCK button on the keyfob.NOTE:
If you change the horn beep or the lamp
flash feature with the keyfob, the mode will
not be changed with the display. Use the
keyfob to return to the previous mode and
re-enable the display control.
Auto re-lock time:
This key allows you to set the length of time
before doors auto re-lock.
Sensitivity of automatic headlights:
This key allows you to set the sensitivity of the
automatic headlights:
cLower- less sensitive, automatic headlights
will take longer to come on when the head-
light sensor senses less ambient light.
cHigher- more sensitive, automatic head-
lights will come on quicker when the head-
light sensor senses less ambient light.
Automatic headlights off delay:
This key allows you to set the length of time
before the automatic headlights turn off after
exiting the vehicle.Speed dependent wiper:
This key allows you to turn on or turn off the
driving speed dependent intermittent wiper func-
tion.
Return all settings to default:
When this key is selected and turned on using
the“ENTER”button, all settings made by VE-
HICLE ELECTRONICS will return to the default
settings.
4-8Display screen, heater, air conditioner and audio systems
ZREVIEW COPY:Ð2004 Pathfinder Armada
(wzw)
Owners Manual(owners)ÐUSA English(nna)
01/14/04Ðtbrooks
X
Page 203 of 344

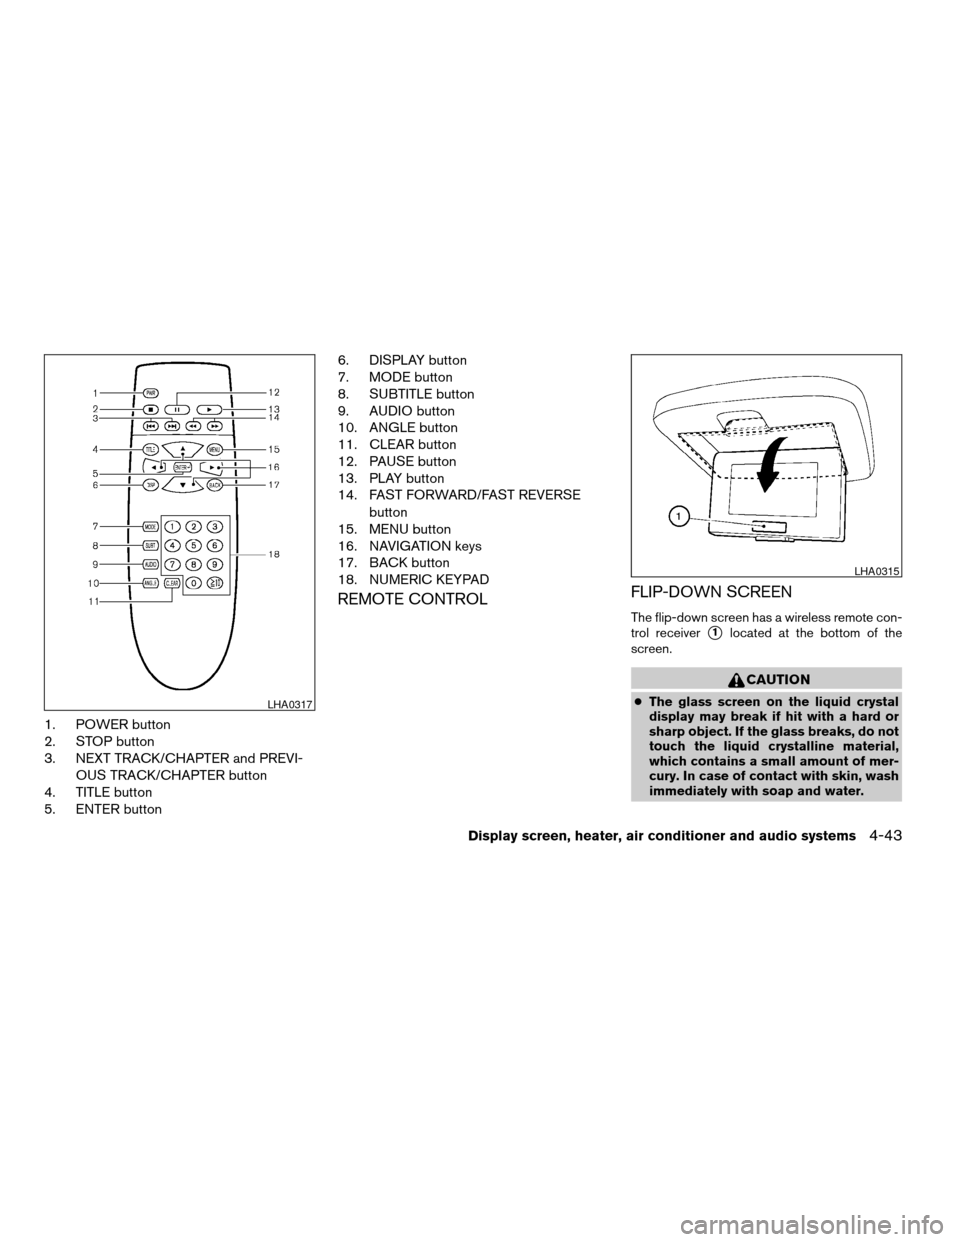
1. POWER button
2. STOP button
3. NEXT TRACK/CHAPTER and PREVI-
OUS TRACK/CHAPTER button
4. TITLE button
5. ENTER button6. DISPLAY button
7. MODE button
8. SUBTITLE button
9. AUDIO button
10. ANGLE button
11. CLEAR button
12. PAUSE button
13. PLAY button
14. FAST FORWARD/FAST REVERSE
button
15. MENU button
16. NAVIGATION keys
17. BACK button
18. NUMERIC KEYPAD
REMOTE CONTROLFLIP-DOWN SCREEN
The flip-down screen has a wireless remote con-
trol receiver
s1located at the bottom of the
screen.
CAUTION
cThe glass screen on the liquid crystal
display may break if hit with a hard or
sharp object. If the glass breaks, do not
touch the liquid crystalline material,
which contains a small amount of mer-
cury. In case of contact with skin, wash
immediately with soap and water.LHA0317
LHA0315
Display screen, heater, air conditioner and audio systems4-43
ZREVIEW COPY:Ð2004 Pathfinder Armada
(wzw)
Owners Manual(owners)ÐUSA English(nna)
01/14/04Ðtbrooks
X
Page 205 of 344

Power ON/OFF:
Push the power button to turn the headphones
on or off.
Volume control:
Turn the volume control knob to adjust the vol-
ume.
The headphones will automatically be turned off
in 30 seconds if there is no sound during that
period. To prevent the battery from being dis-
charged, keep the power suppy turned off when
not in use.
NOTE:
For optimum infrared headphone perfor-
mance, increase the volume on the rear
seat controller to the maximum level and
adjust the infrared headphone volume us-
ing the volume control on the headphones.
Using a lower volume setting on the rear
seat controller can cause static noise in the
infrared headphones.PLAYING A DIGITAL VIDEO DISC
(DVD)
CAUTION
cOnly operate the DVD while the vehicle
engine is running. Operating the DVD
for extended periods of time with the
engine OFF can discharge the vehicle
battery.
cDo not allow the system to get wet.
Excessive moisture such as spilled liq-
uids may cause the system to
malfunction.
cThe driver must not attempt to wear the
headphones while the vehicle is in mo-
tion so that full attention may be given
to vehicle operation.
cWhile playing video CD media, this DVD
player does not guarantee complete
functionality of all video CD formats.
With the DVD player, you can hear DVD videos,
video CDs and CDs using headphones. Passen-
gers in the rear seat can enjoy the sound inde-
pendently of the front seat.
Press the REAR AV button located on the front
controls for more than 1.5 seconds to hear the
sound of the DVD player through the speakers.Pushing the
button on the front controls
turns the rear speakers on and off.
It is possible to operate the DVD player by remote
control.
Headphones are a wireless type and no cables
are necessary. You can use them in almost all the
ranges in the rear seat. (It is not possible to use
the headphones in the front seat.)
POWER on/off button:
With the ignition switch turned to the ACC or ON
position, push the POWER button to turn the
DVD player on or off.
Insert the DVD into the slot with the label side
facing up. The DVD will be guided automatically
into the slot.
If the DVD player is off and a DVD is inserted, the
DVD player will automatically turn on.
CAUTION
Do not force the compact disc into the
slot. This could damage the player.
MODE select button:
Push the Mode button to select Audio/Video
source between DVD and AUX input (input jacks
Display screen, heater, air conditioner and audio systems4-45
ZREVIEW COPY:Ð2004 Pathfinder Armada
(wzw)
Owners Manual(owners)ÐUSA English(nna)
01/14/04Ðtbrooks
X
Page 206 of 344

on the faceplate, Red = right channel audio input,
White = left channel audio input, and Yellow =
Video input) .
The display will show the “AUX” in the upper left
corner of the display for 4 seconds once the
Mode is changed to AUX.
To use the input jacks, refer to “Auxiliary input
jacks” in this section.
orPLAY:
When the PLAY/PAUSE button on the player or
the PLAY button on the remote control is pushed,
the player will play.
In play mode, the display will briefly show
on the upper left corner of the display.
FF (Fast Forward) , REW
(Remote control only):
Push FAST FORWARD/FAST REVERSE but-
tons to carry out the fast forward or fast reverse
presentation at 5 times normal play speed.
Push FAST FORWARD/FAST REVERSE but-
tons again or PLAY button to resume the normal
play speed.
NEXT CHAPTER / PREVI-
OUS CHAPTER (Remote
control only):
When the
(NEXT CHAPTER) button is
pushed while the DVD is being played, the pro-
gram next to the present one will start to play from
its beginning. Push several times to skip through
programs. The DVD will advance the number of
times the button is pushed. When
the
(PREVIOUS CHAPTER) button is
pushed, the program being played returns to its
beginning. Push several times to skip back
through programs. The DVD will go back the
number of times the button is pushed.
orPAUSE:
When the PLAY/PAUSE button on the player or
the PAUSE button on the remote control is
pushed, the player will pause playing of the me-
dia. In pause mode, the player will show
on
the upper left corner of the display until the player
is changed to another mode.
STOP:
Push the STOP button once to stop playing the
media. The display will show
in the upper
left corner of the display for 4 seconds, and the
last disc position will be stored. When the PLAY
button is pushed again, it will resume at the
stored disc track and time position.If the STOP button is pushed again when the
player is already in Stop mode, it will reinitialize
the pointer to the beginning of the disc. In effect it
will ignore the last stored disc position and upon
receipt of the next play message it will begin at
the Title Menu, or at “the beginning of the disc”.
EJECT:
When the EJECT button is pushed with the DVD
loaded, it will be ejected.
The display will show the EJECT symbol
in
the upper left corner of the display for 4 seconds
once the EJECT button is pushed.
If the DVD is not loaded, the display will show
“NO DISC”.
If the DVD comes out and is not removed within
25 seconds, it will be pulled back into the slot to
protect it.
DISPLAY:
If the DISPLAY control is pushed for less than 2
seconds, the display menu will appear on the
screen.
cThe display menu will remain on the screen
for 10 seconds if no subsequent control
activations occur.
4-46Display screen, heater, air conditioner and audio systems
ZREVIEW COPY:Ð2004 Pathfinder Armada
(wzw)
Owners Manual(owners)ÐUSA English(nna)
01/14/04Ðtbrooks
X
Page 207 of 344

cUse NAVIGATION KEYS to navigate within
the display menu, and use ENTER to select
the item.
cHolding the DISPLAY control on the face-
plate for longer than approximately 2 sec-
onds while in the display menu will reset the
display characteristics to their nominal val-
ues. (Faceplate feature only)
If the DISPLAY control button on the faceplate is
pushed for more than 2 seconds, the media
track/time information will be displayed along the
bottom of the display. Pushing the DISPLAY con-
trol for more than 2 seconds will remove the
media track/time information from the display.
(Faceplate feature only)
NAVIGATION KEYS:
If media is in PLAY mode, activation of the NAVI-
GATION KEYS (Up, Down, Left, and Right) will
perform the following functions: next
chapter/track, previous chapter/track, fast re-
verse and fast forward, and the display will
show
,,andrespec-
tively in the upper left corner of the display for 4
seconds. (Faceplate feature only)
If media is in PAUSE mode, activation of the
NAVIGATION KEYS (Up, Down and Right) will
perform the following functions: next
chapter/track, previous chapter/track and slowforward, and the display will show
,and a forward arrow symbol respectively in the
upper left corner of the display for 4 seconds.
(Faceplate feature only)
If media is in activated MENU mode, the NAVI-
GATION KEYS will be used to navigate Up,
Down, Left, and Right within the menu.
If display control menu is on, the NAVIGATION
KEYS will be used to navigate Up, Down, Left,
and Right within the menu.
ENTER:
In MENU mode, push the ENTER button to select
MENU items.
In the display menu, push the ENTER button to
select items for modification, as per the on-
screen instructions.
MENU:
If the media is in PLAY mode and the MENU
button is pressed, the DVD menu will appear on
the screen. Use Navigation Keys to navigate
within the menu, and use ENTER to select the
item.
Push the MENU button again to return to PLAY
mode.TITLE (Remote control only):
Push TITLE button to return the DVD media to the
“title” of the DVD.
Push TITLE button again to return to the previous
stop point and play.
BACK (Remote control only):
Push the BACK button to exit the current active
menu and return to the previous menu.
SUBTITLE (Remote control only):
Push the SUBTITLE button to call up subtitle
selection menu.
Repeatedly press the SUBTITLE button to cycle
through each available subtitle.
AUDIO (Remote control only):
Push the AUDIO button to call up audio menu.
Repeatedly press the AUDIO button to cycle
through each available audio track.
ANGLE (Remote control only):
Push the ANGLE button to call up camera angle
menu.
Repeatedly press the ANGLE button to cycle
through each available angle.
Display screen, heater, air conditioner and audio systems4-47
ZREVIEW COPY:Ð2004 Pathfinder Armada
(wzw)
Owners Manual(owners)ÐUSA English(nna)
01/14/04Ðtbrooks
X
Page 208 of 344

CLEAR (Remote control only):
Push the CLEAR button to clear all numeric in-
puts, if actuated prior to expiration of the
3-second timer.
NUMERIC KEYPAD (0–9 &¸10) (Remote
control only):
Push the NUMERIC KEYPAD to directly access
disc chapters, titles or tracks by inputting their
numeric value.
The “¸10” button input numbers greater than or
equal to 10, allowing up three digits to be input
for selecting chapter/title/track number.
The subsequent actuation of numeric buttons will
continuously shift the previously input number to
the “left”.
The chapter/title/track number will be automati-
cally selected (if valid, based on media content) if
3 seconds expire without any keypad inputs.
The operator can cancel the input
chapter/title/track number by actuating the
CLEAR control prior to the expiration of the
3-second timer.
These functions can be used only for the DVD
discs which correspond to them.Auxiliary input jacks
The auxiliary input jacks are located on the control
panel. Compatible devices such as video games
camcorders and portable video players can be
connected to the auxiliary jacks.
The auxiliary jacks are color coded for identifica-
tion purposes.
cYellow - video input
cWhite - left channel audio input
cRed - right channel audio input
CARE AND MAINTENANCE
Use a lightly dampened, lint free cloth to clean the
surfaces of your NISSAN mobile entertainment
system. (DVD player face, screen, remote con-
trol, etc.)
CAUTION
cDo not use any solvents or cleaning
solutions when cleaning the video
system.
cDo not use excessive force on the moni-
tor screen.
cAvoid touching or scratching the moni-
tor screen as it may become dirty or
damaged.cDo not attempt to use the system in
extreme temperature conditions [below
-4°F (-20°C) or above 158°F (70°C)].
cDo not attempt to operate the system in
extreme humidity conditions (less than
10% or more than 75%) .
4-48Display screen, heater, air conditioner and audio systems
ZREVIEW COPY:Ð2004 Pathfinder Armada
(wzw)
Owners Manual(owners)ÐUSA English(nna)
01/14/04Ðtbrooks
X