2004 NISSAN ALTIMA heater
[x] Cancel search: heaterPage 146 of 264

5. The indicator changes fromblinking green
tosolid greenand the display changes to
show the Disc number icon, Disc number,
Track number and Elapsed time.
All disc loading
1. Press and hold the LOAD button until the
radio beeps (>1.5 seconds) .
2. Thegreenindicator on the lowest available
disc select button will start blinking. (Same
as preset memory button.) The display
shows“Please Wait”.
3. The display changes to“Insert Disc”for a
maximum of 15 seconds.
4. During the 15 second interval, insert the
disc. The display changes to“Loading
Disc”.
5. The indicator changes fromblinking green
tosolid green.
6. The disc number icon is turned on.7. Repeat steps 2–5 until all discs are loaded,
then the last loaded disc will begin to play.
The display shows the Disc number, Track
number and Elapsed Time.
Selected disc loading
1. Press an available disc select button whose
indicator is off. The display shows“Please
Wait”.
2. Thegreenindicator starts blinking and the
display shows“Insert Disc”for 15 sec-
onds.
3. Insert the CD. The display shows“Loading
Disc”.
4. The CD will play after the disc is set to a play
position.
5. The indicator color changes fromblinking
greentosolid greenand the display
shows the Disc icon, Disc number, Track
number and Elapsed Time.
If a disc is not inserted within 15 seconds or if the
load button is pressed during load sequence, the
entire disc load sequence will be canceled.
Disc play
Press the CD button. If a CD is loaded and the
radio is playing, the radio turns off and the last
loaded disc starts to play.Selected disc play
1. Press the disc select button whose disc icon
is displayed.
2. The indicator blinksgreenduring the
change and the display shows“Changing
Disc”.
3. The CD plays after the disc is set to a play
position.
4. The indicator changes fromblinking green
tosolid greenand the display shows the
Disc number, Track number and Elapsed
Time.
FF (fast forward) REW
(rewind) buttons
When the TUNE/FF-REV (
or) but-
ton is pressed while the compact disc is playing,
the compact disc plays at an increased speed
while fast forwarding or rewinding. When the
button is released, the CD returns to normal play
speed.
SEEK/TRACK buttons
When
is pressed while the compact disc
is playing, the selection following the present one
starts to play from the beginning. Press
several times to skip several selections. Each
time the button is pressed, the CD advances 1
4-26Heater, air conditioner and audio systems
ZREVIEW COPY:Ð2004 Altima(l30)
Owners Manual(owners)ÐUSA English(nna)
10/13/03Ðtbrooks
X
Page 147 of 264

additional selection. The track number appears in
the display window. (When the last selection on
the compact disc is skipped, the first selection is
played.)
When
is pressed, the selection being
played returns to the beginning. Press
several times to skip back several selections.
Each time the button is pressed, the CD moves
back 1 selection. If the play pattern is in MIX
mode when the button is pressed the next ran-
dom selection will be played.
MIX·PTY
Press the MIX·PTY button to change CD play
patterns:
Repeat!Mix!All Mix!Normal Play
Repeat
Press the MIX·PTY button (<1.5 seconds) once
to repeat the current track. The “1” icon is turned
on, and the display shows“Repeat Track”for 2
seconds. The display then shows the Track num-
ber and Elapsed time as normal.
Mix
Press the MIX·PTY button (<1.5 seconds) again
to start shuffle play of the current disc. The “MIX”
icon is turned on and the display shows“Mix
Tracks”for 2 seconds. The display then shows
the Track number and Elapsed time as normal.All Mix
Press the MIX·PTY button (<1.5 seconds) again
to start shuffle play of all discs. The “MIX” icon is
turned on, and the display shows“Mix All
Tracks”for 2 seconds. The display then shows
the Track number and Elapsed time as normal.
Also, the indicators of the loaded discs are turned
on with amber color. (Green for current disc.)
Normal play
Press the MIX·PTY button (<1.5 seconds) again
to return to normal play mode. The “MIX” icon and
the amber LEDs are turned off. The display
shows“Normal Play”for 2 seconds. The dis-
play then shows the Track number and Elapsed
time as normal.
CD scan
1 Disc All Tracks
Press the SCAN button (<1.5 seconds) to scan
all tracks of the current disc for 7 seconds per
track. The display shows“Disc Scan”for 2
seconds, and then shows the track number and
elapsed time as normal. The SCAN icon is
flashed during Scan mode.
The Scan mode is canceled once it scans
through all tracks on the disc, or if the SCAN
button is pressed during Scan mode.All Discs, 1 Track
Press and hold the SCAN button (>1.5 seconds)
to scan the first track of all the loaded discs for 7
seconds per track. The display shows“All Disc
Scan”for 2 seconds, and then shows the track
number and elapsed time as normal. The SCAN
icon is flashed during Scan mode.
The Scan mode is canceled once it scans
through all the loaded discs, or if the SCAN
button is pressed during Scan mode.
Eject CD
Current disc
1. Press the
button.
2. Thegreenindicator starts to blink and the
display shows“Disc Eject”for 2 seconds.
The display then changes to“Ejecting
Disc”.
3. The disc ejects. Remove the disc. (If the disc
is not removed within 15 seconds, the disc
will reload.)
4. The indicator and symbol for the disc are
turned off.
Select a disc
1. Press the desired disc, then press
the
button.
Heater, air conditioner and audio systems4-27
ZREVIEW COPY:Ð2004 Altima(l30)
Owners Manual(owners)ÐUSA English(nna)
10/13/03Ðtbrooks
X
Page 148 of 264

2. Thegreenindicator starts blinking and the
display shows“Disc Eject”for 2 seconds.
The display then changes to“Ejecting
Disc”.
3. The disc ejects. Remove the disc (If the disc
is not removed within 15 seconds, the disc
will reload.)
4. The indicator and symbol for the disc are
turned off.
All discs
1. Press and hold the
button until it
beeps (>1.5 seconds) .
2. Lowest used disc number indicator blinks
greenand display shows“All Disc Eject”
for 2 seconds. The display then changes to
“Ejecting Disc”.
3. When a disc is removed, the indicator and
disc icon will be turned off, and then the next
disc will emerge, and so on.
4. The display will be turned off after all discs
are ejected and removed.
If a disc is not removed within 15 seconds, or if
the
button is pressed again during the
Eject sequence, the entire disc Eject sequence
will be canceled.
CD CARE AND CLEANING
cHandle a CD by its edges. Do not bend the
disc. Never touch the surface of the disc.
cAlways place the discs in the storage case
when they are not being used.
cTo clean a disc, wipe the surface from the
center to the outer edge using a clean, soft
cloth. Do not wipe the disc using a circular
motion.
cDo not use a conventional record cleaner or
alcohol intended for industrial use.cA new disc may be rough on the inner and
outer edges. Remove the rough edges by
rubbing the inner and outer edges with the
side of a pen or pencil as illustrated.
LHA0049
4-28Heater, air conditioner and audio systems
ZREVIEW COPY:Ð2004 Altima(l30)
Owners Manual(owners)ÐUSA English(nna)
10/13/03Ðtbrooks
X
Page 149 of 264

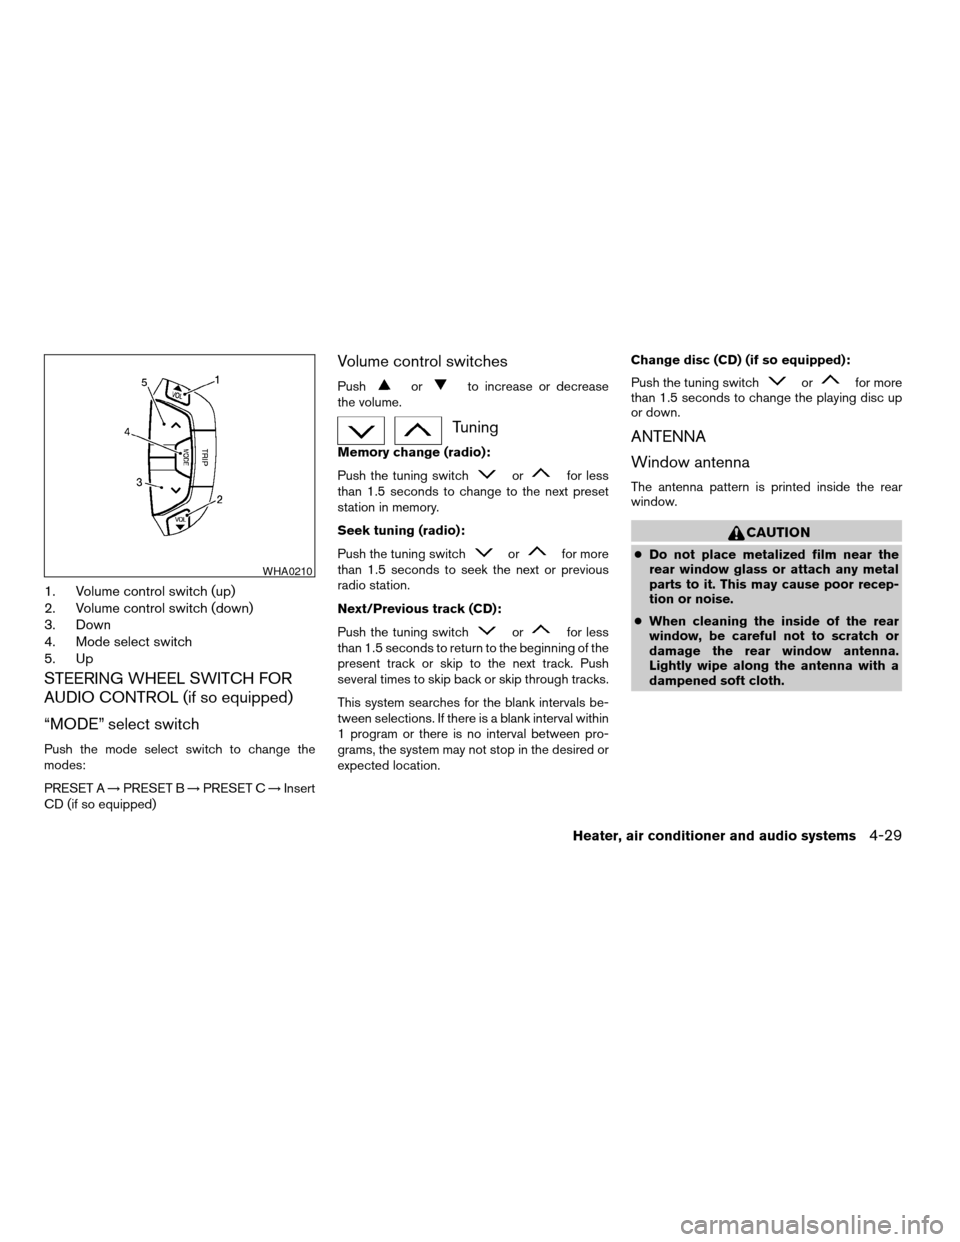
1. Volume control switch (up)
2. Volume control switch (down)
3. Down
4. Mode select switch
5. Up
STEERING WHEEL SWITCH FOR
AUDIO CONTROL (if so equipped)
“MODE” select switch
Push the mode select switch to change the
modes:
PRESET A!PRESET B!PRESET C!Insert
CD (if so equipped)
Volume control switches
Pushorto increase or decrease
the volume.
Tuning
Memory change (radio):
Push the tuning switch
orfor less
than 1.5 seconds to change to the next preset
station in memory.
Seek tuning (radio):
Push the tuning switch
orfor more
than 1.5 seconds to seek the next or previous
radio station.
Next/Previous track (CD):
Push the tuning switch
orfor less
than 1.5 seconds to return to the beginning of the
present track or skip to the next track. Push
several times to skip back or skip through tracks.
This system searches for the blank intervals be-
tween selections. If there is a blank interval within
1 program or there is no interval between pro-
grams, the system may not stop in the desired or
expected location.Change disc (CD) (if so equipped):
Push the tuning switch
orfor more
than 1.5 seconds to change the playing disc up
or down.
ANTENNA
Window antenna
The antenna pattern is printed inside the rear
window.
CAUTION
cDo not place metalized film near the
rear window glass or attach any metal
parts to it. This may cause poor recep-
tion or noise.
cWhen cleaning the inside of the rear
window, be careful not to scratch or
damage the rear window antenna.
Lightly wipe along the antenna with a
dampened soft cloth.
WHA0210
Heater, air conditioner and audio systems4-29
ZREVIEW COPY:Ð2004 Altima(l30)
Owners Manual(owners)ÐUSA English(nna)
10/13/03Ðtbrooks
X
Page 150 of 264

When installing a CB, ham radio or car phone in
your NISSAN, be sure to observe the following
cautions, otherwise the new equipment may ad-
versely affect the MFI (Multiport Fuel Injection)
system and other electronic parts.
WARNING
cA cellular telephone should not be used
while driving so full attention may be
given to vehicle operation. Some juris-
dictions prohibit the use of cellular tele-
phones while driving.
cIf you must make a call while your ve-
hicle is in motion, the hands free cellu-
lar phone operational mode (if so
equipped) is highly recommended. Ex-
ercise extreme caution at all times so
full attention may be given to vehicle
operation.
cIf a conversation in a moving vehicle
requires you to take notes, pull off the
road to a safe location and stop your
vehicle before doing so.
CAUTION
cKeep the antenna as far away as pos-
sible from the Engine Control Module
(ECM) .
cKeep the antenna wire more than 8 in
(20 cm) away from the Multiport Fuel
Injection harness. Do not route the an-
tenna wire next to any harness.
cAdjust the antenna standing-wave ratio
as recommended by the manufacturer.
cConnect the ground wire from the CB
radio chassis to the body.
cFor details, consult a NISSAN dealer.
CAR PHONE OR CB RADIO
4-30Heater, air conditioner and audio systems
ZREVIEW COPY:Ð2004 Altima(l30)
Owners Manual(owners)ÐUSA English(nna)
10/13/03Ðtbrooks
X
Page 151 of 264

5 Starting and driving
Precautions when starting and driving................5-2
Exhaust gas (carbon monoxide)..................5-2
Three-way catalyst..............................5-2
Avoiding collision and rollover....................5-3
Drinking alcohol/drugs and driving................5-3
Ignition switch.....................................5-4
Automatic transmission..........................5-4
Manual transmission............................5-5
Key positions..................................5-5
Nissan vehicle immobilizer system (NVIS).........5-5
Before starting the engine..........................5-6
Starting the engine................................5-6
Driving the vehicle.................................5-7
Automatic transmission (if so equipped)...........5-7
Manual transmission...........................5-10
Parking brake....................................5-12
Cruise control (if so equipped).....................5-12
Precautions on cruise control...................5-12
Cruise control operations.......................5-13Break-in schedule................................5-14
Increasing fuel economy...........................5-14
Parking/parking on hills............................5-15
Power steering...................................5-16
Brake system....................................5-17
Brake precautions.............................5-17
Anti-lock brake system (ABS) (if so
equipped)....................................5-17
Traction control system (TCS) (if so equipped).......5-19
Cold weather driving..............................5-20
Freeing a frozen door lock......................5-20
Anti-freeze....................................5-20
Battery.......................................5-20
Draining of coolant water.......................5-20
Tire equipment................................5-20
Special winter equipment.......................5-21
Driving on snow or ice.........................5-21
Engine block heater (if so equipped).............5-21
ZREVIEW COPY:Ð2004 Altima(l30)
Owners Manual(owners)ÐUSA English(nna)
10/13/03Ðtbrooks
X
Page 171 of 264

SPECIAL WINTER EQUIPMENT
It is recommended that the following items be
carried in the vehicle during winter:
cA scraper and stiff-bristled brush to remove
ice and snow from the windows and wiper
blades.
cA sturdy, flat board to be placed under the
jack to give it firm support.
cA shovel to dig the vehicle out of snowdrifts.
cExtra window washer fluid to refill the reser-
voir tank.
DRIVING ON SNOW OR ICE
WARNING
cWet ice (32°F, 0°C and freezing rain) ,
very cold snow or ice can be slick and
very hard to drive on. The vehicle will
have much less traction or “grip” under
these conditions. Try to avoid driving on
wet ice until the road is salted or
sanded.
cWhatever the condition, drive with cau-
tion. Accelerate and slow down with
care. If accelerating or downshifting too
fast, the drive wheels will lose even
more traction.cAllow more stopping distance under
these conditions. Braking should be
started sooner than on dry pavement.
cAllow greater following distances on
slippery roads.
cWatch for slippery spots (glare ice) .
These may appear on an otherwise
clear road in shaded areas. If a patch of
ice is seen ahead, brake before reach-
ing it. Try not to brake while on the ice,
and avoid any sudden steering
maneuvers.
cDo not use the cruise control on slip-
pery roads.
cSnow can trap dangerous exhaust
gases under your vehicle. Keep snow
clear of the exhaust pipe and from
around your vehicle.
ENGINE BLOCK HEATER (if so
equipped)
An engine block heater to assist in extreme cold
temperature starting is available through a
NISSAN dealer.
WARNING
Do not use your heater with an un-
grounded electrical system or two-
pronged (cheater) adapters. You can be
injured by an electrical shock if you use an
ungrounded connection.
Starting and driving5-21
ZREVIEW COPY:Ð2004 Altima(l30)
Owners Manual(owners)ÐUSA English(nna)
10/13/03Ðtbrooks
X
Page 179 of 264

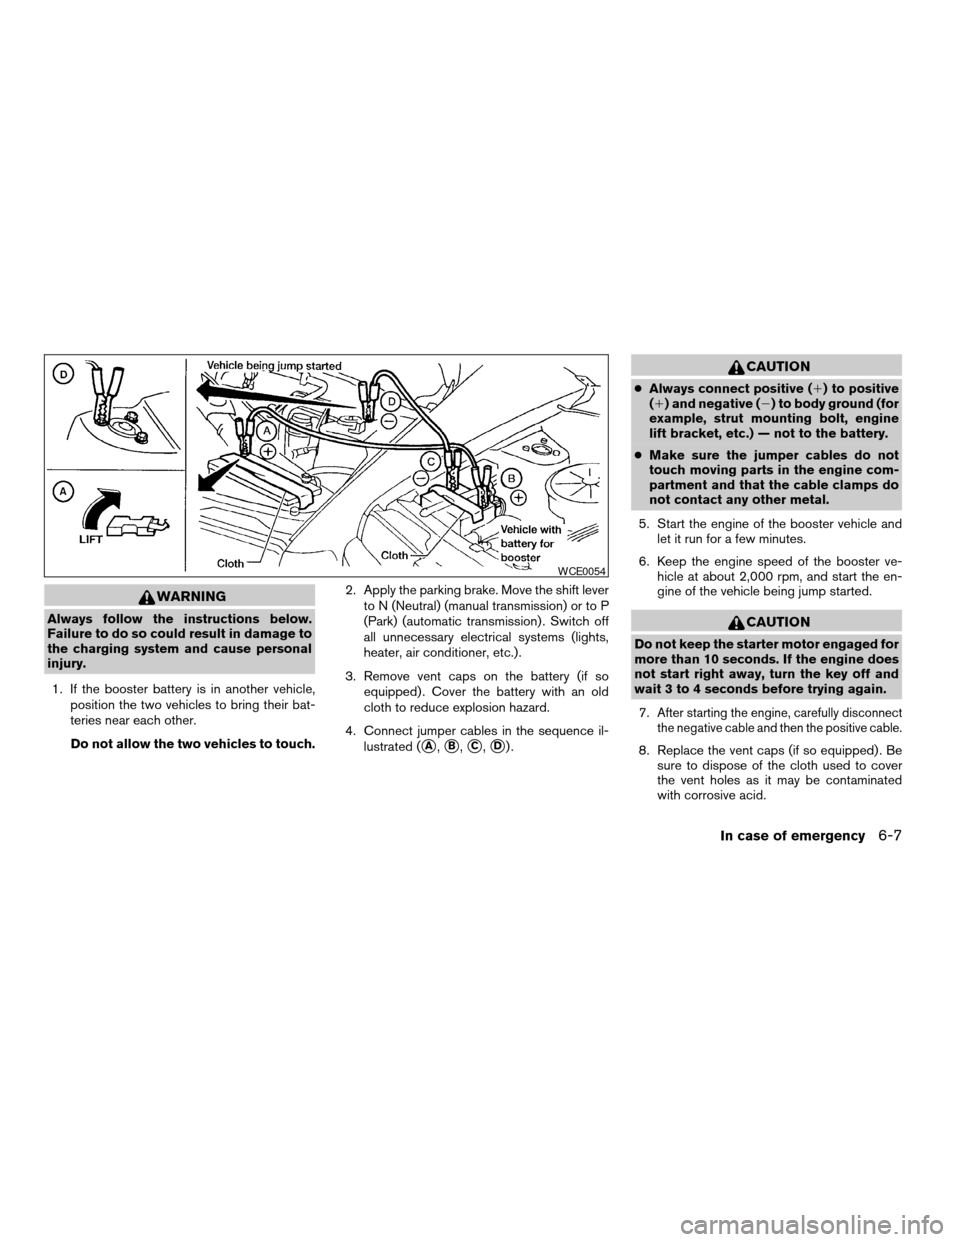
WARNING
Always follow the instructions below.
Failure to do so could result in damage to
the charging system and cause personal
injury.
1. If the booster battery is in another vehicle,
position the two vehicles to bring their bat-
teries near each other.
Do not allow the two vehicles to touch.2. Apply the parking brake. Move the shift lever
to N (Neutral) (manual transmission) or to P
(Park) (automatic transmission) . Switch off
all unnecessary electrical systems (lights,
heater, air conditioner, etc.) .
3. Remove vent caps on the battery (if so
equipped) . Cover the battery with an old
cloth to reduce explosion hazard.
4. Connect jumper cables in the sequence il-
lustrated (
sA,sB,sC,sD).
CAUTION
cAlways connect positive (1) to positive
(1) and negative (2) to body ground (for
example, strut mounting bolt, engine
lift bracket, etc.) — not to the battery.
cMake sure the jumper cables do not
touch moving parts in the engine com-
partment and that the cable clamps do
not contact any other metal.
5. Start the engine of the booster vehicle and
let it run for a few minutes.
6. Keep the engine speed of the booster ve-
hicle at about 2,000 rpm, and start the en-
gine of the vehicle being jump started.
CAUTION
Do not keep the starter motor engaged for
more than 10 seconds. If the engine does
not start right away, turn the key off and
wait 3 to 4 seconds before trying again.
7.
After starting the engine, carefully disconnect
the negative cable and then the positive cable.
8. Replace the vent caps (if so equipped) . Be
sure to dispose of the cloth used to cover
the vent holes as it may be contaminated
with corrosive acid.
WCE0054
In case of emergency6-7
ZREVIEW COPY:Ð2004 Altima(l30)
Owners Manual(owners)ÐUSA English(nna)
10/13/03Ðtbrooks
X