2004 NISSAN ALTIMA audio
[x] Cancel search: audioPage 147 of 264

additional selection. The track number appears in
the display window. (When the last selection on
the compact disc is skipped, the first selection is
played.)
When
is pressed, the selection being
played returns to the beginning. Press
several times to skip back several selections.
Each time the button is pressed, the CD moves
back 1 selection. If the play pattern is in MIX
mode when the button is pressed the next ran-
dom selection will be played.
MIX·PTY
Press the MIX·PTY button to change CD play
patterns:
Repeat!Mix!All Mix!Normal Play
Repeat
Press the MIX·PTY button (<1.5 seconds) once
to repeat the current track. The “1” icon is turned
on, and the display shows“Repeat Track”for 2
seconds. The display then shows the Track num-
ber and Elapsed time as normal.
Mix
Press the MIX·PTY button (<1.5 seconds) again
to start shuffle play of the current disc. The “MIX”
icon is turned on and the display shows“Mix
Tracks”for 2 seconds. The display then shows
the Track number and Elapsed time as normal.All Mix
Press the MIX·PTY button (<1.5 seconds) again
to start shuffle play of all discs. The “MIX” icon is
turned on, and the display shows“Mix All
Tracks”for 2 seconds. The display then shows
the Track number and Elapsed time as normal.
Also, the indicators of the loaded discs are turned
on with amber color. (Green for current disc.)
Normal play
Press the MIX·PTY button (<1.5 seconds) again
to return to normal play mode. The “MIX” icon and
the amber LEDs are turned off. The display
shows“Normal Play”for 2 seconds. The dis-
play then shows the Track number and Elapsed
time as normal.
CD scan
1 Disc All Tracks
Press the SCAN button (<1.5 seconds) to scan
all tracks of the current disc for 7 seconds per
track. The display shows“Disc Scan”for 2
seconds, and then shows the track number and
elapsed time as normal. The SCAN icon is
flashed during Scan mode.
The Scan mode is canceled once it scans
through all tracks on the disc, or if the SCAN
button is pressed during Scan mode.All Discs, 1 Track
Press and hold the SCAN button (>1.5 seconds)
to scan the first track of all the loaded discs for 7
seconds per track. The display shows“All Disc
Scan”for 2 seconds, and then shows the track
number and elapsed time as normal. The SCAN
icon is flashed during Scan mode.
The Scan mode is canceled once it scans
through all the loaded discs, or if the SCAN
button is pressed during Scan mode.
Eject CD
Current disc
1. Press the
button.
2. Thegreenindicator starts to blink and the
display shows“Disc Eject”for 2 seconds.
The display then changes to“Ejecting
Disc”.
3. The disc ejects. Remove the disc. (If the disc
is not removed within 15 seconds, the disc
will reload.)
4. The indicator and symbol for the disc are
turned off.
Select a disc
1. Press the desired disc, then press
the
button.
Heater, air conditioner and audio systems4-27
ZREVIEW COPY:Ð2004 Altima(l30)
Owners Manual(owners)ÐUSA English(nna)
10/13/03Ðtbrooks
X
Page 148 of 264

2. Thegreenindicator starts blinking and the
display shows“Disc Eject”for 2 seconds.
The display then changes to“Ejecting
Disc”.
3. The disc ejects. Remove the disc (If the disc
is not removed within 15 seconds, the disc
will reload.)
4. The indicator and symbol for the disc are
turned off.
All discs
1. Press and hold the
button until it
beeps (>1.5 seconds) .
2. Lowest used disc number indicator blinks
greenand display shows“All Disc Eject”
for 2 seconds. The display then changes to
“Ejecting Disc”.
3. When a disc is removed, the indicator and
disc icon will be turned off, and then the next
disc will emerge, and so on.
4. The display will be turned off after all discs
are ejected and removed.
If a disc is not removed within 15 seconds, or if
the
button is pressed again during the
Eject sequence, the entire disc Eject sequence
will be canceled.
CD CARE AND CLEANING
cHandle a CD by its edges. Do not bend the
disc. Never touch the surface of the disc.
cAlways place the discs in the storage case
when they are not being used.
cTo clean a disc, wipe the surface from the
center to the outer edge using a clean, soft
cloth. Do not wipe the disc using a circular
motion.
cDo not use a conventional record cleaner or
alcohol intended for industrial use.cA new disc may be rough on the inner and
outer edges. Remove the rough edges by
rubbing the inner and outer edges with the
side of a pen or pencil as illustrated.
LHA0049
4-28Heater, air conditioner and audio systems
ZREVIEW COPY:Ð2004 Altima(l30)
Owners Manual(owners)ÐUSA English(nna)
10/13/03Ðtbrooks
X
Page 149 of 264

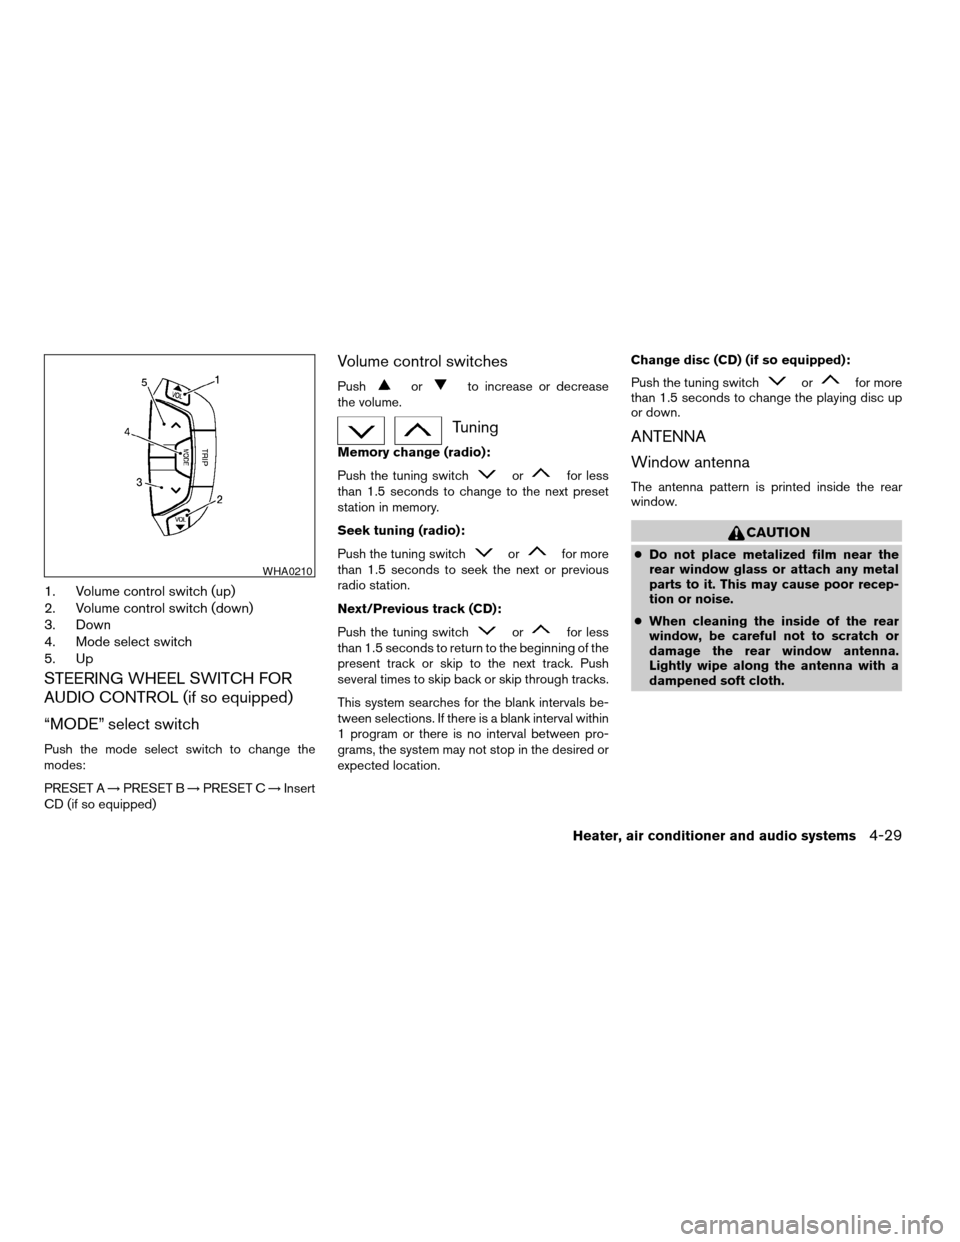
1. Volume control switch (up)
2. Volume control switch (down)
3. Down
4. Mode select switch
5. Up
STEERING WHEEL SWITCH FOR
AUDIO CONTROL (if so equipped)
“MODE” select switch
Push the mode select switch to change the
modes:
PRESET A!PRESET B!PRESET C!Insert
CD (if so equipped)
Volume control switches
Pushorto increase or decrease
the volume.
Tuning
Memory change (radio):
Push the tuning switch
orfor less
than 1.5 seconds to change to the next preset
station in memory.
Seek tuning (radio):
Push the tuning switch
orfor more
than 1.5 seconds to seek the next or previous
radio station.
Next/Previous track (CD):
Push the tuning switch
orfor less
than 1.5 seconds to return to the beginning of the
present track or skip to the next track. Push
several times to skip back or skip through tracks.
This system searches for the blank intervals be-
tween selections. If there is a blank interval within
1 program or there is no interval between pro-
grams, the system may not stop in the desired or
expected location.Change disc (CD) (if so equipped):
Push the tuning switch
orfor more
than 1.5 seconds to change the playing disc up
or down.
ANTENNA
Window antenna
The antenna pattern is printed inside the rear
window.
CAUTION
cDo not place metalized film near the
rear window glass or attach any metal
parts to it. This may cause poor recep-
tion or noise.
cWhen cleaning the inside of the rear
window, be careful not to scratch or
damage the rear window antenna.
Lightly wipe along the antenna with a
dampened soft cloth.
WHA0210
Heater, air conditioner and audio systems4-29
ZREVIEW COPY:Ð2004 Altima(l30)
Owners Manual(owners)ÐUSA English(nna)
10/13/03Ðtbrooks
X
Page 150 of 264

When installing a CB, ham radio or car phone in
your NISSAN, be sure to observe the following
cautions, otherwise the new equipment may ad-
versely affect the MFI (Multiport Fuel Injection)
system and other electronic parts.
WARNING
cA cellular telephone should not be used
while driving so full attention may be
given to vehicle operation. Some juris-
dictions prohibit the use of cellular tele-
phones while driving.
cIf you must make a call while your ve-
hicle is in motion, the hands free cellu-
lar phone operational mode (if so
equipped) is highly recommended. Ex-
ercise extreme caution at all times so
full attention may be given to vehicle
operation.
cIf a conversation in a moving vehicle
requires you to take notes, pull off the
road to a safe location and stop your
vehicle before doing so.
CAUTION
cKeep the antenna as far away as pos-
sible from the Engine Control Module
(ECM) .
cKeep the antenna wire more than 8 in
(20 cm) away from the Multiport Fuel
Injection harness. Do not route the an-
tenna wire next to any harness.
cAdjust the antenna standing-wave ratio
as recommended by the manufacturer.
cConnect the ground wire from the CB
radio chassis to the body.
cFor details, consult a NISSAN dealer.
CAR PHONE OR CB RADIO
4-30Heater, air conditioner and audio systems
ZREVIEW COPY:Ð2004 Altima(l30)
Owners Manual(owners)ÐUSA English(nna)
10/13/03Ðtbrooks
X
Page 257 of 264

10 Index
A
Air bag
(See supplemental restraint system)......1-8
Air bag warning light...........1-20, 2-11
Air cleaner housing filter............8-20
Air conditioner
Air conditioner operation...........4-5
Air conditioner service...........4-13
Air conditioner specification label.....9-11
Air conditioner system refrigerant and
lubrication recommendations........9-6
Heater and air conditioner
controls.................4-3, 4-12
Servicing air conditioner..........4-13
Air flow charts..................4-6
Alarm system
(See vehicle security system).........2-13
Anchor point locations.............1-38
Antenna.....................4-29
Anti-lock brake system (ABS).........5-17
Anti-lock brake warning light..........2-9
Armrests.....................1-7
Audible reminders................2-13
Audio system..................4-14
FM-AM radio with compact disc (CD)
changer...................4-22
FM-AM radio with compact disc (CD)
player....................4-17
Radio....................4-14
Autolight switch.................2-20Automatic
Automatic power window switch.....2-34
Automatic transmission fluid (ATF). . . .8-13
Automatic transmission position
indicator light................2-11
Driving with automatic transmission.....5-7
Transmission selector lever lock release . .5-9
Automatic anti-glare inside mirror.......3-16
B
Battery......................8-17
Charge warning light............2-10
Battery replacement
(See remote keyless entry system). . . .3-9, 8-29
Before starting the engine............5-6
Belts (See drive belts).............8-18
Brake
Anti-lock brake system (ABS).......5-17
Brake booster................8-26
Brake fluid..................8-15
Brake light (See stop light).........8-31
Brake pedal.................8-25
Brake system................5-17
Brake warning light.............2-10
Brake wear indicators........2-13, 8-26
Parking brake check............8-25
Parking brake operation..........5-12
Self-adjusting brakes............8-26
Break-in schedule................5-14Brightness control
Instrument panel..............2-21
Bulb check/instrument panel..........2-9
Bulb replacement................8-31
C
Capacities and recommended
fuel/lubricants...................9-2
Car phone or CB radio.............4-30
Cargo (See vehicle loading information) . . .9-12
CD care and cleaning.............4-28
Check engine indicator light
(See malfunction indicator light)........2-12
Child restraint with top tether strap......1-38
Child restraints.......1-24, 1-25, 1-30, 1-37
Precautions on child restraints.......1-30
Top tether strap anchor point locations . .1-38
Child safety rear door lock............3-5
Chimes, audible reminders...........2-13
Cleaning exterior and interior..........7-2
Clock...................4-18, 4-22
Clutch
Clutch fluid.................8-15
Cold weather driving..............5-20
Console box...................2-29
Controls
Heater and air conditioner
controls.................4-3, 4-12
ZREVIEW COPY:Ð2004 Altima(l30)
Owners Manual(owners)ÐUSA English(nna)
10/13/03Ðtbrooks
X
Page 264 of 264

1. Engine coolant 8-8
2. Window washer fluid 8-16
3. Engine oil 8-9
4. Passenger supplemental front impact air bag
1-8
5. Audio system 4-14, 4-17, 4-22; Air condi-
tioner 4-3, 4-10
6. Supplemental side-impact air bag 1-8
7. Front seats 1-2
8. Spare tire 6-2
9. Fuel filler lid release 3-13; Fuel recommen-
dation 9-3
10. Keys 3-2
11. Supplemental side-impact air bag 1-8
12. Seat belts 1-22
13. Trunk release 3-11
14. Supplemental curtain side-impact air bag
1-8
15. Driver supplemental front impact air bag 1-8
16. Hood release 3-10
17. Meters and gauges 2-3
WGS0016
QUICK REFERENCE
10-8Filling information
ZREVIEW COPY:Ð2004 Altima(l30)
Owners Manual(owners)ÐUSA English(nna)
10/13/03Ðtbrooks
X