Page 100 of 262

Setting hazard indicator and horn
modeThis vehicle is set in hazard indicator and horn
mode when you first receive the vehicle.
In hazard indicator and horn mode, when the
LOCK button is pushed, the hazard indicator
flashes twice and the horn chirps once. When
the UNLOCK button is pushed, the hazard indi-
cator flashes once.
If hazard indicator and horn mode is not neces-
sary, you can switch to hazard indicator only
mode by following the switching procedure.
In hazard indicator only mode, when the LOCKbutton is pushed, the hazard indicator flashes
twice. When the UNLOCK button is pushed,
neither the hazard indicator nor the horn oper-
ates.
(Switching procedure)
Push the LOCK and UNLOCK buttons on the
keyfobsimultaneously for more than 2 seconds
to switch from one mode to the other.
When pushing the buttons to set hazard indica-
tor only mode, the hazard indicator flashes 3
times.
When pushing the buttons to set hazard indica-
tor and horn mode, the hazard indicator flashesonce and the horn chirps once.
SPA1260
Pre-driving checks and adjustments
3-7
�
04.5.17/Z33-D/V5.0
�
Page 102 of 262
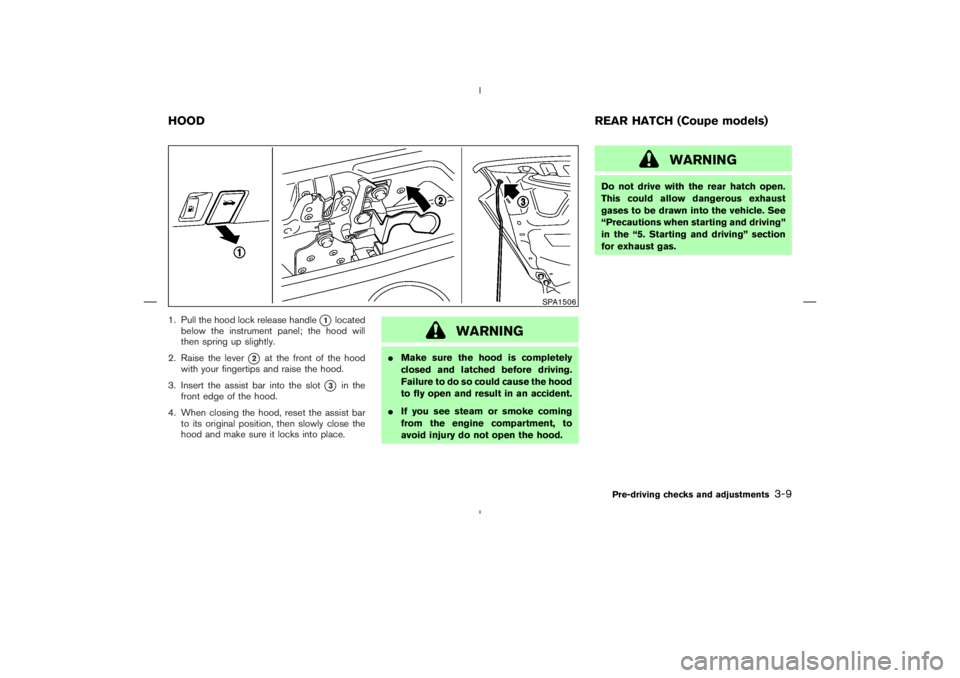
1. Pull the hood lock release handle
�1
located
below the instrument panel; the hood will
then spring up slightly.
2. Raise the lever
�2
at the front of the hood
with your fingertips and raise the hood.
3. Insert the assist bar into the slot
�3
in the
front edge of the hood.
4. When closing the hood, reset the assist bar
to its original position, then slowly close the
hood and make sure it locks into place.
WARNING
�Make sure the hood is completely
closed and latched before driving.
Failure to do so could cause the hood
to fly open and result in an accident.
�If you see steam or smoke coming
from the engine compartment, to
avoid injury do not open the hood.
WARNING
Do not drive with the rear hatch open.
This could allow dangerous exhaust
gases to be drawn into the vehicle. See
“Precautions when starting and driving”
in the “5. Starting and driving” section
for exhaust gas.
SPA1506
HOODREAR HATCH (Coupe models)
Pre-driving checks and adjustments
3-9
�
04.5.17/Z33-D/V5.0
�
Page 103 of 262

OPENER OPERATIONThe rear hatch release switch is located be-
tween the license plate lights.
To open the rear hatch, unlock it with one of the
following operations then push the release
switch:
�Press the UNLOCK button on the keyfob
once. (Pressing the HATCH/TRUNK button
on the keyfobcan open the rear hatch at
once without pushing the release switch.)
�Insert the key into the door key cylinder and
turn the door key counterclockwise once.�Press the power door lock switch to the
UNLOCK side.
The rear hatch employs a spring component
which enables you to lift up the hatch by one
hand. Because of this, sometimes the rear hatch
may clatter when the lock is released, but it is not
a malfunction.
To close, push the rear hatch down securely.
The rear hatch release switch is linked with the
driver side door lock. To open the rear hatch,
unlock the driver side door.
SECONDARY REAR HATCH
RELEASEThe secondary rear hatch release mechanism
allows opening the rear hatch in the event of
discharged battery or emergency.
The release (string) handle is located under the
strut tower bar inside the luggage compartment.
To open the rear hatch from the inside,
firmly pull the release handle to the direc-
tion shown above until the lock releases.
SPA1507
SPA1556
3-10
Pre-driving checks and adjustments
�
04.5.17/Z33-D/V5.0
�
Page 104 of 262

WARNING
�Do not drive with the trunk lid open.
This could allow dangerous exhaust
gases to be drawn into the vehicle.
See “Precautions when starting and
driving” in the “5. Starting and driv-
ing” section for exhaust gas.
�Closely supervise children when they
are around your vehicle to prevent
them from playing and becoming
locked in the trunk where they could
be seriously injured. Keep the car
locked with the trunk closed when
not in use, and prevent children’s
access to car keys.
OPENER OPERATIONThe trunk lid release switch is located between
the license plate lights.
To open the trunk lid, unlock it with one of the
following operations then push the release
switch:
�Press the UNLOCK button on the keyfob
once. (Pressing the HATCH/TRUNK button
on the keyfobcan open the trunk lid at once
without pushing the release switch.)
�Insert the key into the door key cylinder and
turn it counterclockwise once.�Press the power door lock switch to the
UNLOCK side. (After locking the doors with a
keyfob, this switch is not available due to the
security system.)
To close, push the trunk lid down securely.
The trunk lid release switch is linked with the
driver side door lock. To open the trunk lid,
unlock the driver side door.
SPA1685
TRUNK LID (Roadster models)
Pre-driving checks and adjustments
3-11
�
04.5.17/Z33-D/V5.0
�
Page 105 of 262
 is OFF, the trunk lid cannot be opened
with the release switch. It can be opened only by
pushing the HATCH/TRUNK button on the k")
Cancel switchWhen the cancel switch (located inside the rear
floor box) is OFF, the trunk lid cannot be opened
with the release switch. It can be opened only by
pushing the HATCH/TRUNK button on the key-
fob.
INTERIOR TRUNK LID RELEASE
WARNING
Closely supervise children when they
are around cars to prevent them from
playing and becoming locked in the
trunk where they could be seriously in-
jured. Keep the car locked, with the
trunk closed, when not in use, and pre-
vent children’s access to car keys.The interior trunk lid release mechanism pro-
vides a means of escape for children and adults
in the event they become locked inside the trunk.
The handle
�A
is located inside the trunk com-
partment as illustrated.
To open the trunk lid from the inside, pull
the release handle towards you until the
lock releases and push up on the trunk lid.
The release lever is made of a material that
glows in the dark after a brief exposure to
ambient light.
SPA1686
SPA1687
3-12
Pre-driving checks and adjustments
�
04.5.17/Z33-D/V5.0
�
Page 106 of 262
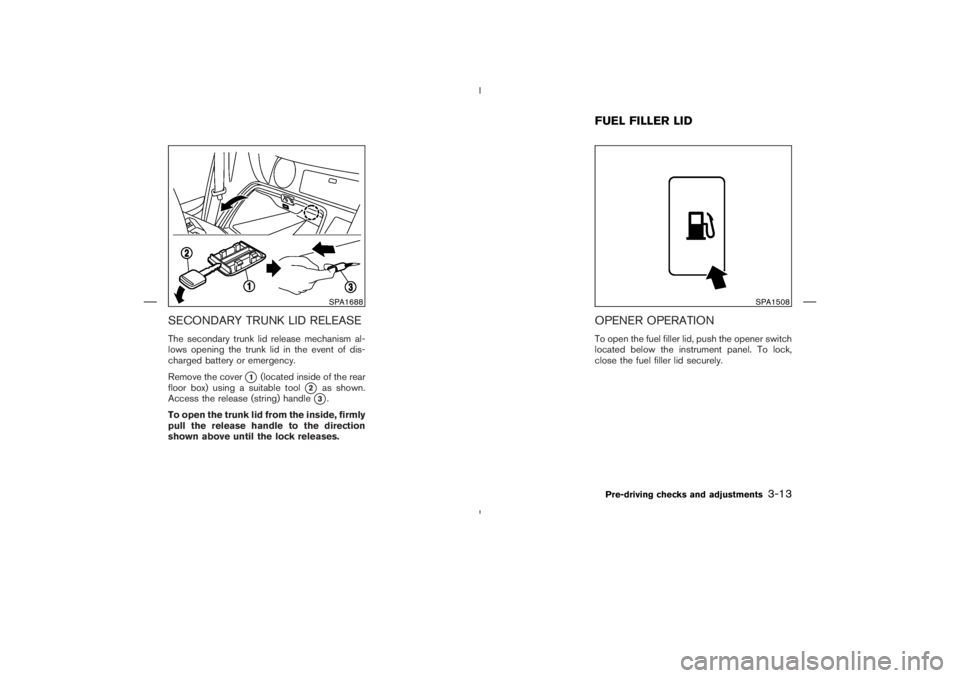
SECONDARY TRUNK LID RELEASEThe secondary trunk lid release mechanism al-
lows opening the trunk lid in the event of dis-
charged battery or emergency.
Remove the cover
�1
(located inside of the rear
floor box) using a suitable tool
�2
as shown.
Access the release (string) handle�3.
To open the trunk lid from the inside, firmly
pull the release handle to the direction
shown above until the lock releases.
OPENER OPERATIONTo open the fuel filler lid, push the opener switch
located below the instrument panel. To lock,
close the fuel filler lid securely.
SPA1688
SPA1508
FUEL FILLER LIDPre-driving checks and adjustments
3-13
�
04.5.17/Z33-D/V5.0
�
Page 107 of 262

FUEL FILLER CAPThe fuel filler cap is a ratcheting type. Tighten the
cap clockwise until ratcheting clicks are heard.
Hang the string of the cap on the hook as shown
while refueling.
WARNING
�Gasoline is extremely flammable and
highly explosive under certain condi-
tions. You could be burned or seri-
ously injured if it is misused ormishandled. Always stop the engine
and do not smoke or allow open
flames or sparks near the vehicle
when refueling.
�Fuel may be under pressure. Turn the
cap a third of a turn, and wait for any
hissing sound to stop to prevent fuel
from spraying out and possible per-
sonal injury. Then remove the cap.
�Do not attempt to top off the fuel
tank after the fuel pump nozzle shutsoff automatically.
Continued refueling may cause fuel
overflow, resulting in fuel spray and
possibly a fire.
�Use only an original equipment type
fuel filler cap as a replacement. It has
a built-in safety valve needed for
proper operation of the fuel system
and emission control system. An in-
correct cap can result in a serious
malfunction and possible injury. It
could also cause the
malfunc-
tion indicator lamp to come on.
�Do not fill a portable fuel container in
the vehicle or trailer. Static electricity
can cause an explosion of flammable
liquid, vapor or gas in any vehicle or
trailer. To reduce the risk of serious
injury or death when filling portable
fuel containers:
— Always place the container on the
ground when filling.
— Do not use electronic devices
while filling.
SPA1509
3-14
Pre-driving checks and adjustments
�
04.5.17/Z33-D/V5.0
�
Page 108 of 262

— Keep the pump nozzle in contact
with the container while you are
filling it.
— Use only approved portable fuel
containers for flammable liquid.
�Never pour fuel into the throttle body
to attempt to start your vehicle.
CAUTION
�If fuel is spilled on the car body, flush
it away with water to avoid paint
damage.
�Tighten until the fuel filler cap clicks.
Failure to tighten the fuel filler cap
properly may cause the
mal-
function indicator lamp (MIL) to illu-
minate. If the
lamp illuminates
because the fuel filler cap is loose or
missing, tighten or install the cap and
continue to drive the vehicle. The
lamp should turn off after a few
driving trips. If the
lamp does
not turn off after a few driving trips,have the vehicle inspected by a
NISSAN dealer.
�For additional information, see the
“Malfunction indicator lamp (MIL)” in
the “2. Instruments and controls”
section.
TILT OPERATIONPush the lock lever down and adjust the steering
wheel up or down to the desired position.
Push the lock lever up securely to lock the
steering wheel in place.
WARNING
Do not adjust the steering wheel while
driving. You could lose control of your
vehicle and cause an accident.
SPA1510
STEERING WHEELPre-driving checks and adjustments
3-15
�
04.5.17/Z33-D/V5.0
�