Page 77 of 262
 displays time
when the ignition key is in the ACC or ON
position.
If the battery cable is disconnected, the
clock will reset its time and the correct
time will no")
The digital clock (in the audio unit) displays time
when the ignition key is in the ACC or ON
position.
If the battery cable is disconnected, the
clock will reset its time and the correct
time will not be indicated. Readjust the
time.ADJUSTING THE TIMEAdjust the time in the following steps:
1. Switch the display to the clock adjusting
mode.
Type A (Audio without cassette player):
Push and hold the DISP (Clock) button
�A
until the clock display starts to flash.
Type B (Audio with cassette player):
Push and hold the RPT button
�B
until the
clock display starts to flash.
2. Push the SEEK/TRACK button
�C
(
,
) to adjust the hour. Push the TUNE
button�D
(
,
) to adjust the
minute. Pushing theor
side will
advance the time and the
or
side
will turn back the time.
3. Push the DISP button
�A
(Type A), or DISP
�A
or RPT
�B
button (Type B) to finish the
adjustment.
ResettingType A (Audio without cassette player):
Push the DISP
�A
and TUNE
�D
buttons.
Type B (Audio with cassette player):
Push the RPT
�B
and TUNE
�D
buttons.
The time will be set to a time signal.
For example, if these buttons are pushed while
the time is between 8:00 and 8:29, the display
will be reset to 8:00. If pushed while it is
between 8:30 and 8:59, the display will be reset
to 9:00. At the same time the display will return
to the previous audio mode.The power outlet is for powering electrical ac-
cessories such as cellular telephones.
CAUTION
�Use caution as the socket and plug
may be hot during or immediately
after use.
�This power outlet is not designed for
use with a cigarette lighter unit.
�Do not use accessories that exceed a
combined power draw of 12 volt,
SIC2318
SIC2258
Front
CLOCKPOWER OUTLET2-28
Instruments and controls
�
04.5.17/Z33-D/V5.0
�
Page 78 of 262
 for both the front and
rear power outlets. Do not use
double adapters or more than one
accessory with a single power outlet.
�Use this power outlet with the engine
running. (If the engine i")
120W (10A) for both the front and
rear power outlets. Do not use
double adapters or more than one
accessory with a single power outlet.
�Use this power outlet with the engine
running. (If the engine is stopped,
this could result in a discharged bat-
tery.)
�Avoid using when the air conditioner,
headlights or rear window defroster
is on.�Before inserting or disconnecting a
plug, be sure to turn off the power
switch of electrical accessory being
used or the ACC power of the vehicle.
�Push the plug in as far as it will go. If
good contact is not made, the plug
may overheat or the internal tem-
perature fuse may blow.
�Do not allow water to contact the
socket. When not in use, be sure to
close the lid.
INSTRUMENT POCKET (except for
navigation system equipped models)�aTo open the lid, push the button.
�bTo close, pull the lid down.
WARNING
�The instrument pocket should not be
used while driving so full attention
may be given to vehicle operation.
SIC1968
Rear
SIC2259
STORAGE
Instruments and controls
2-29
�
04.5.17/Z33-D/V5.0
�
Page 79 of 262
�Keep the pocket lid closed while driv-
ing to help prevent injury in an acci-
dent or a sudden stop.
For navigation system equipped models:
The lid is an electronic type. See the separate
Navigation System Owner’s Manual for the op-
eration.
SUNGLASSES HOLDER (Coupe
models)The sunglasses holder can be opened by push-
ing the button
�A.WARNING
�The sunglasses holder should not be
used while driving so full attention
may be given to vehicle operation.
�Keep the sunglasses holder closed
while driving to prevent an accident.
CAUTION
�Do not use for anything other than
glasses.
�Do not leave glasses in the sun-
glasses holder while parking in direct
sunlight. The heat may damage the
glasses.
SIC2317
2-30
Instruments and controls
�
04.5.17/Z33-D/V5.0
�
Page 81 of 262
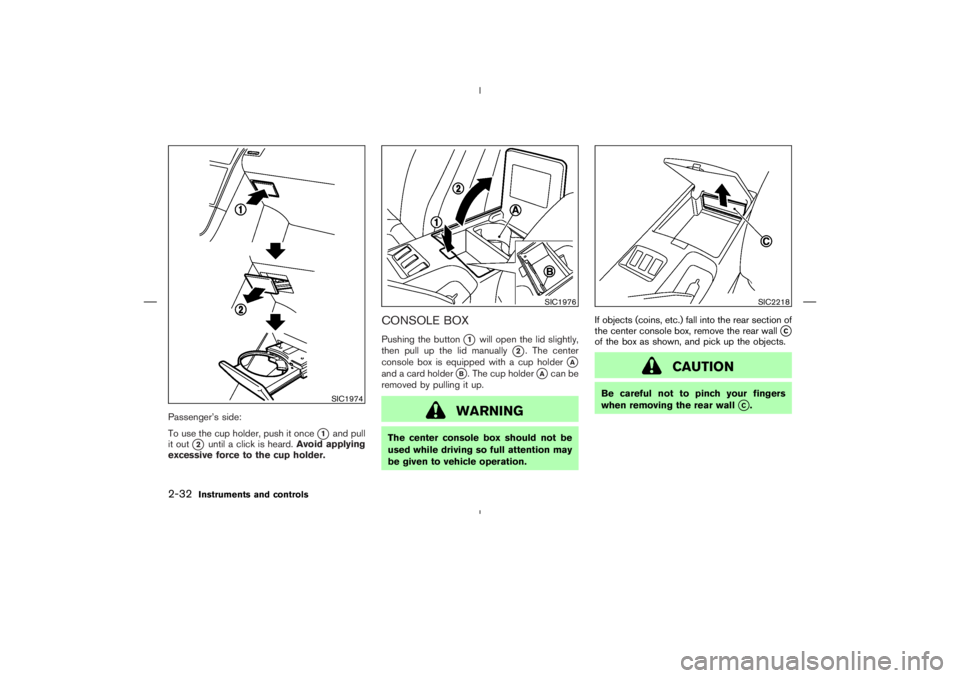
Passenger’s side:
To use the cup holder, push it once
�1
and pull
it out
�2
until a click is heard.Avoid applying
excessive force to the cup holder.
CONSOLE BOXPushing the button
�1
will open the lid slightly,
then pull up the lid manually
�2. The center
console box is equipped with a cup holder
�A
and a card holder
�B. The cup holder
�Acan be
removed by pulling it up.
WARNING
The center console box should not be
used while driving so full attention may
be given to vehicle operation.If objects (coins, etc.) fall into the rear section of
the center console box, remove the rear wall
�C
of the box as shown, and pick up the objects.
CAUTION
Be careful not to pinch your fingers
when removing the rear wall
�C.
SIC1974
SIC1976
SIC2218
2-32
Instruments and controls
�
04.5.17/Z33-D/V5.0
�
Page 82 of 262
REAR FLOOR BOXThe rear floor box is located behind the passen-
ger’s seat. Fold the seat to use the rear floor box.
When locking or unlocking the rear floor box, use
the master key.
The rear floor box may be opened by pulling the
handle. The rear floor box light illuminates when
the box lid is opened with the headlight switch
ON.The rear floor box has another storage space
under the bottom plate.
WARNING
Keep rear floor box lid closed while
driving to help prevent injury in an acci-
dent or a sudden stop.
REAR PARCEL BOXPush the upper part of the lid to open the rear
parcel box. For models without the Navigation
system, two boxes are available.
WARNING
�The rear parcel box should not be
used while driving so full attention
may be given to vehicle operation.
�Keep rear parcel box lid closed while
driving to help prevent injury in an
SIC1975
SIC2377
SIC1977
Instruments and controls
2-33
�
04.5.17/Z33-D/V5.0
�
Page 86 of 262

45 seconds after the ignition key is turned to the
OFF position.
Depending on the environment or driving
conditions, the auto reverse function may
be activated if an impact or load similar to
something being caught in the window
occurs.
WARNING
There are some small distances imme-
diately before the closed position which
cannot be detected. Make sure that all
passengers have their hands, etc., in-
side the vehicle before closing the win-
dow.Automatic window lowering (Roadster
models)When the soft top operating switch is pressed,
the power windows will automatically be low-
ered completely. The windows do not rise auto-
matically after the soft top open/close operation
is completed. Use the power window switches
to raise them.
AUTOMATIC ADJUSTING
FUNCTION
CAUTION
When the battery cable is removed from
the battery terminal, do not close either
of the front doors. The automatic win-
dow adjusting function will not work,
and the side roof panel/top side rail
may be damaged.
The power window has an automatic adjusting
function. When the door is being opened, the
window is automatically lowered slightly to avoid
contact between the window and the side roof
panel/top side rail. When the door is closed, the
window is automatically raised slightly.
INTERIORThe interior light has a two-position switch. (
�A:
DOOR,
�B: OFF)
When the switch is in the DOOR position, the
light will illuminate when a door is opened.
The light will stay on for about 30 seconds when:
�The doors are unlocked by the keyfob, a key
or the power door lock switch while all doors
are closed.
�The driver’s door is opened and then closed
while the key is removed from the ignition
switch.
SIC1980A
Coupe models
INTERIOR LIGHTS
Instruments and controls
2-37
�
04.5.17/Z33-D/V5.0
�
Page 87 of 262

�The key is removed from the ignition switch
while all doors are closed.
The interior light will turn off while the 30 second
timer is activated, when:
�The driver’s door is locked either with the
keyfob, a key or the power door lock switch.
�The ignition switch is turned ON.MAPTo turn on the light, push the plastic surface
�C
of the light. Push it again to turn off the light.
When the map light stays on, it will auto-
matically turn off 30 minutes after theignition switch has been turned to the OFF
position. To turn on the light again, turn the
ignition switch to the ONposition.
The map and vanity mirror lights will automati-
cally turn off 30 minutes after the latest operation
of the following with the ignition switch in the
ACC or OFF position:
�Opening or closing any door
�Locking or unlocking with the keyfob, a key or
the power door lock switch
�Inserting or removing a key from the ignition
switch
These lights will turn on again when any of the
above operations is performed after the lights
have turned off automatically. (The lights will turn
off 30 minutes after the latest operation of the
above as well.)
CAUTION
�Turn off the lights when you leave the
vehicle.
�Do not use the lights for extended
periods of time with the engine
stopped. This could result in a dis-
charged battery.The light on the vanity mirror will turn on when
the cover on the vanity mirror is opened.
When the vanity mirror light stays on, it will
automatically turn off 30 minutes after the
ignition switch has been turned to the OFF
position. To turn on the light again, turn the
ignition switch to the ONposition.
SIC2238
Roadster models
SIC1859
VANITY MIRROR LIGHT (if so
equipped)
2-38
Instruments and controls
�
04.5.17/Z33-D/V5.0
�
Page 88 of 262

The light illuminates when the rear hatch is
opened. When the rear hatch is closed, the light
will go off.The light illuminates when the trunk lid is
opened. When the trunk lid is closed, the light
will go off.The HomeLink
Universal Transceiver provides a
convenient way to consolidate the functions of
up to three individual hand-held transmitters into
one built-in device.
HomeLink
Universal Transceiver:
�Will operate most Radio Frequency (RF)
devices such as garage doors, gates, home
and office lighting, entry door locks and se-
curity systems.
�Is powered by your vehicle’s battery. No
separate batteries are required. If the vehi-
cle’s battery is discharged or is discon-
nected, HomeLink
will retain all program-
ming.
Once the HomeLinkUniversal Transceiver
is programmed, retain the original trans-
mitter for future programming procedures
(for example, new vehicle purchases).
Upon sale of the vehicle, the programmed
HomeLink
Universal Transceiver buttons
should be erased for security purposes.
For additional information, refer to “Pro-
gramming HomeLink
” later in this sec-
tion.
LUGGAGE COMPARTMENT LIGHT
(Coupe models)TRUNK LIGHT (Roadster models)
HomeLink
UNIVERSAL
TRANSCEIVER (if so equipped)Instruments and controls
2-39
�
04.5.17/Z33-D/V5.0
�