Page 32 of 224

BULBS
Replacing exterior bulbs
Check the operation of all the bulbs frequently.
Using the right bulbs
Replacement bulbs are specified in the chart below. Headlamp bulbs
must be marked with an authorized ªD.O.T.º for North America and an
ªEº for Europe to assure lamp performance, light brightness and pattern
and safe visibility. The correct bulbs will not damage the lamp assembly
or void the lamp assembly warranty and will provide quality bulb burn
time.
Function Trade Number
Headlamp 9007
Park lamp and turn lamp (front) 3157 AK
Cornering lamp (front) 3156 K
Tail, stop and turn (rear) 3157 K
Backup lamp 3156 K
License plate lamp 168
High-mount brakelamp 912
Foglamps H1
Luggage compartment lamp 211-2
Dome lamp 906
Underhood lamp 211±2
Rear reading lamp 211-2
Map lamp 168
Illuminated visor mirror 168
Dual floorwell lamp 906
Glove compartment 168
All replacement bulbs are clear in color except where noted.
To replace all instrument panel lights - see your dealer.
Replacing the interior bulbs
Check the operation of all bulbs frequently.
2004 Marauder(mdr)
Owners Guide (post-2002-fmt)
USA English(fus)
Lights
32
Page 71 of 224

If a problem occurs with the SecuriLockysystem, the indicator will flash
rapidly or glow steadily when the ignition is in the 3 (ON) position. If
this occurs, the vehicle should be taken to an authorized dealer for
service.
Automatic arming
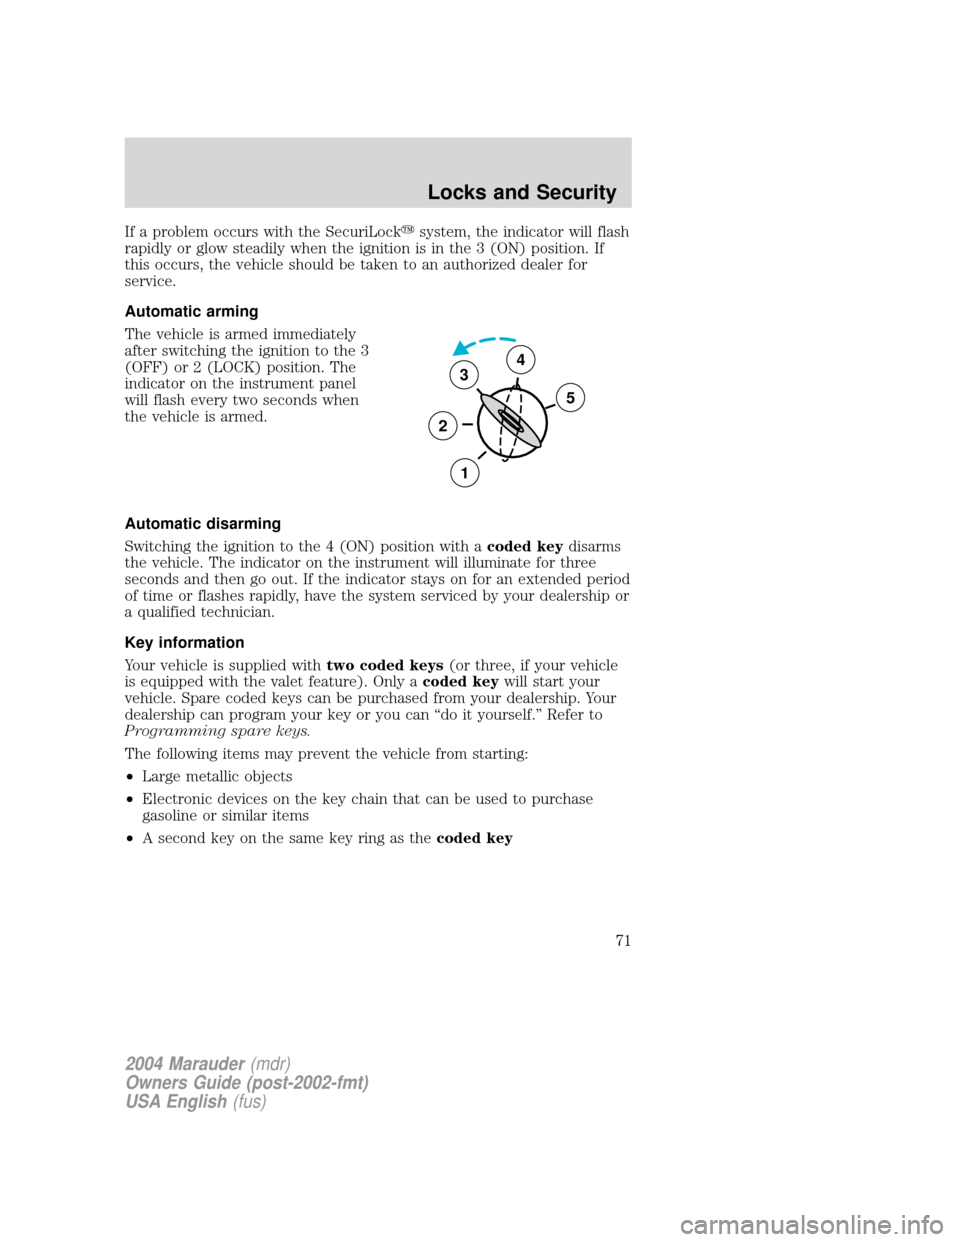
The vehicle is armed immediately
after switching the ignition to the 3
(OFF) or 2 (LOCK) position. The
indicator on the instrument panel
will flash every two seconds when
the vehicle is armed.
Automatic disarming
Switching the ignition to the 4 (ON) position with acoded keydisarms
the vehicle. The indicator on the instrument will illuminate for three
seconds and then go out. If the indicator stays on for an extended period
of time or flashes rapidly, have the system serviced by your dealership or
a qualified technician.
Key information
Your vehicle is supplied withtwo coded keys(or three, if your vehicle
is equipped with the valet feature). Only acoded keywill start your
vehicle. Spare coded keys can be purchased from your dealership. Your
dealership can program your key or you can ªdo it yourself.º Refer to
Programming spare keys.
The following items may prevent the vehicle from starting:
²Large metallic objects
²Electronic devices on the key chain that can be used to purchase
gasoline or similar items
²A second key on the same key ring as thecoded key
3
2
1
5
4
2004 Marauder(mdr)
Owners Guide (post-2002-fmt)
USA English(fus)
Locks and Security
71
Page 95 of 224

The side air bags are fitted on the outboard side of the seatbacks of the
front seats. In certain lateral collisions, the air bag on the side affected
by the collision will be inflated. The air bag was designed to inflate
between the door panel and occupant to further enhance the protection
provided occupants in side impact collisions.
The air bag SRS is designed to activate when the vehicle sustains lateral
deceleration sufficient to cause the sensors to close an electrical circuit
that initiates air bag inflation.
The fact that the air bags did not inflate in a collision does not mean that
something is wrong with the system. Rather, it means the forces were
not of the type sufficient to cause activation. Side air bags are designed
to inflate in side-impact collisions, not roll-over, rear-impact, frontal or
near-frontal collisions, unless the collision causes sufficient lateral
deceleration.
Several air bag system components get hot after inflation. Do not
touch them after inflation.
If the side air bag has
deployed,the air bag will
not function again. The side
air bag system (including the
seat) must be inspected and
serviced by a qualified
technician in accordance with
the vehicle service manual.If
the air bag is not replaced, the
unrepaired area will increase the
risk of injury in a collision.
Determining if the system is operational
The SRS uses a readiness light in the instrument cluster or a tone to
indicate the condition of the system. Refer to theAir bag readiness
section in theInstrument clusterchapter. Routine maintenance of the
side air bag is not required.
A difficulty with the system is indicated by one or more of the following:
²The readiness light (same light as for front air bag system) will either
flash or stay lit.
2004 Marauder(mdr)
Owners Guide (post-2002-fmt)
USA English(fus)
Seating and Safety Restraints
95
Page 116 of 224

During Traction Controlyoperation you may hear an electric motor type
of sound coming from the engine compartment and the engine will not
ªrev-upº when you push further on the accelerator. This is normal
system behavior.
If you should become stuck in snow
or ice or on a very slippery road
surface, try switching the Traction
Controlysystem off. This may allow
excess wheel spin to ªdigº the
vehicle out and enable a successful
ªrockingº maneuver.
The traction control indicator
flashes during a Traction Controly
system event.
If the traction control indicator
comes on and stays lit, either:
²the Traction Controlysystem
requires service, or
²the customer has disabled the system using the traction control switch
located on the left side of the instrument panel.
The Traction Controlysystem will be on every time you turn the ignition
key from OFF to ON until you deactivate the system using the traction
control switch on the instrument panel left of the steering column.
STEERING
To prevent damage to the power steering system, never hold the steering
wheel at its furthest turning points (until it stops) for more than a few
seconds when the engine is running.
It is also important to maintain a proper power steering fluid level in the
power steering fluid reservoir:
²Do not operate the vehicle with a low power steering pump fluid level
(below the MIN mark on the reservoir).
²Some noise is normal during operation. If the noise is excessive, check
for low power steering pump fluid level before seeking service by your
dealer.
²Heavy or uneven steering efforts may be caused by low power steering
pump fluid level. Check for low power steering pump fluid level before
seeking service by your dealer.
²Do not fill the power steering pump reservoir above the MAX mark on
the reservoir, as this may result in leaks from the reservoir.
2004 Marauder(mdr)
Owners Guide (post-2002-fmt)
USA English(fus)
Driving
116
Page 133 of 224
The fuses are coded as follows.
Fuse/Relay
LocationFuse Amp
RatingPassenger Compartment Fuse
Panel Description
1 15A Audio, CD changer
2 5A Audio
3 7.5A Mirrors
4 10A Air bags
5 Ð Not used
6 15A Instrument cluster warning lamps
module, Overdrive control switch,
Lighting Control Module (LCM),
Gauge pack, Analog cluster
7 10A Driver's Door Module (DDM),
Audio (Start)
8 25A Powertrain Control Module (PCM)
power relay, Coil-on plugs, Radio
noise capacitor, Passive Anti-Theft
System (PATS)
9 5A Transmission range sensor
27 25
26 2423 21
2219
20
18 16
17 1514 12
131030
32
31
28
29
11
97
8653
41
2
2004 Marauder(mdr)
Owners Guide (post-2002-fmt)
USA English(fus)
Roadside Emergencies
133
Page 134 of 224

Fuse/Relay
LocationFuse Amp
RatingPassenger Compartment Fuse
Panel Description
10 10A Rear window defrost, Heated
mirrors
11 5A Traction control indicator relay
(ABS w/traction control only)
12 15A Multi-function switch for
turn/hazard lamps
13 5A Audio (Run/Accy)
14 10A Anti-lock Brake System (ABS),
Instrument Cluster
15 15A Speed control, LCM, EATC blower
motor relay, Door lock switch
illumination, Moonroof, Heated
seat switch
16 15A Reversing lamps, Shift lock, DRL
module, VAP Steering, Electronic
day/night mirror, Overhead
console, Air suspension, Climate
control, Heated seat module,
Speed chime module (GCC only),
DDM, Back-up lamps
17 7.5A Wiper motor
18 15A Fog lamps
19 15A Brake lamps, Brake signal for
PCM, ABS and speed control
module, DDM
20 Ð Not used
21 15A LCM for park lamps and interior
illumination, Autolamp/Sunload
sensor
22 20A Speed control servo,
Multi-function switch for hazard
lamps, Brake on/off switch, Feed
for IP fuse 19
2004 Marauder(mdr)
Owners Guide (post-2002-fmt)
USA English(fus)
Roadside Emergencies
134
Page 135 of 224

Fuse/Relay
LocationFuse Amp
RatingPassenger Compartment Fuse
Panel Description
23 15A EATC module, Instrument cluster,
LCM, Interior lamps, Door lock
switches
24 10A Left-hand low beam
25 15A Cigar lighter
26 10A Right-hand low beam
27 25A LCM for cornering lamps and high
beam headlamps, Police vehicle
option
28 20A* Power windows
29 Ð Not used
30 Ð Not used
31 Ð Not used
32 Ð Not used
* Circuit breaker
Power distribution box
The power distribution box is located in the engine compartment. The
power distribution box contains high-current fuses that protect your
vehicle's main electrical systems from overloads.
Always disconnect the battery before servicing high current
fuses.
Always replace the cover to the power distribution box before
reconnecting the battery or refilling fluid reservoirs
If the battery has been disconnected and reconnected, refer to the
Batterysection of theMaintenance and Specificationschapter.
2004 Marauder(mdr)
Owners Guide (post-2002-fmt)
USA English(fus)
Roadside Emergencies
135
Page 163 of 224

Do not use sharp objects, such as a razor blade, to clean the
inside of the rear window or to remove decals, as it may cause
damage to the rear window defroster's heated grid lines.
INSTRUMENT PANEL AND CLUSTER LENS
Clean the instrument panel with a damp cloth, then dry with a dry cloth.
²Avoid cleaners or polish that increase the gloss of the upper portion of
the instrument panel. The dull finish in this area helps protect the
driver from undesirable windshield reflection.
Do not use chemical solvents or strong detergents when cleaning
the steering wheel or instrument panel to avoid contamination of
the air bag system.
²Be certain to wash or wipe your hands clean if you have been in
contact with certain products such as insect repellent and suntan
lotion in order to avoid possible damage to the interior painted
surfaces.
INTERIOR TRIM
²Clean the interior trim areas with a damp cloth, then dry by wiping
with a dry, soft, clean cloth.
²Do not use household or glass cleaners as these may damage the
finish.
INTERIOR
For fabric, carpets, cloth seats, safety belts and seats equipped with side
air bags:
²Remove dust and loose dirt with a vacuum cleaner.
²Remove light stains and soil with Motorcraft Extra Strength
Upholstery Cleaner (ZC-41).
²If grease or tar is present on the material, spot-clean the area first
with Motorcraft Spot and Stain Remover (ZC-14).
²Never saturate the seat covers with cleaning solution.
²Do not use household cleaning products or glass cleaners, which can
stain and discolor the fabric and affect the flame retardant abilities of
the seat materials.
2004 Marauder(mdr)
Owners Guide (post-2002-fmt)
USA English(fus)
Cleaning
163