Page 68 of 314

monitors the vehicles traction (force of
adhesive friction between the tires and the
road surface) and handl")
68 Safety and SecurityDriving safety systems
ESP
The Electronic Stability Program (ESP)
monitors the vehicle's traction (force of
adhesive friction between the tires and the
road surface) and handling.
The ESP recognizes when a wheel is spin-
ning or if the vehicle starts to skid. By ap-
plying brakes to the appropriate wheel and
by limiting engine output, the ESP works to
stabilize the vehicle. The ESP is especially
useful while driving off and on wet or slip-
pery road surfaces.
The ESP warning lampv in the speed-
ometer dial flashes when the ESP is en-
gaged.
The warning lampv in the speedome-
ter dial lights up when you turn the key in
the steering lock to position2. It goes out
when the engine is running.
Warning!
G
The BAS cannot prevent the natural laws of
physics from acting on the vehicle, nor can
it increase braking efficiency beyond that af-
forded by the condition of the vehicle brakes
and tires or the traction. The BAS cannot
prevent accidents, including those resulting
from excessive speed in turns, following an-
other vehicle too closely, or hydroplaning.
Only a safe, attentive, and skillful driver can
prevent accidents. The capabilities of a BAS
equipped vehicle must never be exploited in
a reckless or dangerous manner which
could jeopardize the user’s safety or the
safety of others.
Warning!
G
Never switch off the ESP when you see the
ESP warning lampv flashing in the
speedometer dial. In this case, proceed as
follows:�
While driving off, apply as little throttle
as possible
�
While driving, ease up on the accelera-
tor
�
Adapt your speed and driving style to
the prevailing road conditions
Failure to observe these guidelines could
cause the vehicle to skid.
The ESP cannot prevent accidents resulting
from excessive speed.
Page 70 of 314

70 Safety and SecurityDriving safety systemsThe switch is located on the center con-
sole.
1ESP off
2ESP on�
Press upper half1 of the ESP switch
until the ESP warning lampv in the
speedometer lights up.
The ESP is deactivated.
If one or more drive wheels are spinning,
the ESP warning lampv in the speed-
ometer flashes, regardless of the speed.
Traction control brakes a spinning wheel
even when the ESP is deactivated.The ESP always operates when you are
braking, even when it has been deactivat-
ed.Switching on the ESP
�
Press lower half2 of the ESP switch
until the ESP warning lampv in the
speedometer goes out.
You are now again in normal driving
mode.
!Avoid spinning of a drive wheel for an
extended period with the ESP switched
off. This may cause serious damage to
the drivetrain which is not covered by
the Mercedes-Benz Limited Warranty.Warning!
G
When the ESP warning lampv is
illuminated continuously, the ESP is
switched off.
Adapt your speed and driving to the prevail-
ing road conditions and to the non-operating
status of the ESP.
Page 72 of 314

72 Safety and SecurityAnti-theft systemsTow-away alarm
Once the tow-away alarm is armed, a visual
and audible alarm will be triggered when
someone attempts to raise the vehicle.
Arming tow-away alarm
When you lock your vehicle, the tow-away
alarm is automatically armed after about
30 seconds.
When you unlock your vehicle, the
tow-away protection disarms automatical-
ly.Disarming tow-away alarm
To prevent triggering the tow-away alarm
feature, switch off the tow-away alarm be-
fore towing the vehicle, or when parking on
a surface subject to movement, such as a
ferry or auto train.
1Tow-away alarm off switch
2Indicator lamp
The switch is located on the center con-
sole.
�
Turn off the ignition and remove the
key.
�
Press upper half1 of the switch.
Indicator lamp2 in the switch lights
up briefly.
�
Lock your vehicle with the key or re-
mote control.
The tow-away alarm remains disarmed un-
til you lock your vehicle again.
Canceling tow-away alarm
To cancel the alarm:
�
Insert the key in the steering lock.
or
�
Press theŒ or‹button.
The alarm is canceled.
iThe tow-away protection alarm is trig-
gered, for example, if the vehicle is lift-
ed on one side.
If the alarm stays on for more than
20 seconds, an emergency call is initi-
ated automatically by the Tele Aid sys-
tem provided Tele Aid service was
subscribed to and properly activated,
and that necessary cellular service and
GPS coverage are available.
iYou cannot disarm the tow-away alarm
while the ignition is turned on.
Page 73 of 314
73 Controls in detail
Locking and unlocking
Seats
Lighting
Instrument cluster
Manual transmission
Automatic transmission*
Good visibility
Climate control
Audio system
Power windows
Retractable hardtop
Driving systems
Useful features
Page 76 of 314

76 Controls in detailLocking and unlocking
Checking the batteries�
Press button‹orŒ longer than
one second.
The battery check lamp4comes on
briefly to indicate that the key batteries
are in order.Loss of remote control with folding key
If you lose a remote control or the folding
key, you should do the following:
�
Have the remote control deactivated
by an authorized Mercedes-Benz
Center.
�
Report the loss of the remote control or
the folding key immediately to your car
insurance company.
�
If necessary have the mechanical lock
replaced.
Your authorized Mercedes-Benz Center
will be glad to supply you with a replace-
ment.
!If you can no longer lock or unlock the
vehicle with the remote control, then
either the batteries in the remote con-
trol are discharged, the remote control
is malfunctioning, or the vehicle battery
is drained.�
Check the batteries in the remote
control and replace them if neces-
sary (
�page 216)
�
Synchronize the remote control
(�page 219)
�
Check the vehicle battery
(�page 251)
�
Use the folding key to unlock the
doors (
�page 216) and the trunk
(
�page 216) as required. Lock the
vehicle using the folding key
(�page 217).
If the remote control is malfunctioning,
contact an authorized Mercedes-Benz
Center.
!If battery check lamp4 does not light
up briefly during the check, then the re-
mote control batteries are discharged.
Replace the batteries (
�page 218).
You can obtain the required batteries
at any authorized Mercedes-Benz
Center.
iIf the batteries are checked within sig-
nal range of the vehicle, pressing
the‹orŒ button will lock or
unlock the vehicle accordingly.
Page 80 of 314

80 Controls in detailLocking and unlockingActivating�
Check that the ignition is switched on.
All the lamps in the instrument cluster
light up.
�
Press and hold upper part1 of the
central locking switch for approximate-
ly five seconds.
The automatic central locking is acti-
vated.
Deactivating
�
Check that the ignition is switched on.
All the lamps in the instrument cluster
light up.
�
Press and hold lower part2 of the
central locking switch for approximate-
ly five seconds.
The automatic central locking is deacti-
vated.
Locking and unlocking from the inside
You can lock or unlock the vehicle from in-
side using the central locking switch. This
can be useful, for example, if you want to
unlock the passenger door from the inside
or want to lock the vehicle before starting
to drive.Locking
�
Press upper part1 of central locking
switch (
�page 79).
If all the doors are closed, the vehicle
locks.
Unlocking
�
Press lower part2 of central locking
switch (
�page 79).
The vehicle unlocks.
Warning!
G
When leaving the vehicle, always remove the
key from the steering lock and lock the vehi-
cle. Do not leave children unattended in the
vehicle, or with access to an unlocked vehi-
cle. Unsupervised use of vehicle equipment
may cause an accident and/or serious per-
sonal injury.
iYou can open a locked door from the
inside. Open door only when conditions
are safe to do so.
If the vehicle was previously centrally
locked using the remote control, it will
not unlock using the central locking
switch.
Page 82 of 314

82 Controls in detailSeatsHeated seats*
Both switches are located in the center
console.
1Normal heating
2Rapid heating�
Make sure the ignition is switched on.
All the lights in the instrument cluster
come on.Switching on seat heating
�
Press upper switch position1.
A red indicator lamp on the switch
lights up.
Switching off seat heating
�
Press upper switch position1 again.
Switching on rapid seat heating
�
Press lower switch position2.
Both red indicator lamps on the switch
light up.Switching off rapid seat heating
�
Press lower switch position2 again.
iThe seat heater will be automatically
switched off after approximately
30 minutes.iThe system switches over to normal
heating mode after approximately five
minutes. Only one indicator lamp re-
mains lit.
!If one or both of the indicator lamps on
the seat heater switch are blinking,
there is insufficient voltage available
since too many electrical consumers
are turned on. The seat heater switches
off automatically.
The seat heater will switch back on
again automatically as soon as suffi-
cient voltage is available.
Page 83 of 314
83 Controls in detail
Lighting
�Lighting
For notes on how to switch on the head-
lamps and use the turn signals, see the
“Getting started” section (
�page 43).
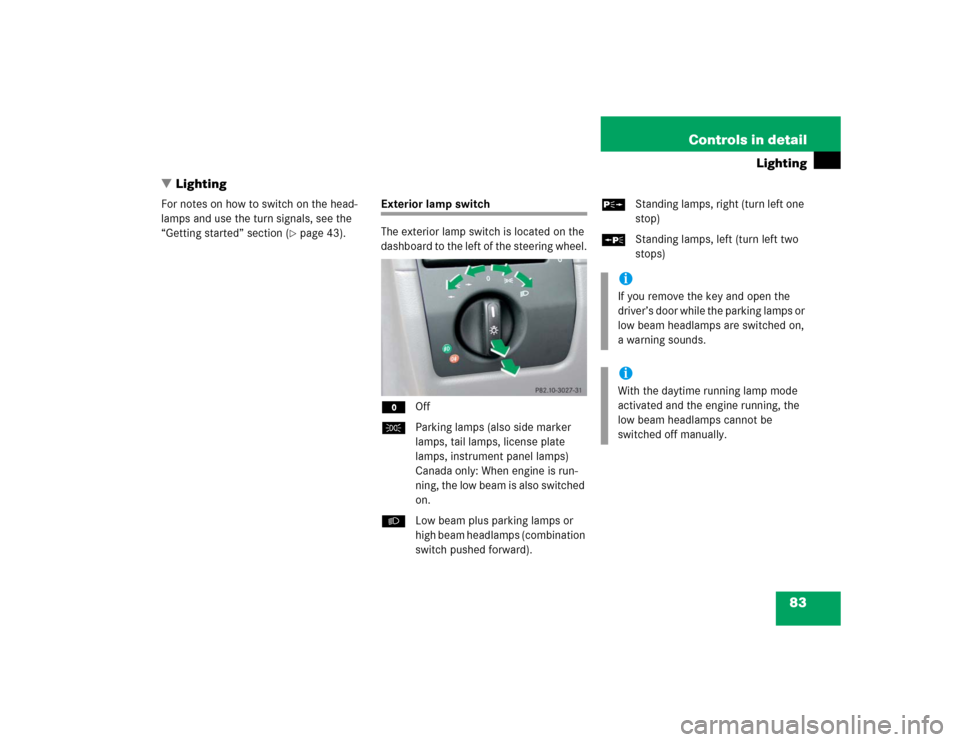
Exterior lamp switch
The exterior lamp switch is located on the
dashboard to the left of the steering wheel.
MOff
CParking lamps (also side marker
lamps, tail lamps, license plate
lamps, instrument panel lamps)
Canada only: When engine is run-
ning, the low beam is also switched
on.
BLow beam plus parking lamps or
high beam headlamps (combination
switch pushed forward).ˆStanding lamps, right (turn left one
stop)
‚Standing lamps, left (turn left two
stops)
iIf you remove the key and open the
driver’s door while the parking lamps or
low beam headlamps are switched on,
a warning sounds.iWith the daytime running lamp mode
activated and the engine running, the
low beam headlamps cannot be
switched off manually.