Page 82 of 314

82 Controls in detailSeatsHeated seats*
Both switches are located in the center
console.
1Normal heating
2Rapid heating�
Make sure the ignition is switched on.
All the lights in the instrument cluster
come on.Switching on seat heating
�
Press upper switch position1.
A red indicator lamp on the switch
lights up.
Switching off seat heating
�
Press upper switch position1 again.
Switching on rapid seat heating
�
Press lower switch position2.
Both red indicator lamps on the switch
light up.Switching off rapid seat heating
�
Press lower switch position2 again.
iThe seat heater will be automatically
switched off after approximately
30 minutes.iThe system switches over to normal
heating mode after approximately five
minutes. Only one indicator lamp re-
mains lit.
!If one or both of the indicator lamps on
the seat heater switch are blinking,
there is insufficient voltage available
since too many electrical consumers
are turned on. The seat heater switches
off automatically.
The seat heater will switch back on
again automatically as soon as suffi-
cient voltage is available.
Page 85 of 314
85 Controls in detail
Lighting
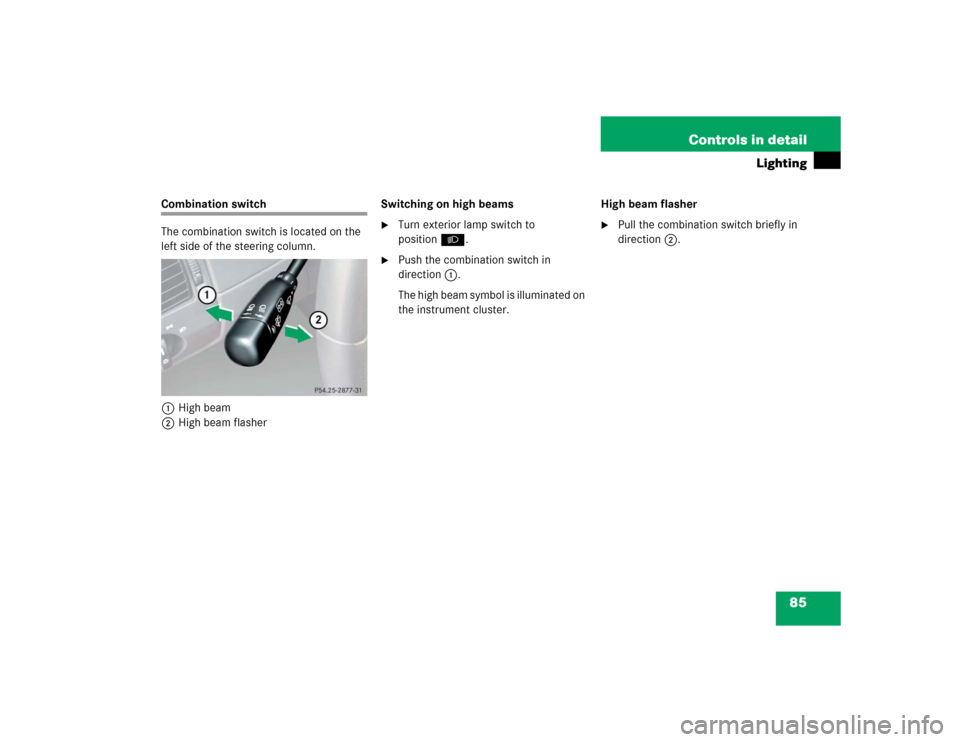
Combination switch
The combination switch is located on the
left side of the steering column.
1High beam
2High beam flasherSwitching on high beams
�
Turn exterior lamp switch to
positionB.
�
Push the combination switch in
direction1.
The high beam symbol is illuminated on
the instrument cluster.High beam flasher
�
Pull the combination switch briefly in
direction2.
Page 89 of 314
.
The instrume")
89 Controls in detail
Instrument cluster
�Instrument cluster
A full view illustration of the instrument
cluster can be found in the “At a glance”
section of this manual (
�page 20).
The instrument cluster is activated when
you
�
open the driver’s door
�
turn the key in steering lock to
position2 (
�page 29)
�
press left knob3 (
�page 20)
Instrument cluster illumination
Instrument lamps
To brighten illumination�
Turn knob3 (
�page 20) clockwise.
The instrument lamps will brighten.
To dim illumination
�
Turn knob3 counterclockwise.
The instrument lamps will dim.
Display illumination
�
Press knob3.
With key removed or in steering lock
position0 or1 (
�page 29), the display
is illuminated for a short time.
Coolant temperature gauge
Under normal driving conditions, the cool-
ant temperature may rise to 248°F
(120°C). The coolant temperature may
climb to the red marking:�
at high outside temperatures
�
during stop-and-go traffic
�
when driving on hilly terrain
The engine should not be operated with
the coolant temperature in the red zone.
Doing so may cause serious engine dam-
age which is not covered by the
Mercedes-Benz Limited Warranty.
Page 90 of 314
 once
with key in steering lock position2
(
�page 29) until the trip odometer is
reset
or
�
Press left knob3 (
�pa")
90 Controls in detailInstrument cluster
Trip odometer�
Press left knob3 (
�page 20) once
with key in steering lock position2
(
�page 29) until the trip odometer is
reset
or
�
Press left knob3 (
�page 20) twice
with key removed or in steering lock
position0 or1 (
�page 29) until the
trip odometer is reset.
Tachometer
The red marking on the tachometer
(�page 20) denotes excessive engine
speed.
To help protect the engine, the fuel supply
is interrupted if the engine is operated
within the red marking.
Warning!
G
Driving when your engine is badly overheat-
ed can cause some fluids which may have
leaked into the engine compartment to
catch fire. You could be seriously burned.
Steam from an overheated engine can cause
serious burns and can occur just by opening
the engine hood. Stay away from the engine
if you see or hear steam coming from it.
Turn off the engine, get out of the vehicle
and do not stand near the vehicle until the
engine has cooled down.
!Avoid driving at excessive engine
speeds, as it may result in serious en-
gine damage that is not covered by the
Mercedes-Benz Limited Warranty.
Page 91 of 314
, you will notice a delay before the")
91 Controls in detail
Instrument cluster
Outside temperature indicator
When moving the vehicle into colder ambi-
ent temperatures (e.g. when leaving your
garage), you will notice a delay before the
lower temperature is displayed.
A delay also occurs when ambient temper-
atures rise. This prevents inaccurate tem-
perature indications caused by heat
radiated from the engine during idling or
slow driving.
Setting clock
Hour�
Pull out right knob5 in the instrument
cluster (
�page 20) and turn it counter-
clockwise.
Minutes
�
Pull out right knob5 in the instrument
cluster and turn it clockwise.
Warning!
G
The outside temperature indicator is not de-
signed to serve as an ice-warning device and
is therefore unsuitable for that purpose.
Indicated temperatures just above the freez-
ing point do not guarantee that the road sur-
face is free of ice. The road may still be icy,
especially in wooded areas or on bridges.
iTo adjust the time by a single hour or a
few minutes, turn knob5 just a few
degrees in the direction indicated for
hours or minutes.
Page 162 of 314
, it is advisable to brake the
vehicle with")
162 OperationDriving instructionsPower assistanceBrakesTo help prevent brake disk corrosion after
driving on wet road surfaces (particularly
salted roads), it is advisable to brake the
vehicle with considerable force prior to
parking. The heat generated serves to dry
the brakes.
If your brake system is normally only sub-
jected to moderate loads, you should occa-
sionally test the effectiveness of the
brakes by applying above-normal braking
pressure at higher speeds. This will also
enhance the grip of the brake pads.Warning!
G
With the engine not running, there is no
power assistance for the brake and steering
systems. In this case, it is important to keep
in mind that a considerably higher degree of
effort is necessary to brake and steer the ve-
hicle.Warning!
G
After driving in heavy rain for some time
without applying the brakes or through wa-
ter deep enough to wet brake components,
the first braking action may be somewhat
reduced and increased pedal pressure may
be necessary to obtain expected braking ef-
fect. Maintain a safe distance from vehicles
in front.
Resting your foot on the brake pedal will
cause excessive and premature wear of the
brake pads.
It can also result in the brakes overheating,
thereby significantly reducing their effec-
tiveness. It may not be possible to stop the
vehicle in sufficient time to avoid an acci-
dent.
!Be very careful not to endanger other
road users when you apply the brakes.
Refer to the description of the Brake
Assist System (BAS) (
�page 67).
If the parking brake is released and the
brake warning lamp in the instrument
cluster stays on, the brake fluid level in
the reservoir is too low.
Brake pad wear or a leak in the system
may be the reason for low brake fluid in
the reservoir.
Have the brake system checked imme-
diately. Contact your authorized Mer-
cedes-Benz Center.
All checks and service work on the
brake system should be carried out by
qualified technicians only. Contact
your authorized Mercedes-Benz Cen-
ter.
Install only brake pads and brake fluid
recommended by Mercedes-Benz.
Page 177 of 314

177 Operation
Engine compartment
TheI symbol flashes in the
speedometer display if a proper oil level
check cannot be performed.�
If engine is at normal operating
temperature, wait five minutes before
repeating check procedure.
�
If engine is not yet at normal operating
temperature, wait 30 minutes before
repeating check procedure.See the “Practical hints” section
(
�page 199) if the low engine oil level
warning lamp in the instrument cluster
comes on.
Checking engine oil level with the oil
dipstick
When checking the oil level the vehicle
must
�
be parked on level ground
�
be at normal operating temperature
�
have been stationary for at least five
minutes with the engine turned off
!Excess oil must be siphoned or drained
off. It could cause damage to the
engine and catalytic converter not
covered by the Mercedes-Benz Limited
Warranty.
iPerform the engine oil level check with
the dipstick if it cannot be completed
via the speedometer display
(�page 177).
In this case we recommend that you
have the system checked at a
Mercedes-Benz Center.
iIf the: andI symbols are
continuously illuminated after pressing
button1 (
�page 176) twice, and if
there is no change in the speedometer
display or the low engine oil level
warning lamp comes on, a malfunction
has occurred to the system.
Perform the engine oil level check with
the dipstick (�page 177).
Visually check for oil leaks. If no obvi-
ous oil leaks are noted, drive to the
nearest authorized Mercedes-Benz
Center to have the system checked.
iThe engine oil level can be checked by
either the oil dipstick or via the
speedometer display (SLK 320,
SLK 32 AMG only) in the instrument
cluster (
�page 176). The amount of
engine oil needed is shown more
precisely in the speedometer display.
Page 178 of 314
178 OperationEngine compartmentTo check the engine oil level with the oil
dipstick, do the following:�
Open the hood (
�page 174).
�
Pull out oil dipstick1 (
�page 179)
�
Wipe oil dipstick1 clean.
�
Fully insert oil dipstick1 into the
dipstick guide tube.
�
Pull out oil dipstick1 again after
approximately three seconds to obtain
accurate reading.
Oil dipstickThe oil level is correct when it is between
the lower (min) and upper (max) mark of
the oil dipstick.
�
If necessary, add engine oil.
For adding engine oil see (
�page 179).
More information on engine oil can be
found in the “Technical data” section
(
�page 277) and (
�page 279).
See the “Practical hints” section
(
�page 199) if the low engine oil level
warning lamp in the instrument cluster
comes on.
iThe filling quantity between the upper
and lower marks on the oil dipstick is
approximately 2.1 US qt. (2.0 l).