Page 75 of 314

75 Controls in detail
Locking and unlocking
Factory setting
Global unlocking�
Press buttonŒ.
All turn signal lamps flash once. The
locking knobs in the doors move up.
The vehicle will lock again automatically
within approximately 40 seconds of un-
locking if neither door nor trunk is opened,
the key is not inserted in the steering lock,
or the central locking switch is not
activated.
Global locking
�
Press button‹.
All turn signal lamps flash three times.
The locking knobs in the doors move
down.Selective setting
If you frequently travel alone, you may wish
to reprogram the remote control so that
pressingŒ only unlocks the driver’s
door, the storage compartment in the arm-
rest and the fuel filler flap.
�
Press and hold buttons Πand
‹simultaneously for about five sec-
onds until battery check lamp4 flash-
es twice.
The remote control will then function
as follows:
Unlocking driver’s door, storage com-
partment in armrest and fuel filler flap
�
Press buttonΠonce.
Global unlocking
�
Press buttonΠtwice.
Global locking
�
Press button‹.
Restoring to factory setting
�
Press and hold buttonsŒand‹
simultaneously for about six seconds
until battery check lamp4 flashes
twice.
iIf the turn signal lamps do not flash
three times, one of the following ele-
ments may not be properly closed:�
a door
�
the trunk
Close the respective element and lock
the vehicle again.
Warning!
G
When leaving the vehicle, always remove the
key from the steering lock and lock the vehi-
cle. Do not leave children unattended in the
vehicle, or with access to an unlocked vehi-
cle. It is possible for children to open a
locked door from the inside, which could re-
sult in an accident and/or serious injury.
Page 78 of 314
78 Controls in detailLocking and unlockingClosing the trunk
The recess is located on the inner side of
the trunk lid.
1Recess�
Lower trunk lid by pulling firmly on
recess1.
�
Close trunk lid with hands placed flat
on it.
Trunk lid emergency release
The handle for the trunk lid emergency re-
lease is located on the inside of the trunk
lid.
1Handle�
Pull handle1 in direction of arrow to
open the trunk lid.
Warning!
G
To prevent possible personal injury, always
keep hands and fingers away from the trunk
opening when closing the trunk. Be espe-
cially careful when small children are
around.Warning!
G
Only drive with the trunk closed as, among
other dangers such as visibility blockage,
exhaust fumes may enter the vehicle
interior.iTo prevent an inadvertent lockout, do
not place the key in the trunk.
!The emergency release handle unlocks
and opens the trunk while the vehicle is
standing or driving.
Page 80 of 314

80 Controls in detailLocking and unlockingActivating�
Check that the ignition is switched on.
All the lamps in the instrument cluster
light up.
�
Press and hold upper part1 of the
central locking switch for approximate-
ly five seconds.
The automatic central locking is acti-
vated.
Deactivating
�
Check that the ignition is switched on.
All the lamps in the instrument cluster
light up.
�
Press and hold lower part2 of the
central locking switch for approximate-
ly five seconds.
The automatic central locking is deacti-
vated.
Locking and unlocking from the inside
You can lock or unlock the vehicle from in-
side using the central locking switch. This
can be useful, for example, if you want to
unlock the passenger door from the inside
or want to lock the vehicle before starting
to drive.Locking
�
Press upper part1 of central locking
switch (
�page 79).
If all the doors are closed, the vehicle
locks.
Unlocking
�
Press lower part2 of central locking
switch (
�page 79).
The vehicle unlocks.
Warning!
G
When leaving the vehicle, always remove the
key from the steering lock and lock the vehi-
cle. Do not leave children unattended in the
vehicle, or with access to an unlocked vehi-
cle. Unsupervised use of vehicle equipment
may cause an accident and/or serious per-
sonal injury.
iYou can open a locked door from the
inside. Open door only when conditions
are safe to do so.
If the vehicle was previously centrally
locked using the remote control, it will
not unlock using the central locking
switch.
Page 81 of 314
.
Removing and installing head
restraints
1Release button
Removing head")
81 Controls in detail
Seats
�Seats
Information on seat adjustment can be
found in the “Getting started” section
(�page 27).
Removing and installing head
restraints
1Release button
Removing head restraint
�
Open the retractable hardtop
(�page 130).
�
Pull head restraint to its highest
position.
�
Push button1 and pull out head re-
straint.Installing head restraint
�
Insert head restraint and push it down
to the stop.
�
Push button1 and adjust head re-
straint to desired position.
Warning!
G
For your protection, drive only with properly
positioned head restraints.
Adjust head restraint so that the head re-
straint supports the back of the head at eye
level. This will reduce the potential for injury
to the head and neck in the event of an ac-
cident or similar situation.
Do not drive the vehicle without the seat
head restraints. Head restraints are intend-
ed to help reduce injuries during an acci-
dent.iSLK 32 AMG has integrated,
non-removable head restraints.
Warning!
G
Be sure to install the head restraint so that
it is facing in the right direction. Otherwise
you could damage the mounting.
In addition, a head restraint installed in the
wrong direction will not provide the intend-
ed protection and can cause injury in an ac-
cident or similar situation.
Page 83 of 314
83 Controls in detail
Lighting
�Lighting
For notes on how to switch on the head-
lamps and use the turn signals, see the
“Getting started” section (
�page 43).
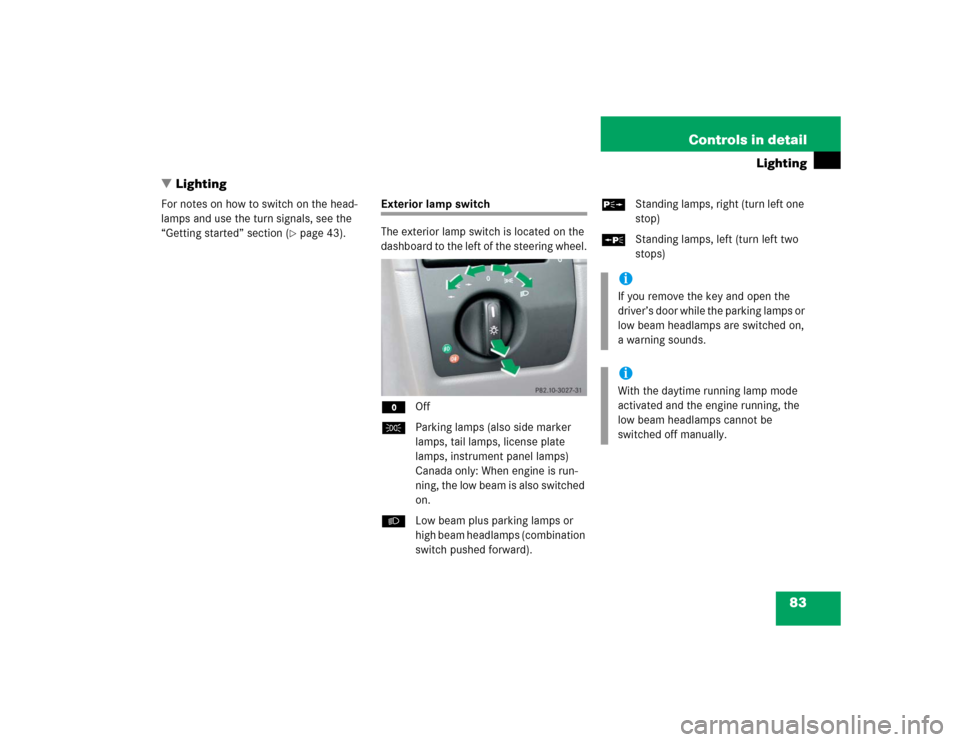
Exterior lamp switch
The exterior lamp switch is located on the
dashboard to the left of the steering wheel.
MOff
CParking lamps (also side marker
lamps, tail lamps, license plate
lamps, instrument panel lamps)
Canada only: When engine is run-
ning, the low beam is also switched
on.
BLow beam plus parking lamps or
high beam headlamps (combination
switch pushed forward).ˆStanding lamps, right (turn left one
stop)
‚Standing lamps, left (turn left two
stops)
iIf you remove the key and open the
driver’s door while the parking lamps or
low beam headlamps are switched on,
a warning sounds.iWith the daytime running lamp mode
activated and the engine running, the
low beam headlamps cannot be
switched off manually.
Page 86 of 314
86 Controls in detailLightingHazard warning flasher
The hazard warning flasher can be activat-
ed with the ignition switched on or off. It is
activated automatically when an airbag is
deployed.
The switch is located on the center
console.
1Hazard warning flasher switchSwitching on hazard warning flasher
�
Press hazard warning flasher
switch1.
All the turn signals will blink.
Switching off hazard flasher
�
Press hazard warning flasher switch1
again.
Page 90 of 314
 once
with key in steering lock position2
(
�page 29) until the trip odometer is
reset
or
�
Press left knob3 (
�pa")
90 Controls in detailInstrument cluster
Trip odometer�
Press left knob3 (
�page 20) once
with key in steering lock position2
(
�page 29) until the trip odometer is
reset
or
�
Press left knob3 (
�page 20) twice
with key removed or in steering lock
position0 or1 (
�page 29) until the
trip odometer is reset.
Tachometer
The red marking on the tachometer
(�page 20) denotes excessive engine
speed.
To help protect the engine, the fuel supply
is interrupted if the engine is operated
within the red marking.
Warning!
G
Driving when your engine is badly overheat-
ed can cause some fluids which may have
leaked into the engine compartment to
catch fire. You could be seriously burned.
Steam from an overheated engine can cause
serious burns and can occur just by opening
the engine hood. Stay away from the engine
if you see or hear steam coming from it.
Turn off the engine, get out of the vehicle
and do not stand near the vehicle until the
engine has cooled down.
!Avoid driving at excessive engine
speeds, as it may result in serious en-
gine damage that is not covered by the
Mercedes-Benz Limited Warranty.
Page 91 of 314
, you will notice a delay before the")
91 Controls in detail
Instrument cluster
Outside temperature indicator
When moving the vehicle into colder ambi-
ent temperatures (e.g. when leaving your
garage), you will notice a delay before the
lower temperature is displayed.
A delay also occurs when ambient temper-
atures rise. This prevents inaccurate tem-
perature indications caused by heat
radiated from the engine during idling or
slow driving.
Setting clock
Hour�
Pull out right knob5 in the instrument
cluster (
�page 20) and turn it counter-
clockwise.
Minutes
�
Pull out right knob5 in the instrument
cluster and turn it clockwise.
Warning!
G
The outside temperature indicator is not de-
signed to serve as an ice-warning device and
is therefore unsuitable for that purpose.
Indicated temperatures just above the freez-
ing point do not guarantee that the road sur-
face is free of ice. The road may still be icy,
especially in wooded areas or on bridges.
iTo adjust the time by a single hour or a
few minutes, turn knob5 just a few
degrees in the direction indicated for
hours or minutes.