Page 196 of 314
196 OperationVehicle care�
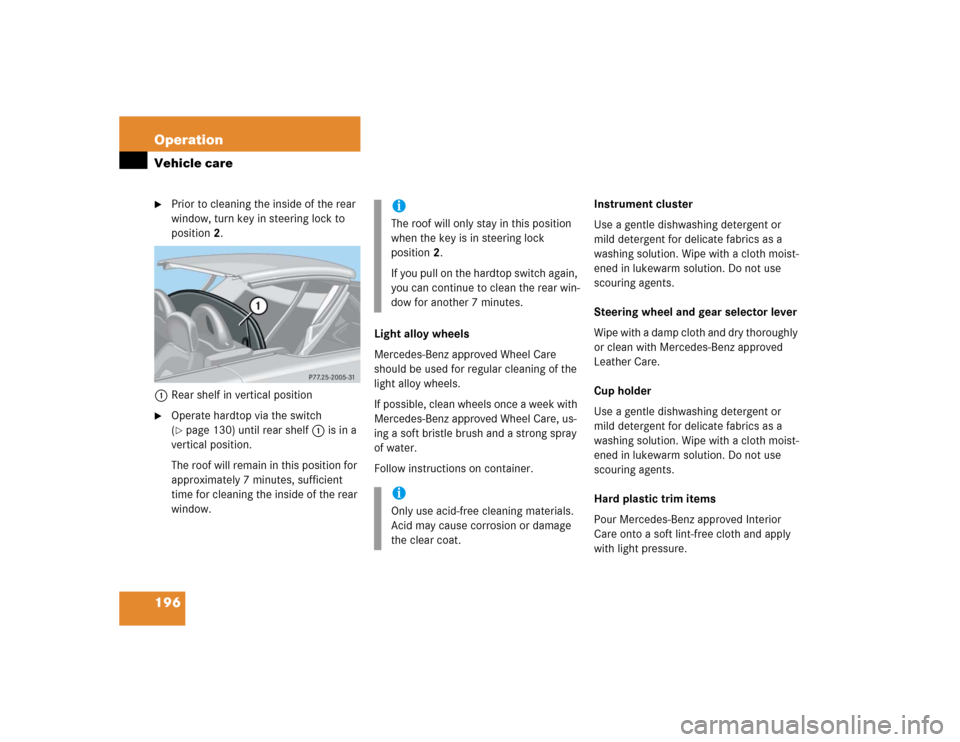
Prior to cleaning the inside of the rear
window, turn key in steering lock to
position2.
1Rear shelf in vertical position
�
Operate hardtop via the switch
(�page 130) until rear shelf1 is in a
vertical position.
The roof will remain in this position for
approximately 7 minutes, sufficient
time for cleaning the inside of the rear
window.Light alloy wheels
Mercedes-Benz approved Wheel Care
should be used for regular cleaning of the
light alloy wheels.
If possible, clean wheels once a week with
Mercedes-Benz approved Wheel Care, us-
ing a soft bristle brush and a strong spray
of water.
Follow instructions on container.Instrument cluster
Use a gentle dishwashing detergent or
mild detergent for delicate fabrics as a
washing solution. Wipe with a cloth moist-
ened in lukewarm solution. Do not use
scouring agents.
Steering wheel and gear selector lever
Wipe with a damp cloth and dry thoroughly
or clean with Mercedes-Benz approved
Leather Care.
Cup holder
Use a gentle dishwashing detergent or
mild detergent for delicate fabrics as a
washing solution. Wipe with a cloth moist-
ened in lukewarm solution. Do not use
scouring agents.
Hard plastic trim items
Pour Mercedes-Benz approved Interior
Care onto a soft lint-free cloth and apply
with light pressure.
iThe roof will only stay in this position
when the key is in steering lock
position2.
If you pull on the hardtop switch again,
you can continue to clean the rear win-
dow for another 7 minutes.iOnly use acid-free cleaning materials.
Acid may cause corrosion or damage
the clear coat.
Page 201 of 314
201 Practical hints
What to do if …
Problem
Possible cause
Suggested solution
-
The yellow ABS malfunction indi-
cator lamp and warning comes
on while driving.
The ABS has detected a malfunction and has
switched off. The BAS and ESP are also
switched off. Both indicator lamps come on
with the engine running.
The brake system is still functioning normally
but without the ABS available.
�
Continue driving with added caution.
Wheels will lock during hard braking
reducing steering capability.
�
Have the system checked at an autho-
rized Mercedes-Benz Center as soon
as possible.
Failure to follow these instructions in-
creases the risk of an accident.
The charging voltage has fallen below
10 volts and the ABS has switched off.
�
When the voltage is above this value
again, the ABS is operational again.
�
If necessary, have the alternator and
battery checked.
Page 202 of 314
202 Practical hintsWhat to do if …Problem
Possible cause
Suggested solution
¿
The yellow BAS/ESP malfunction
indicator lamp comes on while
driving.
The ESP is deactivated because of an inter-
rupted power supply. The ABS may still be
operational.
�
Synchronize the ESP. With vehicle sta-
tionary and the engine running, turn
the steering wheel completely to the
left and then to the right to synchro-
nize the ESP.
The BAS has detected a malfunction and
switched off. The brake system is still func-
tioning normally but without the BAS avail-
able.
�
Continue driving with added caution.
�
Have the system checked at an autho-
rized Mercedes-Benz Center as soon
as possible.
Failure to follow these instructions in-
creases the risk of accident.
!When synchronizing the ESP, make
sure you can turn the steering wheel in
both directions as far as it will go with-
out the wheels hitting any objects, e.g.
a road curb.
Page 235 of 314
235 Practical hints
Flat tire
�Flat tire
Your vehicle is equipped with a TIREFIT kit
(SLK 32 AMG only) (
�page 214) or a
spare wheel with collapsible tire
(SLK 230 Kompressor and SLK 320 only)
(
�page 213).
You can identify which TIREFIT kit
(SLK 32 AMG only) you have as follows:
�
The TIREFIT container of kit 1 is a
squeeze container.
�
The TIREFIT container of kit 2 is a rigid
container and includes a flange for filler
hose (outlet) and air hose (inlet).
Preparing the vehicle�
Park the vehicle as far as possible from
moving traffic on a hard surface.
�
Turn on hazard warning flasher.
�
Engage the steering wheel lock in the
straight ahead position and set the
parking brake.
�
Move the selector lever toP (manual
transmission to first or reverse gear).
�
Have any passenger exit the vehicle at
a safe distance from the roadway.
Sealing tires with TIREFIT kit 1
Small tire punctures, only those in the
tread, can be sealed with TIREFIT.
TIREFIT can be used in ambient tempera-
tures down to -4°F (-20°C).
The TIREFIT kit stored in the trunk
(�page 214) contains the TIREFIT
container, a filler hose, a valve stem tool,
a valve core and a sticker.
�
Foreign objects (e.g. screws or nails)
should not be removed from the tire.
�
Attach the sticker where it will be easily
seen by the driver on the instrument
cluster.
Warning!
G
Keep TIREFIT away from sparks, open flame
or heat source.
Do not smoke.
Warning!
G
TIREFIT is a limited repair device. TIREFIT
cannot be used for:�
cuts or punctures larger than approx.
0.16 in (4 mm)
�
on a flat tire, or a damaged wheel
�
tire damage caused by driving with ex-
tremely low tire pressure
Do not drive the vehicle under such circum-
stances.
Contact your nearest Mercedes-Benz
Center for assistance or call Roadside Assis-
tance.
Page 249 of 314
249 Practical hints
Flat tire
�
Before storing the jack in the trunk, it
should be fully collapsed, with pin and
handle folded in.
Inflating the collapsible spare tire
�
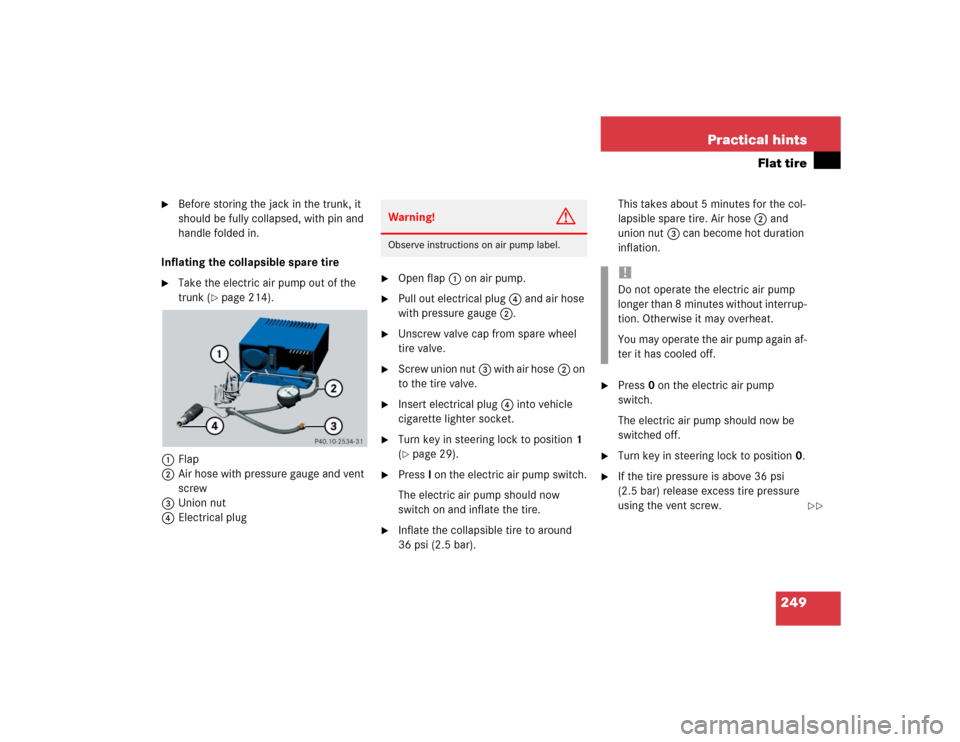
Take the electric air pump out of the
trunk (
�page 214).
1Flap
2Air hose with pressure gauge and vent
screw
3Union nut
4Electrical plug
�
Open flap1 on air pump.
�
Pull out electrical plug4 and air hose
with pressure gauge2.
�
Unscrew valve cap from spare wheel
tire valve.
�
Screw union nut3 with air hose2 on
to the tire valve.
�
Insert electrical plug4 into vehicle
cigarette lighter socket.
�
Turn key in steering lock to position1
(�page 29).
�
PressI on the electric air pump switch.
The electric air pump should now
switch on and inflate the tire.
�
Inflate the collapsible tire to around
36 psi (2.5 bar).This takes about 5 minutes for the col-
lapsible spare tire. Air hose2 and
union nut3 can become hot duration
inflation.
�
Press0 on the electric air pump
switch.
The electric air pump should now be
switched off.
�
Turn key in steering lock to position0.
�
If the tire pressure is above 36 psi
(2.5 bar) release excess tire pressure
using the vent screw.
Warning!
G
Observe instructions on air pump label.
!Do not operate the electric air pump
longer than 8 minutes without interrup-
tion. Otherwise it may overheat.
You may operate the air pump again af-
ter it has cooled off.
��
Page 257 of 314
257 Practical hints
Towing the vehicle
Warning!
G
Prior to towing the vehicle with all wheels on
the ground, make certain that the key is in
starter switch position2.
If the key is left in starter switch position 0
for an extended period of time, it can no
longer be turned in the switch. In this case,
the steering is locked. To unlock, remove
key from starter switch and reinsert.
If circumstances require towing the vehicle
with all wheels on the ground, always tow
with a tow bar if:�
the engine will not run
�
there is a malfunction in the power sup-
ply or in the vehicle’s electrical system
as that will be necessary to adequately con-
trol the towed vehicle.
Warning!
G
With the engine not running, there is no
power assistance for the brake and steering
systems. In this case, it is important to keep
in mind that a considerably higher degree of
effort is necessary to brake and steer the ve-
hicle. Adapt your driving accordingly.iTo signal turns while being towed with
the hazard warning flasher in use, turn
key in starter switch to position2 and
activate the combination switch for the
left or right turn signal in the usual
manner – only the selected turn signal
will operate.
Upon canceling the turn signal, the haz-
ard warning flasher will operate again.
!When towing the vehicle with all wheels
on the ground, please note the follow-
ing:
With the automatic central locking acti-
vated and the key in starter switch
position2, the vehicle doors lock if the
left front wheel as well as the right rear
wheel are turning at vehicle speeds of
approx. 9 mph (15 km / h) or more.
Switch off the tow-away alarm
(�page 72).
To prevent the vehicle door locks from
locking, deactivate the automatic cen-
tral locking (
�page 79).
Towing of the vehicle should only be
done using the properly installed tow-
ing eye bolt. Never attach tow cable,
tow rope or tow rod to the vehicle chas-
sis, frame or suspension parts.
Page 277 of 314
277 Technical data
Fuels, coolants, lubricants etc.
�Fuels, coolants, lubricants etc.
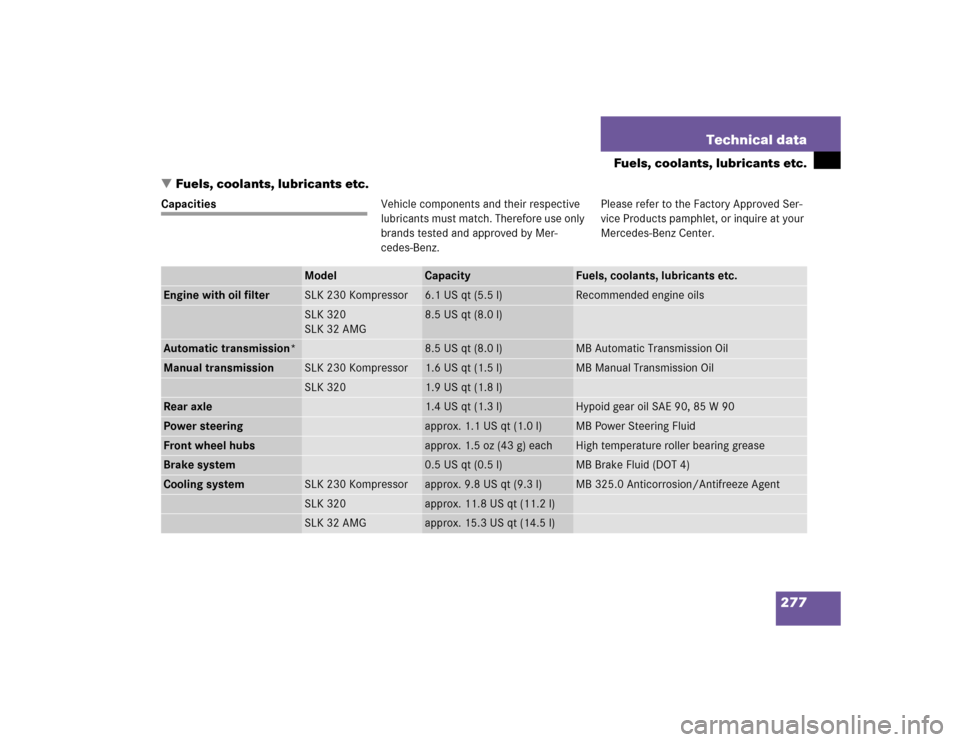
CapacitiesVehicle components and their respective
lubricants must match. Therefore use only
brands tested and approved by Mer-
cedes-Benz.Please refer to the Factory Approved Ser-
vice Products pamphlet, or inquire at your
Mercedes-Benz Center.
Model
Capacity
Fuels, coolants, lubricants etc.
Engine with oil filter
SLK 230 Kompressor
6.1 US qt (5.5 l)
Recommended engine oils
SLK 320
SLK 32 AMG
8.5 US qt (8.0 l)
Automatic transmission*
8.5 US qt (8.0 l)
MB Automatic Transmission Oil
Manual transmission
SLK 230 Kompressor
1.6 US qt (1.5 l)
MB Manual Transmission Oil
SLK 320
1.9 US qt (1.8 l)
Rear axle
1.4 US qt (1.3 l)
Hypoid gear oil SAE 90, 85 W 90
Power steering
approx. 1.1 US qt (1.0 l)
MB Power Steering Fluid
Front wheel hubs
approx. 1.5 oz (43 g) each
High temperature roller bearing grease
Brake system
0.5 US qt (0.5 l)
MB Brake Fluid (DOT 4)
Cooling system
SLK 230 Kompressor
approx. 9.8 US qt (9.3 l)
MB 325.0 Anticorrosion/Antifreeze Agent
SLK 320
approx. 11.8 US qt (11.2 l)
SLK 32 AMG
approx. 15.3 US qt (14.5 l)
Page 296 of 314

296 IndexCentral locking
From inside 80
Unlocking from inside 80
Certification label 266
Changing CDs
CD mode 121
Charging
Vehicle battery 252
CHECK ENGINE malfunction indicator
lamp 205
Checking
Coolant level 173, 180
Oil level 172, 175
Tire inflation pressure 173
Vehicle lighting 173
Child safety 60
Airbags 54
Infant and child restraint systems 57,
60
Cigarette lighter 143
Cleaning
Cloth upholstery 197Cup holder 196
Gear selector lever 196
Hard plastic trim items 196
Headliner 197
Instrument cluster 196
Leather upholstery 197
Light alloy wheels 196
Plastic and rubber parts 197
Rear window 195
Seat belts 197
Steering wheel 196
Windows 195
Windshield 45
Wiper blades 195
Cleaning*
Headlamps 99
Climate control 102
Adjusting air distribution 105
Adjusting air volume 105
Air conditioning 106
Air recirculation mode 106
Deactivating the climate control
system 110
Defogging windshield 110
Defrosting 109Reactivating the climate control
system 110
Rear window defroster 101
Residual heat utilization 107
Residual ventilation 107
Setting the temperature 104
Clock 21
Setting 91
Closing
Glove box 139
Hood 175
Retractable hardtop 221
Side windows 128
Trunk lid 78
Windows 128
Closing hardtop
In an emergency 221
Cloth upholstery
Cleaning 197
Cockpit 18, 287
Coin holder 142
Collapsible tire 287