Page 83 of 314
83 Controls in detail
Lighting
�Lighting
For notes on how to switch on the head-
lamps and use the turn signals, see the
“Getting started” section (
�page 43).
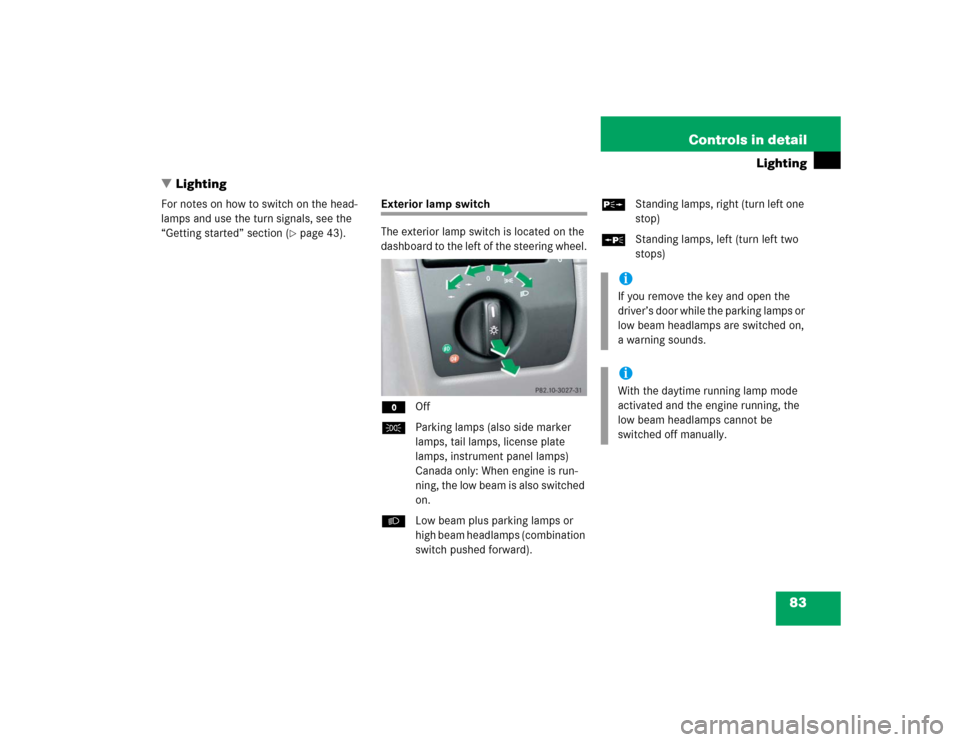
Exterior lamp switch
The exterior lamp switch is located on the
dashboard to the left of the steering wheel.
MOff
CParking lamps (also side marker
lamps, tail lamps, license plate
lamps, instrument panel lamps)
Canada only: When engine is run-
ning, the low beam is also switched
on.
BLow beam plus parking lamps or
high beam headlamps (combination
switch pushed forward).ˆStanding lamps, right (turn left one
stop)
‚Standing lamps, left (turn left two
stops)
iIf you remove the key and open the
driver’s door while the parking lamps or
low beam headlamps are switched on,
a warning sounds.iWith the daytime running lamp mode
activated and the engine running, the
low beam headlamps cannot be
switched off manually.
Page 84 of 314

Vehicles with automatic transmission
When the engine is running, the low beam
headlamps are automatically switched on.
In low am")
84 Controls in detailLightingDaytime running lamp mode (Canada
only)
Vehicles with automatic transmission
When the engine is running, the low beam
headlamps are automatically switched on.
In low ambient light conditions the parking
lamps will also switch on.
When you shift from a driving position to
positionN orP, the low beam switches off
(two seconds delay).
Vehicles with manual transmission
With the engine running, the low beam
headlamps are automatically switched on.
For nighttime driving you should turn the
exterior lamp switch to positionB to
permit activation of the high beam head-
lamps.Switching on front fog lamps
�
Make sure the low beam headlamps
are switched on.
�
Pull out exterior lamp switch to first
stop.
The green indicator lamp‡ in the
lamp switch lights up.Switching on rear fog lamp
�
Make sure the low beam headlamps
are switched on.
�
Pull out exterior lamp switch to second
stop.
The yellow indicator lamp† in the
lamp switch lights up.
iThe high beam flasher is always avail-
able.
iFog lamps will operate with the parking
lamps and/or low beam headlamps on.
Fog lamps should only be used in con-
junction with low beam headlamps.
Consult your State or Province Motor
Vehicle Regulations regarding allow-
able lamp operation.
Page 89 of 314
.
The instrume")
89 Controls in detail
Instrument cluster
�Instrument cluster
A full view illustration of the instrument
cluster can be found in the “At a glance”
section of this manual (
�page 20).
The instrument cluster is activated when
you
�
open the driver’s door
�
turn the key in steering lock to
position2 (
�page 29)
�
press left knob3 (
�page 20)
Instrument cluster illumination
Instrument lamps
To brighten illumination�
Turn knob3 (
�page 20) clockwise.
The instrument lamps will brighten.
To dim illumination
�
Turn knob3 counterclockwise.
The instrument lamps will dim.
Display illumination
�
Press knob3.
With key removed or in steering lock
position0 or1 (
�page 29), the display
is illuminated for a short time.
Coolant temperature gauge
Under normal driving conditions, the cool-
ant temperature may rise to 248°F
(120°C). The coolant temperature may
climb to the red marking:�
at high outside temperatures
�
during stop-and-go traffic
�
when driving on hilly terrain
The engine should not be operated with
the coolant temperature in the red zone.
Doing so may cause serious engine dam-
age which is not covered by the
Mercedes-Benz Limited Warranty.
Page 90 of 314
 once
with key in steering lock position2
(
�page 29) until the trip odometer is
reset
or
�
Press left knob3 (
�pa")
90 Controls in detailInstrument cluster
Trip odometer�
Press left knob3 (
�page 20) once
with key in steering lock position2
(
�page 29) until the trip odometer is
reset
or
�
Press left knob3 (
�page 20) twice
with key removed or in steering lock
position0 or1 (
�page 29) until the
trip odometer is reset.
Tachometer
The red marking on the tachometer
(�page 20) denotes excessive engine
speed.
To help protect the engine, the fuel supply
is interrupted if the engine is operated
within the red marking.
Warning!
G
Driving when your engine is badly overheat-
ed can cause some fluids which may have
leaked into the engine compartment to
catch fire. You could be seriously burned.
Steam from an overheated engine can cause
serious burns and can occur just by opening
the engine hood. Stay away from the engine
if you see or hear steam coming from it.
Turn off the engine, get out of the vehicle
and do not stand near the vehicle until the
engine has cooled down.
!Avoid driving at excessive engine
speeds, as it may result in serious en-
gine damage that is not covered by the
Mercedes-Benz Limited Warranty.
Page 91 of 314
, you will notice a delay before the")
91 Controls in detail
Instrument cluster
Outside temperature indicator
When moving the vehicle into colder ambi-
ent temperatures (e.g. when leaving your
garage), you will notice a delay before the
lower temperature is displayed.
A delay also occurs when ambient temper-
atures rise. This prevents inaccurate tem-
perature indications caused by heat
radiated from the engine during idling or
slow driving.
Setting clock
Hour�
Pull out right knob5 in the instrument
cluster (
�page 20) and turn it counter-
clockwise.
Minutes
�
Pull out right knob5 in the instrument
cluster and turn it clockwise.
Warning!
G
The outside temperature indicator is not de-
signed to serve as an ice-warning device and
is therefore unsuitable for that purpose.
Indicated temperatures just above the freez-
ing point do not guarantee that the road sur-
face is free of ice. The road may still be icy,
especially in wooded areas or on bridges.
iTo adjust the time by a single hour or a
few minutes, turn knob5 just a few
degrees in the direction indicated for
hours or minutes.
Page 92 of 314
.
Do not exceed the maximum s")
92 Controls in detailManual transmission
�Manual transmissionInformation on driving with a manual trans-
mission is found in the “Getting started”
section (
�page 40).
Do not exceed the maximum speed in the
individual gears. Refer to tachometer
(
�page 90) for engine speeds.
Shifting into reverse�
Stop the vehicle completely.
�
Pull gearshift lever up and shift in
Rreverse.
Warning!
G
For vehicles equipped with a manual trans-
mission, getting out of your vehicle with the
gearshift lever not engaged in first or re-
verse gear and parking brake engaged is
dangerous. Also, when parked on an incline,
an engaged first or reverse gear alone may
not prevent your vehicle from moving, possi-
bly hitting people or objects.
Always set the parking brake in addition to
engaging first or reverse gear (
�page 47).
When parked on an incline, turn front wheels
towards the road curb.
Do not park this vehicle in areas where com-
bustible materials such as grass, hay or
leaves can come into contact with the hot
exhaust system, as these materials could be
ignited and cause a vehicle fire.Warning!
G
When leaving the vehicle, always remove the
key from the steering lock, and lock the ve-
hicle. Do not leave children unattended in
the vehicle, or with access to an unlocked
vehicle. Children could move the gearshift
lever, which could result in an accident
and/or serious injury.
On slippery road surfaces as well as high en-
gine speeds, never downshift in order to ob-
tain braking action. This could result in drive
wheel slip and reduced vehicle control. Your
vehicle’s ABS will not prevent this type of
loss of control.
!Downshifting gears leading to overrev-
ving the engine can result in engine
damage that is not covered by the
Mercedes-Benz Limited Warranty.
Never hold the vehicle stopped on a hill
by using the clutch pedal. The clutch
may be damaged which is not covered
by the Mercedes-Benz Limited
Warranty.
Do not exceed the engine speed limits
(�page 90).
Page 93 of 314
.
Your vehicle�")
93 Controls in detail
Automatic transmission*
�Automatic transmission*
Information on driving with an automatic
transmission is found in the “Getting
started” section (
�page 27).
Your vehicle’s transmission adapts its gear
shifting process to your individual driving
style by continually adjusting the shift
points up or down. These shift point adjust-
ments are performed based on current
operating and driving conditions.
If the operating conditions change, the
automatic transmission reacts by
adjusting its gear shift program.The automatic transmission selects indi-
vidual gears automatically, depending on:
�
the gear selector lever positionD with
gear ranges4, 3, 2, 1 (
�page 95)
�
the selected shift program (W/S)
(�page 97)
�
the position of the accelerator pedal
(�page 98)
�
the vehicle speed
The current gear selector lever position
appears in the tachometer display see
“Getting started” (
�page 27). When the gear selector lever is in
positionD, you can influence transmission
shifting by:
�
limiting the gear range
�
changing gears manually
iDuring the brief warm-up, transmission
upshifting is delayed. This allows the
catalytic converter to heat up more
quickly to operating temperature.
Warning!
G
It is dangerous to shift the gear selector
lever out ofP orN if the engine speed is
higher than idle speed. If your foot is not
firmly on the brake pedal, the vehicle could
accelerate quickly forward or reverse. You
could lose control of the vehicle and hit
someone or something. Only shift into gear
when the engine is idling normally and when
your right foot is firmly on the brake pedal.
Page 94 of 314

94 Controls in detailAutomatic transmission*One-touch gearshifting
Even with an automatic transmission you
can change the gears manually when the
gear selector lever is in positionD.
Downshifting�
Briefly press the gear selector lever to
the left in theD-direction.
The transmission will shift from the current
gear to the next lower gear. This action
simultaneously limits the gear range of the
transmission (
�page 95).Upshifting
�
Briefly press the gear selector lever to
the right in theD+direction.
The transmission will shift from the current
gear to the next higher gear as permitted
by the shift program. This action simul-
taneously extends the gear range of the
transmission.Canceling gear range limit
�
Press and hold the gear selector lever
in theD+direction until
D reappears in
the tachometer display.
The transmission will shift from the current
gear range directly to gear rangeD.
Shifting into optimal gear range
�
Press and hold the gear selector lever
in theD-direction.
The transmission will automatically select
the gear range suited for optimal
acceleration and deceleration. This will
involve shifting down one or more gears.
Warning!
G
On slippery road surfaces, never downshift
in order to obtain braking action. This could
result in drive wheel slip and reduced
vehicle control. Your vehicle’s ABS will not
prevent this type of loss of control.
iTo avoid overrevving the engine when
the gear selector lever is moved to
theD-direction, the transmission will
not shift to a lower gear if the engine’s
max. speed would be exceeded.