Page 171 of 314

171 Operation
At the gas station
�At the gas station
Refueling
The fuel filler flap is located on the
right-hand side of the vehicle towards the
rear. Locking/unlocking the vehicle with
the remote control automatically
locks/unlocks the fuel filler flap.
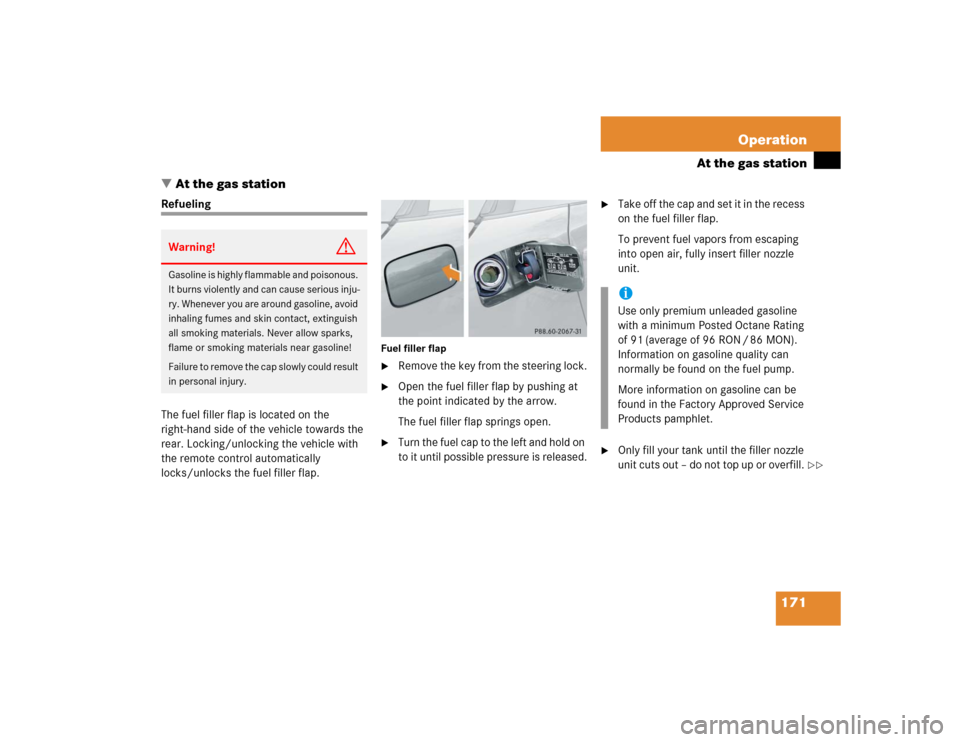
Fuel filler flap�
Remove the key from the steering lock.
�
Open the fuel filler flap by pushing at
the point indicated by the arrow.
The fuel filler flap springs open.
�
Turn the fuel cap to the left and hold on
to it until possible pressure is released.
�
Take off the cap and set it in the recess
on the fuel filler flap.
To prevent fuel vapors from escaping
into open air, fully insert filler nozzle
unit.
�
Only fill your tank until the filler nozzle
unit cuts out – do not top up or overfill.
Warning!
G
Gasoline is highly flammable and poisonous.
It burns violently and can cause serious inju-
ry. Whenever you are around gasoline, avoid
inhaling fumes and skin contact, extinguish
all smoking materials. Never allow sparks,
flame or smoking materials near gasoline!
Failure to remove the cap slowly could result
in personal injury.
iUse only premium unleaded gasoline
with a minimum Posted Octane Rating
of 91 (average of 96 RON / 86 MON).
Information on gasoline quality can
normally be found on the fuel pump.
More information on gasoline can be
found in the Factory Approved Service
Products pamphlet.
��
Page 216 of 314

216 Practical hintsUnlocking/locking in an emergency
�Unlocking/locking in an emergencyUnlocking the vehicle
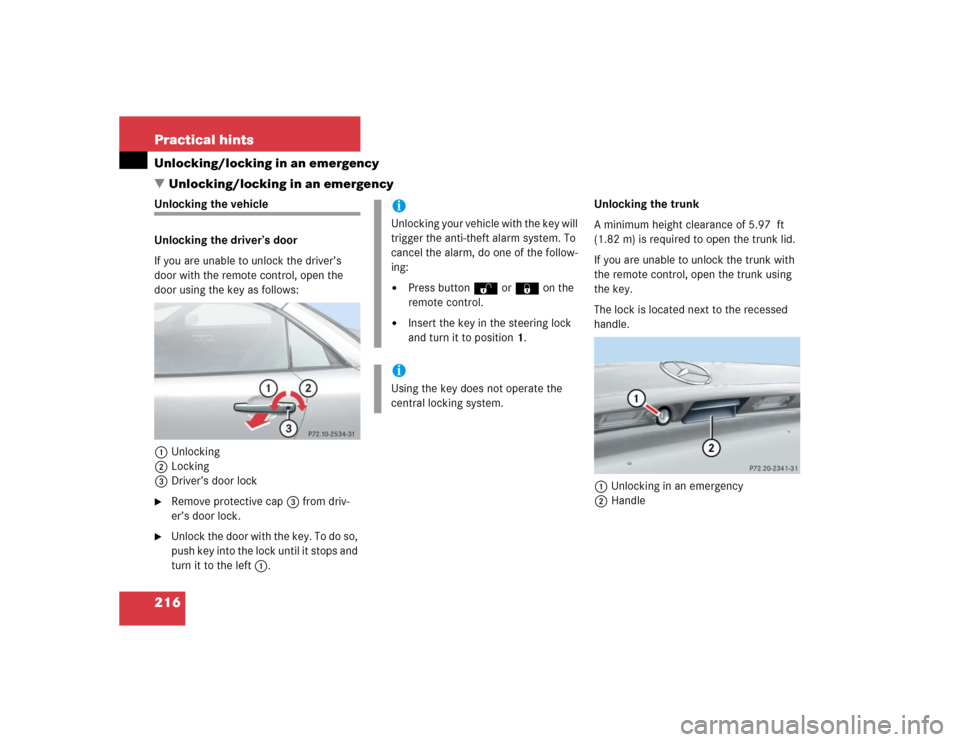
Unlocking the driver’s door
If you are unable to unlock the driver’s
door with the remote control, open the
door using the key as follows:
1Unlocking
2Locking
3Driver’s door lock�
Remove protective cap3 from driv-
er’s door lock.
�
Unl ock t he door wi th the ke y. T o do s o,
push key into the lock until it stops and
turn it to the left1.Unlocking the trunk
A minimum height clearance of 5.97 ft
(1.82 m) is required to open the trunk lid.
If you are unable to unlock the trunk with
the remote control, open the trunk using
the key.
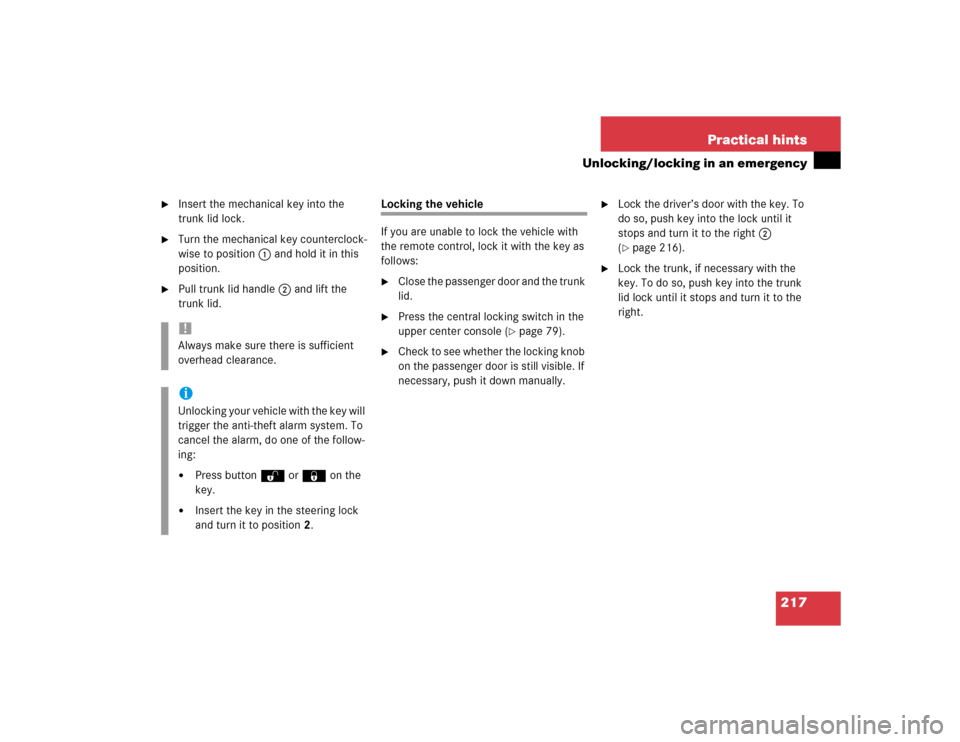
The lock is located next to the recessed
handle.
1Unlocking in an emergency
2Handle
iUnlocking your vehicle with the key will
trigger the anti-theft alarm system. To
cancel the alarm, do one of the follow-
ing:�
Press buttonŒor‹on the
remote control.
�
Insert the key in the steering lock
and turn it to position1.
iUsing the key does not operate the
central locking system.
Page 217 of 314

217 Practical hints
Unlocking/locking in an emergency
�
Insert the mechanical key into the
trunk lid lock.
�
Turn the mechanical key counterclock-
wise to position1 and hold it in this
position.
�
Pull trunk lid handle2 and lift the
trunk lid.
Locking the vehicle
If you are unable to lock the vehicle with
the remote control, lock it with the key as
follows:�
Close the passenger door and the trunk
lid.
�
Press the central locking switch in the
upper center console (
�page 79).
�
Check to see whether the locking knob
on the passenger door is still visible. If
necessary, push it down manually.
�
Lock the driver’s door with the key. To
do so, push key into the lock until it
stops and turn it to the right2
(�page 216).
�
Lock the trunk, if necessary with the
key. To do so, push key into the trunk
lid lock until it stops and turn it to the
right.
!Always make sure there is sufficient
overhead clearance. iUnlocking your vehicle with the key will
trigger the anti-theft alarm system. To
cancel the alarm, do one of the follow-
ing:�
Press buttonŒ or‹on the
key.
�
Insert the key in the steering lock
and turn it to position 2.
Page 218 of 314

218 Practical hintsUnlocking/locking in an emergencyChanging batteries in remote control
If the batteries in the remote control are
discharged, the vehicle can no longer be
locked or unlocked. It is recommended to
have the batteries replaced at an autho-
rized Mercedes-Benz Center.
Batteries contain materials that can harm
the environment if disposed of improperly.
Recycling of batteries is the preferred
method of disposal. Many states require
sellers of batteries to accept old batteries
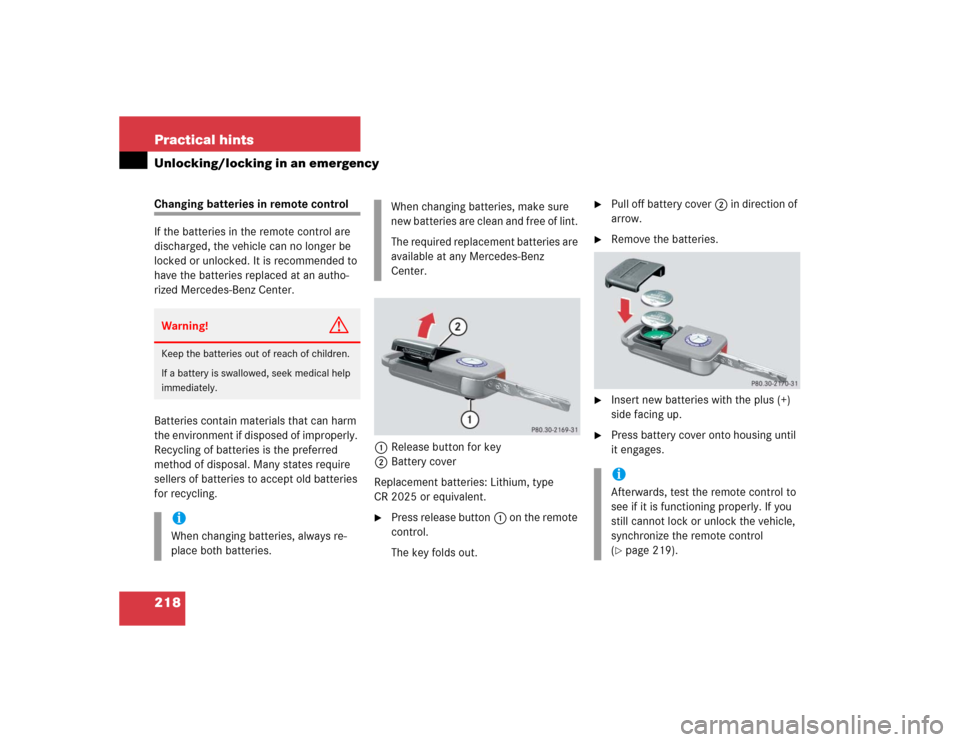
for recycling.1Release button for key
2Battery cover
Replacement batteries: Lithium, type
CR 2025 or equivalent.
�
Press release button1 on the remote
control.
The key folds out.
�
Pull off battery cover2 in direction of
arrow.
�
Remove the batteries.
�
Insert new batteries with the plus (+)
side facing up.
�
Press battery cover onto housing until
it engages.
Warning!
G
Keep the batteries out of reach of children.
If a battery is swallowed, seek medical help
immediately.iWhen changing batteries, always re-
place both batteries.
When changing batteries, make sure
new batteries are clean and free of lint.
The required replacement batteries are
available at any Mercedes-Benz
Center.
iAfterwards, test the remote control to
see if it is functioning properly. If you
still cannot lock or unlock the vehicle,
synchronize the remote control
(�page 219).
Page 219 of 314
219 Practical hints
Unlocking/locking in an emergency
Synchronizing remote control
If you are unable to lock or unlock the ve-
hicle with the remote control, the remote
control may have to be resynchronized.�
Aim transmitter eye at vehicle and
briefly press transmit buttonŒ
or‹twice.
�
Within approximately 30 seconds
insert key in steering lock and turn it to
position2 (
�page 29).
The remote control should once again be
operational.
If the remote control is still malfunctioning,
contact an authorized Mercedes-Benz
Center.
Fuel filler flap
In case the central locking system does
not release the fuel filler flap, you can open
it manually.
1Release knob
2Cover
�
Open the trunk lid.
�
Open cover2 in the right side trunk
panel.
The cover is located behind the trunk
lid hinge.
�
Pull release knob1 in the direction of
arrow.
The fuel filler flap is opened simulta-
neously.
Page 295 of 314

295 Index
BAS/ESP
Malfunction indicator lamp 200
Batteries, Remote control
Check lamp 75
Batteries, remote control
Changing 218
Battery discharged
Jump starting 254
Battery, vehicle 183, 251
Charging 252
Disconnecting 252
Reconnecting 252
Reinstalling 252
Removing 252
Block heater 189
Bolts
For spare wheel 213
Brake assist system (BAS) 287
Brake fluid 279
Brake lamp bulbs 227
Brake lamp, high mounted 227
Brakes 162
Warning lamp 204Break-in period 160
Bulbs, replacing 226
Additional turn signals 226
Backup lamps 227
Brake lamps 227
Fog lamps 226
Front lamps 226
High beam 226
High mounted brake lamp 227
License plate lamps 227, 231
Low beam 226
Parking lamps 226, 227, 229
Rear fog lamp 227
Rear fog lamps 230
Side marker lamps 226, 230
Standing lamps 226, 227, 229
Tail lamp assemblies 227, 230
Turn signal lamps 226, 227
Button
Audio system 115C
CAC (Customer Assistance Center) 287
California
Important notice 9
Calling up
Service indicator 191
CAN system 287
Capacities
Fuels, coolants, lubricants, etc. 277
Casette mode
Playing cassettes 118
Catalytic converter 169
CD changer* 122, 215
Removing and installing 122
CD mode 121
Center console 23
AIRBAG OFF indicator lamp 211
Lower part 24
Storage compartment 140
Upper part 23
Page 298 of 314

298 IndexDownhill driving
Cruise control 137
Downshifting 92, 94
Drink holder see Cup holder 140
Drinking and driving 161
Driving
General instructions 37, 161
Hydroplaning 165
In winter 167
Problems 45
Safety systems 66
Through standing water 168
Traveling abroad 168
Driving instructions 161
Driving off 163
Driving safety systems
ABS 66
BAS 67
ESP 68
Driving systems 136
Cruise control 136
Driving safety systems 66E
Electrical fuses 260
Electrical system
Technical data 274
Electronic Stability Program see ESP 22,
68, 288
Emergency call system 145
Requirements 145
Emergency calls
Initiating an emergency call 147
With Tele Aid 146
Emergency operation (Limp Home
Mode) 98
Emergency operations
Closing hardtop 221
Opening hardtop 221
Releasing trunk lid from inside 78
Remote door unlock 151
Unlocking the vehicle 216
Emergency tensioning device see
ETD 60, 288
Emission control 170
Emission control label 266
Engine
Compartment 174Starting with automatic
transmission* 41
Starting with manual
transmission 40
Starting with the key 40, 41
Technical data 268
Turning off with the key 48
Engine cleaning 194
Engine compartment 174
Hood 174
Engine malfunction indicator lamp 21,
205
Engine number 288
Engine oil 175, 279
Adding 179
Additives 279
Checking level 175
Consumption 175
Messages in display 176
Oil dipstick 179
Viscosity 288
Engine oil level see Oil level 172
ESP 22, 68, 288
Switching off 69
Switching on 70
Synchronizing 202
Page 301 of 314

301 Index
Interior lighting 87
Automatic control 87
Deactivating automatic control 87
Manual control 88
Manual operation 88
Interior storage spaces 139
Cup holder 140
Glove box 139
Parcel net in front passenger
footwell 141
Storage compartment in armrest 141
Storage compartment in center
console 140
J
Jack 212
Jump starting 254K
Key 216
Positions in steering lock 29
Remote control 74
Starting the engine 40, 41
Key positions in steering lock 29
Key, Remote control
Loss of 76
Keys 74
Kickdown 98, 288
L
Labels, identification 266
Lamp bulbs, exterior 226
Lamps, exterior
Front 226
Rear 227
Lamps, indicator and warning
ABS 201
Airbag Off 56
Battery (Remote control) 75Brakes 204
CHECK ENGINE 205
Engine diagnostics 205
ESP 200
Fuel reserve 207
Instrument cluster 207
Seat belts 205
Service indicator 190
SRS 52
Turn signals 21
Lamps, malfunction indicator
BAS/ESP 200
Layout of poly-V-belt drive 267
Leather upholstery
Cleaning 197
License plate lamps
Replacing bulbs 227, 231
Light alloy wheels
Cleaning 196
Technical data 270
Lighter see Cigarette lighter 143
Lighting 83
Combination switch 85
Daytime running lamp mode 84
Exterior lamp switch 83
Front fog lamps 84