Page 214 of 314
214 Practical hintsWhere will I find ...?More information can be found in the
“Technical data” section (
�page 263).
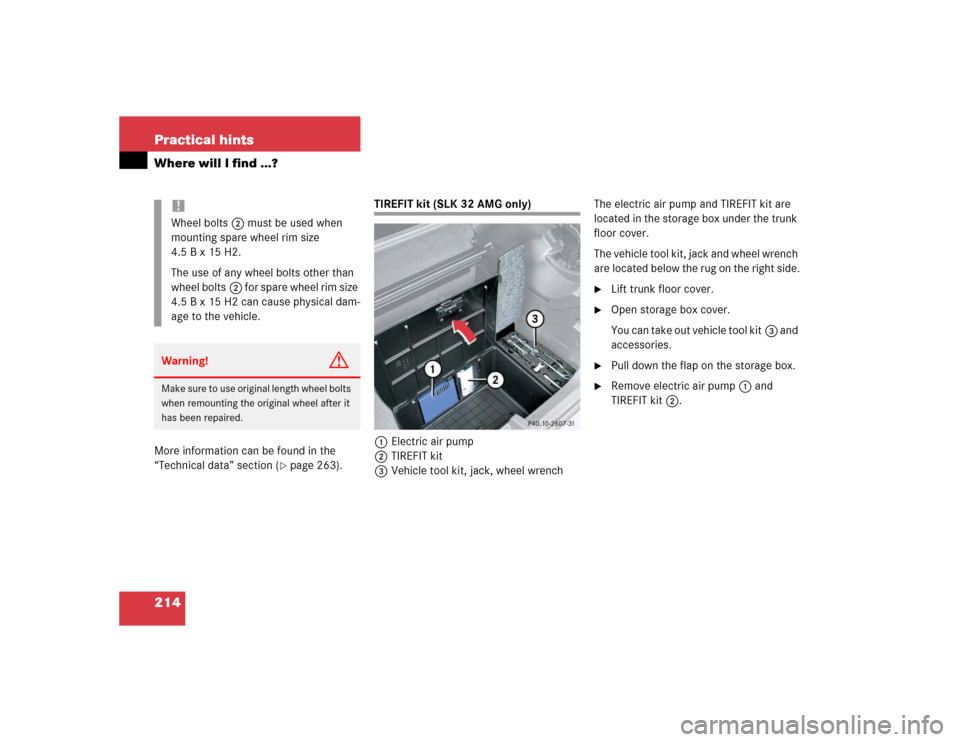
TIREFIT kit (SLK 32 AMG only)
1Electric air pump
2TIREFIT kit
3Vehicle tool kit, jack, wheel wrenchThe electric air pump and TIREFIT kit are
located in the storage box under the trunk
floor cover.
The vehicle tool kit, jack and wheel wrench
are located below the rug on the right side.
�
Lift trunk floor cover.
�
Open storage box cover.
You can take out vehicle tool kit3 and
accessories.
�
Pull down the flap on the storage box.
�
Remove electric air pump1 and
TIREFIT kit2.
!Wheel bolts2 must be used when
mounting spare wheel rim size
4.5 B x 15 H2.
The use of any wheel bolts other than
wheel bolts2 for spare wheel rim size
4.5 B x 15 H2 can cause physical dam-
age to the vehicle.Warning!
G
Make sure to use original length wheel bolts
when remounting the original wheel after it
has been repaired.
Page 218 of 314

218 Practical hintsUnlocking/locking in an emergencyChanging batteries in remote control
If the batteries in the remote control are
discharged, the vehicle can no longer be
locked or unlocked. It is recommended to
have the batteries replaced at an autho-
rized Mercedes-Benz Center.
Batteries contain materials that can harm
the environment if disposed of improperly.
Recycling of batteries is the preferred
method of disposal. Many states require
sellers of batteries to accept old batteries
for recycling.1Release button for key
2Battery cover
Replacement batteries: Lithium, type
CR 2025 or equivalent.
�
Press release button1 on the remote
control.
The key folds out.
�
Pull off battery cover2 in direction of
arrow.
�
Remove the batteries.
�
Insert new batteries with the plus (+)
side facing up.
�
Press battery cover onto housing until
it engages.
Warning!
G
Keep the batteries out of reach of children.
If a battery is swallowed, seek medical help
immediately.iWhen changing batteries, always re-
place both batteries.
When changing batteries, make sure
new batteries are clean and free of lint.
The required replacement batteries are
available at any Mercedes-Benz
Center.
iAfterwards, test the remote control to
see if it is functioning properly. If you
still cannot lock or unlock the vehicle,
synchronize the remote control
(�page 219).
Page 221 of 314

221 Practical hints
Opening/closing in an emergency
�Opening/closing in an emergency
Raising retractable hardtop manually
If the retractable hardtop cannot be closed
automatically, make certain that all points
listed under the “Retractable hardtop” sec-
tion (
�page 130) were observed.
If the automatic operation still does not
function properly, you can close the re-
tractable hardtop manually.
This procedure should be performed with
great care by two persons.
�
Open doors or lower windows
(�page 128).
�
Set parking brake (
�page 47).
�
Remove key from steering lock
(�page 29).
�
Open trunk lid (
�page 78).
�
Remove CD changer (
�page 122).
�
Open the right side trim panel in the
trunk. Remove cover, if necessary.
!Manually closing the retractable hard-
top is a complicated and technically de-
manding procedure. Close the
retractable hardtop manually in emer-
gency cases only. Otherwise, visit an
authorized Mercedes-Benz Center.
Warning!
G
�
It is important that a second person
helps you. Otherwise, you could become
trapped or injured.
�
Remove any wristwatches or jewelry
such as rings or bracelets. Otherwise,
they could get caught in the vehicle
mechanism, causing personal injury to
yourself or damage to the vehicle.
�
Always use the grips provided. Other-
wise you could injure yourself.
iIf your CD changer holder does not
have the fasteners 1 as shown under
“Installing and removing the CD chang-
er*” (
�page 122), your vehicle may be
equipped with a non-factory installed
CD changer holder. The holder then
does not need to be removed as there
should be enough room between the
CD changer holder and the right side
trim panel in the trunk to remove the
cover and gain access to the screw for
hydraulic pump should you need to
raise the retractable hardtop manually.
��
Page 222 of 314

222 Practical hintsOpening/closing in an emergency1Screw of hydraulic pump
2Control cable, right
3Hex-socket wrench�
Remove hex-socket wrench3 from
cover.
�
Using wrench3 turn screw1 of the
hydraulic pump counterclockwise as
far as it will go.
�
Keep wrench with you for later use in
closing and locking the retractable
hardtop.
�
Pull the loop of right control cable2
out of the opening.
�
Remove first aid kit (
�page 212).
�
Open the left side trim panel in the
trunk. 4Control cable, left
�
Pull the loop of left control cable4 out
of the opening.
iVehicles with factory-installed
CD changer:
Guide hex-socket wrench through the
available opening in the CD changer
holder to access and turn the screw of
the hydraulic pump. !Do not operate the hardtop switch with
screw1 in opened position, otherwise
the hydraulic pump could be damaged.
iIf you cannot find the control cable,
carefully insert a finger into the open-
ing to feel for the cable. Warning!
G
At this point, the remaining procedure
needs to be done by two people. Otherwise
you could be injured.
��
Page 223 of 314
223 Practical hints
Opening/closing in an emergency
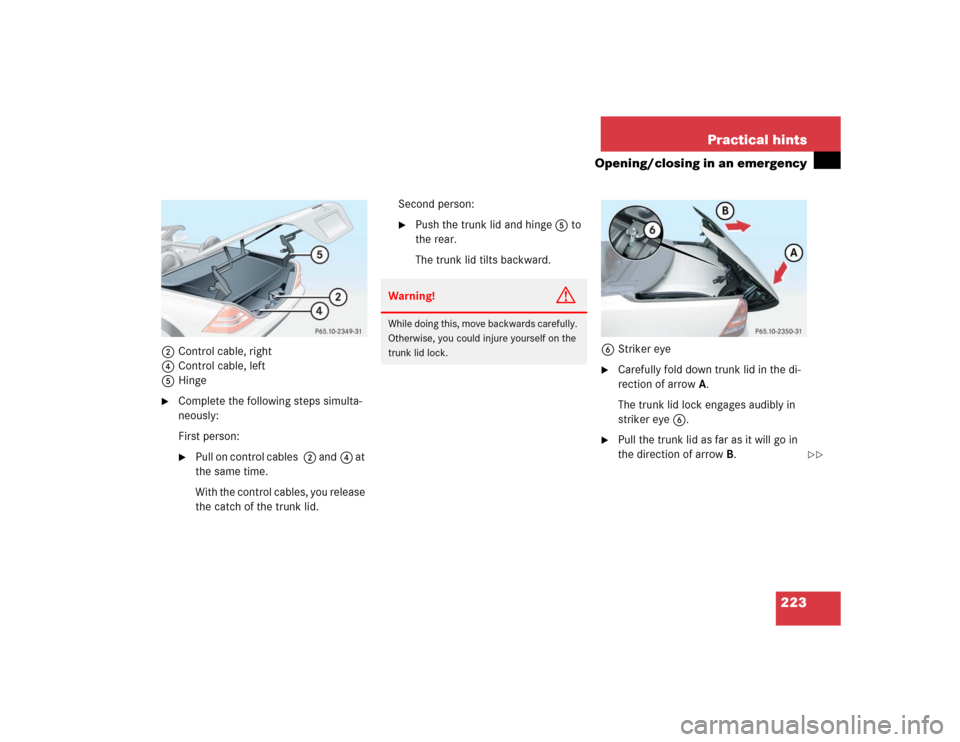
2Control cable, right
4Control cable, left
5Hinge�
Complete the following steps simulta-
neously:
First person:�
Pull on control cables 2 and4 at
the same time.
With the control cables, you release
the catch of the trunk lid.Second person:
�
Push the trunk lid and hinge5 to
the rear.
The trunk lid tilts backward.
6Striker eye
�
Carefully fold down trunk lid in the di-
rection of arrowA.
The trunk lid lock engages audibly in
striker eye6.
�
Pull the trunk lid as far as it will go in
the direction of arrowB.
Warning!
G
While doing this, move backwards carefully.
Otherwise, you could injure yourself on the
trunk lid lock.
��
Page 224 of 314

224 Practical hintsOpening/closing in an emergency7Bottom half of retractable hardtop�
One person should stand on the left
side of the vehicle and the other on the
right side.
�
At the same time, reach from each side
of the trunk underneath the bottom
half of retractable hardtop7.
�
In a smooth motion, pull up on the re-
tractable hardtop in the direction of the
arrow until the bottom half of the re-
tractable hardtop is standing vertically.
8Pins for the retractable hardtop locking
mechanism
9Holes for the pins
�
Complete the next steps simultaneous-
ly. One person should stand on the left
side of the vehicle and the other on the
right side.�
Move the retractable hardtop with
one hand in the direction of the ar-
row.
�
With the other hand, guide pins8
belonging to the retractable hard-
top locking mechanism into corre-
sponding holes9 located in the
upper edges of the windshield.
Warning!
G
Do not place your hands near the upper
windshield area, trunk lid, or between roof
panels while the retractable hardtop is being
raised and locked. Serious personal injury
may occur.
Warning!
G
Do not place your hands in areas marked X.
Serious personal injury may occur.
��
Page 227 of 314

227 Practical hints
Replacing bulbs
Rear lamps Notes on bulb replacement
�
Use only 12-volt bulbs of the same type
and with the specified watt rating.
�
Switch lights off before changing a bulb
to prevent short circuits.
�
Always use a clean lint-free cloth when
handling bulbs.
�
Your hands should be dry and free of oil
and grease.
�
If the newly installed bulb does not light
up, visit an authorized Mercedes-Benz
Center.
�
Have the LEDs and bulbs for the follow-
ing lamps replaced by an authorized
Mercedes-Benz Center.�
Additional turn signals in the
exterior rear view mirrors
�
High mounted brake lamp
�
Xenon* lamps
�
Front fog lamps
Lamp
Type
7
Brake lamp
1154/ 32 cp
8
High mounted brake
lamp
LED
9
Backup lamp
1154 / 32 cp
a
Turn signal lamp
1156 NA
b
Tail, parking, stand-
ing and side marker
lamp
67 / 4 cp
c
License plate lamps
C5W
d
Rear fog lamp,
driver’s side
1155 / 32 cp
Warning!
G
Keep bulbs out of reach of children.
Bulbs and bulb sockets can be very hot.
Allow the lamp to cool down before
changing a bulb.
Halogen lamps contain pressurized gas.
A bulb can explode if you:�
touch or move it when hot
�
drop the bulb
�
scratch the bulb
Wear eye and hand protection.
Because of high voltage in xenon lamps, it is
dangerous to replace the bulb or repair the
lamp and its components. We recommend
that you have such work done by a qualified
technician.
Page 228 of 314
�
Switch off the lights.
�
Open the hood (
�page 174).
1Headlamp cover with loc")
228 Practical hintsReplacing bulbsReplacing bulbs for front lamps
Low and high beam headlamps (Halo-
gen headlamps only)�
Switch off the lights.
�
Open the hood (
�page 174).
1Headlamp cover with locking tab
�
Push down locking tab at top and end
of headlamp cover1 and remove.2Electrical connector for low beam
headlamp bulb
3Electrical connector for high beam
headlamp bulb
�
Pull off electrical connector2 or3.
�
Unhook clamping ring and pull out the
bulb together with clamping ring.
�
Remove bulb.
�
Insert new bulb so that bulb sits prop-
erly in cutouts of bulb socket.
�
Mount clamping ring and reinstall.
�
Plug electrical connector onto the bulb.
�
Reinstall headlamp cover1.Low and high beam headlamps (Xenon*
headlamps only)
Warning!
G
Do not remove the cover for the xenon head-
lamp. Because of high voltage in xenon
lamps, it is dangerous to replace the bulb or
repair the lamp and its components. We rec-
om men d t ha t y ou ha ve s uc h w o rk do n e by a
qualified technician.