Page 195 of 314

195 Operation
Vehicle care
Wiper blades�
Fold wiper arm forward.
�
Clean the wiper blade inserts with a
clean cloth and detergent solution.Window cleaning
�
Fold wiper arm forward.
�
Use a window cleaning solution on all
glass surfaces.
An automotive glass cleaner is recom-
mended.Rear window cleaning
The corner flaps of the rear shelf partially
cover the rear window. This prevents the
window from being fully cleaned with the
hardtop closed.
Warning!
G
For safety reasons, switch off wipers and re-
move Key from starter switch before clean-
ing the wiper blades, otherwise the wiper
motor might suddenly turn on and cause in-
jury.!Fold the windshield wiper arms back
onto the windshield before turning the
key in the starter switch.
Hold onto the wiper when folding the
wiper arm back. If released, the force
of the impact from the tensioning
spring could crack the windshield.
Warning!
G
For safety reasons, switch off wipers and re-
move Key from starter switch before clean-
ing the wiper blades, otherwise the wiper
motor might suddenly turn on and cause in-
jury.!Fold the windshield wiper arms back
onto the windshield before turning the
key in the steering lock.
Hold onto the wiper when folding the
wiper arm back. If released, the force
of the impact from the tensioning
spring could crack the windshield.
!Do not manually move corner flaps or
rear shelf. Doing so will result in dam-
age to the roof folding mechanism that
is not covered by the Mercedes-Benz
Limited Warranty.Warning!
G
If a warning sounds and the indicator lamp
in the hardtop switch blinks, immediately
stop cleaning and move back from window
to prevent possible injury.
The hardtop is lowered into its storage com-
partment.
Page 196 of 314

196 OperationVehicle care�
Prior to cleaning the inside of the rear
window, turn key in steering lock to
position2.
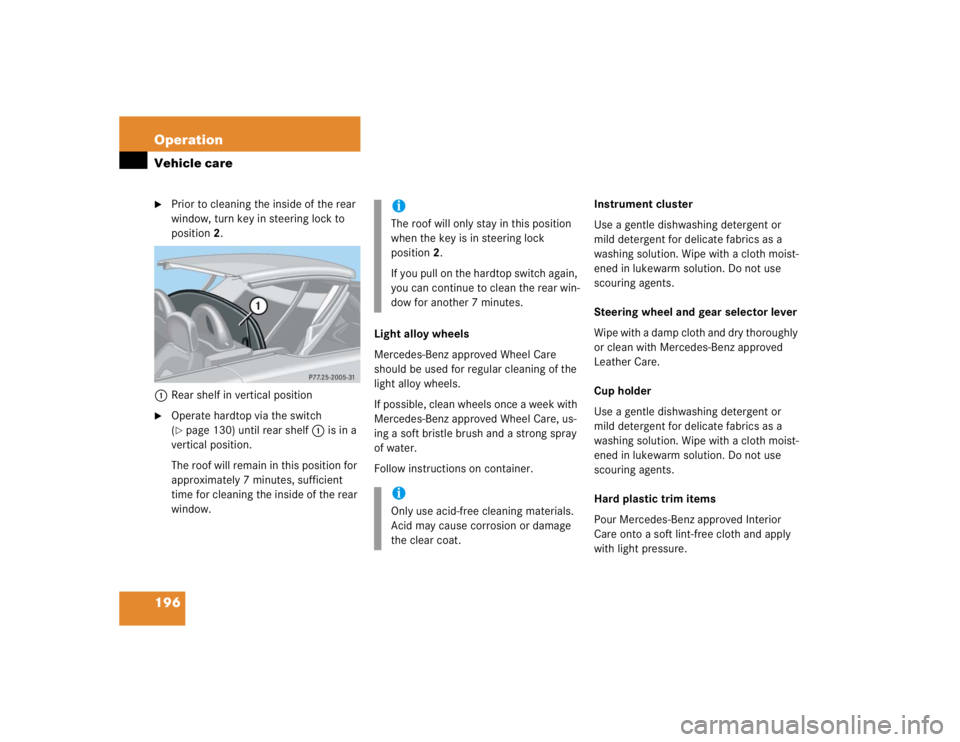
1Rear shelf in vertical position
�
Operate hardtop via the switch
(�page 130) until rear shelf1 is in a
vertical position.
The roof will remain in this position for
approximately 7 minutes, sufficient
time for cleaning the inside of the rear
window.Light alloy wheels
Mercedes-Benz approved Wheel Care
should be used for regular cleaning of the
light alloy wheels.
If possible, clean wheels once a week with
Mercedes-Benz approved Wheel Care, us-
ing a soft bristle brush and a strong spray
of water.
Follow instructions on container.Instrument cluster
Use a gentle dishwashing detergent or
mild detergent for delicate fabrics as a
washing solution. Wipe with a cloth moist-
ened in lukewarm solution. Do not use
scouring agents.
Steering wheel and gear selector lever
Wipe with a damp cloth and dry thoroughly
or clean with Mercedes-Benz approved
Leather Care.
Cup holder
Use a gentle dishwashing detergent or
mild detergent for delicate fabrics as a
washing solution. Wipe with a cloth moist-
ened in lukewarm solution. Do not use
scouring agents.
Hard plastic trim items
Pour Mercedes-Benz approved Interior
Care onto a soft lint-free cloth and apply
with light pressure.
iThe roof will only stay in this position
when the key is in steering lock
position2.
If you pull on the hardtop switch again,
you can continue to clean the rear win-
dow for another 7 minutes.iOnly use acid-free cleaning materials.
Acid may cause corrosion or damage
the clear coat.
Page 200 of 314

200 Practical hintsWhat to do if …
�What to do if …Lamps in instrument clusterGeneral information:
If a bulb in the instrument cluster fails to
light up during the bulb self-check when turning the key in steering lock to
position2, have it checked and replaced if
necessary.Problem
Possible cause
Suggested solution
v
The yellow ESP warning lamp
flashes while driving.
The ESP or traction control has come into op-
eration because of detected traction loss in
at least one tire.
�
When driving off apply as little throttle
as possible.
�
While driving, ease up on the acceler-
ator.
�
Adapt your speed and driving to the
prevailing road and weather condi-
tions.
�
Do not deactivate the ESP.
Exceptions: (
�page 68)
Failure to follow these instructions in-
creases the risk of accidents.
¿
The yellow BAS/ESP malfunction
indicator lamp comes on while
driving.
The ESP has detected a malfunction and
switched off. Risk of accident! Adapt your
speed and driving to the prevailing road con-
ditions.
�
Turn the ESP back on (
�page 68).
If the ESP cannot be turned back on, have
the system checked at an authorized
Mercedes-Benz Center as soon as possi-
ble.
Page 216 of 314

216 Practical hintsUnlocking/locking in an emergency
�Unlocking/locking in an emergencyUnlocking the vehicle
Unlocking the driver’s door
If you are unable to unlock the driver’s
door with the remote control, open the
door using the key as follows:
1Unlocking
2Locking
3Driver’s door lock�
Remove protective cap3 from driv-
er’s door lock.
�
Unl ock t he door wi th the ke y. T o do s o,
push key into the lock until it stops and
turn it to the left1.Unlocking the trunk
A minimum height clearance of 5.97 ft
(1.82 m) is required to open the trunk lid.
If you are unable to unlock the trunk with
the remote control, open the trunk using
the key.
The lock is located next to the recessed
handle.
1Unlocking in an emergency
2Handle
iUnlocking your vehicle with the key will
trigger the anti-theft alarm system. To
cancel the alarm, do one of the follow-
ing:�
Press buttonŒor‹on the
remote control.
�
Insert the key in the steering lock
and turn it to position1.
iUsing the key does not operate the
central locking system.
Page 217 of 314

217 Practical hints
Unlocking/locking in an emergency
�
Insert the mechanical key into the
trunk lid lock.
�
Turn the mechanical key counterclock-
wise to position1 and hold it in this
position.
�
Pull trunk lid handle2 and lift the
trunk lid.
Locking the vehicle
If you are unable to lock the vehicle with
the remote control, lock it with the key as
follows:�
Close the passenger door and the trunk
lid.
�
Press the central locking switch in the
upper center console (
�page 79).
�
Check to see whether the locking knob
on the passenger door is still visible. If
necessary, push it down manually.
�
Lock the driver’s door with the key. To
do so, push key into the lock until it
stops and turn it to the right2
(�page 216).
�
Lock the trunk, if necessary with the
key. To do so, push key into the trunk
lid lock until it stops and turn it to the
right.
!Always make sure there is sufficient
overhead clearance. iUnlocking your vehicle with the key will
trigger the anti-theft alarm system. To
cancel the alarm, do one of the follow-
ing:�
Press buttonŒ or‹on the
key.
�
Insert the key in the steering lock
and turn it to position 2.
Page 218 of 314

218 Practical hintsUnlocking/locking in an emergencyChanging batteries in remote control
If the batteries in the remote control are
discharged, the vehicle can no longer be
locked or unlocked. It is recommended to
have the batteries replaced at an autho-
rized Mercedes-Benz Center.
Batteries contain materials that can harm
the environment if disposed of improperly.
Recycling of batteries is the preferred
method of disposal. Many states require
sellers of batteries to accept old batteries
for recycling.1Release button for key
2Battery cover
Replacement batteries: Lithium, type
CR 2025 or equivalent.
�
Press release button1 on the remote
control.
The key folds out.
�
Pull off battery cover2 in direction of
arrow.
�
Remove the batteries.
�
Insert new batteries with the plus (+)
side facing up.
�
Press battery cover onto housing until
it engages.
Warning!
G
Keep the batteries out of reach of children.
If a battery is swallowed, seek medical help
immediately.iWhen changing batteries, always re-
place both batteries.
When changing batteries, make sure
new batteries are clean and free of lint.
The required replacement batteries are
available at any Mercedes-Benz
Center.
iAfterwards, test the remote control to
see if it is functioning properly. If you
still cannot lock or unlock the vehicle,
synchronize the remote control
(�page 219).
Page 219 of 314
219 Practical hints
Unlocking/locking in an emergency
Synchronizing remote control
If you are unable to lock or unlock the ve-
hicle with the remote control, the remote
control may have to be resynchronized.�
Aim transmitter eye at vehicle and
briefly press transmit buttonŒ
or‹twice.
�
Within approximately 30 seconds
insert key in steering lock and turn it to
position2 (
�page 29).
The remote control should once again be
operational.
If the remote control is still malfunctioning,
contact an authorized Mercedes-Benz
Center.
Fuel filler flap
In case the central locking system does
not release the fuel filler flap, you can open
it manually.
1Release knob
2Cover
�
Open the trunk lid.
�
Open cover2 in the right side trunk
panel.
The cover is located behind the trunk
lid hinge.
�
Pull release knob1 in the direction of
arrow.
The fuel filler flap is opened simulta-
neously.
Page 221 of 314

221 Practical hints
Opening/closing in an emergency
�Opening/closing in an emergency
Raising retractable hardtop manually
If the retractable hardtop cannot be closed
automatically, make certain that all points
listed under the “Retractable hardtop” sec-
tion (
�page 130) were observed.
If the automatic operation still does not
function properly, you can close the re-
tractable hardtop manually.
This procedure should be performed with
great care by two persons.
�
Open doors or lower windows
(�page 128).
�
Set parking brake (
�page 47).
�
Remove key from steering lock
(�page 29).
�
Open trunk lid (
�page 78).
�
Remove CD changer (
�page 122).
�
Open the right side trim panel in the
trunk. Remove cover, if necessary.
!Manually closing the retractable hard-
top is a complicated and technically de-
manding procedure. Close the
retractable hardtop manually in emer-
gency cases only. Otherwise, visit an
authorized Mercedes-Benz Center.
Warning!
G
�
It is important that a second person
helps you. Otherwise, you could become
trapped or injured.
�
Remove any wristwatches or jewelry
such as rings or bracelets. Otherwise,
they could get caught in the vehicle
mechanism, causing personal injury to
yourself or damage to the vehicle.
�
Always use the grips provided. Other-
wise you could injure yourself.
iIf your CD changer holder does not
have the fasteners 1 as shown under
“Installing and removing the CD chang-
er*” (
�page 122), your vehicle may be
equipped with a non-factory installed
CD changer holder. The holder then
does not need to be removed as there
should be enough room between the
CD changer holder and the right side
trim panel in the trunk to remove the
cover and gain access to the screw for
hydraulic pump should you need to
raise the retractable hardtop manually.
��