Page 207 of 314

207 Practical hints
What to do if …
Problem
Possible cause
Suggested solution
The fuel reserve and fuel cap placement
warning lamp:�
lights up while driving
The fuel level has gone below the reserve
mark.
�
Refuel at the next gas station
(�page 171).
�
blinks
The fuel cap is not closed tight.
�
Check the fuel cap.
A fuel system leak has been detected.
�
Have the fuel system checked as soon
as possible by an authorized
Mercedes-Benz Center
B
The yellow low engine coolant
level warning lamp remains lit af-
ter starting the engine or lights
up while driving.
The coolant level is too low.
�
Add coolant (
�page 180).
�
If you have to add coolant frequently,
have the cooling system checked by
an authorized Mercedes-Benz Center.
Warning!
G
Do not spill antifreeze on hot engine parts.
Antifreeze contains ethylene glycol which
may burn if it comes into contact with hot
engine parts. You can be seriously burned.
!Do not ignore the low engine coolant
level warning light. Extended driving
with the light illuminated may cause
serious engine damage not covered by
the Mercedes-Benz Limited Warranty.
Do not drive without sufficient amount
of coolant in the cooling system. The
engine will overheat, causing major
engine damage.
Page 208 of 314
208 Practical hintsWhat to do if …Problem
Possible cause
Suggested solution
#
The red charge indicator lamp
lights up while the engine is
running.
The battery was charged with a battery
charger or jump started.
�
Have the battery checked at a service
station.
The battery is no longer charging.
Possible causes:�
alternator malfunctioning
�
broken poly-V-belt
�
Stop immediately and check the
poly-V-belts.
If one is broken:
�
Do not continue to drive. Otherwise
the engine will overheat due to an in-
operative water pump which may re-
sult in damage to the engine. Notify
an authorized Mercedes-Benz Center.
If it is intact:
�
Drive immediately to the nearest
authorized Mercedes-Benz Center.
Adjust driving to be consistent with
reduced braking responsiveness.
Page 209 of 314

209 Practical hints
What to do if …
Problem
Possible cause
Suggested solution
2
The yellow brake pad wear indi-
cator lamp lights up while brak-
ing.
The brake pads have reached their wear limit.
�
Have the brake pads replaced as soon
as possible.
.
The yellow exterior lamp failure
indicator lamp lights up while
applying the brake and stays on
until the engine is turned off.
One of the brake lamps is malfunctioning.
�
Replace the bulb as soon as possible
(�page 226).
.
The yellow exterior lamp failure
indicator lamp remains lit after
starting the engine or lights up
while driving.
One of the following lamps is malfunctioning:�
parking lamp
�
tail lamp
�
brake lamp
�
low beam head lamp
�
Replace the bulb as soon as possible
(�page 226).
!Brake pad thickness must be visually
checked by a qualified technician at the
intervals specified in the Service book-
let.
iAdditional lighting equipment, if not
properly installed (e.g. auxiliary head-
lamps etc.), could cause the failure in-
dicator monitoring unit to malfunction.
We therefore recommend that an au-
thorized Mercedes-Benz Center install
such equipment for you.
iIf an exterior lamp fails, the indicator
lamp will come on only when that lamp
is switched on.
Page 210 of 314
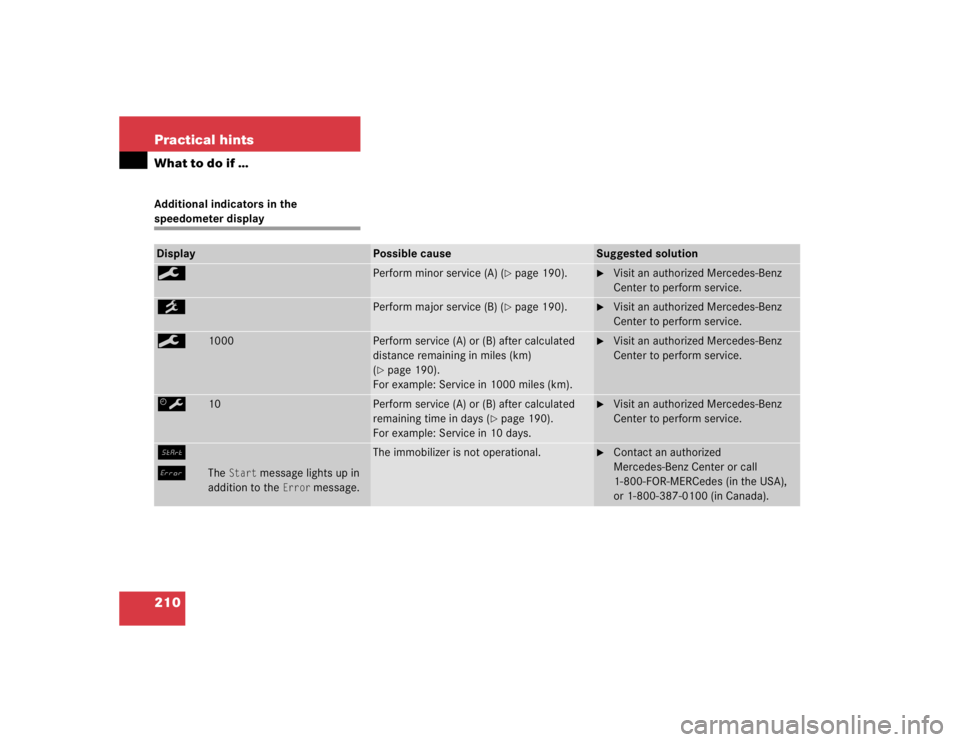
210 Practical hintsWhat to do if …Additional indicators in the speedometer displayDisplay
Possible cause
Suggested solution
9
Perform minor service (A) (
�page 190).
�
Visit an authorized Mercedes-Benz
Center to perform service.
´
Perform major service (B) (
�page 190).
�
Visit an authorized Mercedes-Benz
Center to perform service.
9
1000
Perform service (A) or (B) after calculated
distance remaining in miles (km)
(�page 190).
For example: Service in 1000 miles (km).
�
Visit an authorized Mercedes-Benz
Center to perform service.
š
10
Perform service (A) or (B) after calculated
remaining time in days (
�page 190).
For example: Service in 10 days.
�
Visit an authorized Mercedes-Benz
Center to perform service.
Á
î
The
Start
message lights up in
addition to the
Error
message.
The immobilizer is not operational.
�
Contact an authorized
Mercedes-Benz Center or call
1-800-FOR-MERCedes (in the USA),
or 1-800-387-0100 (in Canada).
Page 211 of 314
211 Practical hints
What to do if …
Lamp in center consoleProblem
Possible cause
Suggested solution
7
The indicator lamp lights up.
A BabySmart
TM child seat is installed on the
passenger seat. Therefore the front passen-
ger airbag is switched off.
The system is malfunctioning when there is
no BabySmart
TM child seat installed on the
passenger seat.
�
Have the system checked as soon as
possible by an authorized
Mercedes-Benz Center.
7
The indicator lamp does not light
up when a BabySmart
TM child
seat is properly installed on the
front passenger seat.
The system is malfunctioning.
�
Make sure there is nothing between
seat cushion and child seat and check
installation of the child seat.
�
If the light remains out, have the sys-
tem checked as soon as possible by
an authorized Mercedes-Benz Center.
Do not use the BabySmart
TM restraint
to transport children on the passen-
ger seat until the system has been
repaired.
Page 227 of 314

227 Practical hints
Replacing bulbs
Rear lamps Notes on bulb replacement
�
Use only 12-volt bulbs of the same type
and with the specified watt rating.
�
Switch lights off before changing a bulb
to prevent short circuits.
�
Always use a clean lint-free cloth when
handling bulbs.
�
Your hands should be dry and free of oil
and grease.
�
If the newly installed bulb does not light
up, visit an authorized Mercedes-Benz
Center.
�
Have the LEDs and bulbs for the follow-
ing lamps replaced by an authorized
Mercedes-Benz Center.�
Additional turn signals in the
exterior rear view mirrors
�
High mounted brake lamp
�
Xenon* lamps
�
Front fog lamps
Lamp
Type
7
Brake lamp
1154/ 32 cp
8
High mounted brake
lamp
LED
9
Backup lamp
1154 / 32 cp
a
Turn signal lamp
1156 NA
b
Tail, parking, stand-
ing and side marker
lamp
67 / 4 cp
c
License plate lamps
C5W
d
Rear fog lamp,
driver’s side
1155 / 32 cp
Warning!
G
Keep bulbs out of reach of children.
Bulbs and bulb sockets can be very hot.
Allow the lamp to cool down before
changing a bulb.
Halogen lamps contain pressurized gas.
A bulb can explode if you:�
touch or move it when hot
�
drop the bulb
�
scratch the bulb
Wear eye and hand protection.
Because of high voltage in xenon lamps, it is
dangerous to replace the bulb or repair the
lamp and its components. We recommend
that you have such work done by a qualified
technician.
Page 228 of 314
�
Switch off the lights.
�
Open the hood (
�page 174).
1Headlamp cover with loc")
228 Practical hintsReplacing bulbsReplacing bulbs for front lamps
Low and high beam headlamps (Halo-
gen headlamps only)�
Switch off the lights.
�
Open the hood (
�page 174).
1Headlamp cover with locking tab
�
Push down locking tab at top and end
of headlamp cover1 and remove.2Electrical connector for low beam
headlamp bulb
3Electrical connector for high beam
headlamp bulb
�
Pull off electrical connector2 or3.
�
Unhook clamping ring and pull out the
bulb together with clamping ring.
�
Remove bulb.
�
Insert new bulb so that bulb sits prop-
erly in cutouts of bulb socket.
�
Mount clamping ring and reinstall.
�
Plug electrical connector onto the bulb.
�
Reinstall headlamp cover1.Low and high beam headlamps (Xenon*
headlamps only)
Warning!
G
Do not remove the cover for the xenon head-
lamp. Because of high voltage in xenon
lamps, it is dangerous to replace the bulb or
repair the lamp and its components. We rec-
om men d t ha t y ou ha ve s uc h w o rk do n e by a
qualified technician.
Page 229 of 314
229 Practical hints
Replacing bulbs
Parking, standing and turn signal lamp�
Switch off the lights.
�
Open the hood (
�page 174).
1Release opening
�
Insert the screwdriver from the vehicle
tool kit into release opening1.
�
Press the top of the screwdriver toward
the middle of the vehicle and toward
the rear.
The turn signal lamp will be lifted out.
�
Pull the turn signal lamp slightly out of
its mounting.
�
Pull off the electrical connector from
the turn signal lamp.
�
Take the turn signal lamp completely
out of its mounting.
�
Twist bulb socket counterclockwise
and pull out.
�
Gently push bulb into socket, turn
counterclockwise and remove.
�
Insert new bulb in socket, push in and
twist clockwise.
�
Reinstall bulb socket, push in and twist
clockwise.
�
Plug electrical connector back into the
turn signal lamp.2Guides
3Tabs
�
Slide the turn signal lamp with tabs3
into guides2 and press it toward the
rear into the mounting until it engages.