Page 223 of 314
223 Practical hints
Opening/closing in an emergency
2Control cable, right
4Control cable, left
5Hinge�
Complete the following steps simulta-
neously:
First person:�
Pull on control cables 2 and4 at
the same time.
With the control cables, you release
the catch of the trunk lid.Second person:
�
Push the trunk lid and hinge5 to
the rear.
The trunk lid tilts backward.
6Striker eye
�
Carefully fold down trunk lid in the di-
rection of arrowA.
The trunk lid lock engages audibly in
striker eye6.
�
Pull the trunk lid as far as it will go in
the direction of arrowB.
Warning!
G
While doing this, move backwards carefully.
Otherwise, you could injure yourself on the
trunk lid lock.
��
Page 224 of 314

224 Practical hintsOpening/closing in an emergency7Bottom half of retractable hardtop�
One person should stand on the left
side of the vehicle and the other on the
right side.
�
At the same time, reach from each side
of the trunk underneath the bottom
half of retractable hardtop7.
�
In a smooth motion, pull up on the re-
tractable hardtop in the direction of the
arrow until the bottom half of the re-
tractable hardtop is standing vertically.
8Pins for the retractable hardtop locking
mechanism
9Holes for the pins
�
Complete the next steps simultaneous-
ly. One person should stand on the left
side of the vehicle and the other on the
right side.�
Move the retractable hardtop with
one hand in the direction of the ar-
row.
�
With the other hand, guide pins8
belonging to the retractable hard-
top locking mechanism into corre-
sponding holes9 located in the
upper edges of the windshield.
Warning!
G
Do not place your hands near the upper
windshield area, trunk lid, or between roof
panels while the retractable hardtop is being
raised and locked. Serious personal injury
may occur.
Warning!
G
Do not place your hands in areas marked X.
Serious personal injury may occur.
��
Page 225 of 314

225 Practical hints
Opening/closing in an emergency
3Hex-socket wrench
aProtective cap
bScrew for the retractable hardtop lock-
ing mechanism�
Take off protective capa on the inner
side of the retractable hardtop.
�
Turn the retractable hardtop’s locking
mechanism screwb with hex-socket
wrench3 clockwise as far as it will go.
The screw will be difficult to turn.
The clasp will open and the retractable
hardtop will engage audibly.
�
Turn the retractable hardtop’s locking
mechanism screwb with hex-socket
wrench3 counterclockwise as far as
it will go.
The retractable hardtop will be locked.
�
Put protective capa back into the
opening and press down on it firmly.
�
Place flat hands near edges (arrows)
and close trunk lid.Have the retractable hardtop operation
checked at your authorized
Mercedes-Benz Center as soon as possi-
ble.
iAfter you have closed the retractable
hardtop manually, you can no longer�
lock the trunk lid
�
close the rear quarter windows
The trunk lid will also no longer seal
properly.
Page 228 of 314
�
Switch off the lights.
�
Open the hood (
�page 174).
1Headlamp cover with loc")
228 Practical hintsReplacing bulbsReplacing bulbs for front lamps
Low and high beam headlamps (Halo-
gen headlamps only)�
Switch off the lights.
�
Open the hood (
�page 174).
1Headlamp cover with locking tab
�
Push down locking tab at top and end
of headlamp cover1 and remove.2Electrical connector for low beam
headlamp bulb
3Electrical connector for high beam
headlamp bulb
�
Pull off electrical connector2 or3.
�
Unhook clamping ring and pull out the
bulb together with clamping ring.
�
Remove bulb.
�
Insert new bulb so that bulb sits prop-
erly in cutouts of bulb socket.
�
Mount clamping ring and reinstall.
�
Plug electrical connector onto the bulb.
�
Reinstall headlamp cover1.Low and high beam headlamps (Xenon*
headlamps only)
Warning!
G
Do not remove the cover for the xenon head-
lamp. Because of high voltage in xenon
lamps, it is dangerous to replace the bulb or
repair the lamp and its components. We rec-
om men d t ha t y ou ha ve s uc h w o rk do n e by a
qualified technician.
Page 229 of 314
229 Practical hints
Replacing bulbs
Parking, standing and turn signal lamp�
Switch off the lights.
�
Open the hood (
�page 174).
1Release opening
�
Insert the screwdriver from the vehicle
tool kit into release opening1.
�
Press the top of the screwdriver toward
the middle of the vehicle and toward
the rear.
The turn signal lamp will be lifted out.
�
Pull the turn signal lamp slightly out of
its mounting.
�
Pull off the electrical connector from
the turn signal lamp.
�
Take the turn signal lamp completely
out of its mounting.
�
Twist bulb socket counterclockwise
and pull out.
�
Gently push bulb into socket, turn
counterclockwise and remove.
�
Insert new bulb in socket, push in and
twist clockwise.
�
Reinstall bulb socket, push in and twist
clockwise.
�
Plug electrical connector back into the
turn signal lamp.2Guides
3Tabs
�
Slide the turn signal lamp with tabs3
into guides2 and press it toward the
rear into the mounting until it engages.
Page 230 of 314

230 Practical hintsReplacing bulbsSide marker lamp bulb�
Switch off the lights.
�
Carefully slide lamp towards front.
�
Remove rear end first.
�
Twist bulb socket counterclockwise
and pull out.
�
Gently push bulb into socket, turn
counterclockwise and remove.
�
Insert new bulb in socket, push in and
twist clockwise.
�
Reinstall bulb socket, push in and twist
clockwise.
�
To reinstall lamp, set rear end in
bumper and let front end snap into
place.
Replacing bulbs for rear lamps
Tail lamp assemblies
1Brake lamp
2Turn signal lamp
3Tail, parking and standing lamp, side
marker
4Backup lamp
5Rear fog lamp (driver’s side)
�
Switch off the lights.
�
Open trunk lid (
�page 78).
�
Remove cover in right side panel.
�
Remove first aid kit (
�page 212).
�
Remove cover in left side panel.
�
Turn bulb socket counterclockwise and
pull out.
�
Gently push bulb into socket, turn
counterclockwise and remove.
�
Insert new bulb in socket, push in and
turn clockwise.
�
Reinstall bulb socket, push in and turn
clockwise.
�
Close cover.
Page 232 of 314
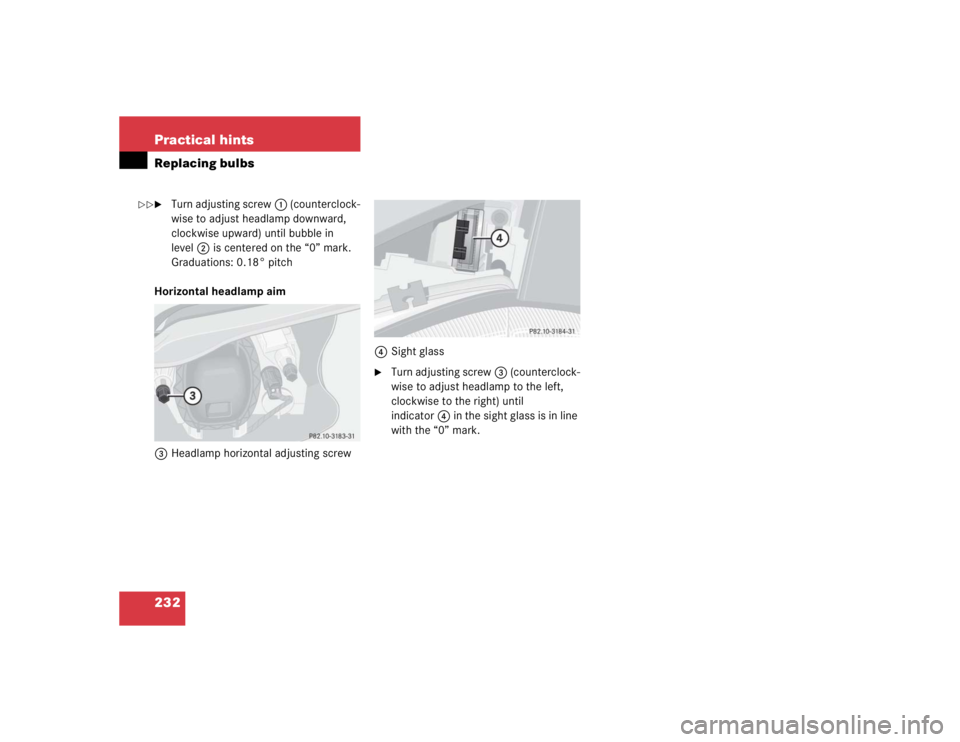
232 Practical hintsReplacing bulbs�
Turn adjusting screw1 (counterclock-
wise to adjust headlamp downward,
clockwise upward) until bubble in
level2 is centered on the “0” mark.
Graduations: 0.18° pitch
Horizontal headlamp aim
3Headlamp horizontal adjusting screw4Sight glass
�
Turn adjusting screw3 (counterclock-
wise to adjust headlamp to the left,
clockwise to the right) until
indicator4 in the sight glass is in line
with the “0” mark.
��
Page 233 of 314
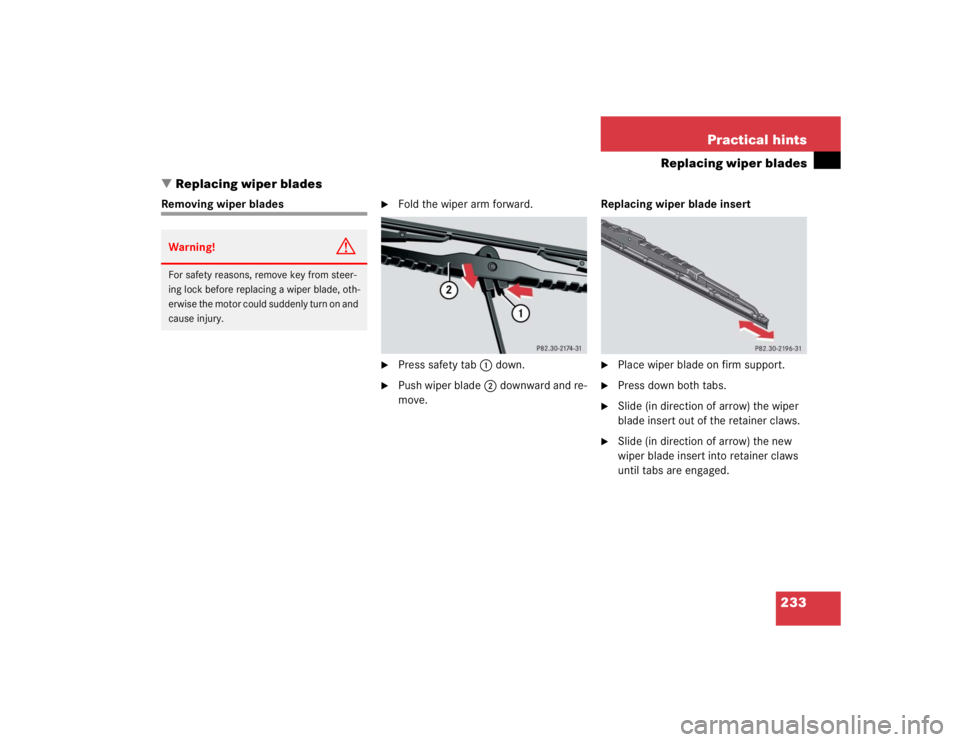
233 Practical hints
Replacing wiper blades
�Replacing wiper blades
Removing wiper blades
�
Fold the wiper arm forward.
�
Press safety tab1down.
�
Push wiper blade2downward and re-
move.Replacing wiper blade insert
�
Place wiper blade on firm support.
�
Press down both tabs.
�
Slide (in direction of arrow) the wiper
blade insert out of the retainer claws.
�
Slide (in direction of arrow) the new
wiper blade insert into retainer claws
until tabs are engaged.
Warning!
G
For safety reasons, remove key from steer-
ing lock before replacing a wiper blade, oth-
erwise the motor could suddenly turn on and
cause injury.