Page 105 of 434
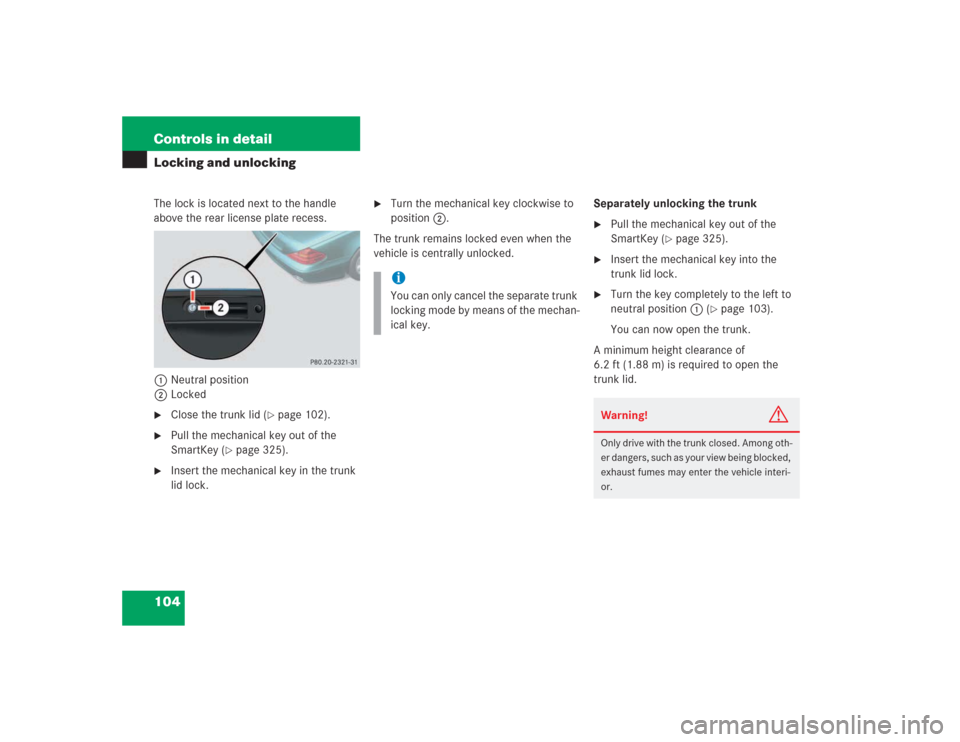
104 Controls in detailLocking and unlockingThe lock is located next to the handle
above the rear license plate recess.
1Neutral position
2Locked�
Close the trunk lid (
�page 102).
�
Pull the mechanical key out of the
SmartKey (
�page 325).
�
Insert the mechanical key in the trunk
lid lock.
�
Turn the mechanical key clockwise to
position2.
The trunk remains locked even when the
vehicle is centrally unlocked.Separately unlocking the trunk
�
Pull the mechanical key out of the
SmartKey (
�page 325).
�
Insert the mechanical key into the
trunk lid lock.
�
Turn the key completely to the left to
neutral position1 (
�page 103).
You can now open the trunk.
A minimum height clearance of
6.2 ft (1.88 m) is required to open the
trunk lid.
iYou can only cancel the separate trunk
locking mode by means of the mechan-
ical key.
Warning!
G
Only drive with the trunk closed. Among oth-
er dangers, such as your view being blocked,
exhaust fumes may enter the vehicle interi-
or.
Page 106 of 434

105 Controls in detail
Locking and unlocking
Automatic central locking
The doors and the trunk lid lock automati-
cally when the vehicle is set into motion.
You can open a locked door from the in-
side. Open door only when conditions are
safe to do so.
You can deactivate the automatic locking
using the control system (
�page 146).
Locking and unlocking from the inside
You can lock or unlock the vehicle from in-
side using the central locking switches.
This can be useful, for example, if you want
to unlock the passenger door from the in-
side or want to lock the vehicle before
starting to drive.
The central locking switch does not lock or
unlock the fuel filler flap.The switches are located above and be-
tween the center air vents of the air condi-
tioning.
Central locking switches1Locking
2Unlocking
iThe doors unlock automatically after an
accident if the force of the impact ex-
ceeds a preset threshold.
The vehicle locks automatically when
the ignition is switched on and the
wheels are turning at vehicle speeds of
approximately 9 mph (15 km/h) or
more. You could therefore lock yourself
out when the vehicle �
is pushed
�
is on a test stand
Warning!
G
When leaving the vehicle, always remove the
SmartKey from the starter switch, take the
SmartKey with KEYLESS-GO
* with you and
lock the vehicle. Do not leave children unat-
tended in the vehicle, or with access to an
unlocked vehicle. Unsupervised use of vehi-
cle equipment may cause an accident
and/or serious personal injury.
Warning!
G
You can open a locked door from inside at
any time. Open door only when conditions
are safe to do so.
Page 107 of 434
106 Controls in detailLocking and unlockingLocking�
Press central locking switch1.
If all the doors are closed, the vehicle
locks.
Unlocking
�
Press central locking switch2.
The vehicle unlocks.
iIf the vehicle was previously centrally
locked using the SmartKey or the
SmartKey with KEYLESS-GO*, it will
not unlock using the central locking
switch.
If the vehicle was previously locked
with the central locking switch�
while in the global remote control
mode, the complete vehicle is un-
locked when a door is opened from
the inside
�
while in the selective remote con-
trol mode, only the door opened
from the inside is unlocked
Page 108 of 434
.
Easy-entry / exit feature
With the easy-entry/exit feature activated,
the steering wheel")
107 Controls in detailSeats
�Seats
For information on seat adjustment, see
“Seat adjustment” (
�page 35).
Easy-entry / exit feature
With the easy-entry/exit feature activated,
the steering wheel tilts upwards and the
driver’s seat moves to the rear.
This allows easier entry into and exit from
the vehicle when the driver’s door is
opened. However, the engine must be
turned off.
When the SmartKey is inserted in the start-
er switch or you have pressed the
KEYLESS-GO* start / stop button once and
the driver’s door is closed, the steering
wheel and the driver’s seat return to their
last set positions.You can activate the following functions:
�
Steering column:
Only the steering column is adjusted.
�
Steering column and seat:
The steering column and the seat are
adjusted.
The easy-entry / exit feature can be
switched on or off in the convenience sub-
menu of the control system (
�page 148).
Warning!
G
You must make sure that no one can be-
come trapped or injured by the moving
steering wheel and driver’s seat when the
easy-entry/exit feature is activated, the
driver’s door is being opened and the engine
is turned off or the SmartKey is removed
from the starter switch. Do not leave chil-
dren unattended in the vehicle, or with ac-
cess to an unlocked vehicle. Children could
open the driver’s door an unintentionally ac-
tivate the easy-entry/exit feature*, which
could result in an accident and/or serious
personal injury.
iTo cancel seat/steering wheel move-
ment, do one of the following:�
Press the seat adjustment switch
(�page 35)
�
Move the steering column stalk
(�page 37)
�
Press the memory button
(�page 114)
Page 123 of 434
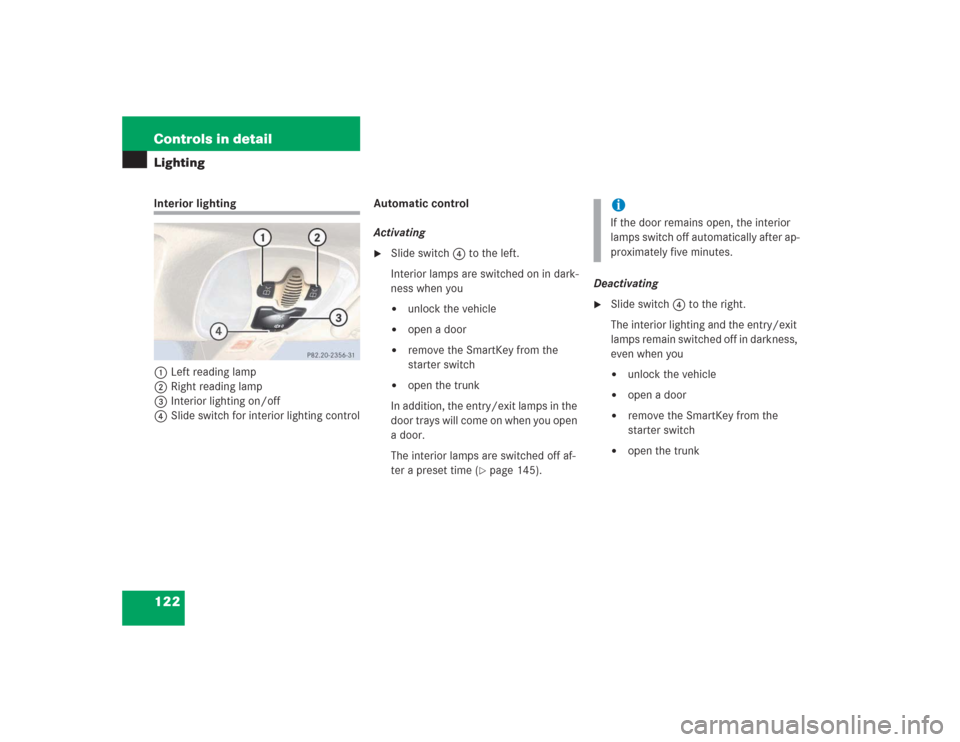
122 Controls in detailLightingInterior lighting
1Left reading lamp
2Right reading lamp
3Interior lighting on/off
4Slide switch for interior lighting controlAutomatic control
Activating
�
Slide switch4 to the left.
Interior lamps are switched on in dark-
ness when you �
unlock the vehicle
�
open a door
�
remove the SmartKey from the
starter switch
�
open the trunk
In addition, the entry/exit lamps in the
door trays will come on when you open
a door.
The interior lamps are switched off af-
ter a preset time (
�page 145).Deactivating
�
Slide switch4 to the right.
The interior lighting and the entry/exit
lamps remain switched off in darkness,
even when you�
unlock the vehicle
�
open a door
�
remove the SmartKey from the
starter switch
�
open the trunk
iIf the door remains open, the interior
lamps switch off automatically after ap-
proximately five minutes.
Page 125 of 434
.
The instrument cluster is activated when")
124 Controls in detailInstrument cluster
�Instrument clusterFor a full view illustration of the instrument
cluster, see “Instrument cluster”
(�page 22).
The instrument cluster is activated when
you
�
open a door
�
switch on the ignition
�
press the reset button (
�page 22)
�
switch on the exterior lamps
Opening a door will activate the instrument
cluster only for about 30 seconds.
You can change the instrument cluster set-
tings in the Instrument cluster submenu of
the control system (
�page 140).
Instrument cluster illumination
Use the reset button to adjust the illumina-
tion brightness for the instrument cluster
and the switches on the center console.
To brighten illumination�
Turn the reset button in the instrument
cluster (
�page 22) clockwise.
The instrument cluster illumination will
brighten.
To dim illumination
�
Turn the reset button in the instrument
cluster (
�page 22) counterclockwise.
The instrument cluster illumination will
dim.
Coolant temperature gauge
iThe instrument cluster illumination is
dimmed or brightened to suit ambient
light conditions.
Warning
G
�
Driving when your engine is badly over-
heated can cause some fluids which
may have leaked into the engine com-
partment to catch fire. You could be se-
riously burned.
�
Steam from an overheated engine can
cause serious burns an can occur just by
opening the hood. Stay away from the
engine if you see or hear steam coming
from it.
Turn off the engine, get out of the vehicle
and do not stand near the vehicle until the
engine has cooled down.
Page 140 of 434
139 Controls in detail
Control system
The table below shows what settings can
be changed within the various menus. De-
tailed instructions on making individual
settings can be found on the following pag-
es.Instrument cluster
Lighting
Vehicle
Convenience
Select time display mode
Set daytime running
lamp mode (USA only)
Set station selection
mode (radio)
Activate easy-entry/exit
feature
Select temperature dis-
play mode
Set locator lighting
Set automatic locking
Set key-dependency
Select speedometer dis-
play mode
Exterior lamps delayed
switch-off
Tire pressure display*
Set parking position for
exterior rear view mirror
Select language
Interior lighting delayed
switch-off
Page 141 of 434

140 Controls in detailControl systemInstrument cluster submenu
Access the
Inst. cluster
menu via the
Settings
menu. Use the
Inst. cluster
submenu to change the instrument cluster
display settings. The following functions
are available:Selecting time display mode
�
Move the selection marker with the
æ or ç button to the
Inst.
cluster
submenu.
�
Press button j or k repeatedly
until you see this message in the left
display:
Clock
.
The selection marker is on the current
setting.
�
Press æ or ç to set the
12-hour
or
24-hour
time display mode.Selecting temperature display mode
�
Move the selection marker with button
æ or ç to the
Inst. cluster
submenu.
�
Press button j or k repeatedly
until you see this message in the left
display:
Temp. indicator
.
The selection marker is on the current
setting.
�
Press æ or ç to set temperature
unit to degrees Celsius (
°C) or degrees
Fahrenheit (
°F).
Function
Page
Select time display mode
140
Select temperature display
mode
140
Select speedometer display
mode
141
Select language
141
iFor information on setting the time, re-
fer to the separate COMAND operating
instructions.