Page 102 of 434

101 Controls in detail
Locking and unlocking
�
Pull remote trunk lid release switch1.
The trunk lid unlocks. Indicator
lamp2 comes on and remains lit until
the trunk is closed again.
�
Lift the trunk lid.The trunk can also be opened using
�
the SmartKey, see “Locking and un-
locking” (
�page 90)
�
the remote trunk lid release switch, see
“Opening the trunk from the inside”
(�page 100)
�
the trunk lid emergency release button,
see “Trunk lid emergency release”
(�page 102)
!Always make sure that there is suffi-
cient overhead clearance.
iTo facilitate trunk loading and unload-
ing when the hardtop is retracted, you
can raise the hardtop from its storage
position in the trunk using the loading
aid feature (
�page 221). You may also
unhook the luggage cover.
Remember to resecure the luggage
cover after loading/unloading the
trunk. Otherwise you will not be able to
lower the retractable hardtop.
If the vehicle was previously centrally
locked, the trunk lid will lock automati-
cally when closed (
�page 102). The
turn signals will flash three times to
confirm locking.
Page 118 of 434
117 Controls in detail
Lighting
�Lighting
For information on how to switch on the
headlamps and use the turn signals, see
“Switching on headlamps” (
�page 46).
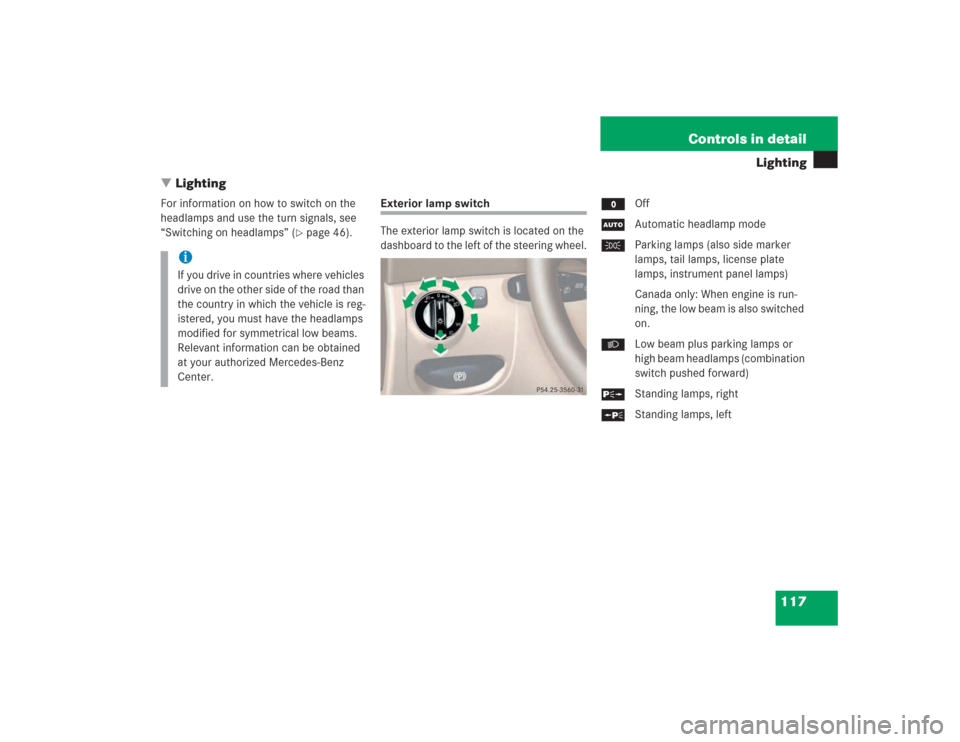
Exterior lamp switch
The exterior lamp switch is located on the
dashboard to the left of the steering wheel.MOff
UAutomatic headlamp mode
CParking lamps (also side marker
lamps, tail lamps, license plate
lamps, instrument panel lamps)
Canada only: When engine is run-
ning, the low beam is also switched
on.
BLow beam plus parking lamps or
high beam headlamps (combination
switch pushed forward)
ˆStanding lamps, right
‚Standing lamps, left
iIf you drive in countries where vehicles
drive on the other side of the road than
the country in which the vehicle is reg-
istered, you must have the headlamps
modified for symmetrical low beams.
Relevant information can be obtained
at your authorized Mercedes-Benz
Center.
Page 122 of 434
121 Controls in detail
Lighting
Switching on high beams�
Turn the exterior lamp switch toB
or toU (
�page 117).
�
Push the combination switch in
direction1.
The high beam indicator A in the ta-
chometer comes on.
High beam flasher
�
Pull the combination switch briefly in
direction2.
Hazard warning flasher
The hazard warning flasher can be activat-
ed with the ignition switched on or off. It is
activated automatically when an airbag is
deployed.
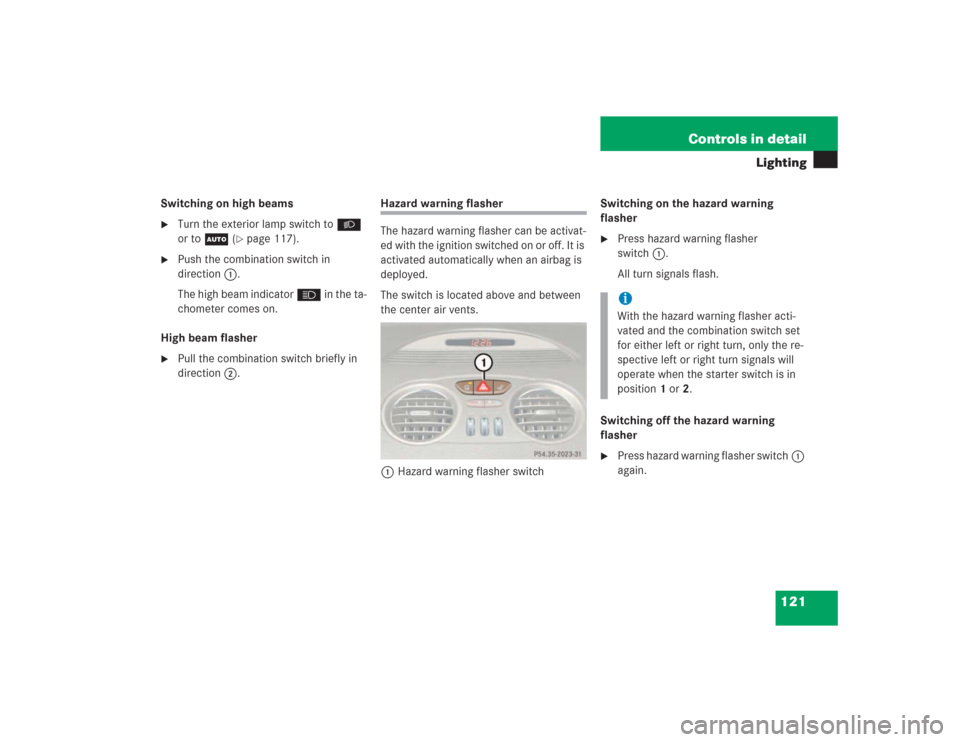
The switch is located above and between
the center air vents.
1Hazard warning flasher switchSwitching on the hazard warning
flasher
�
Press hazard warning flasher
switch1.
All turn signals flash.
Switching off the hazard warning
flasher
�
Press hazard warning flasher switch1
again.iWith the hazard warning flasher acti-
vated and the combination switch set
for either left or right turn, only the re-
spective left or right turn signals will
operate when the starter switch is in
position 1 or 2.
Page 204 of 434

�
the ESP is active (
�page 78) or you de-
activate")
203 Controls in detail
Driving systems
Distronic deactivates automatically when�
you set the parking brake
�
you drive slower than 25 mph
(40 km/h)
�
the ESP is active (
�page 78) or you de-
activate the ESP
�
You move the gear selector lever into
positionN.
A signal will sound. The
DTR off
mes-
sage appears in the speedometer dis-
play for approximately five seconds.Setting the following distance in
Distronic
You can set the specified following for Dis-
tronic by varying the time setting between
1.0 and 2.0 seconds. Using this time set-
ting and the current speed of your vehicle,
Distronic calculates and sets the required
following distance to the vehicle ahead.
The set distance will be shown in the
speedometer display field.
The thumbwheel for making the time set-
ting is located on the lower section of the
center console.1Distance warning function on/off
switch
2Thumbwheel for setting distance
Increasing distance
Increasing the distance setting tells Dis-
tronic to maintain a greater following dis-
tance to the vehicle ahead.
�
Turn thumbwheel2 towards ¯.
Warning!
G
Distronic switches off and releases the
brakes when the vehicle decelerates below
the minimum speed of 25 mph (40 km / h)
by operation of the system. At that time the
driver must apply the brakes in order to re-
duce vehicle speed further or bring it to a
stop.
Warning!
G
It is up to the driver to exercise discretion to
select the appropriate setting given road
conditions, traffic, driver’s preferred driving
style and applicable laws and driving recom-
mendations for safe following distance.
Page 235 of 434

234 Controls in detailUseful featuresStep 7:�
To program the remaining two buttons,
repeat the steps above starting with
step 3.Rolling code programming
To train a garage door opener (or other roll-
ing code devices) with the rolling code fea-
ture, follow these instructions after
completing the “Programming” portion
(steps 1 through 6) of this text. (A second
person may make the following training
procedures quicker and easier.)
Step 8:
�
Locate “training” button on the garage
door opener motor head unit.
Exact location and color of the button
may vary by garage door opener brand.
Depending on manufacturer, the “train-
ing” button may also be referred to as
“learn”or “smart” button. If there is dif-
ficulty locating the transmitting button,
refer to the garage door opener opera-
tor’s manual. Step 9:
�
Press “training” button on the garage
door opener motor head unit.
The “training light” is activated.
You have 30 seconds to initiate the follow-
ing step.
Step 10:
�
Firmly press, hold for two seconds and
release the programmed integrated
signal transmitter button (2, 3
or4).
Step 11:
�
Press, hold for two seconds and re-
lease same button a second time to
complete the training process.
Some garage door openers (or other rolling
code equipped devices) may require you to
perform this procedure a third time to
complete the training.
iIf the indicator lamp1 blinks rapidly
for about two seconds and then turns
to a constant light, continue with pro-
gramming steps 8 through 12 as your
garage door opener may be equipped
with the “rolling code” feature.
Page 277 of 434

276 OperationVehicle careEngine cleaning
Prior to cleaning the engine compartment
make sure to protect electrical compo-
nents and connectors from the intrusion of
water and cleaning agents.
Corrosion protection, such as MB Anticor-
rosion Wax, should be applied to the en-
gine compartment after every engine
cleaning. Before applying, all control link-
age bushings and joints should be lubricat-
ed. The poly-V-belt and all pulleys should
be protected from any wax.
Vehicle washing
Do not use hot water or wash your vehicle
in direct sunlight. Only use a mild car wash
detergent, such as Mercedes-Benz ap-
proved Car Shampoo.
Thoroughly spray the vehicle with a dif-
fused jet of water. Direct only a very weak
spray towards the ventilation intake. Use
plenty of water and rinse the sponge and
chamois frequently.Rinse with clear water and thoroughly dry
with a chamois. Do not allow cleaning
agents to dry on the finish.
Due to the width of the vehicle, fold in ex-
terior rear view mirrors prior to running the
vehicle through an automatic car wash to
prevent damage to the mirrors.
In the winter, thoroughly remove all traces
of road salt as soon as possible.
When washing the underbody, do not for-
get to clean the inner sides of the wheels.Ornamental moldings
For regular cleaning and care of very dirty
chrome-plated parts, use a chrome clean-
er.
Headlamps, side markers, taillamps,
turn signal lenses
Use a mild car wash detergent, such as
Mercedes-Benz approved Car Shampoo,
with plenty of water.
To prevent scratches, never apply strong
force and only use a soft, non-scratchy
cloth when cleaning the lenses. Do not at-
tempt to wipe dirty lenses with a dry cloth
or sponge.
iVehicles with KEYLESS-GO*:
If a door handle is hit by a strong jet of
water, and a SmartKey with
KEYLESS-GO* is in close proximity, i.e.
within approx 3 ft (approx. 1 m), the ve-
hicle could be inadvertently locked or
unlocked.
Page 313 of 434

312 Practical hintsWhat to do if …Left display
Right display
Possible cause
Possible solution
.
Brake lamp
Right
Back-up
lamp on!
The right brake lamp is malfunction-
ing. A backup bulb has been
brought into use.
�
Visit an authorized Mercedes-Benz Center as
soon as possible.
Brake light
!
Drive to
workshop!
Brake lamp illumination is delayed
or lamp is permanently on.
�
Visit an authorized Mercedes-Benz Center as
soon as possible.
Front foglamp
Left
The left front fog lamp is malfunc-
tioning.
�
Replace the bulb as soon as possible.
Front foglamp
Right
The right front fog lamp is malfunc-
tioning.
�
Replace the bulb as soon as possible.
Rear foglamp
Left
The left rear fog lamp is malfunc-
tioning.
�
Replace the bulb as soon as possible.
High beam
Left
The left high beam lamp is malfunc-
tioning.
�
Replace the bulb as soon as possible.
High beam
Right
The right high beam lamp is mal-
functioning.
�
Replace the bulb as soon as possible.
Left turn signal
Mirror
The left turn signal in the side mirror
is malfunctioning. This message will
only appear if all light emitting di-
odes have stopped working.
�
Have the LEDs replaced as soon as possible.
Page 315 of 434

314 Practical hintsWhat to do if …Left display
Right display
Possible cause
Possible solution
.
Parking lamp
Front left
Back-up
lamp on!
The left front parking lamp is mal-
functioning. A backup bulb has
been brought into use.
�
Replace the bulb as soon as possible.
Parking lamp
Front right
Back-up
lamp on!
The right front parking lamp is mal-
functioning. A backup bulb has
been brought into use.
�
Replace the bulb as soon as possible.
Reverse lamp
Left
The left backup lamp is malfunc-
tioning.
�
Replace the bulb as soon as possible.
Reverse lamp
Right
The right backup lamp is malfunc-
tioning.
�
Replace the bulb as soon as possible.
Right turn signal
Mirror
The right turn signal in the side mir-
ror is malfunctioning. This message
will only appear if all light emitting
diodes have stopped working.
�
Have the LEDs replaced as soon as possible.
Tail lamp
Left
Back-up
lamp on!
The left tail lamp is malfunctioning.
A backup bulb has been brought
into use.
�
Visit an authorized Mercedes-Benz Center as
soon as possible.