Page 92 of 434

91 Controls in detail
Locking and unlocking
Factory setting
Global unlocking�
Press button Œ.
All turn signals flash once. The locking
knobs in the doors move up.
The vehicle will lock again automatically
within approximately 40 seconds of un-
locking if:
�
neither door nor trunk is opened
�
the SmartKey is not inserted in the
starter switch
�
the central locking switch is not acti-
vated
Global locking
�
Press button ‹.
All turn signals flash three times. The lock-
ing knobs in the doors move down.Selective setting
If you frequently travel alone, you may wish
to reprogram the SmartKey so that
pressingŒ only unlocks the driver’s
door, interior lockable storage compart-
ments and the fuel filler flap.
�
Press and hold buttons Œ and ‹
simultaneously for about six seconds
until battery check lamp5 flashes
twice.
The SmartKey will then function as fol-
lows:
Unlocking driver’s door and fuel filler flap
�
Press button Πonce.
Global unlocking
�
Press button Πtwice.
Global locking
�
Press button ‹.
Warning!
G
When leaving the vehicle, always remove the
SmartKey from the starter switch, take the
SmartKey with KEYLESS-GO
* with you and
lock the vehicle. Do not leave children unat-
tended in the vehicle, or with access to an
unlocked vehicle. It is possible for children
to open a locked door from the inside, which
could result in an accident and/or serious
injury.
!To prevent possible malfunction, avoid
exposing the SmartKey to high levels of
electromagnetic radiation.iYou can also open and close the power
windows (
�page 181) and the retract-
able hardtop using the SmartKey
(
�page 188).
Page 95 of 434
.
�
You can combine KEYLESS-GO func-
ti")
94 Controls in detailLocking and unlocking
Important notes on using KEYLESS-GO�
You can also use the SmartKey with
KEYLESS-GO like a normal SmartKey
(�page 90).
�
You can combine KEYLESS-GO func-
tions with normal SmartKey functions
(e.g. unlocking with KEYLESS-GO and
locking with the remote control).
�
Always carry the SmartKey with
KEYLESS-GO with you.
�
Never store the SmartKey with
KEYLESS-GO together with:�
Electronic items such as a cellular
phone or another SmartKey with
KEYLESS-GO
�
Metallic objects such as coins or
metal foil
Doing so could impair the function of
the KEYLESS-GO system.
Warning!
G
When leaving the vehicle, always remove the
SmartKey from the starter switch, take the
SmartKey with KEYLESS-GO with you and
lock the vehicle. Do not leave children unat-
tended in the vehicle, or with access to an
unlocked vehicle. Unsupervised use of vehi-
cle equipment may cause an accident
and/or serious personal injury.!To prevent possible malfunction, avoid
exposing the SmartKey with
KEYLESS-GO to high levels of electro-
magnetic radiation.
iYou can also close the power windows
(�page 181) and the retractable hard-
top using the SmartKey with
KEYLESS-GO (
�page 188).
iIf the vehicle has been parked for a
longer period of time, you must pull the
door handle in order to activate the
KEYLESS-GO function.
When you unlock the vehicle, the SBC
brake system is activated.
Page 100 of 434

99 Controls in detail
Locking and unlocking
Opening the doors from the inside
You can open a locked door from the in-
side. Open door only when conditions are
safe to do so.
1Locking knob
2Inside door handle�
Pull on door handle2.
If door was locked, locking knob1 will
move up.
Opening the trunk
Opening the trunk from the outside
A minimum height clearance of
6.2 ft (1.88 m) is required to open the
trunk lid.
The handle is located above the rear li-
cense plate recess.
1Handle �
Pull on handle 1 and lift the trunk lid.
iIf you open a door, the side windows on
that side of the vehicle will lower slight-
ly. The windows close again when you
close the door.iIf the vehicle has previously been
locked from the outside with the
SmartKey, opening a door from the in-
side will trigger the anti-theft alarm sys-
tem.
To cancel the alarm, do one of the fol-
lowing:�
Press button Œ or ‹on the
SmartKey.
�
Insert the SmartKey in the starter
switch.
�
Press the KEYLESS-GO* start/stop
button (
�page 44).
�
Grasp the outside door handle (ve-
hicles with KEYLESS-GO* only)
Page 170 of 434
169 Controls in detail
Good visibility
Rear window defroster
For information, see “Rear window defrost-
er” (
�page 177).
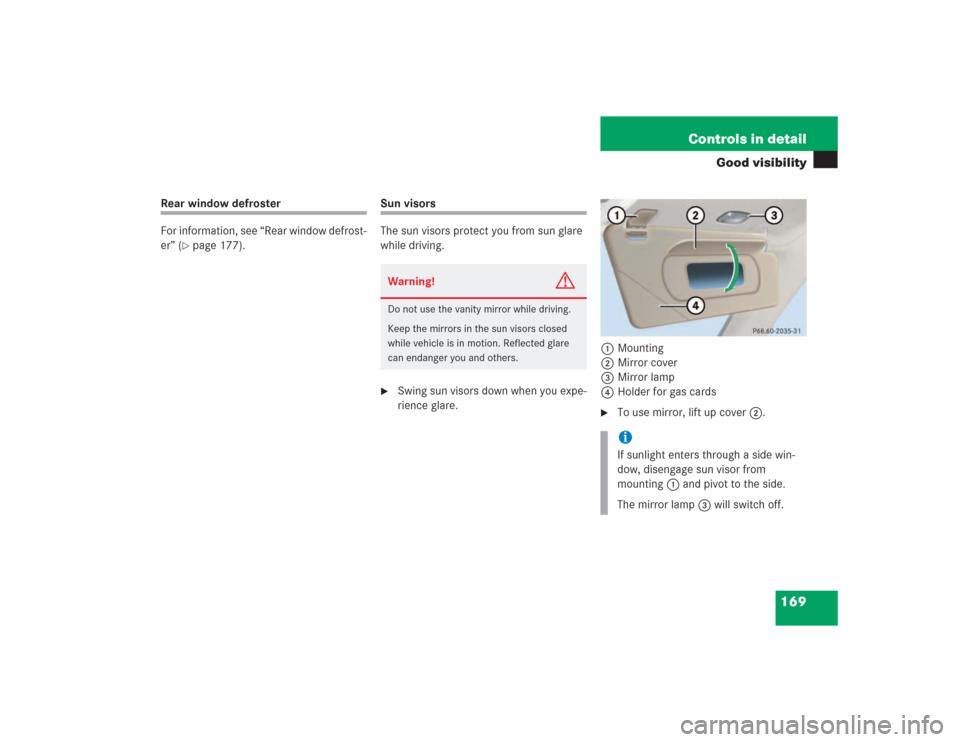
Sun visors
The sun visors protect you from sun glare
while driving.�
Swing sun visors down when you expe-
rience glare.1Mounting
2Mirror cover
3Mirror lamp
4Holder for gas cards
�
To use mirror, lift up cover2.
Warning!
G
Do not use the vanity mirror while driving.
Keep the mirrors in the sun visors closed
while vehicle is in motion. Reflected glare
can endanger you and others.
iIf sunlight enters through a side win-
dow, disengage sun visor from
mounting1 and pivot to the side.
The mirror lamp3 will switch off.
Page 172 of 434
171 Controls in detail
Automatic climate control
Automatic climate control panel
Item
1
Center air vent, adjustable
2
Center air vent, fixed
3
Air temperature controls for cen-
ter and side air vents
4
Air volume control for center and
side air vents
5
Center air vent, adjustable
6
Side defroster vent
7
Side air vent, adjustable
8
Automatic climate control paneliFor draft-free ventilation, move the slid-
ers for the center air vents to the mid-
dle position.
Item
1
Temperature control, left
2
Air distribution, left (automatic or
manual operation)
3
Defrosting
4
Air recirculation
5
Rear window defroster
6
Air distribution, right (automatic or
manual operation)
7
Temperature control, right
8
Automatic climate control on/off
(complete system)
9
Residual heat/ventilation
a
Air volume control (automatic, man-
ual)
b
AC cooling on/off
Page 173 of 434

172 Controls in detailAutomatic climate controlThe automatic climate control is operation-
al whenever the engine is running. You can
operate the climate control system in ei-
ther the automatic or manual mode. The
system cools or heats the interior depend-
ing on the selected interior temperature
and the current outside temperature.Nearly all dust particles, pollutants and
odors are filtered out before outside air en-
ters the passenger compartment through
the air distribution system.
Setting the temperature
Use temperature controls1 and7 to
separately adjust the air temperature on
each side of the passenger compartment.
You should raise or lower the temperature
setting in small increments, preferably
starting at 72°F (22°C).
Increasing�
Turn the outer adjustment ring slightly
to the right.
The automatic climate control system
will correspondingly adjust the interior
air temperature.
Warning!
G
When operating the automatic climate con-
trol, the air that enters the passenger com-
partment through the air vents in the
footwell can be very hot or very cold (de-
pending on the set temperature). This may
cause burns or frostbite on unprotected skin
in the immediate area of the air vents. Al-
ways keep sufficient distance between un-
protected parts of the body and the footwell
air vents. If necessary change the air flow
using the air distribution controls to direct
the air away from the footwell air vents
(�page 174).
Warning!
G
Follow the recommended settings for heat-
ing and cooling given on the following pag-
es. Otherwise the windows could fog up,
impairing visibility and endangering you and
others.iIf the vehicle interior is hot, ventilate
the interior before driving off.
Keep the air intake grille in front of the
windshield free of snow and debris.
When the retractable hardtop is closed,
do not obstruct air flow by placing ob-
jects on the air flow-through exhaust
slots below the rear window.
iWhen operating the climate control
system in automatic mode, you will
only rarely need to adjust the tempera-
ture, air volume and air distribution.
Page 175 of 434
 to separately adjust the air
distribution on each side of the passenger
com")
174 Controls in detailAutomatic climate controlAdjusting air distribution
Use air distribution controls2 and6
(�page 171) to separately adjust the air
distribution on each side of the passenger
compartment. The following symbols are
found on the controls:
Adjusting manually
�
Press the control knob.
The U light on the control knob
goes out. The air distribution can be ad-
justed manually.Adjusting automatically
�
Press the control knob.
The U light on the control knob
comes on. The air distribution is adjust-
ed automatically.
Windshield fogged on the outside
�
Switch the windshield wipers on.
�
Turn the air distribution control to h
or j.
Maximum cooling MAXCOOL
If the left and right air distribution controls
as well as the airflow volume control are
set to U and there is a high need for
cooling, MAXCOOL is activated.
This provides the fastest possible cooling
of the vehicle interior (when retractable
hardtop is closed).
Symbol
Function
h
Directs air through the cen-
ter air vents
j
Directs air to the windows
V
Directs air into the entire
vehicle interior
k
Directs air to the footwells
Page 176 of 434
.
The indicator lamp on the button
comes on.
Deactivating
�
Press button P (
�page 171).
The indica")
175 Controls in detail
Automatic climate control
Defrosting
Activating�
Press button P (
�page 171).
The indicator lamp on the button
comes on.
Deactivating
�
Press button P (
�page 171).
The indicator lamp on the button goes
out. Defrosting is turned off.
Air recirculation mode
Switch to air recirculation mode to prevent
unpleasant odors from entering the vehicle
from the outside. This setting cuts off the
intake of outside air and recirculates the
air in the passenger compartment.Activating
�
Press button , (
�page 171).
The indicator lamp on the button
comes on.
iThese settings should only be selected
for a short time.
Warning!
G
When the outside temperature is below
41°F (5°C), only switch to air recirculation
mode for short periods to prevent window
fogging.
Warning!
G
Never operate the side windows if there is
the possibility of anyone being harmed by
the closing procedure.
In the event that the procedure causes po-
tential danger, the closing of the side win-
dows can be immediately halted by
releasing the
,
button or by pressing or
pulling the respective window switch.