Page 215 of 434
214 Controls in detailUseful features
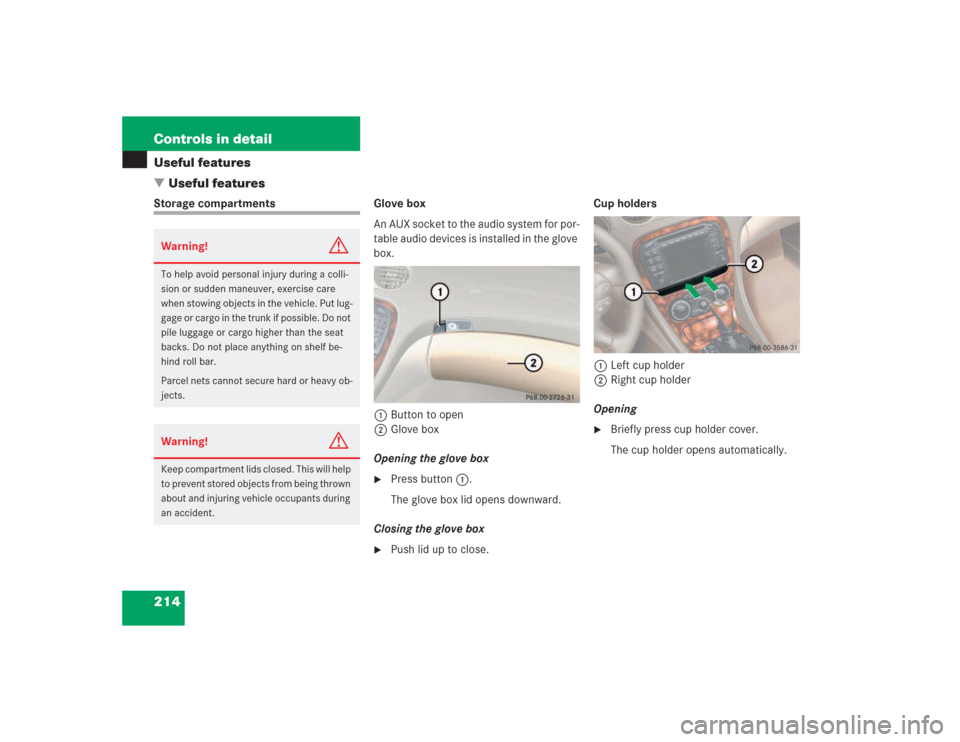
�Useful featuresStorage compartments Glove box
An AUX socket to the audio system for por-
table audio devices is installed in the glove
box.
1Button to open
2Glove box
Opening the glove box
�
Press button1.
The glove box lid opens downward.
Closing the glove box
�
Push lid up to close.Cup holders
1Left cup holder
2Right cup holder
Opening
�
Briefly press cup holder cover.
The cup holder opens automatically.
Warning!
G
To help avoid personal injury during a colli-
sion or sudden maneuver, exercise care
when stowing objects in the vehicle. Put lug-
gage or cargo in the trunk if possible. Do not
pile luggage or cargo higher than the seat
backs. Do not place anything on shelf be-
hind roll bar.
Parcel nets cannot secure hard or heavy ob-
jects. Warning!
G
Keep compartment lids closed. This will help
to prevent stored objects from being thrown
about and injuring vehicle occupants during
an accident.
Page 218 of 434

217 Controls in detail
Useful features
�
Insert the mechanical key into the
glove box lock and turn it to
position3.
The following storage compartments
will be locked. They can then not be
opened with the SmartKey or with the
SmartKey with KEYLESS-GO*:�
Glove box
�
Armrest storage compartments
�
Rear storage compartmentsUnlocking the storage compartments
separately
�
Turn the mechanical key in the glove
box lock to position1.
You can now open the storage com-
partments.
Parcel net in passenger footwellParcel net in trunk
There are three nets available in the trunk
to secure loads:
�
a pocket net on each side of the right
and left trunk side walls
�
a trunk floor net
�
Pull the trunk floor net from the trunk
back wall towards the front over the
luggage.
�
Hang the hooks of the net on the eyes
on the trunk floor.
iThe separate locking status of these
storage compartments can only be
canceled by means of the mechanical
key.
The storage compartments in the doors
cannot be locked.
Warning!
G
Do not place heavy or fragile objects, or ob-
jects having sharp edges, in the parcel net.
In an accident, during hard braking or sud-
den maneuvers, they could be thrown
around inside the vehicle, and cause injury
to vehicle occupants.
Page 327 of 434
 is required to open the
trunk lid.
If you are unable to unlock the trunk with
t")
326 Practical hintsLocking/unlocking in an emergencyUnlocking the trunk
A minimum height clearance of
6.2 ft (1.89 m) is required to open the
trunk lid.
If you are unable to unlock the trunk with
the SmartKey, open the trunk with the me-
chanical key.
The handle is located above the rear li-
cense plate recess.Trunk lid lock1Unlocking
2Handle
�
Insert the mechanical key into the
trunk lid lock.
�
Turn the mechanical key counterclock-
wise to position 1 and hold it in this
position.
�
Pull the trunk lid handle 2 and lift lid.Unlocking interior storage compart-
ments
Locking storage areas in the passenger
compartment include:
�
the glove box
�
the storage compartment under the
armrest
�
the rear storage compartments
If these cannot be unlocked by means of
the SmartKey, the SmartKey with
KEYLESS-GO*, or the central locking but-
ton, use the mechanical key to open the
glove box.
iUnlocking your vehicle with the me-
chanical key will trigger the anti-theft
alarm system. To cancel the alarm, do
one of the following:�
Press button Œ or ‹on the
SmartKey.
�
Insert the SmartKey in the starter
switch.
�
Press the KEYLESS-GO* start/stop
button (
�page 33).
�
Grasp the outside door handle (ve-
hicles with KEYLESS-GO* only).
iThe storage compartment under the
armrest and the rear storage compart-
ments can only be unlocked at the
glove box lock using the mechanical
key.
Page 328 of 434

327 Practical hints
Locking/unlocking in an emergency
1Separately unlock storage compart-
ments
2Centrally lock/unlock storage com-
partments
3Separately lock storage compartments�
Slide mechanical key out of SmartKey
housing (
�page 325).
�
Insert the mechanical key into the
glove box lock and turn it to
position2.
All storage compartments are now un-
locked.
Locking the vehicle
If you are unable to lock the vehicle with
the SmartKey, lock it with the mechanical
key as follows:�
Close the passenger door and the trunk
lid.
�
Press the central locking switch in the
center console (
�page 105).
�
Check to see whether the locking knob
on the passenger door is still visible. If
necessary push it down manually.
�
Slide the mechanical key out of the
SmartKey.
�
Lock the driver’s door with the me-
chanical key.
Lowering the load assist manually
If the load assist feature does not fully low-
er the retractable hardtop into the trunk
compartment and you are unable to close
the trunk lid, follow the instructions below.
1Hex-socket wrench
2Locking screw�
Remove the trunk floor from the trunk.
�
Lift up the lid located at the lower left
side of the trunk.
�
Have a second person lift and hold the
retracted hardtop.
��
Page 398 of 434

Prevents the wheels from locking up
during braking so that the vehicle can
continue to be steered.
ABC
(A
ctive B
ody C
ontrol)
Active, computer-co")
397 Technical terms
ABS
(A
ntilock B
rake S
ystem)
Prevents the wheels from locking up
during braking so that the vehicle can
continue to be steered.
ABC
(A
ctive B
ody C
ontrol)
Active, computer-controlled system
that hydraulically adjusts the suspen-
sion at all four wheels in response to
various driving situations.
Alignment bolt
Metal pin with thread. The alignment
bolt, or centering bolt, is an aid used
when changing a tire to align the wheel
with the wheel hub.BabySmart
TM1
airbag deactivation
system
This system detects if a special system
compatible child restraint seat is in-
stalled on the front passenger seat. The
system will automatically deactivate
the passenger front airbag when such a
seat is properly installed (indicator
lamp 7 on the glove box comes on).
See your authorized Mercedes-Benz
Center for availability.
BabySmart
TM compatible child seats
Special restraint system for children.
The sensor system for the passenger
seat prevents deployment of the pas-
senger front airbag if a BabySmart
TM
compatible child seat is installed.BAS
(B
rake A
ssist S
ystem)
System for potentially reducing braking
distances in emergency braking situa-
tions. The system is activated when it
senses an emergency based on how
fast the brake is applied.
Bi-Xenon headlamps*
Headlamps which use an electric arc as
the light source and produce a more in-
tense light than filament headlamps.
Bi-Xenon headlamps produce low
beam and high beam.
CAC
(C
ustomer A
ssistance C
enter)
Mercedes-Benz customer service cen-
ter, which can help you with any ques-
tions about your vehicle and provide
assistance in the event of a break-
down.
1BabySmart
TM
is a trademark of Siemens
Automotive Corp.
Page 412 of 434

411 Index
Fuse chart 369
Fuse chart see Vehicle tool kit
Fuses 369
Fuse chart 369
Fuse extractor 369
Main fuse box 369
Spare fuses 369
G
Garage door opener 27, 231
Gasoline see Fuel
Gear range
Automatic transmission 157
Indicator 23
Limiting 157
Shifting into optimal 156
Gear range limit
Canceling 156
Gear selector lever 26
Cleaning 279
Lock 43, 401
Position 158
Position (automatic
transmission) 155Glove box 21, 214
GPS 399
H
Hands-free microphone 27
Hard plastic trim items
Cleaning 279
Hardtop open/close control 26
Hardtop see Retractable hardtop
Hardtop switch 185
Hazard warning flasher 121
Hazard warning flasher switch 25
Headlamp switch-off delay see Delayed
switch-off, exterior lamps
Headlamps
Automatic mode 118
Headlamp cleaning system 168, 261
Manual mode 118
Refilling washer fluid 261Headliner
Cleaning 279
Head-thorax airbag 72, 399
Heated steering wheel* 220
Height adjustment
Head restraints 36
Height adjustments
Vehicle level 208
High beam flasher 121
High beam headlamp indicator 23
High beam headlamps 47, 117, 332
Replacing bulbs 334
Switching on 121
Hood 253
Messages in display 309
Horn 21
Hydroplaning 243
Page 421 of 434

420 Index
Global locking 96
Global unlocking 96
Locking 98
Loss of 98
Messages in display 311
Reprogramming 96
Selective setting 96
Unlocking 32, 93
SmartKey with remote control 90
Snow chains 269
Spare fuses 369
Spare fuses see Vehicle tool kit
Spare parts service 372
Spare tire see Spare wheel 339
Spare wheel 323, 324, 350, 382
Inflating tire 354
Tire inflation pressure 354
Speed settings
Cruise control 195
Distronic* 202Speedometer 23
Setting units 141
Sporty driving style 208
SRS 401
Indicator lamp 289
Standing lamps 117, 332
Replacing bulbs 335
Standing water
Driving instructions 246
Starter battery 260, 358
Starter switch 21, 31
Starting difficulties 44
Starting position 31
Starting the engine
With the SmartKey 43
With the SmartKey with
KEYLESS-GO* 44
Steering column
In/out adjustment 37
Length adjustment 37
Up/down adjustment 37Steering wheel
Adjusting 37
Buttons 24
Cleaning 279
Heating* 220
Height adjustment 37
Steering wheel adjustment lever 21
Stopping
Windows 183
Storage compartments 214
Armrest 215
Cup holder 214
Glove box 214
In door 215
In rear 216
Locking compartments
separately 216
Locking storage compartments 216
Rear 216
Storage tray 216
Unlocking compartments
separately 217