Page 140 of 434
139 Controls in detail
Control system
The table below shows what settings can
be changed within the various menus. De-
tailed instructions on making individual
settings can be found on the following pag-
es.Instrument cluster
Lighting
Vehicle
Convenience
Select time display mode
Set daytime running
lamp mode (USA only)
Set station selection
mode (radio)
Activate easy-entry/exit
feature
Select temperature dis-
play mode
Set locator lighting
Set automatic locking
Set key-dependency
Select speedometer dis-
play mode
Exterior lamps delayed
switch-off
Tire pressure display*
Set parking position for
exterior rear view mirror
Select language
Interior lighting delayed
switch-off
Page 141 of 434

140 Controls in detailControl systemInstrument cluster submenu
Access the
Inst. cluster
menu via the
Settings
menu. Use the
Inst. cluster
submenu to change the instrument cluster
display settings. The following functions
are available:Selecting time display mode
�
Move the selection marker with the
æ or ç button to the
Inst.
cluster
submenu.
�
Press button j or k repeatedly
until you see this message in the left
display:
Clock
.
The selection marker is on the current
setting.
�
Press æ or ç to set the
12-hour
or
24-hour
time display mode.Selecting temperature display mode
�
Move the selection marker with button
æ or ç to the
Inst. cluster
submenu.
�
Press button j or k repeatedly
until you see this message in the left
display:
Temp. indicator
.
The selection marker is on the current
setting.
�
Press æ or ç to set temperature
unit to degrees Celsius (
°C) or degrees
Fahrenheit (
°F).
Function
Page
Select time display mode
140
Select temperature display
mode
140
Select speedometer display
mode
141
Select language
141
iFor information on setting the time, re-
fer to the separate COMAND operating
instructions.
Page 143 of 434

142 Controls in detailControl systemLighting submenu
Access the
Lighting
submenu via the
Settings
menu. Use the
Lighting
sub-
menu to change the lamp and lighting set-
tings on your vehicle. The following
functions are available:Setting daytime running lamp mode
(USA only)
�
Move the selection marker with button
æ or ç to the
Lighting
sub-
menu.
�
Press button j or k repeatedly
until you see this message in the left
display:
Light circuit Headlamp
mode
.
The selection marker is on the current
setting.
�
Press æ or ç to select manual or
daytime running lamp (constant) mode.
This function is not available in coun-
tries where daytime running lamps are
mandatory.With daytime running lamp mode se-
lected and the exterior lamp switch at
positionM, the following lamps will
come on automatically when the en-
gine is turned on:
�
Parking lamps and low beam head-
lamps
�
License plate lamps
Function
Page
Set daytime running lamp mode
(USA only)
142
Set locator lighting
143
Exterior lamps delayed
switch-off
143
Interior lighting delayed
switch-off
145
iIf you turn the exterior lamp switch to
another position, the corresponding
lamp(s) will switch on.
For safety reasons, resetting the Lighting
submenu to factory settings
(
�page 111) will not reset the daytime
running lamp mode.
In the right display you will then see the
message:
Cannot be fully reset to
factory settings while driv.!
.
Page 146 of 434
145 Controls in detail
Control system
Interior lighting delayed switch-off
Use this function to set whether and for
how long you would like the interior light-
ing to remain lit during darkness after the
SmartKey is removed from the starter
switch. �
Move the selection marker with button
æ or ç to the
Lighting
sub-
menu.
�
Press button j or k repeatedly
until you see this message in the left
display:
Int. lighting delayed
switch-off
.
The selection marker is on the current
setting.
�
Press æ or ç to select the de-
sired lamp-on time period. You can se-
lect:�
0 s
, the delayed switch-off feature
is deactivated
�
5 s
, 10 s
, 15 s
or
20 s
, the delayed
switch-off feature is activatedVehicle submenu
Access the
Vehicle
submenu via the
Set-
tings
menu. Use the
Vehicle
submenu to
make general vehicle settings. The follow-
ing functions are available:
Function
Page
Set station selection mode
(radio)
146
Set automatic locking
146
Tire pressure display*
147
Page 151 of 434
150 Controls in detailControl system
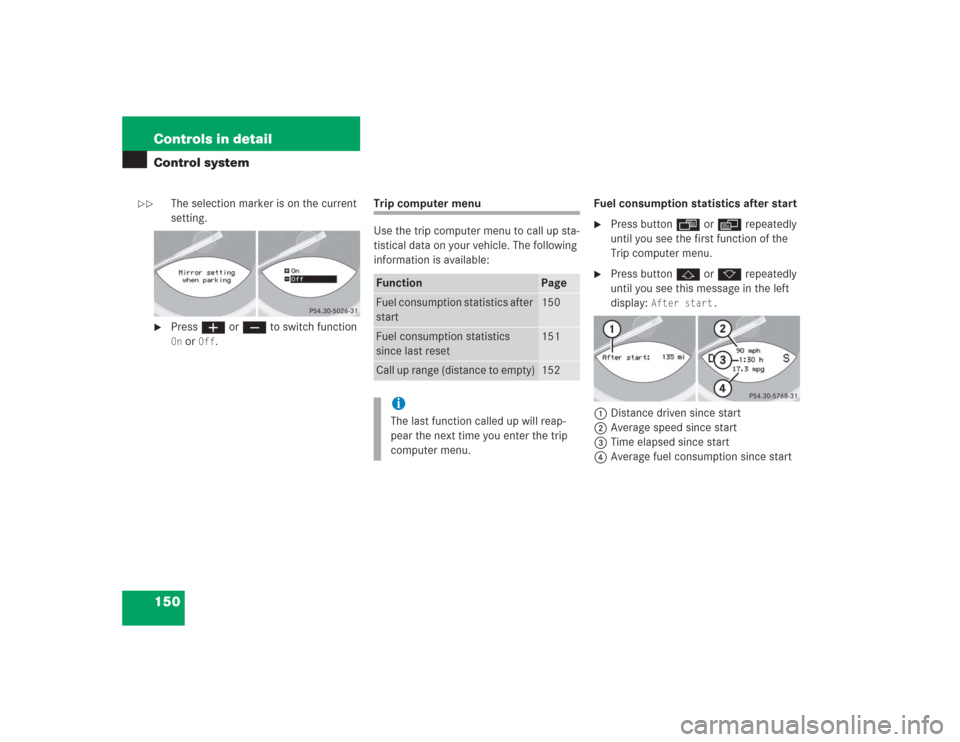
The selection marker is on the current
setting.
�
Press æ or ç to switch function On or
Off
.
Trip computer menu
Use the trip computer menu to call up sta-
tistical data on your vehicle. The following
information is available:Fuel consumption statistics after start
�
Press button ÿ or è repeatedly
until you see the first function of the
Trip computer menu.
�
Press button j or k repeatedly
until you see this message in the left
display:
After start.
1Distance driven since start
2Average speed since start
3Time elapsed since start
4Average fuel consumption since start
Function
Page
Fuel consumption statistics after
start
150
Fuel consumption statistics
since last reset
151
Call up range (distance to empty)
152
iThe last function called up will reap-
pear the next time you enter the trip
computer menu.
��
Page 152 of 434

151 Controls in detail
Control system
Fuel consumption since last reset�
Press button ÿ or è repeatedly
until you see the first function of the
Trip computer menu.
�
Press button j or k repeatedly
until you see this message in the left
display:
From reset.
1Distance driven since last reset
2Average speed since last reset
3Time elapsed since last reset
4Average fuel consumption since last re-
setResetting fuel consumption statistics
�
Press button ÿ or è repeatedly
until you see the first function of the
Trip computer menu.
�
Press button j or k repeatedly
until you see the reading that you want
to reset in the left display.
�
Press and hold the reset button in the
instrument cluster (
�page 23) until
the value is reset to 0.
iAll statistics stored since the last en-
gine start will be reset approximately
four hours after the SmartKey in the
starter switch is turned to position0 or
removed from the starter switch.
Resetting will not occur if you turn the
SmartKey back to position1 or2 with-
in this time period.
Page 169 of 434
.
A rain sensor automatically controls the
windshield wi")
168 Controls in detailGood visibilityWindshield wipers
For information on windshield wiper opera-
tion, see “Windshield wipers” (
�page 47).
A rain sensor automatically controls the
windshield wipers depending on how wet
the windshield is.
�
Switch on ignition.
�
Set wiper switch to position I
(�page 47).
After the initial wipe, pauses between
wipes are automatically controlled by the
rain sensor.
Headlamp cleaning system
The switch is located on the left side of the
dashboard.
1Headlamp washer switch�
Switch on ignition.
�
Press switch1.
The headlamps are cleaned with a
high-pressure water jet.
For information on filling up the washer flu-
id reservoir, see “Windshield washer sys-
tem and headlamp cleaning system”
(
�page 261).
iIntermittent wiping is interrupted when
the vehicle is at a standstill and a door
is opened.
!Do not leave windshield wipers in inter-
mittent setting when vehicle is taken to
an automatic car wash or during wind-
shield cleaning. Wipers will operate in
the presence of water sprayed on the
windshield, and wipers may be dam-
aged as a result.
The switch should not be left in inter-
mittent setting as the wipers will wipe
the windshield once every time the en-
gine is started. Dust that accumulates
on the windshield might scratch the
glass and/or damage the wiper blades
when wiping occurs on a dry wind-
shield.
Page 176 of 434
.
The indicator lamp on the button
comes on.
Deactivating
�
Press button P (
�page 171).
The indica")
175 Controls in detail
Automatic climate control
Defrosting
Activating�
Press button P (
�page 171).
The indicator lamp on the button
comes on.
Deactivating
�
Press button P (
�page 171).
The indicator lamp on the button goes
out. Defrosting is turned off.
Air recirculation mode
Switch to air recirculation mode to prevent
unpleasant odors from entering the vehicle
from the outside. This setting cuts off the
intake of outside air and recirculates the
air in the passenger compartment.Activating
�
Press button , (
�page 171).
The indicator lamp on the button
comes on.
iThese settings should only be selected
for a short time.
Warning!
G
When the outside temperature is below
41°F (5°C), only switch to air recirculation
mode for short periods to prevent window
fogging.
Warning!
G
Never operate the side windows if there is
the possibility of anyone being harmed by
the closing procedure.
In the event that the procedure causes po-
tential danger, the closing of the side win-
dows can be immediately halted by
releasing the
,
button or by pressing or
pulling the respective window switch.