Page 318 of 434

317 Practical hints
What to do if …
Left display
Right display
Possible cause
Possible solution
ì
Function
Unavailable!
This display appears if button ì
or í on the multifunction steer-
ing wheel is pressed and the vehicle
is not equipped with a telephone.
H
Tire pressure
Caution
tire defect!
The tire pressure in one or more
tires is dropping.
�
Carefully bring the vehicle to a halt, avoiding
abrupt steering and braking maneuvers.
�
Change the wheel (
�page 350).
Tire pressure
ChecK
tires!
The tire pressure in one or more
tires is already below the minimum
value.
�
Carefully bring the vehicle to a halt, avoiding
abrupt steering and braking maneuvers.
�
Change the wheel (
�page 350).
H
Tire pressure
ChecK
tires!
The tire pressure in one or more
tires is low.
�
Check and correct tire pressure as required
(�page 264).
Warning!
G
Do not drive with a flat tire. A flat tire affects
the ability to steer or brake the vehicle. You
may lose control of the vehicle.
Continued driving with a flat tire will cause
excessive heat build-up and possibly a fire.
Page 319 of 434
318 Practical hintsWhat to do if …Left display
Right display
Possible cause
Possible solution
H
Tire pres.
monitor
Visit
workshop!
The tire inflation pressure monitor*
is malfunctioning.
�
Have the tire inflation pressure monitor*
checked by an authorized Mercedes-Benz
Center.
�
Change the wheel.
A wheel without proper sensor was
installed.
H
Tire pressure, RL
Caution
tire defect!
The left rear tire is rapidly deflating.
�
Carefully bring the vehicle to a halt, avoiding
abrupt steering and braking maneuvers.
�
Change the wheel (
�page 350).
Tire pressure, RL
Check tires!
The left rear tire pressure is low.
�
Carefully bring the vehicle to a halt.
�
Check the tire pressure.
�
Change the wheel (
�page 350).
Warning!
G
Do not drive with a flat tire. A flat tire affects
the ability to steer or brake the vehicle. You
may lose control of the vehicle.
Continued driving with a flat tire will cause
excessive heat build-up and possibly a fire.
Page 320 of 434
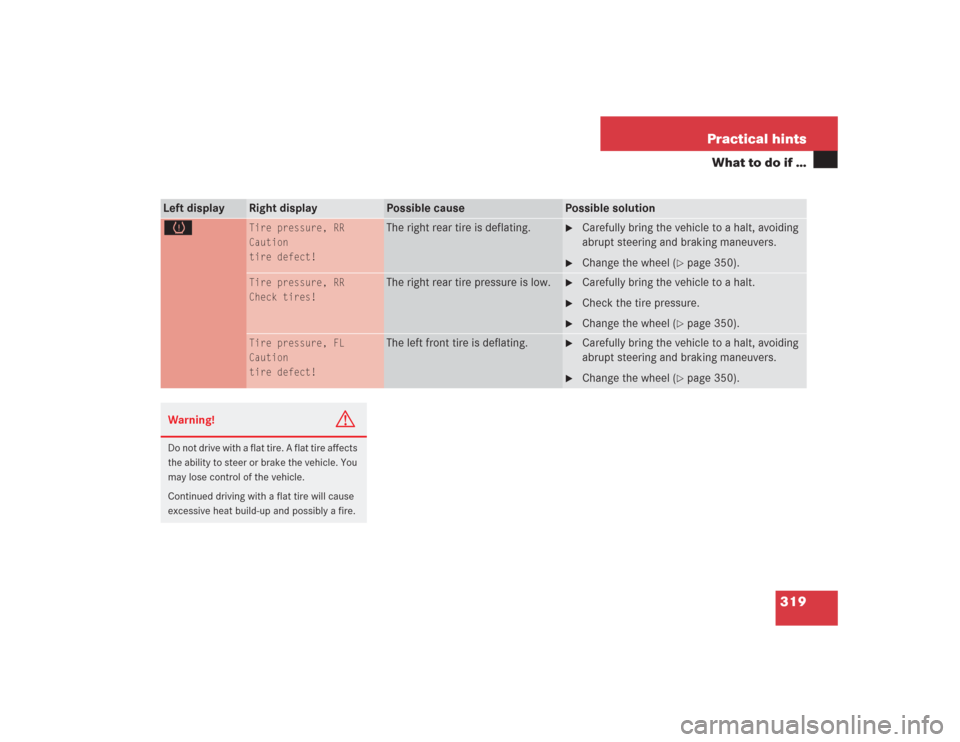
319 Practical hints
What to do if …
Left display
Right display
Possible cause
Possible solution
H
Tire pressure, RR
Caution
tire defect!
The right rear tire is deflating.
�
Carefully bring the vehicle to a halt, avoiding
abrupt steering and braking maneuvers.
�
Change the wheel (
�page 350).
Tire pressure, RR
Check tires!
The right rear tire pressure is low.
�
Carefully bring the vehicle to a halt.
�
Check the tire pressure.
�
Change the wheel (
�page 350).
Tire pressure, FL
Caution
tire defect!
The left front tire is deflating.
�
Carefully bring the vehicle to a halt, avoiding
abrupt steering and braking maneuvers.
�
Change the wheel (
�page 350).
Warning!
G
Do not drive with a flat tire. A flat tire affects
the ability to steer or brake the vehicle. You
may lose control of the vehicle.
Continued driving with a flat tire will cause
excessive heat build-up and possibly a fire.
Page 321 of 434
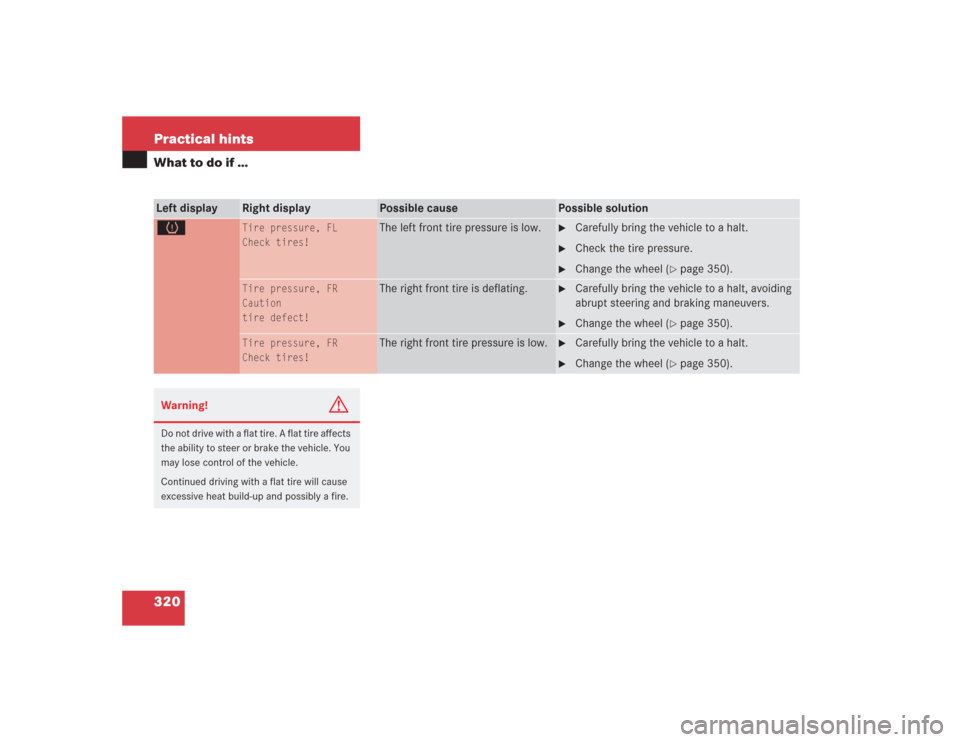
320 Practical hintsWhat to do if …Left display
Right display
Possible cause
Possible solution
H
Tire pressure, FL
Check tires!
The left front tire pressure is low.
�
Carefully bring the vehicle to a halt.
�
Check the tire pressure.
�
Change the wheel (
�page 350).
Tire pressure, FR
Caution
tire defect!
The right front tire is deflating.
�
Carefully bring the vehicle to a halt, avoiding
abrupt steering and braking maneuvers.
�
Change the wheel (
�page 350).
Tire pressure, FR
Check tires!
The right front tire pressure is low.
�
Carefully bring the vehicle to a halt.
�
Change the wheel (
�page 350).
Warning!
G
Do not drive with a flat tire. A flat tire affects
the ability to steer or brake the vehicle. You
may lose control of the vehicle.
Continued driving with a flat tire will cause
excessive heat build-up and possibly a fire.
Page 324 of 434

323 Practical hints
Where will I find ...?
�Where will I find ...?
First aid kit
The first aid kit is located in storage com-
partment under the passenger seat.
1Handle
2Lid�
Pull handle 1 up.
�
Fold lid 2 down.
You can now remove the first-aid kit.
Vehicle tool kit, jack, and spare wheel
The vehicle tool kit, jack, and spare wheel
are stored in the space underneath the
trunk floor.�
Lift up the trunk floor cover.
You can now remove the tools and ac-
cessories.
The vehicle tool kit includes�
One pair of universal pliers
�
Two open-end wrenches
�
One hex-socket wrench
�
One interchangeable slot/Phillips
screwdriver
�
One towing eye bolt
�
One alignment bolt
�
One fuse extractor
�
One fuse chart for the main fuse
box
�
Spare fuses
The jack is exclusively designed for lifting
the vehicle during a wheel change. Always
lower the vehicle on sufficient capacity
jack stands before working under the vehi-
cle.
iCheck expiration dates and contents
for completeness at least once a year
and replace missing/expired items.
Page 347 of 434

should not be removed from the tire.
�
Take TIREFIT, the sticker, and the elec-
tric air pump out of the trunk.
�
Attach the stick")
346 Practical hintsFlat tire�
Foreign objects (e.g. screws or nails)
should not be removed from the tire.
�
Take TIREFIT, the sticker, and the elec-
tric air pump out of the trunk.
�
Attach the sticker where it will be easily
seen by the driver on the instrument
cluster.1TIREFIT container
2Flap
3Notch
4Electrical plug
5Air hose
6Flange
�
Open flap2 on the electric air pump.
�
Pull plug4 and air hose5 out of the
pump housing.
Warning!
G
TIREFIT is a limited repair device. TIREFIT
cannot be used for cuts or punctures larger
than approx. 0.16 in (4 mm) and tire dam-
age caused by driving with extremely low
tire pressure, or on a flat tire, or a damaged
wheel.
Do not drive the vehicle under such circum-
stances.
Contact your nearest Mercedes-Benz
Center for assistance or call Roadside
Assistance.
Warning!
G
Take care not to allow the contents of
TIREFIT to come in contact with hair, eyes or
clothing. TIREFIT is harmful if inhaled, swal-
lowed or absorbed through the skin - causes
skin, eye and respiratory irritation.
Any contact with eyes or skin should be
flushed immediately with plenty of water.
If clothing comes in contact with TIREFIT,
change clothing as soon as possible.
In case of allergic reaction or rash, consult a
physician immediately.Warning!
G
Keep TIREFIT out of reach of children.
If swallowed, rinse mouth immediately with
plenty of water and drink plenty of water.
Do not induce vomiting!
Consult a physician immediately.
Keep away from open flame or heat source.
iIf sealant has leaked out, let it dry. You
can then peel it off.
Page 351 of 434
.
�
Turn spare wheel bracket counter-
clockwise to loosen.
�
Take the spare whe")
350 Practical hintsFlat tireMounting the spare wheel Preparing the vehicle
Prepare the vehicle as described
(
�page 339).
�
Turn spare wheel bracket counter-
clockwise to loosen.
�
Take the spare wheel out of the trunk.
Lifting the vehicle
�
Prevent the vehicle from rolling away
by blocking wheels with wheel chocks
(not included) or other sizable objects.
When changing wheel on a level sur-
face:�
Place one chock in front of and one
behind the wheel that is diagonally
opposite to the wheel being
changed.
When changing wheel on a hill:
�
Place chocks on the downhill side
blocking both wheels of the other
axle.
�
Take the vehicle tool kit and the jack
out of the storage compartment under
the trunk floor (
�page 323).
Warning!
G
The dimensions of the spare wheel are dif-
ferent from those of the road wheels. As a
result, the vehicle handling characteristics
change when driving with a mounted spare
wheel. Adapt your driving style accordingly.
The spare wheel is for temporary use only.
When driving with spare wheel mounted, en-
sure proper tire pressure and do not exceed
vehicle speed of 50 mph (80 km/h).
Drive to the nearest Mercedes-Benz Center
as soon as possible to have the spare wheel
replaced with a regular road wheel.
Never operate the vehicle with more than
one spare wheel mounted.
Warning!
G
The jack is designed exclusively for jacking
up the vehicle at the jack tubes built into
both sides of the vehicle. To help avoid per-
sonal injury, use the jack only to lift the ve-
hicle during a wheel change. Never get
beneath the vehicle while it is supported by
the jack. Keep hands and feet away from the
area under the lifted vehicle. Always firmly
set parking brake and block wheels before
raising vehicle with jack.
Do not disengage parking brake while the
vehicle is raised. Be certain that the jack is
always vertical (plumb line) when in use, es-
pecially on hills. Always try to use the jack
on level surface. Be sure that the jack arm is
fully inserted in the jack tube. Always lower
the vehicle onto sufficient capacity jack-
stands before working under the vehicle.
Page 352 of 434
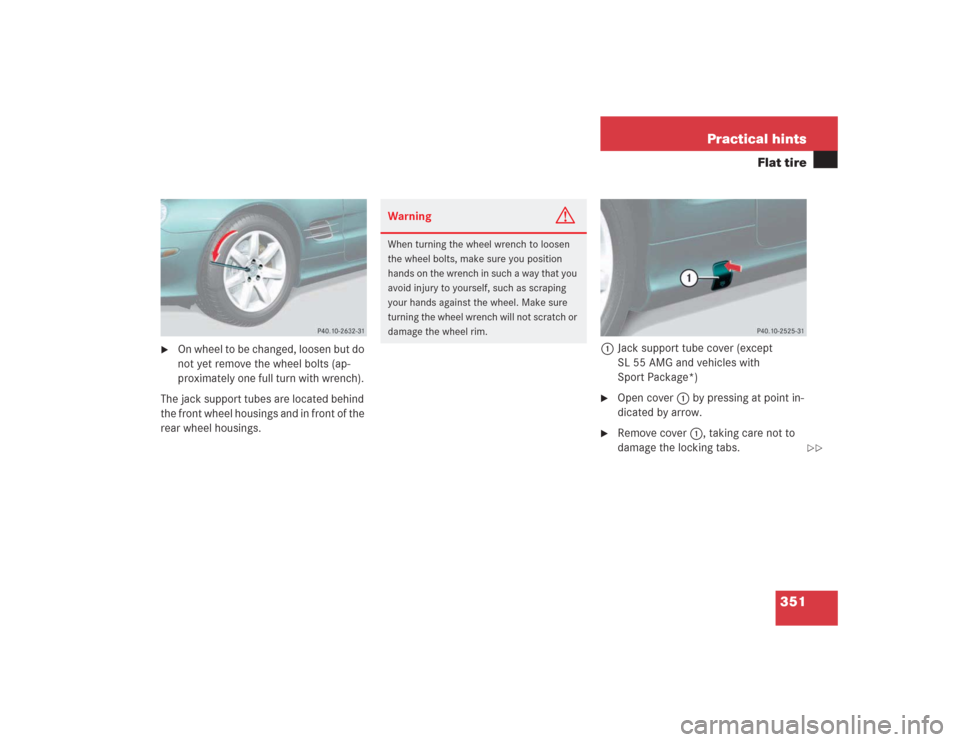
351 Practical hints
Flat tire
�
On wheel to be changed, loosen but do
not yet remove the wheel bolts (ap-
proximately one full turn with wrench).
The jack support tubes are located behind
the front wheel housings and in front of the
rear wheel housings.1Jack support tube cover (except
SL 55 AMG and vehicles with
Sport Package*)
�
Open cover1 by pressing at point in-
dicated by arrow.
�
Remove cover1, taking care not to
damage the locking tabs.
Warning
G
When turning the wheel wrench to loosen
the wheel bolts, make sure you position
hands on the wrench in such a way that you
avoid injury to yourself, such as scraping
your hands against the wheel. Make sure
turning the wheel wrench will not scratch or
damage the wheel rim.
��