Page 115 of 434

114 Controls in detailMemory function
�Memory function
With the memory switch you can store up
to three different settings per SmartKey or
SmartKey with KEYLESS-GO*.
The following settings are saved for each
stored position:�
Driver’s seat and backrest position
�
Steering wheel position
�
Interior rear view mirror position
�
Driver’s side exterior rear view mirror
position
�
Passenger side exterior rear view mir-
ror position
These key-dependent memory settings
can be deactivated if desired
(
�page 149).The memory switch is located on the door.
M Memory button
1, 2, 3 Stored positions
�
Switch on ignition.
or
�
Open the respective door.
All the lamps in the instrument cluster
come on when the ignition is switched
on.
!Prior to operating the vehicle, the driv-
er should check and adjust the seat
height, seat position fore and aft, and
seat backrest angle if necessary, to en-
sure adequate control, reach and com-
fort. The head restraint should also be
adjusted for proper height. See also the
section on airbags (
�page 59) for
proper seat positioning.
In addition, adjust the steering wheel to
ensure adequate control, reach, opera-
tion and comfort. Both the inside and
outside rear view mirrors should be ad-
justed for adequate rear vision.
Fasten seat belts. Infants and small
children should be seated in a properly
secured restraint system that complies
with U.S. Federal Motor Vehicle Safety
Standard 213 and Canadian Motor Ve-
hicle Safety Standard 213.
Warning!
G
Do not activate the memory function while
driving. Activating the memory function
while driving could cause the driver to lose
control of the vehicle.
Page 116 of 434
.
�
Press memory buttonM.
�
Release m")
115 Controls in detail
Memory function
Storing positions into memory�
Adjust the seats, steering wheel and
rear view mirrors to the desired posi-
tion (
�page 34).
�
Press memory buttonM.
�
Release memory button and press a
stored position button1, 2, or3 within
three seconds.
All the settings are stored at the select-
ed position.
Recalling positions from memory�
On memory switch, press and hold
stored position button1, 2 or3 until
the seat, steering wheel and rear view
mirrors have fully moved to the stored
positions.Storing exterior rear view mirror
parking position
For easier parking, you can adjust the
passenger-side exterior rear view mirror so
that you can see the right rear wheel as
soon as you engage reverse gearR.
For information on activating the parking
position feature, see “Setting parking posi-
tion for exterior rear view mirror”
(�page 149).
iReleasing the button immediately
stops movement to the stored posi-
tions.
iYou can store a parking position for the
passenger-side exterior rear view mir-
ror for each SmartKey or SmartKey
with KEYLESS-GO*.
Page 117 of 434
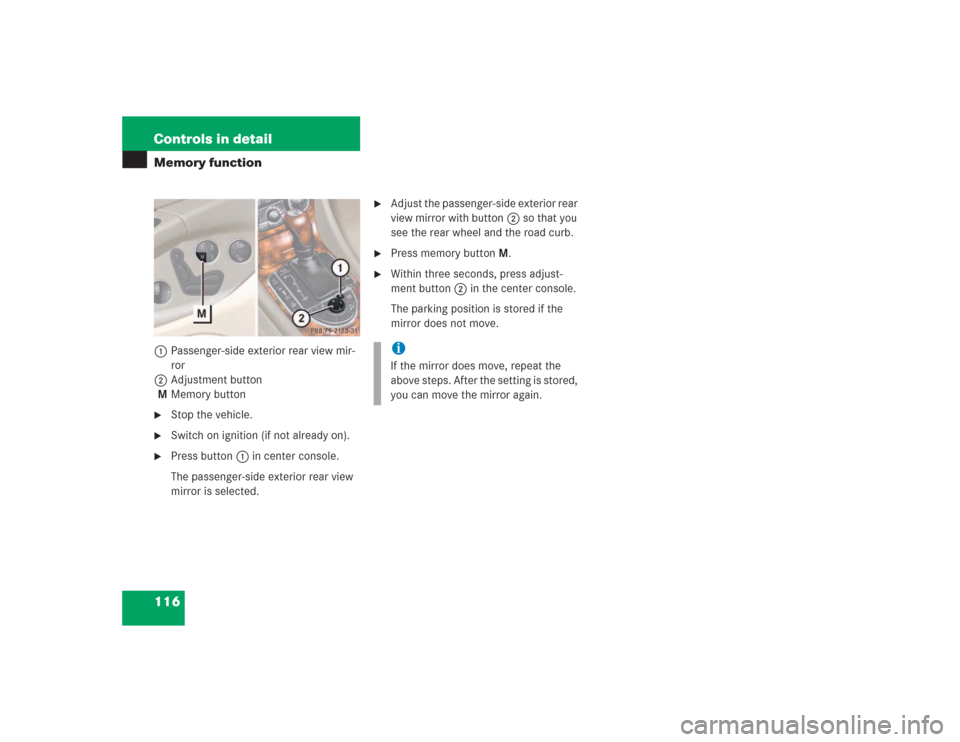
116 Controls in detailMemory function1Passenger-side exterior rear view mir-
ror
2Adjustment button
MMemory button�
Stop the vehicle.
�
Switch on ignition (if not already on).
�
Press button1 in center console.
The passenger-side exterior rear view
mirror is selected.
�
Adjust the passenger-side exterior rear
view mirror with button2 so that you
see the rear wheel and the road curb.
�
Press memory buttonM.
�
Within three seconds, press adjust-
ment button2 in the center console.
The parking position is stored if the
mirror does not move.iIf the mirror does move, repeat the
above steps. After the setting is stored,
you can move the mirror again.
Page 132 of 434
131 Controls in detail
Control system
Menus, submenus and functions
Menu 1
Menu 2
Menu 3
Menu 4
Menu 5
Menu 6
Menu 7
Menu 8
Standard dis-
play
AUDIO
NAVI
Distronic*
Malfunction
memory
Settings
Trip computer
Telephone
Commands/submenusDigital speed-
ometer
Select radio
station
Activate
route guid-
ance
Call up set-
tings
Call up malfunc-
tion messages
Reset to factory
settings
Fuel consump-
tion statistics af-
ter start
Load phone
book
Call up FSS
Select satel-
lite radio sta-
tion*
(USA only)
Instrument clus-
ter submenu
Fuel consump-
tion statistics
since the last re-
set
Search for
name in
phone book
Check tire
pressure*
Operate CD
player
Lighting sub-
menu
Call up range
Check engine
oil level
Vehicle sub-
menuConvenience
submenu
Page 137 of 434

136 Controls in detailControl systemMalfunction memory menu
Use the malfunction memory menu to scan
malfunction and warning messages that
may be stored in the system. What infor-
mation is shown in the display fields de-
pends on whether malfunctions have
actually occurred.
�
Press button è or ÿ repeatedly
until you see the message
Malfunction
memory
in the right display.
No malfunction messages
If no malfunctions have occurred, the mes-
sage in the right display is:
Malfunction
memory, no malfunctions.
Malfunctions have occurred
If malfunctions have occurred, you will see
the number of malfunctions in the right dis-
play:
1Number of malfunctions
�
Press button k or j.The stored messages will now be displayed
in order. See the “Practical hints” section
for malfunction and warning messages
(
�page 291).
Should any malfunctions occur while driv-
ing, the number of malfunctions will reap-
pear in the right display field when the
SmartKey in the starter switch is turned to
position0 or removed from the starter
switch.
Warning!
G
Malfunction and warning messages are only
indicated for certain systems and are inten-
tionally not very detailed. The malfunction
and warning messages are simply a remind-
er with respect to the operation of certain
systems and do not replace the owner’s
and/or driver’s responsibility to maintain
the vehicle’s operating safety by having all
required maintenance and safety checks
performed on the vehicle and by bringing
the vehicle to an authorized Mercedes-Benz
Center to address the malfunction and
warning messages (
�page 291).
iThe message memory will be cleared
when you switch on the ignition. You
will then only see high priority malfunc-
tions (
�page 291).
Page 147 of 434
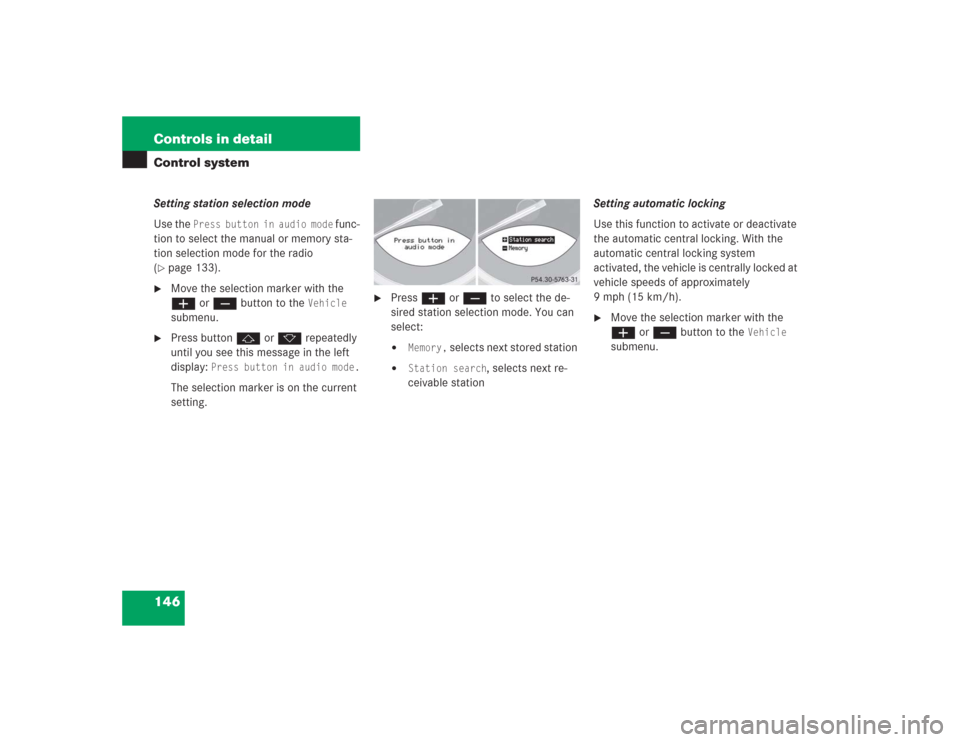
146 Controls in detailControl systemSetting station selection mode
Use the
Press button in audio mode
func-
tion to select the manual or memory sta-
tion selection mode for the radio
(
�page 133).
�
Move the selection marker with the
æ or ç button to the
Vehicle
submenu.
�
Press button j or k repeatedly
until you see this message in the left
display:
Press button in audio mode.
The selection marker is on the current
setting.
�
Press æ or ç to select the de-
sired station selection mode. You can
select:�
Memory,
selects next stored station
�
Station search
, selects next re-
ceivable stationSetting automatic locking
Use this function to activate or deactivate
the automatic central locking. With the
automatic central locking system
activated, the vehicle is centrally locked at
vehicle speeds of approximately
9mph(15km/h).
�
Move the selection marker with the
æ or ç button to the
Vehicle
submenu.
Page 149 of 434

148 Controls in detailControl systemConvenience submenu
Access the
Convenience
submenu via the
Settings
menu. Use the
Convenience
sub-
menu to change the settings for a number
of convenience features. The following
functions are available:
Activating easy-entry/exit feature
Use this function to activate and deacti-
vate the easy-entry/exit feature. When the
feature is activated, the steering wheel and
driver’s seat will move back to facilitate ex-
iting the vehicle when you
�
remove the SmartKey from the starter
switch
�
open the driver’s doorAfter entering the vehicle, the steering
wheel and seat will move into the position
stored in memory when
�
the driver’s door is closed
�
you insert the SmartKey in the starter
switch or press the KEYLESS-GO*
start/stop button and
�
press and hold the appropriate stored
position button on the memory switch
(�page 114)
�
Move the selection marker with button
æ or ç to the
Convenience
sub-
menu.
�
Press button j or k repeatedly
until you see this message in the left
display:
Easy-entry feature Acti-
vate
.
The selection marker is on the current
setting.
Function
Page
Activate easy-entry/exit fea-
ture
148
Set key-dependency
149
Set parking position for exterior
rear view mirror
149
Warning!
G
You must make sure that no one can be-
come trapped or injured by the moving
steering wheel and the driver’s seat when
the easy-entry / exit feature is in operation
and the driver’s door is being opened or the
SmartKey is removed from the starter
switch.
Do not leave children unattended in the ve-
hicle, or with access to an unlocked vehicle.
Children could open the driver’s door and
unintentionally activate the easy-entry/exit
feature, which could result in an accident
and/or serious personal injury.
iTo cancel seat/steering wheel move-
ment, press one of the following:�
the seat adjustment switch
(�page 34)
�
the steering column switch
(�page 37)
�
the memory switch (
�page 114)
Page 196 of 434

195 Controls in detail
Driving systems
Setting a higher speed�
Lift the cruise control lever to
position1 and hold it up until the de-
sired speed is reached.
�
Release the cruise control lever.
The new speed is set.
Setting a lower speed
�
Depress the cruise control lever to
position2 and hold it down until the
desired speed is reached.
�
Release the cruise control lever.
The new speed is set.Fine adjustment in 1 mph
(Canada: 1 km/h) increments
Faster
�
Briefly tip the cruise control lever in the
direction of arrow1.
Slower
�
Briefly tip the cruise control lever in the
direction of arrow2.Setting to last stored speed (“Resume”
function)
�
Briefly push the cruise control lever to
position4.
The cruise control will resume the last
previously set speed.
�
Remove your foot from the accelerator
pedal.
iDepressing the accelerator pedal does
not deactivate the cruise control. After
brief acceleration (e.g. for passing), the
cruise control will resume the last
speed set.
iWhen you use the cruise control lever
to decelerate, the transmission will au-
tomatically downshift if the engine’s
braking power does not brake the vehi-
cle sufficiently.
Warning!
G
The speed stored in memory should only be
set again if prevailing road conditions per-
mit. Possible acceleration or deceleration
differences arising from returning to the pre-
set speed could cause an accident and/or
serious injury to you and others.