Page 220 of 434
219 Controls in detail
Useful features
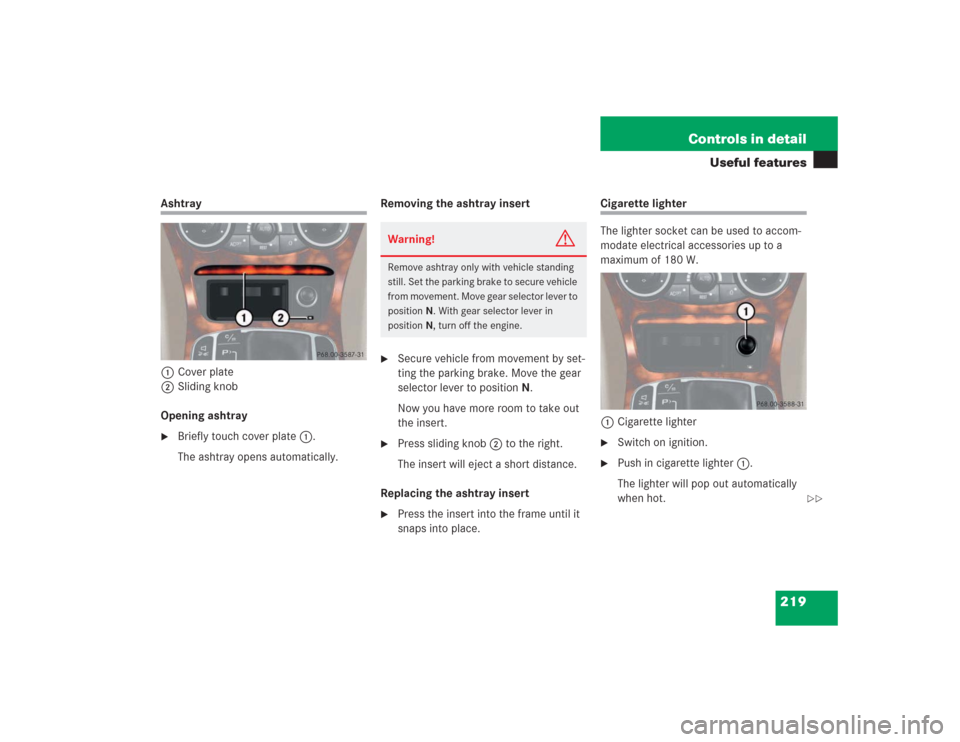
Ashtray
1Cover plate
2Sliding knob
Opening ashtray�
Briefly touch cover plate1.
The ashtray opens automatically.Removing the ashtray insert
�
Secure vehicle from movement by set-
ting the parking brake. Move the gear
selector lever to positionN.
Now you have more room to take out
the insert.
�
Press sliding knob2 to the right.
The insert will eject a short distance.
Replacing the ashtray insert
�
Press the insert into the frame until it
snaps into place.
Cigarette lighter
The lighter socket can be used to accom-
modate electrical accessories up to a
maximum of 180 W.
1Cigarette lighter�
Switch on ignition.
�
Push in cigarette lighter1.
The lighter will pop out automatically
when hot.
Warning!
G
Remove ashtray only with vehicle standing
still. Set the parking brake to secure vehicle
from movement. Move gear selector lever to
positionN. With gear selector lever in
positionN, turn off the engine.
��
Page 239 of 434

�In the “Operation” section you will find de-
tailed information on operating, maintain-
ing and caring for your vehicle.
The first 1000 miles (1500 km")
238 OperationThe first 1000 miles (1500 km)
�In the “Operation” section you will find de-
tailed information on operating, maintain-
ing and caring for your vehicle.
The first 1000 miles (1500 km)
The more cautiously you treat your vehicle
during the break-in period, the more satis-
fied you will be with its performance later
on. �
Drive your vehicle during the first
1000 miles (1500 km) at varying but
moderate vehicle and engine speeds.
�
During this period, avoid heavy loads
(full throttle driving) and excessive en-
gine speeds (no more than
2/3 of max-
imum rpm in each gear).
�
Avoid accelerating by kickdown.
�
Do not attempt to slow the vehicle
down by shifting to a lower gear using
the gear selector lever.
�
Select positions3, 2 or1 only when
driving at moderate speeds (for hill
driving).
After 1000 miles (1500 km), you may
gradually increase vehicle and engine
speeds to the permissible maximum. All of the above instructions, as may apply
to your vehicle type, also apply when driv-
ing the first 1000 miles (1500 km) after
the engine or the rear differential has been
replaced.
!Additional instructions for AMG vehi-
cles:�
During the first 1000 miles
(1500 km), do not exceed a speed
of 85 mph (140 km/h).
�
During this period, avoid engine
speeds above 4500 rpm in each
gear.
iAlways obey applicable speed limits.
Page 243 of 434

242 OperationDriving instructionsDriving off
Apply the brakes to test them briefly after
driving off. Perform this procedure only
when the road is clear of other traffic.
Warm up the engine smoothly. Do not
place full load on the engine until the oper-
ating temperature has been reached.
When starting off on a slippery surface, do
not allow a drive wheel to spin for an ex-
tended period with the ESP switched off.
Doing so may cause serious damage to the
drivetrain which is not covered by the
Mercedes-Benz Limited Warranty.
Parking
!Simultaneously depressing the acceler-
ator pedal and applying the brake re-
duces engine performance and causes
premature brake and drivetrain wear.
Warning!
G
Do not park this vehicle in areas where com-
bustible materials such as grass, hay or
leaves can come into contact with the hot
exhaust system, as these materials could be
ignited and cause a vehicle fire.
To reduce the risk of personal injury as a re-
sult of vehicle movement, before
turning off
the engine and leaving the vehicle always:
�
Keep right foot on brake pedal.
�
Firmly depress parking brake pedal.
�
Move the gear selector lever to
positionP.
�
Slowly release brake pedal.
�
When parked on an incline, turn front
wheels towards the road curb.
�
Turn the SmartKey to starter switch
position0 and remove, or press
KEYLESS-GO* start/stop button (vehi-
cles with KEYLESS-GO*).
�
Take the SmartKey or the SmartKey with
KEYLESS-GO* and lock vehicle when
leaving!Set the parking brake whenever park-
ing or leaving the vehicle. In addition,
move gear selector lever to positionP.
When parking on hills, turn front wheels
towards the road curb.
Page 246 of 434
 or “Y”-rated tires,
which have a speed")
245 Operation
Driving instructions
SL 55 AMG
Your vehicle is factory equipped with
“W”-rated tires, which have a speed rating
of 168 mph (270 km / h) or “Y”-rated tires,
which have a speed rating of 188 mph
(300 km / h).
An electronic speed limiter prevents your
vehicle from exceeding a speed of
155 mph (250 km / h).
Winter driving instructions
The most important rule for slippery or icy
roads is to drive sensibly and to avoid
abrupt acceleration, braking and steering
maneuvers. Do not use the cruise control
system under such conditions.
When the vehicle is in danger of skidding,
move gear selector lever to positionN. Try
to keep the vehicle under control by cor-
rective steering action.Road salts and chemicals can adversely af-
fect braking efficiency. Increased pedal
force may become necessary to produce
the normal brake effect.
Depressing the brake pedal periodically
when traveling at length on salt-strewn
roads can bring road-salt-impaired braking
efficiency back to normal.
If the vehicle is parked after being driven
on salt-treated roads, the braking efficien-
cy should be tested as soon as possible af-
ter driving is resumed.
iFor information on tire speed rating for
winter tires, see “Winter driving”
(�page 268).
iFor information on driving with snow
chains, see “Snow chains”
(�page 269).
Warning!
G
On slippery road surfaces, never downshift
in order to obtain braking action. This could
result in drive wheel slip and reduced vehi-
cle control. Your vehicle’s ABS will not pre-
vent this type of control loss.
Warning
G
Make sure not to endanger any other road
users when carrying out these braking ma-
neuvers.
Page 280 of 434

279 Operation
Vehicle care
Light alloy wheels
Mercedes-Benz approved Wheel Care
should be used for regular cleaning of the
light alloy wheels.
If possible, clean wheels once a week with
Mercedes-Benz approved Wheel Care, us-
ing a soft bristle brush and a strong spray
of water.
Follow the instructions on container.
Instrument cluster
Use a gentle dishwashing detergent or
mild detergent for delicate fabrics as a
washing solution. Wipe with a cloth moist-
ened in lukewarm solution. Do not use
scouring agents.Steering wheel and gear selector lever
Wipe with a damp cloth and dry thoroughly
or clean with Mercedes-Benz approved
Leather Care.
Cup holder
Use a gentle dishwashing detergent or
mild detergent for delicate fabrics as a
washing solution. Wipe with a cloth moist-
ened in lukewarm solution. Do not use
scouring agents.
Hard plastic trim items
Pour Mercedes-Benz approved Interior
Care onto soft lint-free cloth and apply
with light pressure.
Headliner
Clean with soft bristle brush, or use a
dry-shampoo cleaner in case of excessive
dirt.Seat belts
The webbing must not be treated with
chemical cleaning agents. Use only clear,
lukewarm water and soap. Do not dry the
webbing at temperatures above 176°F
(80°C) or in direct sunlight.
iOnly use acid-free cleaning materials.
Acid may cause corrosion or damage to
the clear coat.
Warning!
G
Do not bleach or dye seat belts as this may
severely weaken them. In a crash they may
not be able to provide adequate protection.
Page 297 of 434
296 Practical hintsWhat to do if …Left display
Right display
Possible cause
Possible solution
P
Gear selector
lever to P!
You have tried to start the engine
with the KEYLESS-GO* start/stop
button with the gear selector lever
not in P.
�
Place the gear selector lever in position P.
You have tried to turn off the engine
with the KEYLESS-GO* start/stop
button with the gear selector lever
not in P.You have opened the driver’s door
while engine is running with the
gear selector lever not in P.
Page 340 of 434
 you have as follows:�
The TIREFIT container of kit 1 i")
339 Practical hints
Flat tire
�Flat tire
Your SL 55 AMG may be equipped with a
TIREFIT kit.
You can identify which TIREFIT kit
(SL 55 AMG only) you have as follows:�
The TIREFIT container of kit 1 is a
squeeze container.
For information on sealing a damaged
tire with TIREFIT kit 1, see
(�page 340).
�
The TIREFIT container of kit 2 is a rigid
container.
For information on sealing a damaged
tire with TIREFIT kit 2, see
(�page 345).
Preparing the vehicle�
Park the vehicle as far as possible from
moving traffic on a hard surface.
�
Turn on the hazard warning flashers.
�
Turn the steering wheel so that the
front wheels are in a straight ahead po-
sition.
�
Set the parking brake.
�
Move the gear selector lever to P.
Vehicles with SmartKey :
�
Turn off the engine (
�page 53).
�
Remove the SmartKey from the starter
switch.Vehicles with SmartKey with
KEYLESS-GO*:
�
Turn off the engine by pressing the
KEYLESS-GO* button on the gear se-
lector lever once (
�page 54).
�
Open the driver’s door (this puts the
starter switch in position 0, same as
with the SmartKey removed from the
starter switch). The driver's door then
can be closed again.
�
Have any passenger exit the vehicle at
a safe distance from the roadway. iOpen door only when conditions are
safe to do so.
Page 344 of 434

343 Practical hints
Flat tire
1Flap
2Air hose with pressure gauge and vent
screw
3Union nut
4Electrical plug�
Open flap 1 on air pump.
�
Pull out electrical plug 4 and air hose
with the pressure gauge 2.
�
Screw air hose 2 onto the tire valve.
�
Insert electrical plug 4 into vehicle ci-
gar lighter socket.
�
Turn the SmartKey in the ignition to po-
sition 1 (
�page 31).
or
�
Press the KEYLESS-GO* start/stop
button on the gear selector lever once.
Do not depress brake pedal.
�
Press I on the electric air pump switch.
The electric air pump should now
switch on and inflate the tire.
After 5 minutes, the pressure gauge must
display at least 26 psi (1.8 bar). The air
hose and the union nut can become hot
during inflation. Please exercise appropri-
ate caution.
�
If this tire pressure is not attained, turn
off the electric air pump, detach the air
hose from the tire valve, and again
drive vehicle back and forth very slowly
approximately 30 ft (10 m).
This serves to better distribute the
TIREFIT sealant material inside the tire.
�
Inflate the tire again.
�
Press 0 on the electric air pump switch.
�
Turn the SmartKey in the ignition to
position0.
or
�
Press KEYLESS-GO* start/stop button
on the gear selector lever twice. Do not
depress brake pedal.
The electric air pump should now be
switched off.!Do not operate the electric air pump
longer than eight minutes without in-
terruption. Otherwise it may overheat.
You may operate the air pump again af-
ter it has cooled off.
��