Page 327 of 434
326 Practical hintsLocking/unlocking in an emergencyUnlocking the trunk
A minimum height clearance of
6.2 ft (1.89 m) is required to open the
trunk lid.
If you are unable to unlock the trunk with
the SmartKey, open the trunk with the me-
chanical key.
The handle is located above the rear li-
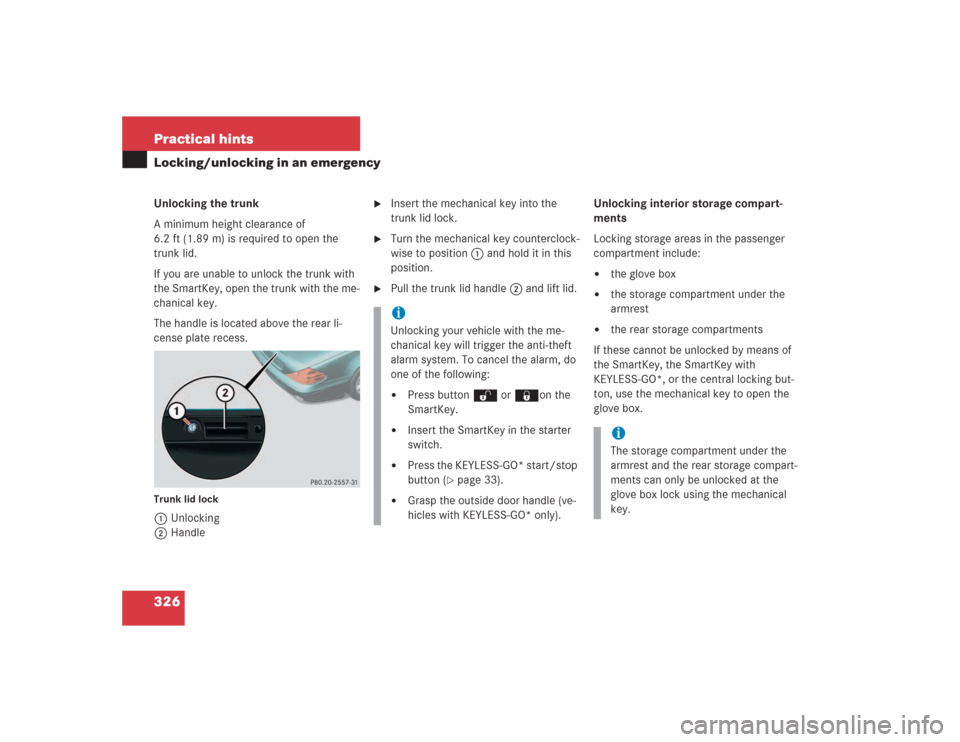
cense plate recess.Trunk lid lock1Unlocking
2Handle
�
Insert the mechanical key into the
trunk lid lock.
�
Turn the mechanical key counterclock-
wise to position 1 and hold it in this
position.
�
Pull the trunk lid handle 2 and lift lid.Unlocking interior storage compart-
ments
Locking storage areas in the passenger
compartment include:
�
the glove box
�
the storage compartment under the
armrest
�
the rear storage compartments
If these cannot be unlocked by means of
the SmartKey, the SmartKey with
KEYLESS-GO*, or the central locking but-
ton, use the mechanical key to open the
glove box.
iUnlocking your vehicle with the me-
chanical key will trigger the anti-theft
alarm system. To cancel the alarm, do
one of the following:�
Press button Œ or ‹on the
SmartKey.
�
Insert the SmartKey in the starter
switch.
�
Press the KEYLESS-GO* start/stop
button (
�page 33).
�
Grasp the outside door handle (ve-
hicles with KEYLESS-GO* only).
iThe storage compartment under the
armrest and the rear storage compart-
ments can only be unlocked at the
glove box lock using the mechanical
key.
Page 328 of 434
327 Practical hints
Locking/unlocking in an emergency
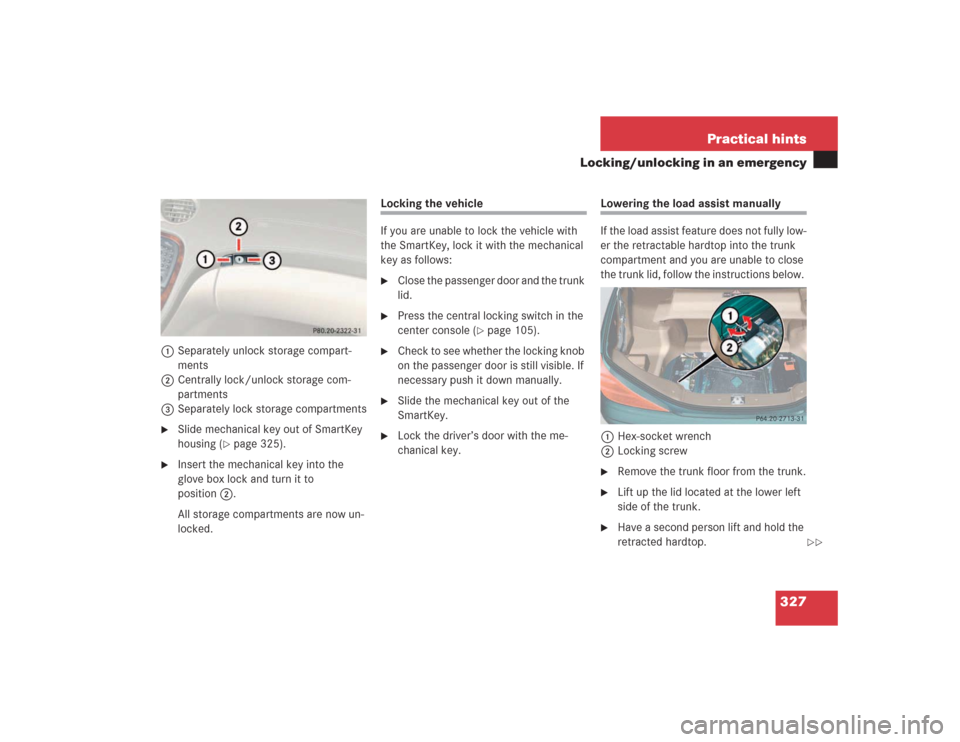
1Separately unlock storage compart-
ments
2Centrally lock/unlock storage com-
partments
3Separately lock storage compartments�
Slide mechanical key out of SmartKey
housing (
�page 325).
�
Insert the mechanical key into the
glove box lock and turn it to
position2.
All storage compartments are now un-
locked.
Locking the vehicle
If you are unable to lock the vehicle with
the SmartKey, lock it with the mechanical
key as follows:�
Close the passenger door and the trunk
lid.
�
Press the central locking switch in the
center console (
�page 105).
�
Check to see whether the locking knob
on the passenger door is still visible. If
necessary push it down manually.
�
Slide the mechanical key out of the
SmartKey.
�
Lock the driver’s door with the me-
chanical key.
Lowering the load assist manually
If the load assist feature does not fully low-
er the retractable hardtop into the trunk
compartment and you are unable to close
the trunk lid, follow the instructions below.
1Hex-socket wrench
2Locking screw�
Remove the trunk floor from the trunk.
�
Lift up the lid located at the lower left
side of the trunk.
�
Have a second person lift and hold the
retracted hardtop.
��
Page 329 of 434
328 Practical hintsLocking/unlocking in an emergency�
Using the hex-socket wrench provided
in the vehicle tool kit, carefully turn the
locking screw 2 approximately one
quarter turn.
�
Hook luggage cover into holders
(�page 185).
�
Let go of the hardtop.
It should gradually lower into the trunk.
�
When top is completely lowered, return
locking screw 2 to its original posi-
tion.
�
Close the lid.
�
Replace the trunk floor.
�
Visit an authorized Mercedes-Benz
Center as soon as possible.Replacing batteries in the SmartKey/
SmartKey with KEYLESS-GO*
If the batteries in the SmartKey or the
SmartKey with KEYLESS-GO* are dis-
charged, the vehicle can no longer be
locked or unlocked. It is recommended to
have the batteries replaced at an autho-
rized Mercedes-Benz Center.
Batteries contain materials that can harm
the environment if disposed of improperly.
Recycling of batteries is the preferred
method of disposal. Many states require
sellers of batteries to accept old batteries
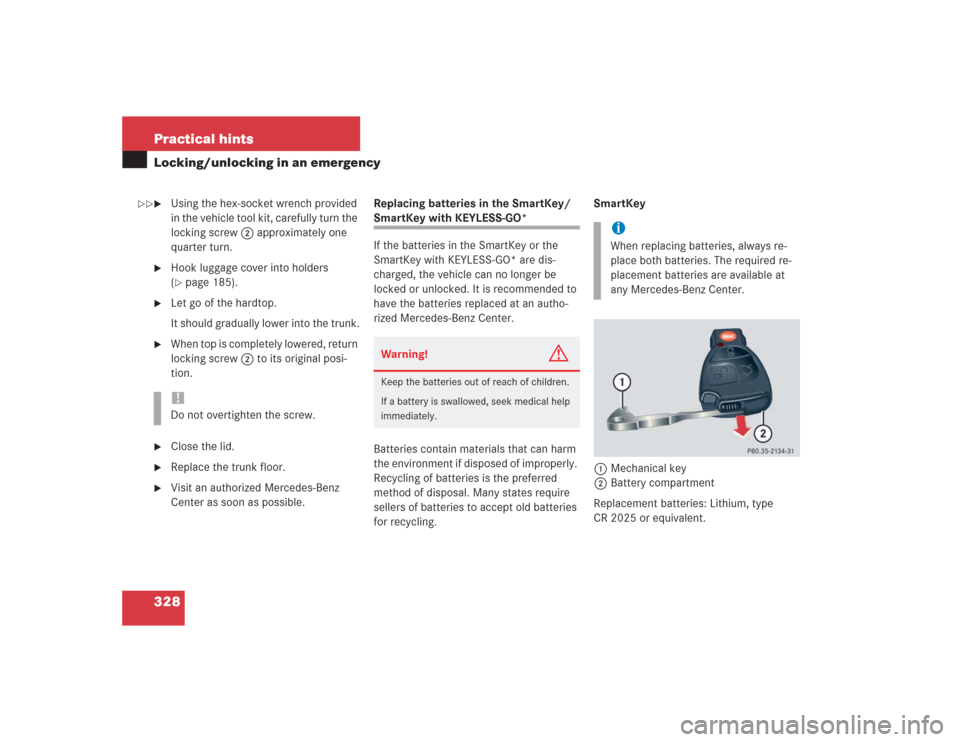
for recycling.SmartKey
1Mechanical key
2Battery compartment
Replacement batteries: Lithium, type
CR 2025 or equivalent.
!Do not overtighten the screw.
Warning!
G
Keep the batteries out of reach of children.
If a battery is swallowed, seek medical help
immediately.
iWhen replacing batteries, always re-
place both batteries. The required re-
placement batteries are available at
any Mercedes-Benz Center.
��
Page 330 of 434
329 Practical hints
Locking/unlocking in an emergency
�
Remove mechanical key (
�page 325).
�
Insert the mechanical key1in side
opening and push gray slide.
The battery compartment is unlatched.
�
Pull battery compartment2out of the
SmartKey housing in direction of ar-
row.
�
Remove the batteries.
3Battery
4Contact spring
�
Using a lint-free cloth, insert new bat-
teries under the contact spring with the
plus (+) side facing up.
�
Return battery compartment into hous-
ing until it locks into place.SmartKey with KEYLESS-GO*
1Battery
2Tilt battery up
3Mechanical key
Replacement batteries: Lithium, type
CR 2025 or equivalent.
iThe required replacement batteries are
available at any Mercedes-Benz
Center.
��
Page 331 of 434
330 Practical hintsLocking/unlocking in an emergency�
Remove mechanical key (
�page 325).
�
Insert the mechanical key in side open-
ing and push gray slide.
The battery compartment is unlatched.
�
Pull the battery compartment out of the
SmartKey housing.
�
Using mechanical key3, apply pres-
sure to position 2.
Battery 1 tilts up slightly.
�
Pull battery 1 out in direction of ar-
row.
�
Using a lint-free cloth, insert new bat-
teries under the contact spring with the
plus (+) side facing up.
�
Return battery compartment into hous-
ing until it locks into place.
��
Page 335 of 434
334 Practical hintsReplacing bulbsReplacing bulbs for front lamps
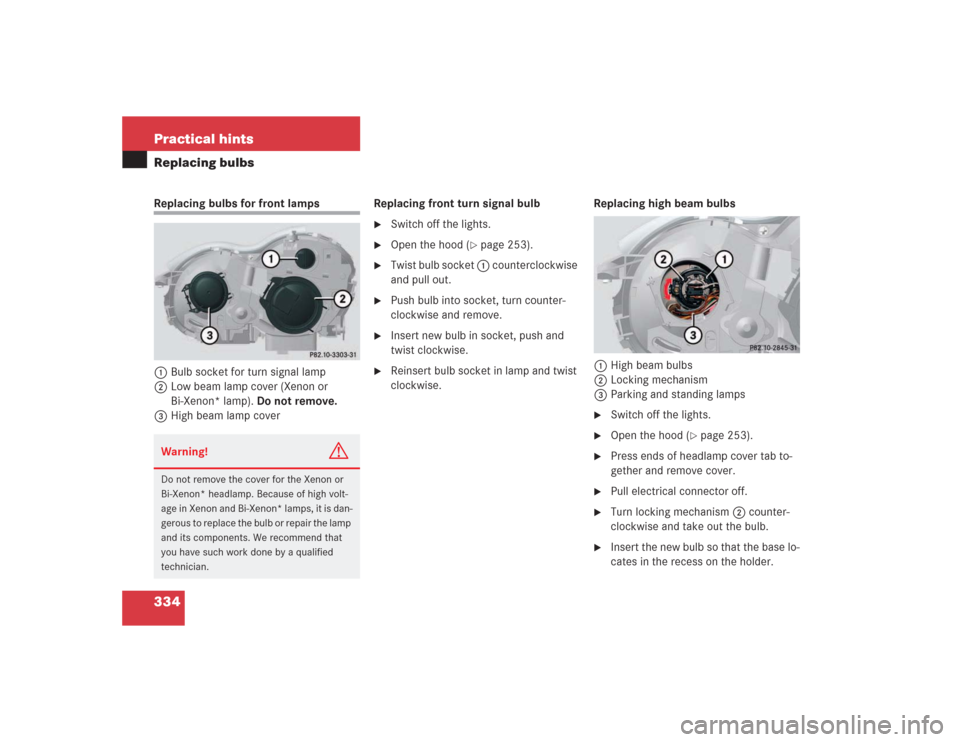
1Bulb socket for turn signal lamp
2Low beam lamp cover (Xenon or
Bi-Xenon* lamp). Do not remove.
3High beam lamp coverReplacing front turn signal bulb
�
Switch off the lights.
�
Open the hood (
�page 253).
�
Twist bulb socket 1 counterclockwise
and pull out.
�
Push bulb into socket, turn counter-
clockwise and remove.
�
Insert new bulb in socket, push and
twist clockwise.
�
Reinsert bulb socket in lamp and twist
clockwise.Replacing high beam bulbs
1High beam bulbs
2Locking mechanism
3Parking and standing lamps
�
Switch off the lights.
�
Open the hood (
�page 253).
�
Press ends of headlamp cover tab to-
gether and remove cover.
�
Pull electrical connector off.
�
Turn locking mechanism 2 counter-
clockwise and take out the bulb.
�
Insert the new bulb so that the base lo-
cates in the recess on the holder.
Warning!
G
Do not remove the cover for the Xenon or
Bi-Xenon* headlamp. Because of high volt-
age in Xenon and Bi-Xenon* lamps, it is dan-
gerous to replace the bulb or repair the lamp
and its components. We recommend that
you have such work done by a qualified
technician.
Page 336 of 434
335 Practical hints
Replacing bulbs
�
Turn locking mechanism 2 clockwise.
�
Plug the connector onto the bulb.
�
Align headlamp cover and click into
place.
Replacing parking and standing lamp
bulbs
�
Switch off the lights.
�
Open the hood (
�page 253).
�
Press ends of headlamp cover tab to-
gether and remove cover.
�
Pull out the bulb socket with the bulb.
�
Pull the bulb out of the bulb socket.
�
Insert a new bulb in the socket.
�
Reinstall the bulb socket.
�
Align headlamp cover and click into
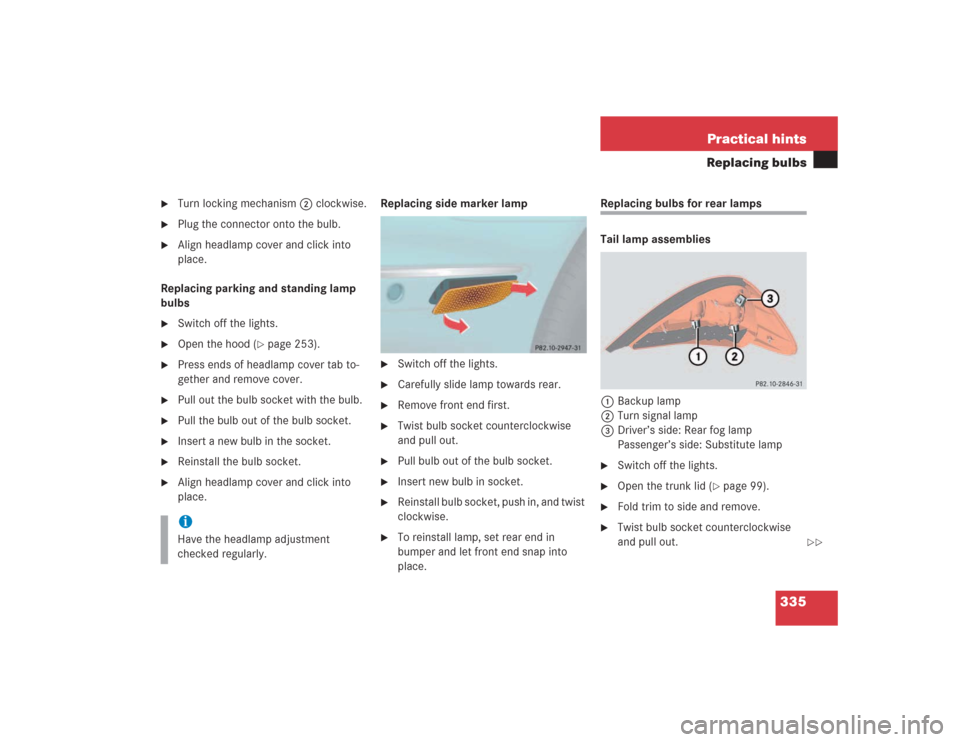
place.Replacing side marker lamp
�
Switch off the lights.
�
Carefully slide lamp towards rear.
�
Remove front end first.
�
Twist bulb socket counterclockwise
and pull out.
�
Pull bulb out of the bulb socket.
�
Insert new bulb in socket.
�
Reinstall bulb socket, push in, and twist
clockwise.
�
To reinstall lamp, set rear end in
bumper and let front end snap into
place.
Replacing bulbs for rear lamps
Tail lamp assemblies
1Backup lamp
2Turn signal lamp
3Driver’s side: Rear fog lamp
Passenger’s side: Substitute lamp�
Switch off the lights.
�
Open the trunk lid (
�page 99).
�
Fold trim to side and remove.
�
Twist bulb socket counterclockwise
and pull out.
iHave the headlamp adjustment
checked regularly.
��
Page 338 of 434
337 Practical hints
Replacing wiper blades
�Replacing wiper blades
Removing wiper blades�
Turn SmartKey in starter switch to
position1.
�
Turn combination switch to wiper
settingII (
�page 47).
�
With wiper arms in the vertical position,
turn SmartKey in starter switch to
position0.
�
Fold the wiper arm forward until it
snaps into place.
�
Turn wiper blade at a right angle to the
wiper arm.
�
Slide the wiper blade sideways out of
the retainer.
!To avoid damage to the hood, the wiper
arms should only be folded forward
when in the vertical position.
Warning!
G
For safety reasons, remove SmartKey from
starter switch before replacing a wiper
blade. Otherwise the motor could suddenly
turn on and cause injury.