Page 354 of 434

353 Practical hints
Flat tire
Removing the wheel
1Alignment bolt�
Unscrew upper-most wheel bolt and re-
move.
�
Replace this wheel bolt with alignment
bolt1 supplied in the tool kit.
�
Remove the remaining bolts.
�
Remove the wheel.Mounting the new wheel
�
Clean contact surfaces of wheel and
wheel hub.
�
Guide the spare wheel onto the align-
ment bolt and push it on.
�
Insert wheel bolts and tighten them
slightly.
!Do not place wheel bolts in sand or dirt.
This could result in damage to the bolt
and wheel hub threads.
Warning!
G
Inflate spare wheel tire only after the wheel
is properly mounted.
Inflate the spare wheel tire using the electric
pump (
�page 354)
before
lowering the ve-
hicle.
Warning!
G
Always replace wheel bolts that are dam-
aged or rusted.
Never apply oil or grease to wheel bolts.
Damaged wheel hub threads should be re-
paired immediately. Do not continue to drive
under these circumstances! Contact an au-
thorized Mercedes-Benz Center or call
Roadside Assistance.
Incorrect wheel bolts or improperly tight-
ened wheel bolts can cause the wheel to
come off. This could cause an accident. Be
sure to use the correct wheel bolts.
Page 355 of 434
354 Practical hintsFlat tire�
Unscrew the alignment bolt, install last
wheel bolt and tighten slightly.Inflating the spare tire
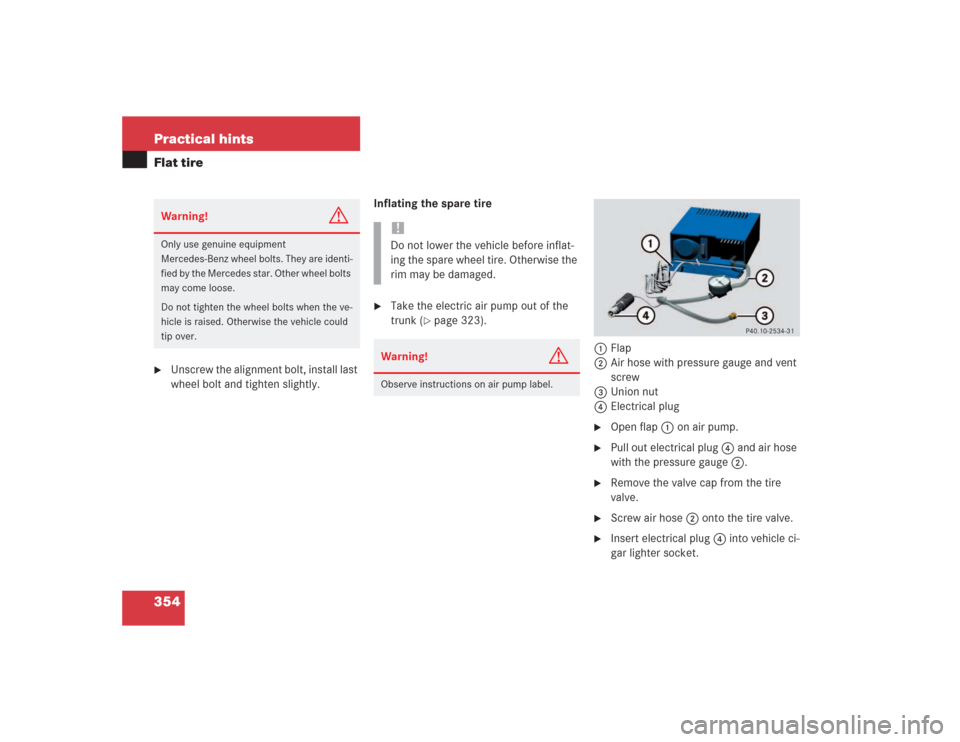
�
Take the electric air pump out of the
trunk (
�page 323).
1Flap
2Air hose with pressure gauge and vent
screw
3Union nut
4Electrical plug
�
Open flap 1 on air pump.
�
Pull out electrical plug 4 and air hose
with the pressure gauge 2.
�
Remove the valve cap from the tire
valve.
�
Screw air hose 2 onto the tire valve.
�
Insert electrical plug 4 into vehicle ci-
gar lighter socket.
Warning!
G
Only use genuine equipment
Mercedes-Benz wheel bolts. They are identi-
fied by the Mercedes star. Other wheel bolts
may come loose.
Do not tighten the wheel bolts when the ve-
hicle is raised. Otherwise the vehicle could
tip over.
!Do not lower the vehicle before inflat-
ing the spare wheel tire. Otherwise the
rim may be damaged.Warning!
G
Observe instructions on air pump label.
Page 356 of 434

355 Practical hints
Flat tire
�
Turn the SmartKey in the starter switch
to position1.
or
�
Press the KEYLESS-GO* start/stop
button on the gear selector lever once
without depressing the brake pedal.
�
Press I on the electric air pump switch.
The electric air pump should now
switch on and inflate the tire.
�
Inflate the tire to approx. 36 psi
(2.5 bar).
This takes about five minutes for the
spare tire. Air hose 2 and union
nut3 can become hot duration infla-
tion. Exercise proper caution to avoid
burning yourself when using the equip-
ment.
�
Press 0 on the electric air pump switch.
�
Turn the SmartKey in the starter switch
to position0.
or
�
Press KEYLESS-GO* start/stop button
on the gear selector lever twice without
depressing the brake pedal.
The electric air pump should now be
switched off.
�
If the tire pressure is above 36 psi
(2.5 bar), release excess tire pressure
using the vent screw.!Do not operate the air pump longer
than eight minutes without interrup-
tion. Otherwise it may overheat.
You may operate the air pump again af-
ter it has cooled off.
Warning!
G
Follow recommend inflation pressures.
Do not overinflate tires. Overinflating tires
can result in sudden deflation (blowout) be-
cause they are more likely to become punc-
tured or damaged by road debris, potholes,
etc.
Do not underinflate tires. Underinflated tires
wear unevenly, adversely affect handling
and fuel economy, and are more likely to fail
from being overheated.
��
Page 357 of 434

356 Practical hintsFlat tire�
Detach the electric air pump.
�
Stow the electrical plug and the air
hose behind the flap and place the air
pump back in the trunk.Lowering the vehicle
�
Lower vehicle by turning crank coun-
terclockwise until the full weight of the
vehicle is resting on the ground.
�
Pull the jack out of the jack support
tube.
1 - 5 Wheel bolts
�
Tighten the five wheel bolts evenly, fol-
lowing the diagonal sequence illustrat-
ed (1 to 5), until all bolts are tight.
Observe a tightening torque of 96 lb-ft
(130 Nm).
�
Before storing the jack in the trunk,
crank back to storage position and fold
in the arm.
iThe flat tire may be transported in the
trunk when the retractable hardtop is
raised. Use the protective sheet provid-
ed with the spare wheel. Do not acti-
vate the tire inflation pressure monitor
until the deflated tire has been re-
moved from the vehicle.
Warning!
G
Have the tightening torque checked after
changing a wheel. The wheels could come
loose if they are not tightened to a torque of
96 lb-ft (130 Nm).Warning
G
When turning the wheel wrench to tighten
the wheel bolts, make sure you position
hands on the wrench in such a way that you
avoid injury to yourself, such as scraping
your hands against the wheel. Make sure
turning the wheel wrench will not scratch or
damage the wheel rim.
��
Page 372 of 434
371 Technical data
Spare parts service
Warranty coverage
Identification labels
Layout of poly-V-belt drive
Engine
Rims and tires
Electrical system
Main dimensions
Weights
Fuels, coolants, lubricants, etc.
Consumer information
Page 383 of 434
382 Technical dataRims and tiresSpare wheel
SL 500
SL 600
SL 55 AMG
Rim
6 B x 17
6 B x 18
6 B x 18
Wheel offset
0.98 in (25 mm)
0.98 in (25 mm)
0.98 in (25 mm)
Collapsible tire
185/60-17 93P
1
1Must not be used with snow chains.
175/55-18 91P
1
175/55-18 91P
1
iSL 55 AMG: May also be equipped with
TIREFIT (
�page 339) in place of
collapsible tire.
Page 399 of 434

Data bus network serving to control ve-
hicle functions such as door locking or
windshield wiping depending on vehi-
cle settings and/or amb")
398 Technical termsCAN system
(C
ontroller A
rea N
etwork)
Data bus network serving to control ve-
hicle functions such as door locking or
windshield wiping depending on vehi-
cle settings and/or ambient condi-
tions.
Cockpit
All instruments, switches, buttons and
indicator/warning lamps in the passen-
ger compartment needed for vehicle
operation and monitoring.
Collapsible tire
An especially compact spare tire that
must be inflated with a provided air
pump before using. It should only be
used to bring the vehicle to the nearest
service station.
COMAND
(Co
ckpit Man
agement and
D
ata System)
Information and operating center for
vehicle sound and communications
systems, including the radio, CD changer and navigation system, as well
as other optional equipment (e.g. tele-
phone).
Control system
The control system is used to call up
vehicle information and to change
component settings. Information and
messages appear in the multifunction
display. The driver uses the buttons on
the multifunction steering wheel to
navigate through the system and to ad-
just settings.
Cruise control
Driving convenience system for auto-
matically maintaining the vehicle speed
set by the driver.
Distronic*
A driving convenience cruise control
system which helps the driver maintain
a pre-selected speed:
�
If there is no vehicle directly ahead,
the system operates in the same
way as conventional cruise control.
�
If a slower moving vehicle is ahead,
Distronic* will reduce your vehicle
speed to the extent permitted by re-
duced throttle and up to 20% brak-
ing power to maintain the preset
minimum following distance.
DTR
(->Distr
onic*)
Engine number
The number set by the manufacturer
and placed on the cylinder block to
uniquely identify each engine pro-
duced.
ESP
(E
lectronic S
tability P
rogram)
Improves vehicle handling and direc-
tional stability.
ETD
(E
mergency Tensioning D
evice)
Device which deploys in certain frontal
and rear collisions exceeding the sys-
tem's threshold to tighten the seat
belts.
->SRS
Page 411 of 434

410 IndexEngine oil 255, 388
Adding 257
Additives 388
Checking level 255
Consumption 255
Display messages 307
Filler neck 257
Messages in display 256
Engine oil level see Oil level
ESP 75, 78, 398
Control switch 26
Switching off 79
Switching on 80
Synchronizing 295
Warning lamp 78
ESP/ABS warning lamp 23
ETD see Emergency Tensioning Device
Express-close front side windows 182
Express-open front side windows 182F
Fahrenheit
Setting temperature units 140
Fastening the seat belts 40
Fine adjustment
Cruise control 195
First aid kit 323
Flat tire 339
Spare wheel 350
TIREFIT kit 340, 345
Flexible Service System (FSS) 271
Fluid level 258
Fog lamp, rear 120, 332
Replacing bulb 335
Fog lamps, front 120
Replacing bulbs 332
Front airbags 64
Front lamps 332
Replacing bulbs 334
FSS (Flexible Service System) 271, 399Fuel 250
Additives 390
Fuel reserve warning lamp 23, 287
Gasoline additives 390
Premium unleaded gasoline 251,
387, 389
Requirements 389
Fuel consumption statistics
After start 150
Since reset 151
Fuel filler flap 250
Locking 250
Opening 250
Unlocking 250
Fuel requirements 389
Fuel reserve tank
Message in display 309
Fuel tank
Filler flap 250
Fuels, coolants, lubricants etc. -
capacities 386
Functions (control system) 128


0.98 in (25 mm)
0.98 in (25 mm)
Collapsible tire
185/60-17 93P
1
1Must n")