Page 168 of 434

167 Controls in detail
Good visibility
Activating exterior rear view mirror
parking position
Follow these steps to activate the mirror
parking position so that the passen-
ger-side exterior rear view mirror will be
turned downward to the stored position.�
Make sure you have stored a parking
position for the passenger-side exterior
rear view mirror (
�page 115).
�
Make sure the
Mirror setting when
parking
function in the
Convenience
submenu of the control system is
switched to
ON (�page 149).
�
Switch on ignition (if not already on).
�
Press button2 for the passenger-side
exterior rear view mirror.
�
Place the gear selector lever in reverse
gearR.
The passenger-side exterior rear view
mirror will be turned downward to the
stored position.
1Driver’s side exterior rear view mirror
button
2Passenger-side exterior rear view
mirror buttonThe exterior rear view mirror returns to its
previously stored driving position:
�
ten seconds after you put the gear se-
lector lever out of positionR
�
immediately once your vehicle exceeds
a speed of approximately 6 mph
(10 km/h)
�
immediately when you press button1
for driver’s side mirror.
Page 170 of 434
169 Controls in detail
Good visibility
Rear window defroster
For information, see “Rear window defrost-
er” (
�page 177).
Sun visors
The sun visors protect you from sun glare
while driving.�
Swing sun visors down when you expe-
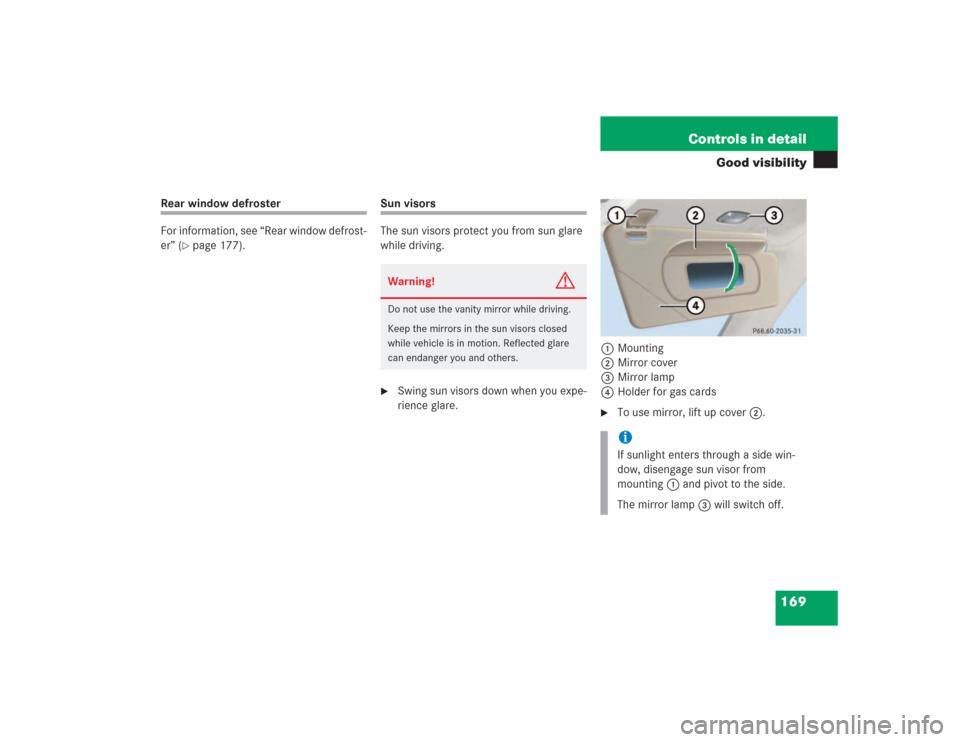
rience glare.1Mounting
2Mirror cover
3Mirror lamp
4Holder for gas cards
�
To use mirror, lift up cover2.
Warning!
G
Do not use the vanity mirror while driving.
Keep the mirrors in the sun visors closed
while vehicle is in motion. Reflected glare
can endanger you and others.
iIf sunlight enters through a side win-
dow, disengage sun visor from
mounting1 and pivot to the side.
The mirror lamp3 will switch off.
Page 225 of 434

224 Controls in detailUseful featuresShortly after the completion of your Tele
Aid acquaintance call, you will receive a
user ID and password via first call mail. By
visiting www.mbusa.com and selecting
“Tele Aid” (USA only), you will have access
to account information, remote door un-
lock, and more.System self-check
Initially, after switching on the ignition,
malfunctions are detected and indicated
(the indicator lamps in the SOS button, the
Roadside Assistance button• and the
Information button¡ stay on longer
than ten seconds or do not come on). The
message
Tele Aid – Drive to workshop!
appears for approximately ten seconds in
the multifunction display.
iThe SOS button is located above the in-
side rear view mirror.
The Roadside Assistance button•
and the Information button¡ are
located below the center armrest cov-
er.!The Tele Aid system utilizes the cellular
network for communication and the
GPS (Global Positioning System) satel-
lites for vehicle location. If either of
these signals are unavailable, the Tele
Aid system may not function and if this
occurs, assistance must be summoned
by other means.
Warning!
G
If the indicator lamps in the SOS button, in
the Roadside Assistance button, and/or in
the Information button do not come on dur-
ing the system self-check, or if any of these
indicators remain illuminated continuously
in red and/or the message
Tele Aid -
Drive to workshop!
is displayed in the
multifunction display after the system
self-check, a malfunction in the system has
been detected.
If a malfunction is indicated as outlined
above, the system may not operate as ex-
pected. Have the system checked at the
nearest Mercedes-Benz Center as soon as
possible
Page 226 of 434

or airbags have deployed")
225 Controls in detail
Useful features
Emergency calls
An emergency call is initiated
automatically�
following an accident in which the
emergency tensioning devices (ETDs)
or airbags have deployed
�
if the anti-theft alarm or the tow-away
alarm stays on for more than
20 seconds, see “Anti-theft alarm sys-
tem” (
�page 85) and
“Tow-away alarm” (
�page 86)
An emergency call can also be initiated
manually by opening the cover next to the
inside rear view mirror labeled SOS, then
briefly pressing the button located under
the cover.
For more information, see “Initiating an
emergency call manually” (�page 226).Once the emergency call is in progress, the
indicator lamp in the SOS button will begin
to flash. The message
Emergency call –
Connecting call
appears in the multifunc-
tion display. When the connection is estab-
lished, the message
Emergency call –
Call connected
appears in the multifunc-
tion display. All information relevant to the
emergency, such as the location of the ve-
hicle (determined by the GPS satellite loca-
tion system), vehicle model, identification
number and color are generated.
A voice connection between the Response
Center and the occupants of the vehicle
will be established automatically soon af-
ter the emergency call has been initiated.
When a voice connection is established,
the audio system mutes and the message
Tele Aid - Emergency call active
ap-
pears in the multifunction display. The Re-
sponse Center will attempt to determine
more precisely the nature of the accident
provided they can speak to an occupant of
the vehicle.The Tele Aid system is available if
�
it has been activated and is operation-
al. Activation requires a subscription
for monitoring services, connection
and cellular air time
�
the relevant cellular phone network
and GPS signals are available and pass
the information on to the Response
CenteriLocation of the vehicle on a map is only
possible if the vehicle is able to receive
signals from the GPS satellite network
and pass the information on to the Re-
sponse Center.
Page 232 of 434

231 Controls in detail
Useful features
Stolen vehicle tracking services
In the event your vehicle was stolen:�
Report the incident to the police
The police will issue a numbered inci-
dent report.
�
Pass this number on to the
Mercedes-Benz Response Center along
with your password issued to you when
you subscribed to the service.
The Response Center will then attempt
to covertly contact the vehicle’s Tele
Aid system. Once the vehicle is locat-
ed, the Response Center will contact
the local law enforcement and you. The
vehicle’s location will only be provided
to law enforcement.
Garage door opener
The built-in remote control is capable of
operating up to three separately controlled
devices, for example garage door openers,
gate openers, or other devices compatible
with HomeLink
® or some other systems.
You can program the signal transmitter
buttons.
Remote control integrated into the interior
rear view mirror1Indicator lamp
2 3 4Signal transmitter button
5Hand-held transmitter button
6Hand-held remote control trans-
mitter (not part of the vehicle
equipment)
Page 234 of 434

233 Controls in detail
Useful features
Programming or reprogramming the in-
tegrated remote control
Step 1:�
Switch on ignition.
Step 2:
�
If you have previously programmed an
integrated signal transmitter button
and wish to retain its programming,
proceed to step 3. Otherwise, press
and hold the two outer signal transmit-
ter buttons2 and4 and release
them only when the indicator light be-
gins to flash after approximately 20
seconds (do not hold the button for
longer than 30 seconds). This proce-
dure erases any previous settings for
all three channels and initializes the
memory. If you later wish to program a
second and/or third hand-held trans-
mitter to the remaining two signal
transmitter buttons, do not repeat this
step and begin directly with step 3.Step 3:
�
Hold the end of the hand-held remote
control transmitter6 of the device
you wish to train approximately 2 to
5 in (5 to12 cm) away from the surface
of the integrated remote control locat-
ed on the interior rear view mirror,
keeping the indicator lamp1 in view.
Step 4:
�
Using both hands, simultaneously
press the hand-held transmitter
button5 and the desired integrated
signal transmitter button (2, 3
or4). Do not release the buttons until
completing step 5.
The indicator lamp1 on the integrat-
ed remote control will flash, first slowly
and then rapidly.Step 5:
�
When the indicator lamp1 flashes
rapidly, release both buttons.
Step 6:
�
Press and hold the just-trained inte-
grated signal transmitter button and
observe the indicator lamp1.
If the indicator lamp1 stays on con-
stantly, programming is complete and
your device should activate when the
integrated signal transmitter button is
pressed and released.iThe indicator lamp1 flashes the first
time the signal transmitter button is
programmed. If this button has already
been programmed, the indicator lamp
will only start flashing after 20 sec-
onds.