Page 166 of 435

165 Controls in detail
Automatic transmission
One-touch gearshifting
Even with an automatic transmission you
can change the gears manually when the
gear selector lever is in positionD.
Downshifting�
Briefly press the gear selector lever to
the left in the D-direction.
The transmission will shift from the current
gear to the next lower gear. This action
simultaneously limits the gear range of the
transmission (
�page 166).Upshifting
�
Briefly press the gear selector lever to
the right in the D+direction.
The transmission will shift from the current
gear to the next higher gear as permitted
by the shift program. This action simulta-
neously extends the gear range of the
transmission.Canceling gear range limit
�
Press and hold the gear selector lever
in the D+ direction until
D reappears in
the tachometer display field.
The transmission will shift from the current
gear range directly to gear rangeD.
Shifting into optimal gear range
�
Press and hold the gear selector lever
in the D-direction.
The transmission will automatically select
the gear range suited for optimal accelera-
tion and deceleration. This will involve
shifting down one or more gears.
Warning!
G
On slippery road surfaces, never downshift
in order to obtain braking action. This could
result in drive wheel slip and reduced
vehicle control. Your vehicle’s ABS will not
prevent this type of loss of control.
iTo avoid overrevving the engine when
the gear selector lever is moved to the
D-direction, the transmission will not
shift to a lower gear if the engine's
max. speed would be exceeded.
Page 169 of 435
 S 55 AMG
You can change the gears manually on the
steering wheel or by using the gear
selector lever (
�pag")
168 Controls in detailAutomatic transmission
Steering wheel gearshift control (Speedshift) S 55 AMG
You can change the gears manually on the
steering wheel or by using the gear
selector lever (
�page 165).
Allow engine to warm up under low load
use. Do not place full load on the engine
until the operating temperature has been
reached. Shift into reverse gear only when
the vehicle is stopped.
!Coasting the vehicle, or driving for any
other reason with gear selector lever
inN can result in transmission damage
that is not covered by the
Mercedes-Benz Limited Warranty.Warning!
G
Getting out of your vehicle with the gear se-
lector lever not fully engaged in positionP is
dangerous. Also, positionP alone is not in-
tended to or capable of preventing your ve-
hicle from moving, possibly hitting people or
objects.
Always set the parking brake in addition to
shifting to positionP (
�page 45).
When parked on an incline, turn the front
wheels towards the road curb.
Do not park this vehicle in areas where com-
bustible materials such as grass, hay or
leaves can come into contact with the hot
exhaust system, as these materials could be
ignited and cause a vehicle fire.Warning!
G
When leaving the vehicle, always remove the
SmartKey from the starter switch, take the
SmartKey with KEYLESS-GO* with you and
lock your vehicle. Do not leave children un-
attended in the vehicle, or with access to an
unlocked vehicle. Children could move the
gear selector lever from positionP, which
could result in an accident and/or serious
personal injury.
!Avoid spinning of a drive wheel for an
extended period when driving off on
slippery road surfaces. This may cause
serious damage to the drivetrain which
is not covered by the Mercedes-Benz
Limited Warranty.
Page 170 of 435

169 Controls in detail
Automatic transmission
The steering wheel gearshift buttons are
located to the left and right of the steering
wheel.
1Left button: downshift
2Right button: upshiftDownshifting
�
Press button1 on the left side of the
steering wheel.
The gear range is limited when you are not
driving in the manual program mode
(
�page 166).
When driving in the manual program mode
(�page 171), the transmission will shift
from the current gear to the next lower
gear (
�page 172).Upshifting
�
Press button2 on the right side of the
steering wheel.
The gear range is extended when you are
not driving in the manual program mode
(
�page 166).
When driving in the manual program mode
(�page 171), the transmission will shift
from the current gear to the next higher
gear (
�page 172).
Warning!
G
On slippery road surfaces, never downshift
in order to obtain braking action. This could
result in drive wheel slip and reduced
vehicle control. Your vehicle’s ABS will not
prevent this type of loss of control.iYou cannot shift with the steering
wheel gearshift buttons when the gear
selector lever is in positionP,N orR.
iYou cannot shift with the steering
wheel gearshift buttons when the gear
selector lever is in positionP,N orR.
Page 173 of 435
.
or
�
Press button1 on the left side of the
steering wheel")
172 Controls in detailAutomatic transmissionDownshifting�
Briefly press the gear selector lever to
the left in the D-direction
(�page 165).
or
�
Press button1 on the left side of the
steering wheel (
�page 168).
The transmission shifts to the next
lower gear.Upshifting
�
Briefly press the gear selector lever to
the right in the D+direction
(�page 165).
or
�
Press button2 on the right side of the
steering wheel (
�page 168).
The transmission shifts to the next
higher gear.Kickdown
The kickdown can also be used for
maximum acceleration when driving in the
manual program mode.
�
Press the accelerator past the point of
resistance.
The transmission shifts to a lower gear.
�
Shift up once the desired speed has
been reached.
Warning!
G
On slippery road surfaces, never downshift
in order to obtain braking action. This could
result in drive wheel slip and reduced
vehicle control. Your vehicle’s ABS will not
prevent this type of loss of control.
iWhen driving at full throttle, the trans-
mission shifts to the next higher gear
when maximum engine speed has been
reached.
When you brake or stop, the transmis-
sion shifts down to a gear from which
you can easily accelerate or take off.
Page 175 of 435
 and
for setting the exterior rear view mirrors,
see “Exteri")
174 Controls in detailGood visibility
�Good visibilityFor information on the windshield wipers,
see “Windshield wipers” (
�page 48) and
for setting the exterior rear view mirrors,
see “Exterior rear view mirror”
(
�page 38).
Rear view mirror
Automatic antiglare rear view mirror
The reflection brightness of the exterior
rear view mirror on the driver’s side and
the interior rear view mirror will respond
automatically to glare when�
the ignition is switched on
and
�
incoming light from headlamps falls on
the sensor in the interior rear view
mirror
The interior rear view mirror will not react if
�
reverse gear is engaged
�
the interior lighting is turned on
Warning!
G
The automatic antiglare function does not
react if incoming light is not aimed directly
at sensors in the interior rear view mirror.
The interior rear view mirror and the exterior
rear view mirror on the driver’s side do not
react, for example, if the rear window sun
shade* is in raised position.
Glare can endanger you and others.Warning!
G
In the case of an accident, liquid electrolyte
may escape from the mirror housing if the
mirror glass breaks.
Electrolyte has an irritating effect. Do not al-
low the liquid to come into contact with
eyes, skin, clothing, or respiratory system.
In case it does, immediately flush affected
area with water, and seek medical help if
necessary.
Warning!
G
Exercise care when using the passen-
ger-side exterior rear view mirror. The mirror
surface is convex (outwardly curved surface
for a wider field of view). Objects in mirror
are closer than they appear. Check your in-
side rear view mirror or glance over your
shoulder before changing lanes.!Electrolyte drops coming into contact
with the vehicle paint finish can be
completely removed only while in the
liquid state by applying plenty of water.
Page 179 of 435
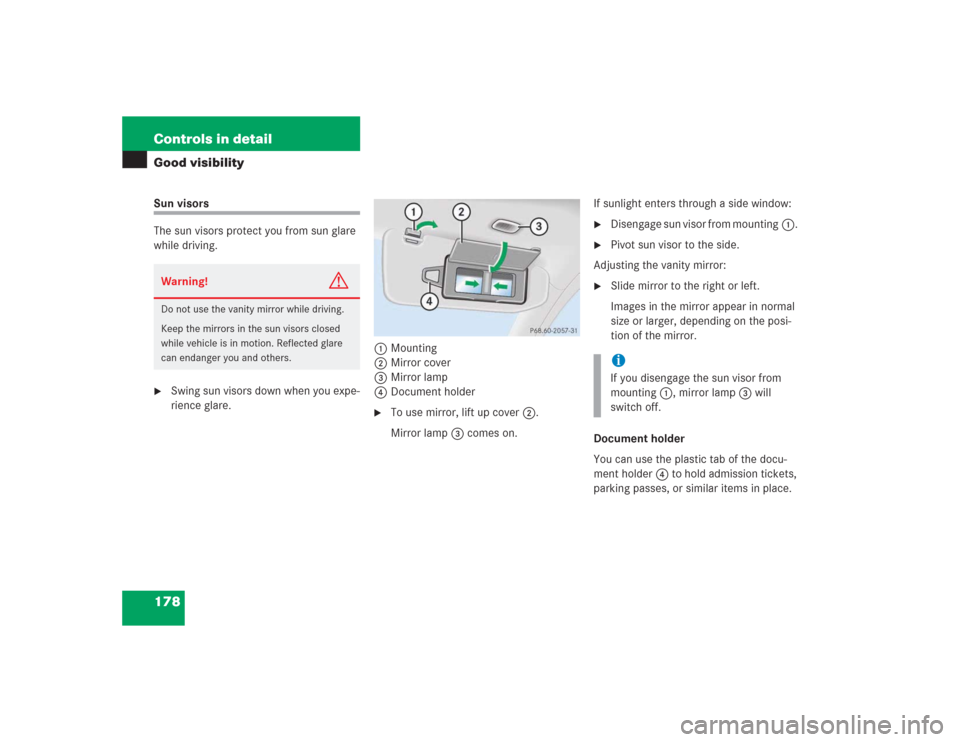
178 Controls in detailGood visibilitySun visors
The sun visors protect you from sun glare
while driving.�
Swing sun visors down when you expe-
rience glare.1Mounting
2Mirror cover
3Mirror lamp
4Document holder
�
To use mirror, lift up cover2.
Mirror lamp3 comes on.If sunlight enters through a side window:
�
Disengage sun visor from mounting1.
�
Pivot sun visor to the side.
Adjusting the vanity mirror:
�
Slide mirror to the right or left.
Images in the mirror appear in normal
size or larger, depending on the posi-
tion of the mirror.
Document holder
You can use the plastic tab of the docu-
ment holder4 to hold admission tickets,
parking passes, or similar items in place.
Warning!
G
Do not use the vanity mirror while driving.
Keep the mirrors in the sun visors closed
while vehicle is in motion. Reflected glare
can endanger you and others.
iIf you disengage the sun visor from
mounting1, mirror lamp3 will
switch off.
Page 180 of 435

179 Controls in detail
Good visibility
Rear window sunshade*
The switch is located in the center console.
1Rear window sunshade switch�
Switch on ignition.
�
Press switch 1 briefly to raise the sun-
shade.
�
Press switch 1 briefly to lower the
sunshade.
Always raise the sunshade fully for its sup-
port against the window frame.
Rear door window sunshade*�
To raise sunshade pull on the tab and
engage in holder.
�
To lower sunshade disengage tab and
guide retraction.
Warning!
G
When operating the rear window sunshade,
be sure that there is no danger of anyone be-
ing harmed by the raising or lowering proce-
dure.
The raising or lowering procedure can be im-
mediately reversed by pressing switch1.Warning!
G
When leaving the vehicle, always remove the
SmartKey from starter switch, take the
SmartKey with KEYLESS-GO* with you, and
lock your vehicle. Do not leave children un-
attended in the vehicle, or with access to an
unlocked vehicle. Unsupervised use of vehi-
cle equipment can cause an accident
and/or serious personal injury.
!Always guide the sunshade. Do not let
it snap back abruptly, as the retractor
could be damaged.
Page 182 of 435

181 Controls in detail
Automatic climate control
Item
1
Left center air vent, adjustable
2
Left air vent, fixed
3
Thumbwheel for air volume control
for left center air vent
4
Thumbwheel for air temperature
control for center air vents
5
Thumbwheel for air volume control
for right center air vent
6
Right air vent, fixed
7
Right center air vent, adjustable
8
Side defroster vent, fixed
9
Side air vent, adjustable
a
Thumbwheel for air volume control
for side air vents
b
Door air vent
c
Automatic climate control panel
Warning!
G
When operating the automatic climate con-
trol, the air that enters the passenger com-
partment through the air vents in the
footwell can be very hot or very cold (de-
pending on the set temperature). This may
cause burns or frostbite on unprotected skin
in the immediate area of the air vents. Al-
ways keep sufficient distance between un-
protected parts of the body and the footwell
air vents. If necessary change the air flow
using the air distribution controls to direct
the air away from the footwell air vents
(�page 184).
iFor draft-free ventilation, move the slid-
ers for the center air vents 1, 7, 9
to the middle position.