Page 4 of 435

Contents
Introduction.......................................... 9
Product information ................................ 9
Operator’s Manual ............................... 10
Service and warranty information .. 10
Important notice for California
retail buyers and lessees of
Mercedes-Benz automobiles .......... 11
Maintenance .................................. 12
Roadside Assistance ...................... 12
Change of address or ownership.... 12
Operating your vehicle outside
the USA or Canada......................... 13
Where to find it .................................... 14
Symbols ............................................... 15
Operating safety .................................. 16
Proper use of the vehicle ............... 16
Problems with your vehicle .................. 17
Reporting safety defects...................... 18
Reporting safety defects ................ 18
At a glance.......................................... 19
Cockpit ................................................. 20
Instrument cluster ................................ 22
Multifunction steering wheel ................ 24
Center console ..................................... 25
Upper part ...................................... 25
Lower part ...................................... 26
Overhead control panel ........................ 27
Door control panel................................ 28
Getting started................................... 29
Unlocking ............................................. 30
Unlocking with the SmartKey ......... 30
Unlocking with KEYLESS-GO*......... 32
Adjusting .............................................. 34
Seats .............................................. 34
Steering wheel ................................ 37
Mirrors ............................................ 38
Driving .................................................. 40
Fastening the seat belts ................. 40
Starting the engine ......................... 43
Switching on headlamps ................. 47
Turn signals and high beam ............ 47
Windshield wipers........................... 48
Problems while driving .................... 50
Parking and locking .............................. 51
Parking brake ................................. 52
Switching off headlamps................. 53
Turning off the engine..................... 53
Page 22 of 435
21 At a glance
Cockpit
Item
Page
1
Combination switch�
Turn signals
�
Windshield wipers
�
High beam
47
48
128
2
Cruise control lever�
Cruise control
�
Distronic*
210
203
206
3
Instrument cluster
22
4
Multifunction steering
wheel
24
5
Gear range indicator, clock
22
6
Lever for voice control sys-
tem*, see separate operat-
ing instructions
Item
Page
7
Front Parktronic* (Parking
assist) warning indicator
for right front area
226
8
Overhead control panel
27
9
Glove box lock
231
a
Glove box lid release
231
b
Glove box
231
c
Center console
25
d
Starter switch
31
e
Horn
f
Steering wheel adjustment
stalk
Heated steering wheel*
37
240
Item
Page
g
Parking brake pedal
45
h
Hood lock release
272
j
Parking brake release
45
k
Door control panel
28
l
Exterior lamp switch
124
m
Headlamp washer button*
177
n
Front Parktronic* (Parking
assist) warning indicator
for left front area
226
Page 24 of 435

23 At a glance
Instrument cluster
Item
Page
1
Coolant temperature gauge
132
2
Fuel gauge with:Fuel reserve warning lamp
308
3
LLeft turn signal
indicator lamp
47
KRight turn signal
indicator lamp
4
Speedometer with:vESP warning lamp
308
lDistance warning
lamp
Vehicles without Distronic*:
Warning lamp without func-
tion. It illuminates when the
ignition is on. It should go
out when the engine is run-
ning.
307
5
Tachometer
133
6
Right display with:
308
Item
Page
AHigh beam headlamp
indicator
48
-Antilock Brake Sys-
tem (ABS) warning
lamp
304
7
Reset button
131
8
Display with:�
Program mode
170
�
Gear range indicator
166
�
Digital clock (see
COMAND operating in-
structions)
9
Multifunction display
with:�
Trip odometer
132
�
Main odometer
132
Stored speed for:�
Cruise control
203
�
Distronic*
206
Item
Page
a
Outside temperature indica-
tor
133
b
Left display with:1Supplemental
restraint system
indicator lamp
310
;Brake warning lamp,
USA only
305
3Brake warning lamp,
Canada only?Engine malfunction
indicator lamp, USA
only
306
±Engine malfunction
indicator lamp,
Canada onlyHTire pressure warning
lamp
287,
309
c
Knob for instrument cluster
illumination
131
Page 48 of 435
47 Getting started
Driving
For more information, see “Driving instruc-
tions” (
�page 259).
Switching on headlampsExterior lamp switch1Off
2Low beam headlamps on�
Turn the switch toB.
For more information, see “Exterior lamp
switch” (
�page 124).
Turn signals and high beam
The combination switch is located on the
left of the steering column.Combination switch1Turn signals, right
2Turn signals, left�
Press the combination switch up1 or
down2.
!Simultaneously depressing the acceler-
ator pedal and applying the brake re-
duces engine performance and causes
premature brake and drivetrain wear.iYou can open a locked door from the
inside. Open doors only when condi-
tions are safe to do so.
You can deactivate the automatic lock-
ing using the control system
(�page 159).
iTo signal minor directional changes,
move combination switch to point of
resistance only and release. The turn
signal flashes three times.
Page 49 of 435
48 Getting startedDrivingHigh beam�
Push the combination switch forward.
The high beam headlamps are switched
on.
The high beam headlamp
indicatorA in the tachometer
comes on.
For more information, see “High beam
flasher” (
�page 128).
Windshield wipers
The combination switch is located on the
left of the steering column.Combination switch1Single wipe
2Switching on windshield wipers�
Make sure the ignition is switched on.
All the lamps in the instrument cluster
come on.Switching on windshield wipers
�
Turn the combination switch to the de-
sired position depending on the inten-
sity of the rain.
0Windshield wipers off
IIntermittent wiping (interval depen-
dent on wetness of windshield)
IINormal wiper speed
IIIFast wiper speediThe intermittent wiping interval is de-
pendent on wetness of windshield.
Wiping will not occur with a door open.
Page 125 of 435
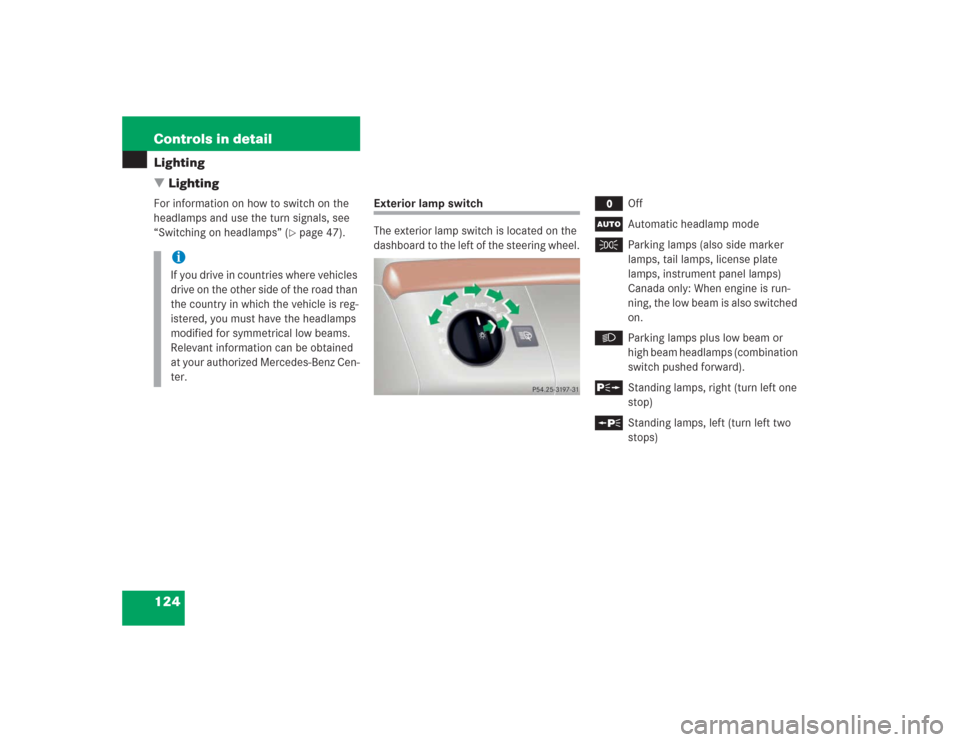
124 Controls in detailLighting
�LightingFor information on how to switch on the
headlamps and use the turn signals, see
“Switching on headlamps” (
�page 47).
Exterior lamp switch
The exterior lamp switch is located on the
dashboard to the left of the steering wheel.
M
Off
U
Automatic headlamp mode
C
Parking lamps (also side marker
lamps, tail lamps, license plate
lamps, instrument panel lamps)
Canada only: When engine is run-
ning, the low beam is also switched
on.
B
Parking lamps plus low beam or
high beam headlamps (combination
switch pushed forward).
ˆ
Standing lamps, right (turn left one
stop)
‚
Standing lamps, left (turn left two
stops)
iIf you drive in countries where vehicles
drive on the other side of the road than
the country in which the vehicle is reg-
istered, you must have the headlamps
modified for symmetrical low beams.
Relevant information can be obtained
at your authorized Mercedes-Benz Cen-
ter.
Page 127 of 435

126 Controls in detailLighting
Daytime running lamp mode�
Turn exterior lamp switch to
positionM orU.
When the engine is running, the low beam
headlamps are automatically switched on.
In low ambient light conditions, the parking
lamps will also switch on.
Canada only
When you shift from a driving position to
positionN orP, the low beam switches off
(with a three-minute delay).
For nighttime driving you should turn the
exterior lamp switch to positionB to
permit activation of the high beam head-
lamps.USA only
The high beam headlamps can also be ac-
tivated when driving with the daytime run-
ning lamp mode activated and exterior
lamp switch in positionM.
To activate the daytime running lamp
mode, see “Setting daytime running lamp
mode (USA only)” (
�page 156).
Locator lighting and night security illu-
mination
Locator lighting and night security illumi-
nation are described in the control system
section under “Setting locator lighting”
(
�page 156) and “Setting night security il-
lumination” (
�page 157).
iWith the daytime running lamp mode
activated, the low beam headlamps will
not switch off automatically.iThe front fog lamps and rear fog lamp
cannot be switched on manually with
exterior lamp switch in positionU.
To activate the fog lamps, turn exterior
lamp switch to positionB and pull
the exterior lamp switch to first or
second stop (
�page 127).
iSee notes on the exterior lamp switch
(�page 124).
Page 129 of 435
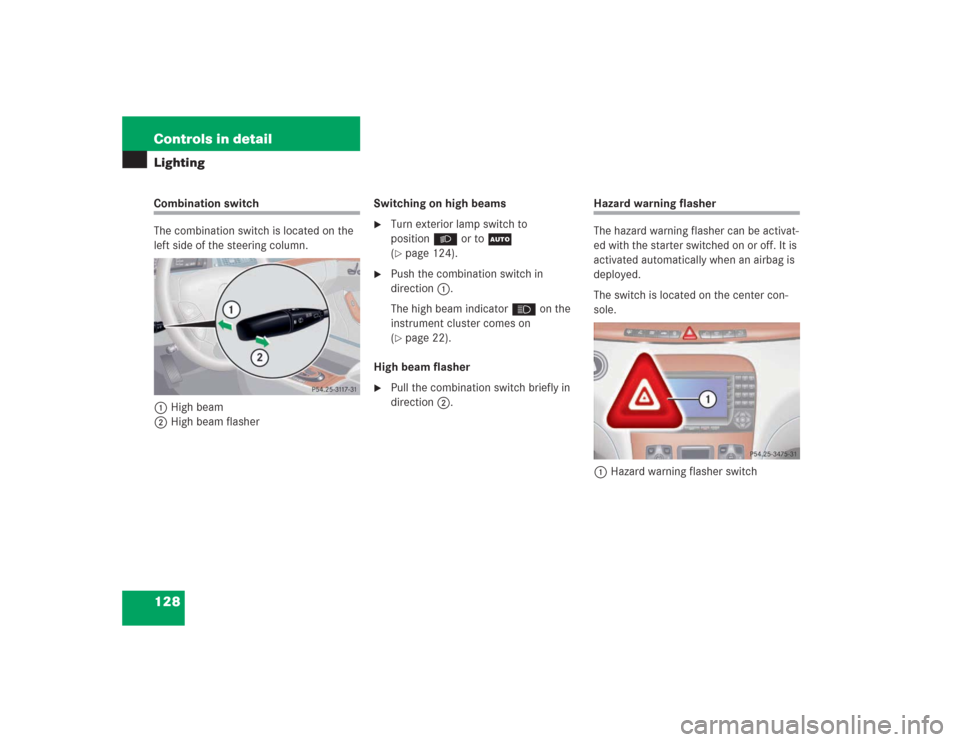
128 Controls in detailLightingCombination switch
The combination switch is located on the
left side of the steering column.
1High beam
2High beam flasherSwitching on high beams
�
Turn exterior lamp switch to
positionB or toU
(�page 124).
�
Push the combination switch in
direction1.
The high beam indicatorA on the
instrument cluster comes on
(�page 22).
High beam flasher
�
Pull the combination switch briefly in
direction2.
Hazard warning flasher
The hazard warning flasher can be activat-
ed with the starter switched on or off. It is
activated automatically when an airbag is
deployed.
The switch is located on the center con-
sole.
1Hazard warning flasher switch