Page 8 of 435

Contents
Maintenance ...................................... 294
Clearing the service indicator ...... 294
Service term exceeded ................ 294
Calling up the service indicator .... 295
Resetting the service indicator..... 295
Vehicle care ....................................... 296
Cleaning and care of vehicle ........ 296
Practical hints.................................. 303
What to do if …? ................................. 304
Lamps in instrument cluster ......... 304
Lamp in center console................. 311
Messages in the display ................ 312
Where will I find ...? ............................ 344
First aid kit .................................... 344
Vehicle jack, vehicle tool kit,
luggage bowl, spare wheel ............ 344
Unlocking/locking in an emergency... 348
Unlocking the vehicle.................... 348
Locking the vehicle ....................... 349
Replacing batteries in
the SmartKey/ SmartKey with
KEYLESS-GO* ............................... 349
Fuel filler flap ................................ 351
Opening/closing in an emergency ..... 352
Sliding/pop-up roof ...................... 352
Replacing bulbs .................................. 353
Bulbs ............................................. 353
Replacing bulbs for front lamps .... 355
Replacing bulbs for rear lamps ..... 358Replacing wiper blades ...................... 359
Removing wiper blades ................. 359
Installing wiper blades .................. 360
Flat tire............................................... 361
Preparing the vehicle .................... 361
Mounting the spare wheel ............ 361
Battery ............................................... 366
Disconnecting the battery ............ 367
Removing the battery ................... 367
Charging and reinstalling battery .. 367
Reconnecting the battery ............. 368
Jump starting...................................... 369
Towing the vehicle.............................. 371
Installing towing eye bolt .............. 373
Fuses.................................................. 374
Fuse boxes in passenger
compartment ................................ 374
Fuse boxes in engine
compartment ................................ 375
Emergency engine shut-down ....... 376
Page 296 of 435

295 Operation
Maintenance
Calling up the service indicator�
Switch on ignition.
The standard display of the control sys-
tem appears (
�page 139).
�
Press button k or j on the mul-
tifunction steering wheel until FSS indi-
cator with the service symbol 9 or
´ and the service deadline appears
in the multifunction display.
Resetting the service indicator
In the event that the service on your vehi-
cle is not carried out by an authorized
Mercedes-Benz Center, you can reset the
service indicator yourself.�
Switch on ignition.
The standard display of the control sys-
tem appears (
�page 139).
�
Press button k or j on the mul-
tifunction steering wheel until the FSS
indicator with the service symbol 9
or ´ and the service deadline ap-
pears in the multifunction display.
�
Press reset button on the instrument
cluster for about three seconds.
This message appears in the multifunc-
tion display:SERVICE INTERVAL...
RESET WITH
R BUTTON FOR 3 SEC.
�
To confirm, press reset button until you
hear a signal.
The service indicator now displays the
reset interval.
iIf the battery is disconnected, the days
of disconnection will not be included in
the count shown by the service indica-
tor. To arrive at the true service dead-
line, you will need to subtract these
days from the days shown in the ser-
vice indicator.
Do not confuse the service indicator
with the engine oil level indicator :.
iIf the service indicator was inadvertent-
ly reset, have a Mercedes-Benz Center
correct it.
Only reset if the proper service has
been performed. Resetting the system
without performing proper service as
called for by the FSS will cause the FSS
to incorrectly determine the next ser-
vice interval which will result in engine
damage not covered by the
Mercedes-Benz Limited Warranty.
Page 299 of 435

298 OperationVehicle careEngine cleaning
Prior to cleaning the engine compartment
make sure to protect electrical compo-
nents and connectors from the intrusion of
water and cleaning agents.
Corrosion protection, such as MB Anticor-
rosion Wax should be applied to the engine
compartment after every engine cleaning.
Before applying, all control linkage bush-
ings and joints should be lubricated. The
poly-V-belt and all pulleys should be pro-
tected from any wax.
Vehicle washing
Do not use hot water or wash your vehicle
in direct sunlight. Only use a mild car wash
detergent, such as Mercedes-Benz ap-
proved Car Shampoo.
Thoroughly spray the vehicle with a dif-
fused jet of water. Direct only a very weak
spray towards the ventilation intake. Use
plenty of water and rinse the sponge and
chamois frequently. Rinse with clear water and thoroughly dry
with a chamois. Do not allow cleaning
agents to dry on the finish.
Due to the width of the vehicle, fold in ex-
terior rear view mirrors prior to running the
vehicle through an automatic car wash to
prevent damage to the mirrors.
In the winter, thoroughly remove all traces
of road salt as soon as possible.
When washing the underbody, do not for-
get to clean the inner sides of the wheels.Ornamental moldings
For regular cleaning and care of very dirty
chrome-plated parts, use a chrome clean-
er.
Headlamps, tail lamps, side markers,
turn signal lenses
�
Use a mild car wash detergent, such as
Mercedes-Benz approved Car Sham-
poo, with plenty of water.
To prevent scratches, never apply strong
force and use only a soft, non-scratchy
cloth when cleaning the lenses. Do not at-
tempt to wipe dirty lenses with a dry cloth
or sponge.
iVehicles with KEYLESS-GO*:
If a door handle is hit by a strong jet of
water, and a SmartKey with
KEYLESS-GO* is in close proximity, i.e.
within approx. 3 ft. (approx. 1 m), the
vehicle could be inadvertently locked
or unlocked.
Page 304 of 435
303 Practical hints
What to do if …?
Where will I find ...?
Unlocking/locking in an emergency
Opening/closing in an emergency
Replacing bulbs
Replacing wiper blades
Flat tire
Battery
Jump starting
Towing the vehicle
Fuses
Page 346 of 435
345 Practical hints
Where will I find ...?
The vehicle tool kit includes:�
One interchangeable slot/Phillips
screwdriver
�
One towing eye bolt
�
One wheel bolt wrench with socket
wrench
�
One alignment bolt
�
One pair of gloves
�
One fuse extractor
�
One fuse chart for the main fuse box
�
Spare fusesVehicle jack
To prepare the vehicle jack for use
�
Remove the vehicle jack from the spare
wheel well under the trunk floor.
�
Push the crank handle up.
�
Turn the crank handle clockwise until it
engages (operational position).Storing the vehicle jack in the trunk
�
Retract the vehicle jack arm to the
base of the vehicle jack.
�
Push the crank handle up.
�
Turn the crank handle counterclock-
wise to the end of the stop (storage po-
sition).
!To prevent damage, always disengage
trunk floor handle from trunk lid and
lower trunk floor before closing the
trunk lid.
��
Page 375 of 435

374 Practical hintsFuses
�FusesYour vehicle’s electrical fuses are located
in various fuse boxes:�
In the dashboard on the passenger side
�
In the rear passenger compartment un-
der the right rear seat
�
In the engine compartment on the driv-
er’s side
�
In the engine compartment on the pas-
senger side
The following implements are located in
the vehicle tool kit in the trunk
(
�page 344):
�
The fuse chart. The amperages of the
fuses are also given there.
�
Spare fuses
�
Special fuse extractor
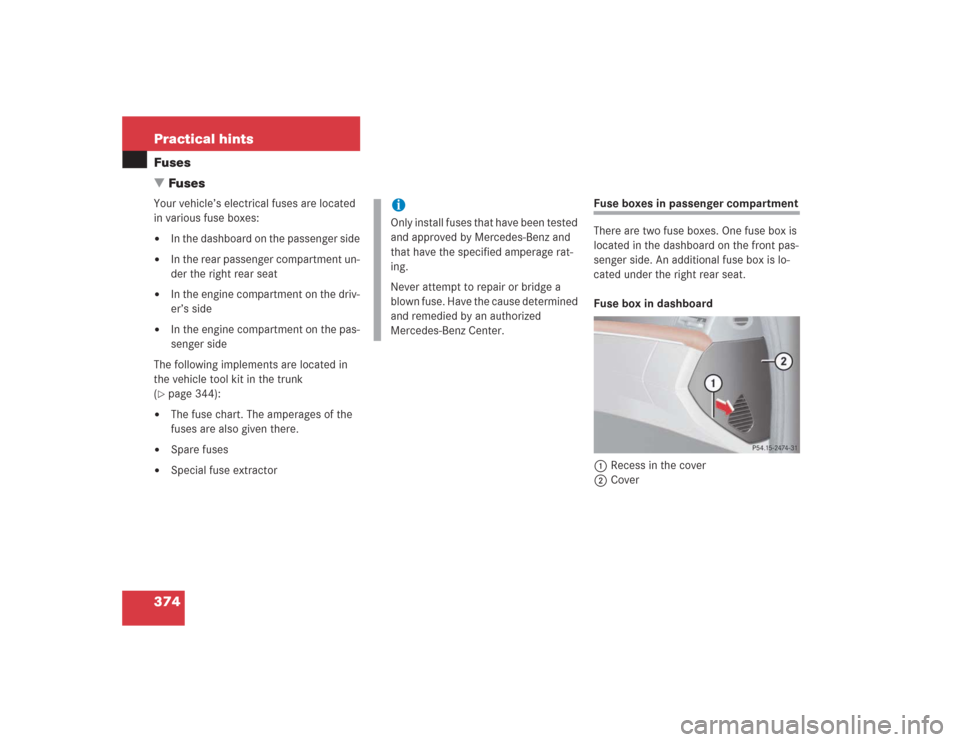
Fuse boxes in passenger compartment
There are two fuse boxes. One fuse box is
located in the dashboard on the front pas-
senger side. An additional fuse box is lo-
cated under the right rear seat.
Fuse box in dashboard
1Recess in the cover
2Cover
iOnly install fuses that have been tested
and approved by Mercedes-Benz and
that have the specified amperage rat-
ing.
Never attempt to repair or bridge a
blown fuse. Have the cause determined
and remedied by an authorized
Mercedes-Benz Center.
Page 376 of 435
375 Practical hintsFuses
Opening�
Open the front passenger door.
�
Insert flat, blunt object as a lever in
recess1 on the edge of cover2.
�
Loosen cover2 from the dashboard
using lever.
�
Using your hands, pull cover2 in the
direction of the arrow and remove.
Closing
�
Press cover2 back onto the dash-
board.Fuse box in the rear passenger
compartment
1Cover
Opening
�
Pull cover1 away from fuse box in di-
rection of arrow.
�
Remove cover rearward.
Closing
�
Press cover back on until it engages.
Fuse boxes in engine compartment
There are fuse boxes located in the engine
compartment on both the driver’s and
front passenger side in front of the firewall
(dividing wall between engine compart-
ment and passenger compartment).
1Fuse box cover, driver’s side
2Slide
!Do not use sharp objects such as a
screw driver to open the fuse box in the
dashboard, as this could damage it.
Page 377 of 435
376 Practical hintsFuses1Fuse box cover, front passenger side
2Slide
Opening�
Push both slides2 to the Πsym-
bol.
�
Remove cover1.Closing
�
Replace cover1 and press it down by
hand.
�
Push both slides 2 to the ‹ sym-
bol.
Emergency engine shut-down
If the engine can no longer be stopped us-
ing the SmartKey or the KEYLESS-GO*
start/stop button, the engine can be
turned off by withdrawing two fuses.
For easy removal of fuses, use the fuse
extractor (supplied with vehicle tool kit) to
pull out the fuses marked on the fuse chart
as "ENGINE EMERGENCY STOP".
The fuse chart is also located in the vehicle
tool kit (
�page 344).
!The cover must fit properly and the
slide must be positioned at the ‹
symbol, as moisture or dirt may impair
the functionality of the fuses.