Page 275 of 435

274 OperationEngine compartmentChecking the engine oil level with the
control system
When checking the oil level the vehicle
must�
be parked on level ground
�
be at normal operating temperature
�
have been stationary for at least five
minutes with the engine turned off
To check the engine oil level via the multi-
function display, do the following:
�
Turn the SmartKey in the starter switch
to position2 or press the KEYLESS-GO
start/stop button* twice.
The standard display (
�page 139) should
appear in the multifunction display.
�
Press buttonk or j on the
steering wheel until the following mes-
sage is seen in the multifunction dis-
play:CORRECT MEASUREMENT
ONLY IF VEH. LEVEL
After about three seconds this mes-
sage is displayed:ENGINE OIL LEVEL
MEASURING NOW
!
One of the following messages will sub-
sequently appear in the indicator:
�
ENGINE OIL LEVEL
OK
�
ADD 1.0 QT. TO
REACH MAX. OIL LEVEL!(Canada:
1.0 LITER
)
�
ADD 1.5 QTS. TO
REACH MAX. OIL LEVEL!(Canada:
1.5 LITERS
)
�
A D D 2 . 0 Q T S .
TO REACH MAX. OIL LEVEL!(Canada:
2.0 LITERS
)
�
If necessary, add engine oil.
For adding engine oil see (
�page 277).
For more information on engine oil, see
the “Technical data” section (�page 391)
and (
�page 393).
iIf you want to interrupt the checking
procedure, press thek or j
button on the multifunction steering
wheel.
Page 276 of 435

275 Operation
Engine compartment
Other display messages
If the SmartKey or KEYLESS-GO start/stop
button* is not in position 2, the following
message will appear:FOR ENGINE OIL LEVEL
IGNITION ON!�
Switch on ignition.
If you see the message:
PERF. SERV. ON TIME�
If engine is at normal operating
temperature, wait five minutes before
repeating check procedure.
�
If engine is not yet at normal operating
temperature, wait 30 minutes before
repeating check procedure.If you see the message:
ENGINE OIL LEVEL
NOT WHEN ENGINE ON!�
Turn off the engine.
�
If the engine is at normal operating
temperature, wait five minutes before
checking oil.
�
If the engine is not yet at normal oper-
ating temperature, you must wait
30 minutes before checking oil.
If there is excess engine oil with the engine
at normal operating temperature, the fol-
lowing message will appear:
ENGINE OIL LEVEL
REDUCE OIL LEVEL�
Have excess oil siphoned or drained
off. Contact an authorized
Mercedes-Benz Center.For more information on messages in the
display concerning engine oil , see the
“Practical hints” section (
�page 326).
!Excess oil must be siphoned or drained
off. It could cause damage to the en-
gine and catalytic converter not cov-
ered by the Mercedes-Benz Limited
Warranty.iPerform the engine oil level check with
the dipstick (S 430, S 500, and
S 55 AMG only) if it cannot be complet-
ed with the control system .
In this case we recommend that you
have the system checked at a
Mercedes-Benz Center.
Page 313 of 435

312 Practical hintsWhat to do if …?Messages in the display
The control system shows warning and
malfunction messages in the multifunction
display.
Certain warning and malfunction messag-
es are accompanied by an audible signal.
Address these messages accordingly and
follow the additional instructions given in
this Operator’s Manual.
Selecting the malfunction memory menu in
the control system (
�page 134) displays
both cleared and uncleared messages.
High-priority messages appear in the mul-
tifunction display in red color.
Certain messages of high priority cannot
be cleared from the multifunction display
using the reset button (�page 22).
Other messages of high priority and mes-
sages of less immediate priority can be
cleared from the multifunction display us-
ing the reset button (
�page 22). These are
then stored in the malfunction message
memory (
�page 150).On the pages that follow, you will find a
compilation of the most important warning
and malfunction messages that may ap-
pear in the display. High priority messages
appear on a red background.
Warning!
G
All categories of messages contain impor-
tant information which should be taken note
of and, where a malfunction is indicated, ad-
dressed as soon as possible at an autho-
rized Mercedes-Benz Center.
Failure to repair condition noted may cause
damage not covered by the Mercedes-Benz
Limited Warranty, or result in property dam-
age or personal injury.Warning!
G
No messages will be displayed if either the
instrument cluster or the multifunction dis-
play is inoperative.
Contact your nearest authorized
Mercedes-Benz Center.
iTurning the SmartKey in the starter
switch to position2, or pressing the
KEYLESS-GO* start/stop button twice
causes all lamps as well as the multi-
function display to come on. Make sure
that they are all in working order before
starting your journey.
Page 318 of 435
317 Practical hints
What to do if …?
Display
Display message
Possible cause
Possible solution
P
SHIFT
TO P
You have tried to turn off the engine with
the KEYLESS-GO* start/stop button with
the gear selector lever not inP.
�
Place the gear selector lever in positionP.
PRE-SAFE
INACTIVE
SEE OPER. MANUAL
!
If BAS or ESP malfunction messages are
displayed simultaneously, PRE-SAFE has
been deactivated as a result of these mal-
functions. All other occupant safety sys-
tems, such as the airbags, are still available.
�
Visit an authorized Mercedes-Benz Center as
soon as possible.
PRE-SAFE itself has failed. All other occu-
pant safety systems, such as the airbags,
are still available.
�
Visit an authorized Mercedes-Benz Center as
soon as possible.
Page 349 of 435
348 Practical hintsUnlocking/locking in an emergency
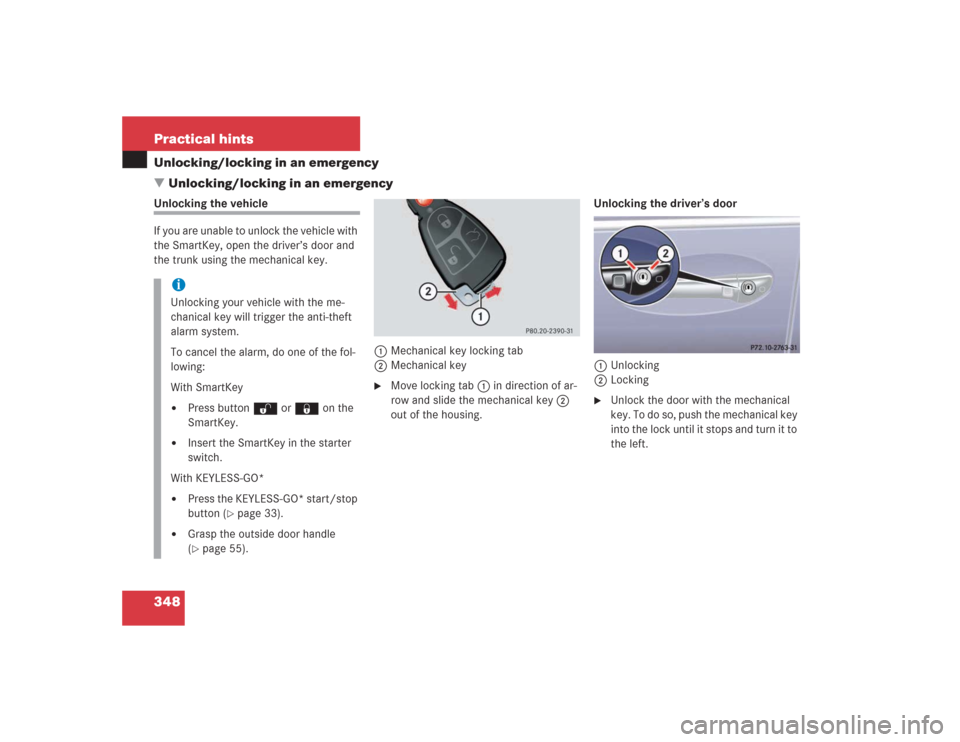
�Unlocking/locking in an emergencyUnlocking the vehicle
If you are unable to unlock the vehicle with
the SmartKey, open the driver’s door and
the trunk using the mechanical key.
1Mechanical key locking tab
2Mechanical key
�
Move locking tab1 in direction of ar-
row and slide the mechanical key2
out of the housing.Unlocking the driver’s door
1Unlocking
2Locking
�
Unlock the door with the mechanical
key. To do so, push the mechanical key
into the lock until it stops and turn it to
the left.
iUnlocking your vehicle with the me-
chanical key will trigger the anti-theft
alarm system.
To cancel the alarm, do one of the fol-
lowing:
With SmartKey�
Press button Œ or ‹ on the
SmartKey.
�
Insert the SmartKey in the starter
switch.
With KEYLESS-GO*
�
Press the KEYLESS-GO* start/stop
button (
�page 33).
�
Grasp the outside door handle
(�page 55).
Page 367 of 435

366 Practical hintsBattery
�Battery
The battery is located on the right side of
the trunk under the battery cover.
1Battery cover �
Pull on the outer, right-hand side of
cover1 and remove it in the direction
of the arrow.
Warning!
G
Failure to follow these instructions can re-
sult in severe injury or death.
Never lean over batteries while connecting,
you might get injured.
Battery fluid contains sulfuric acid. Do not
allow this fluid to come in contact with eyes,
skin or clothing. In case it does, immediately
flush affected area with water and seek
medical help if necessary.
A battery will also produce hydrogen gas,
which is flammable and explosive. Keep
flames or sparks away from battery, avoid
improper connection of jumper cables,
smoking, etc.Warning!
G
Do not place metal objects on the battery as
this could result in a short circuit.
Use leak-proof battery only to avoid the risk
of acid burns in the event of an accident.
!Never loosen or detach battery termi-
nal clamps while the engine is running
or the SmartKey is in the starter switch.
Otherwise the alternator and other
electronic components could be se-
verely damaged.
Have the battery checked regularly by
an authorized Mercedes-Benz Center.
Refer to Service Booklet for mainte-
nance intervals or contact an autho-
rized Mercedes-Benz Center for further
information.Warning!
G
With a disconnected battery�
you will no longer be able to turn the
SmartKey in the starter switch and
pressing the KEYLESS-GO* start/stop
button on the gear selector lever will
have no effect
�
the gear selector lever will remain
locked in positionP
Page 374 of 435

373 Practical hints
Towing the vehicle
Installing towing eye bolt
1Cover on right side of front bumper
2Cover on right side of rear bumperRemoving cover
�
Press mark on cover in direction of ar-
row.
�
Lift cover off to reveal threaded hole for
towing eye bolt.
Installing towing eye bolt
�
Take towing eye bolt and wheel wrench
out of trunk (
�page 344).
�
Screw towing eye bolt clockwise into
its stop and tighten with wheel wrench.
Removing towing eye bolt
�
Loosen towing eye bolt counterclock-
wise with wheel wrench.
�
Unscrew towing eye bolt.
�
Store towing eye bolt and wheel
wrench in trunk.
Installing cover
�
Fit cover and snap into place.
!When towing the vehicle with all wheels
on the ground, please note the follow-
ing:
With the automatic central locking acti-
vated and the SmartKey in starter
switch position2, or KEYLESS-GO*
start/stop button in position2, the ve-
hicle doors lock if the left front wheel
as well as the right rear wheel are turn-
ing at vehicle speeds of approximately
9 mph (15 km/h) or more.
Switch off the tow-away alarm
(�page 85).
To prevent the vehicle doors from lock-
ing, deactivate the automatic central
locking (
�page 106).
Towing of the vehicle should only be
done using the properly installed tow-
ing eye bolt. Never attach tow cable,
tow rope or tow rod to vehicle chassis,
frame or suspension parts.
Page 377 of 435
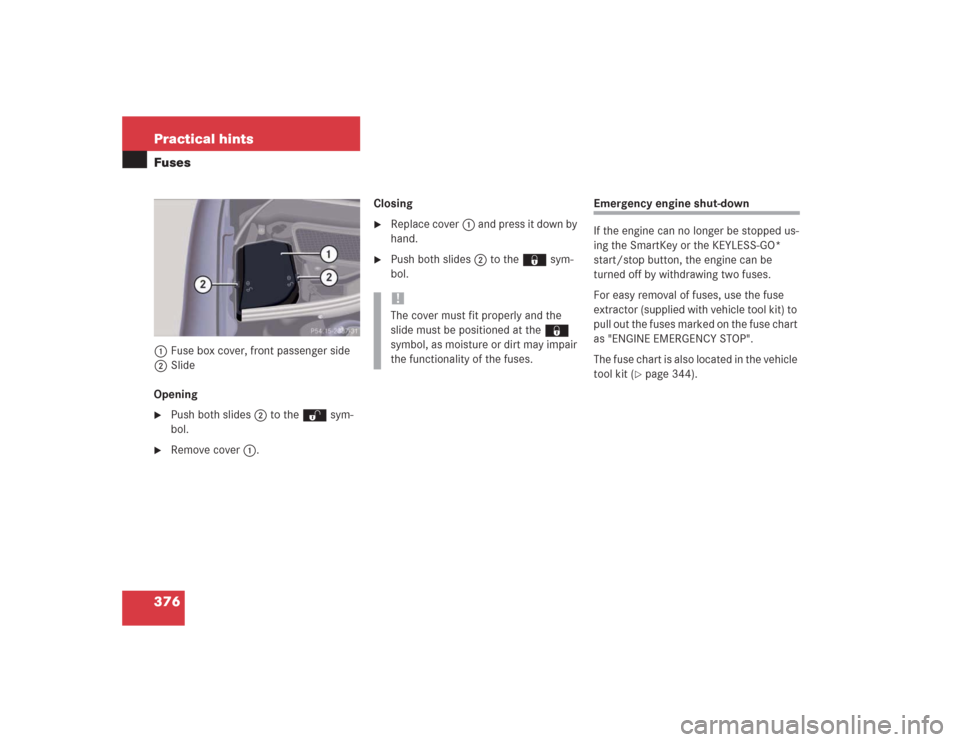
376 Practical hintsFuses1Fuse box cover, front passenger side
2Slide
Opening�
Push both slides2 to the Πsym-
bol.
�
Remove cover1.Closing
�
Replace cover1 and press it down by
hand.
�
Push both slides 2 to the ‹ sym-
bol.
Emergency engine shut-down
If the engine can no longer be stopped us-
ing the SmartKey or the KEYLESS-GO*
start/stop button, the engine can be
turned off by withdrawing two fuses.
For easy removal of fuses, use the fuse
extractor (supplied with vehicle tool kit) to
pull out the fuses marked on the fuse chart
as "ENGINE EMERGENCY STOP".
The fuse chart is also located in the vehicle
tool kit (
�page 344).
!The cover must fit properly and the
slide must be positioned at the ‹
symbol, as moisture or dirt may impair
the functionality of the fuses.