Page 176 of 435
175 Controls in detail
Good visibility
Activating exterior rear view mirror
parking position
Follow these steps to activate the mirror
parking position so that the passen-
ger-side exterior rear view mirror will be
turned downward to the stored position.�
Make sure you have stored a parking
position for the passenger-side exterior
rear view mirror (
�page 122).
�
Make sure the
MIRROR SETTING WHEN
PARKING
function in the
CONVENIENCE
submenu of the control system is
switched to
ON (�page 162).
�
Switch on ignition (if not already on).
�
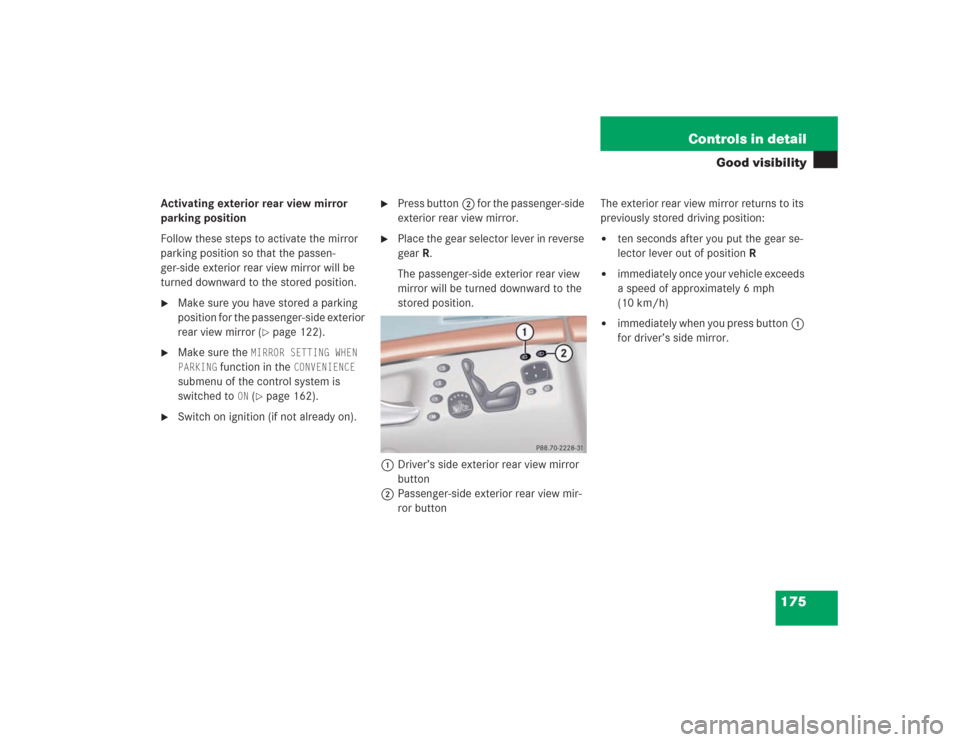
Press button2 for the passenger-side
exterior rear view mirror.
�
Place the gear selector lever in reverse
gearR.
The passenger-side exterior rear view
mirror will be turned downward to the
stored position.
1Driver’s side exterior rear view mirror
button
2Passenger-side exterior rear view mir-
ror buttonThe exterior rear view mirror returns to its
previously stored driving position:
�
ten seconds after you put the gear se-
lector lever out of positionR
�
immediately once your vehicle exceeds
a speed of approximately 6 mph
(10 km/h)
�
immediately when you press button1
for driver’s side mirror.
Page 205 of 435
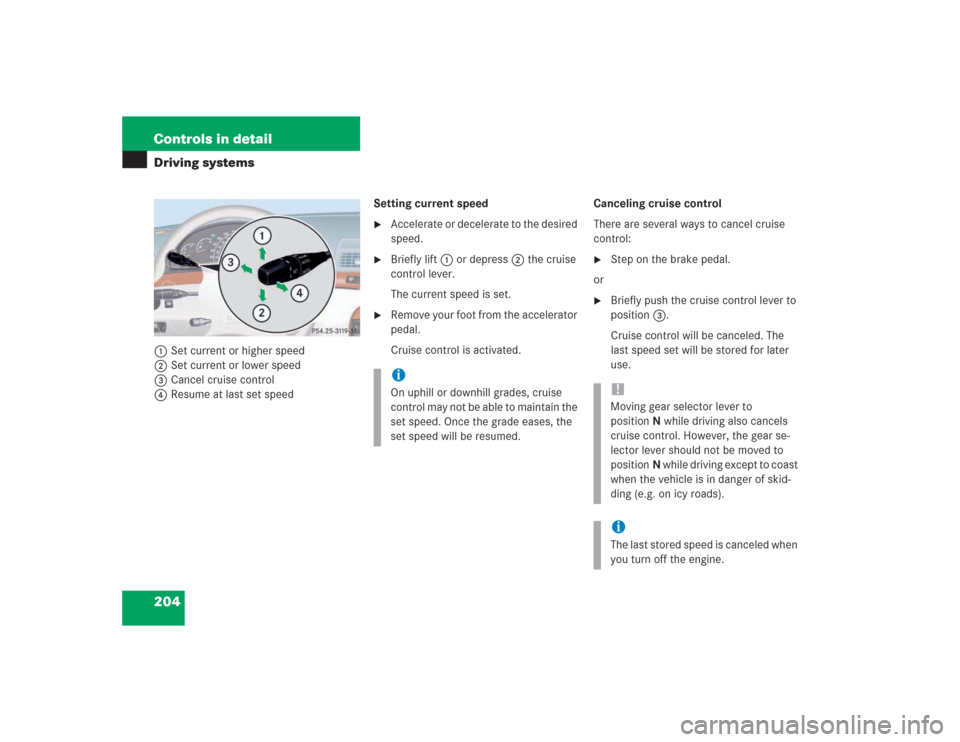
204 Controls in detailDriving systems1Set current or higher speed
2Set current or lower speed
3Cancel cruise control
4Resume at last set speedSetting current speed
�
Accelerate or decelerate to the desired
speed.
�
Briefly lift1 or depress2 the cruise
control lever.
The current speed is set.
�
Remove your foot from the accelerator
pedal.
Cruise control is activated.Canceling cruise control
There are several ways to cancel cruise
control:
�
Step on the brake pedal.
or
�
Briefly push the cruise control lever to
position3.
Cruise control will be canceled. The
last speed set will be stored for later
use.
iOn uphill or downhill grades, cruise
control may not be able to maintain the
set speed. Once the grade eases, the
set speed will be resumed.
!Moving gear selector lever to
positionN while driving also cancels
cruise control. However, the gear se-
lector lever should not be moved to
positionN while driving except to coast
when the vehicle is in danger of skid-
ding (e.g. on icy roads).iThe last stored speed is canceled when
you turn off the engine.
Page 212 of 435
211 Controls in detail
Driving systems
Activating Distronic
You can activate Distronic if:�
you are driving between 25 mph
(40 km/h) and 110 mph (180 km/h)
�
the ESP is activated (
�page 79)
If Distronic has not been activated after
pressing the cruise control lever you will
see the message
---
in the multifunction
display.
In the following cases you cannot activate
Distronic:
�
up to two minutes after starting the en-
gine
�
when you brake
�
if you have set the parking brake
�
if the gear selector lever is in
positionP, R, or N
�
if the ESP is switched offSetting the current speed
�
Accelerate or decelerate to the desired
speed.
�
Briefly lift or depress the cruise control
lever.
Distronic is activated and the current
speed is set.
�
Remove your foot from the accelerator
pedal.Setting a higher speed
�
Briefly tip the cruise control lever in the
direction of arrow1 (
�page 210) to
increase vehicle speed in increments
of 5 mph (Canada: 10 km/h)
The new speed is set.
The stored speed is displayed in the multi-
function display for approximately five sec-
onds (
�page 210), and one or two
segments around the stored speed come
on on the speedometer (
�page 208).
iIf you do not take your foot off of the
accelerator completely, the following
message will appear in the multifunc-
tion display: DISTRONIC OVERRIDE
.
Distronic will not work to maintain the
distance to a slower moving vehicles in
front of you. Your vehicle speed will
then be determined only by the accel-
erator pedal position.
iDepressing the accelerator pedal does
not deactivate Distronic. After brief ac-
celeration (e.g. for passing), the cruise
control will resume the last speed set.
Page 214 of 435
213 Controls in detail
Driving systems
Deactivating Distronic
There are several ways to deactivate the
Distronic system:�
Briefly tip the cruise control lever in the
direction of arrow3 (
�page 210).
or
�
Step on the brake pedal.
Distronic will be deactivated. The last
speed set will be stored into memory.Distronic deactivates automatically when:
�
you set the parking brake
�
you drive slower than
25 mph (40 km/h)
�
the ESP is active (
�page 79) or you de-
activate the ESP
�
you move the gear selector lever into
positionN
A signal will sound. The
DISTRONIC OFF
message appears in the multifunction
display for approximately five seconds.Setting the following distance in
Distronic
You can set the specified following dis-
tance for Distronic by varying the time set-
ting between 1.0 and 2.0 seconds. Using
this time setting and the current speed of
your vehicle, Distronic calculates and sets
the required following distance to the vehi-
cle ahead. The set distance will be shown
in the multifunction display field.
The thumbwheel for making the time set-
ting is located on the lower section of the
center console.
iThe following message will appear in
the multifunction display for approxi-
mately five seconds:
DISTRONIC OFF
.
The last stored speed is deleted when
you turn off the engine.
Warning!
G
Distronic switches off and releases the
brakes when the vehicle decelerates below
the minimum speed of approximately
25 mph (40 km / h) by operation of the sys-
tem. At that time the driver must apply the
brakes in order to reduce vehicle speed fur-
ther or bring it to a stop.
Warning!
G
It is up to the driver to exercise discretion to
select the appropriate setting given road
conditions, traffic, driver’s preferred driving
style and applicable laws and driving recom-
mendations for safe following distance.
Page 227 of 435
226 Controls in detailDriving systemsWarning indicators
Visual signals indicate to the driver the rel-
ative distance between the sensors and an
obstacle. The warning indicators for the
front area are located above the left air
vents and center air vents in the dash-
board (
�page 21). The warning indicator
for the rear area is integrated in the rear
trim.
1Left front area warning indicator1Right front area warning indicator
Each warning indicator is divided into six
yellow and two red segments for either
side of the vehicle. The Parktronic system
is ready when the border around the indi-
cator is illuminated.The position of the gear selector lever de-
termines which warning indicators will be
activated.
Selector lever po-
sition
Warning indicator
D
Front area activated
R or N
Front and rear area
activated
P
Neither activated
Page 228 of 435
227 Controls in detail
Driving systems
As your vehicle approaches an object, one
or more segments will come on, depending
on the distance between your vehicle and
the object. When the eighth segment
comes on, you have reached the minimum
distance.�
Front area: An intermittent acoustic
warning will sound as the first red seg-
ment comes on and a constant acous-
tic warning, both lasting a maximum of
three seconds, will sound for the eighth
segment, i.e. the second red segment.
The signal is canceled when the gear
selector lever is placed in position P.
�
Rear area: An intermittent acoustic
warning will sound as the first red seg-
ment comes on and a constant acous-
tic warning, both lasting a maximum of
three seconds, will sound for the eighth
segment, i.e. the second red segment.
The signal is canceled when the gear
selector lever is placed in position D
orP.Switching the Parktronic system
on/off
You can switch off the Parktronic system
manually.
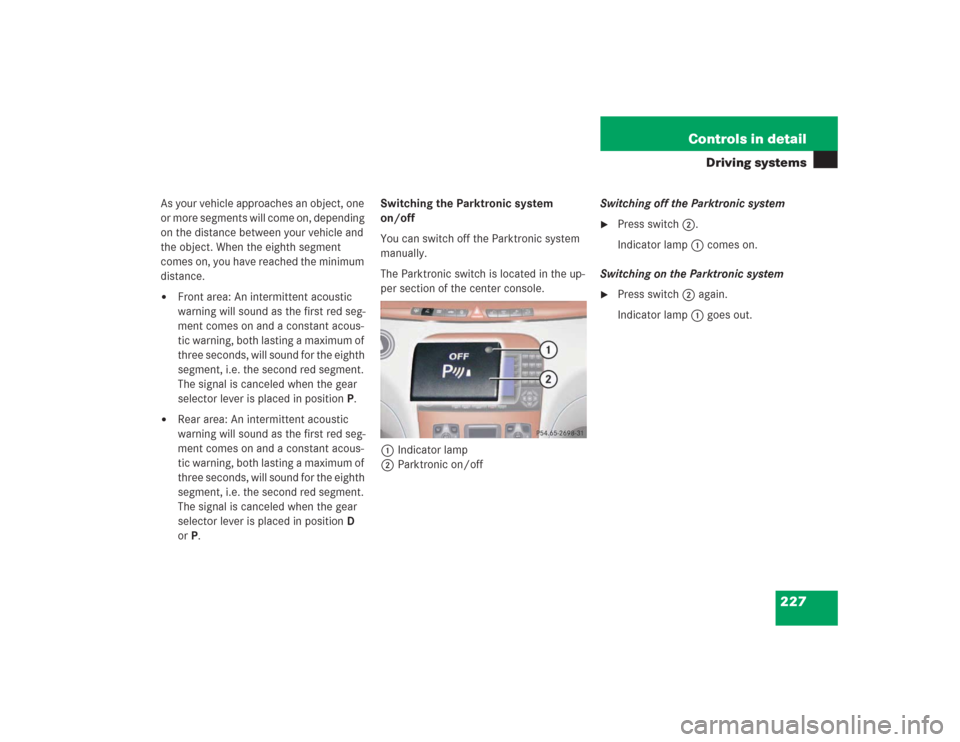
The Parktronic switch is located in the up-
per section of the center console.
1Indicator lamp
2Parktronic on/offSwitching off the Parktronic system
�
Press switch2.
Indicator lamp1 comes on.
Switching on the Parktronic system
�
Press switch2 again.
Indicator lamp1 goes out.
Page 239 of 435
238 Controls in detailUseful featuresParcel net in trunk
You can hang a parcel net in the trunk. The
hooks and the parcel net in the trunk can
hold a load of up to 29.8 lbs (13.5 kg).
1Hook�
Hang the parcel net on hooks1 on the
left and right sides of the trunk.
Ashtrays
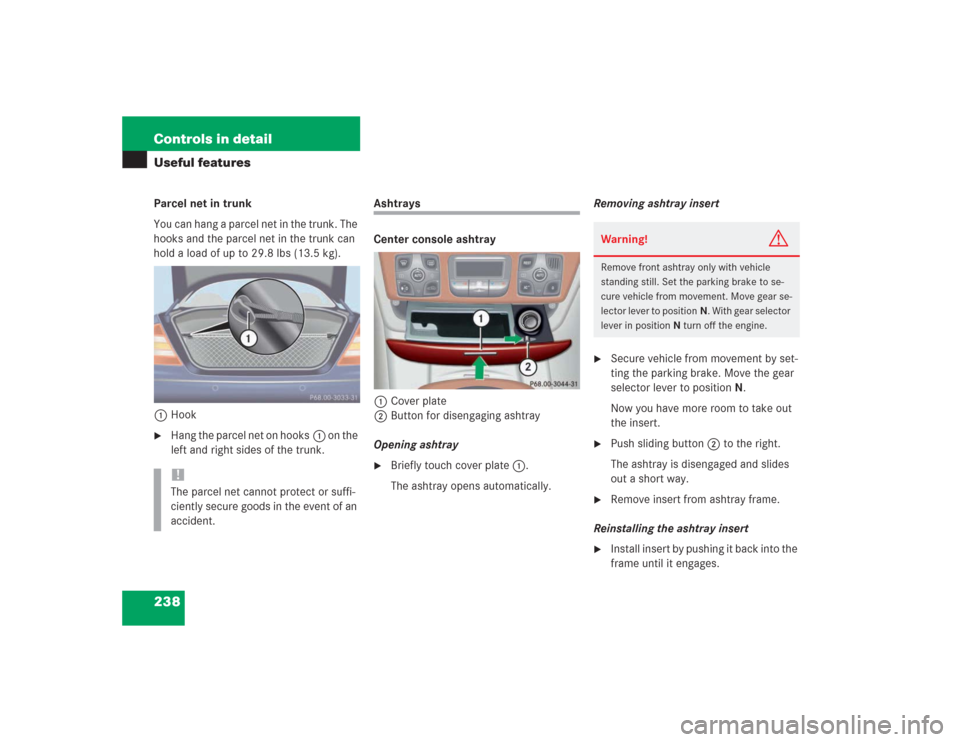
Center console ashtray
1Cover plate
2Button for disengaging ashtray
Opening ashtray�
Briefly touch cover plate1.
The ashtray opens automatically.Removing ashtray insert
�
Secure vehicle from movement by set-
ting the parking brake. Move the gear
selector lever to positionN.
Now you have more room to take out
the insert.
�
Push sliding button2 to the right.
The ashtray is disengaged and slides
out a short way.
�
Remove insert from ashtray frame.
Reinstalling the ashtray insert
�
Install insert by pushing it back into the
frame until it engages.
!The parcel net cannot protect or suffi-
ciently secure goods in the event of an
accident.
Warning!
G
Remove front ashtray only with vehicle
standing still. Set the parking brake to se-
cure vehicle from movement. Move gear se-
lector lever to positionN. With gear selector
lever in positionN turn off the engine.
Page 259 of 435
258 OperationThe first 1000 miles (1500 km)
�In the “Operation” section you will find de-
tailed information on operating, maintain-
ing and caring for your vehicle.
The first 1000 miles (1500 km)
The more cautiously you treat your vehicle
during the break-in period, the more satis-
fied you will be with its performance later
on.�
Drive your vehicle during the first
1 000 miles (1 500 km) at varying but
moderate vehicle and engine speeds.
�
During this period, avoid heavy loads
(full throttle driving) and excessive en-
gine speeds (no more than
2⁄3 of max-
imum rpm in each gear).
�
Avoid accelerating by kick-down.
�
Do not attempt to slow the vehicle
down by shifting to a lower gear using
the gear selector lever.
�
Select positions3,2or1 only when
driving at moderate speeds (for hill
driving).
After 1 000 miles (1 500 km) you may
gradually increase vehicle and engine
speeds to the permissible maximum.All of the above instructions, as may apply
to your vehicle type, also apply when driv-
ing the first 1 000 miles (1 500 km) after
the engine or the rear differential has been
replaced.
!Additional instructions for AMG vehi-
cles:�
During the first 1 000 miles
(1 500 km), do not exceed a speed
of 85 mph (140 km/h).
�
During this period, avoid engine
speeds above 4500 rpm in each
gear.
iAlways obey applicable speed limits.