Page 128 of 435

127 Controls in detail
Lighting
Switching on fog lamps
Switching on front fog lamps
�
Make sure the low beam headlamps
are switched on.
�
Pull out exterior lamp switch to first
stop.
The green indicator lamp‡ in the
lamp switch comes on.Switching on rear fog lamp
�
Make sure the low beam headlamps
are switched on.
�
Pull out exterior lamp switch to second
stop.
The yellow indicator lamp† in the
lamp switch comes on.
Warning!
G
In low ambient lighting or foggy conditions,
only switch from position U to B with
the vehicle at a standstill. Switching from
U to B will briefly switch off the head-
lamps. Doing so while driving in low ambient
lighting conditions may result in an acci-
dent.iFog lamps will operate with the parking
lamps and/or the low beam headlamps
on. Fog lamps should only be used in
conjunction with low beam headlamps.
Consult your State or Province Motor
Vehicle Regulations regarding permis-
sible lamp operation.
iThe front fog lamps and rear fog lamp
cannot be switched on manually with
exterior lamp switch in positionU.
To activate the fog lamps, turn exterior
lamp switch to positionB and pull
the exterior lamp switch to first or sec-
ond stop (
�page 124).
Page 129 of 435
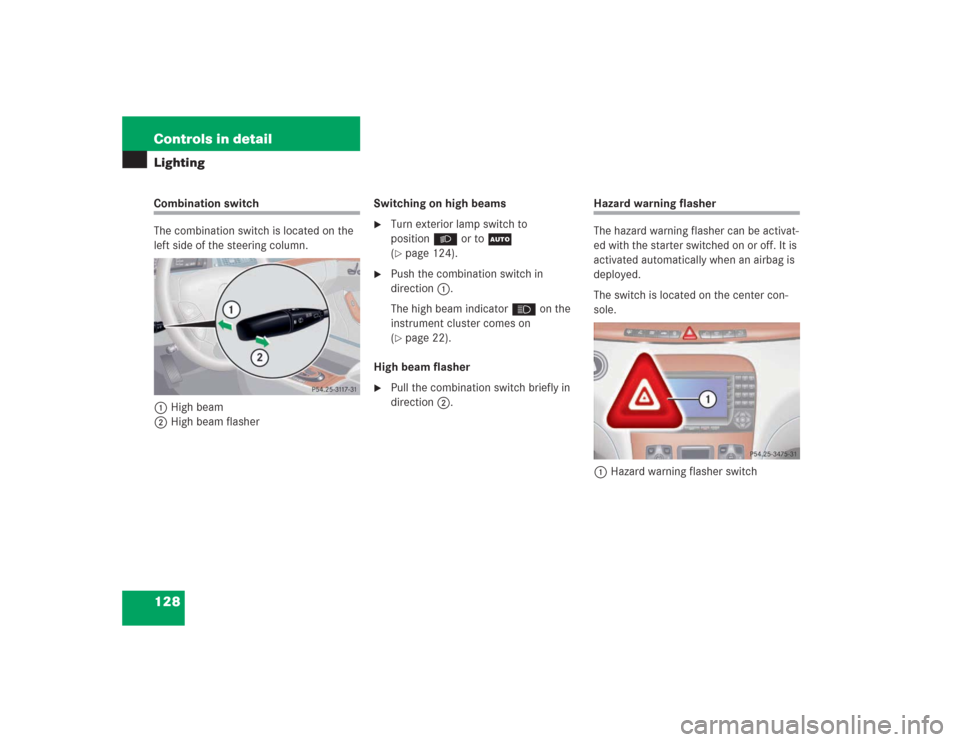
128 Controls in detailLightingCombination switch
The combination switch is located on the
left side of the steering column.
1High beam
2High beam flasherSwitching on high beams
�
Turn exterior lamp switch to
positionB or toU
(�page 124).
�
Push the combination switch in
direction1.
The high beam indicatorA on the
instrument cluster comes on
(�page 22).
High beam flasher
�
Pull the combination switch briefly in
direction2.
Hazard warning flasher
The hazard warning flasher can be activat-
ed with the starter switched on or off. It is
activated automatically when an airbag is
deployed.
The switch is located on the center con-
sole.
1Hazard warning flasher switch
Page 130 of 435

129 Controls in detail
Lighting
Switching on the hazard warning
flasher�
Press hazard warning flasher switch.
All turn signals will flash.
Switching off the hazard warning
flasher
�
Press hazard warning flasher switch
again.
Interior lighting
The controls are located in the overhead
control panel.
1Left front reading lamp
2Rear interior lamps
3Right front reading lamp
4Rocker switch for automatic control
systemActivating automatic control
�
Press rocker switch 4 to the center
position.
Interior lamps are switched on in dark-
ness, even when you:�
unlock the vehicle
�
open a door
�
remove the SmartKey from the
starter switch
The interior lamps are switched off after a
present time (
�page 158).
iWith the hazard warning flasher acti-
vated and the combination switch set
for either left or right turn, only the re-
spective left or right turn signals will
operate when the SmartKey in the
starter switch is in position1 or2.iIf the hazard warning flasher was acti-
vated automatically, press switch1
twice.
iIf the door remains open, the interior
lamps switch off automatically after ap-
proximately five minutes, when the
SmartKey is removed or in the switch
position0.
Page 152 of 435

151 Controls in detail
Control system
�
Press buttonk orj.
The stored messages will now be dis-
played in the order in which the mal-
functions have occurred. See the
“Practical hints” section for malfunc-
tion and warning messages
(�page 312).
Should any malfunctions occur while driv-
ing, the number of malfunctions will reap-
pear in the display when the SmartKey in
the starter switch is turned to position0 or
removed from the starter switch.
Settings menu
In the
SETTINGS
menu there are two func-
tions:
�
The function
RESET WITH R BUTTON FOR
3 SEC.
, with which you can reset all
settings to the original factory settings.
�
A collection of submenus with which
you can make individual settings for
your vehicle.
�
Press buttonè orÿ repeatedly
until the
SETTINGS
menu appears in the
display.Resetting all settings
You can reset all the functions of all sub-
menus to the factory settings.
�
Press the reset button on the instru-
ment cluster (
�page 22) for approxi-
mately three seconds.
In the display you will see the request
to press the reset button again to con-
firm.
�
Press the reset button again.
The functions of all the submenus will
reset to factory settings.
iThe message memory will be cleared
when you turn the SmartKey in the
starter switch to position1 or2. You
will then only see high priority malfunc-
tions (
�page 312).
iThe settings you have changed will not
be reset unless you confirm the action
by pressing the reset button a second
time.
Due to safety reasons, resetting all of
the settings while driving will not reset
all of the values in the
LIGHTING
or the
VEHICLE
menu.
Page 175 of 435
 and
for setting the exterior rear view mirrors,
see “Exteri")
174 Controls in detailGood visibility
�Good visibilityFor information on the windshield wipers,
see “Windshield wipers” (
�page 48) and
for setting the exterior rear view mirrors,
see “Exterior rear view mirror”
(
�page 38).
Rear view mirror
Automatic antiglare rear view mirror
The reflection brightness of the exterior
rear view mirror on the driver’s side and
the interior rear view mirror will respond
automatically to glare when�
the ignition is switched on
and
�
incoming light from headlamps falls on
the sensor in the interior rear view
mirror
The interior rear view mirror will not react if
�
reverse gear is engaged
�
the interior lighting is turned on
Warning!
G
The automatic antiglare function does not
react if incoming light is not aimed directly
at sensors in the interior rear view mirror.
The interior rear view mirror and the exterior
rear view mirror on the driver’s side do not
react, for example, if the rear window sun
shade* is in raised position.
Glare can endanger you and others.Warning!
G
In the case of an accident, liquid electrolyte
may escape from the mirror housing if the
mirror glass breaks.
Electrolyte has an irritating effect. Do not al-
low the liquid to come into contact with
eyes, skin, clothing, or respiratory system.
In case it does, immediately flush affected
area with water, and seek medical help if
necessary.
Warning!
G
Exercise care when using the passen-
ger-side exterior rear view mirror. The mirror
surface is convex (outwardly curved surface
for a wider field of view). Objects in mirror
are closer than they appear. Check your in-
side rear view mirror or glance over your
shoulder before changing lanes.!Electrolyte drops coming into contact
with the vehicle paint finish can be
completely removed only while in the
liquid state by applying plenty of water.
Page 179 of 435
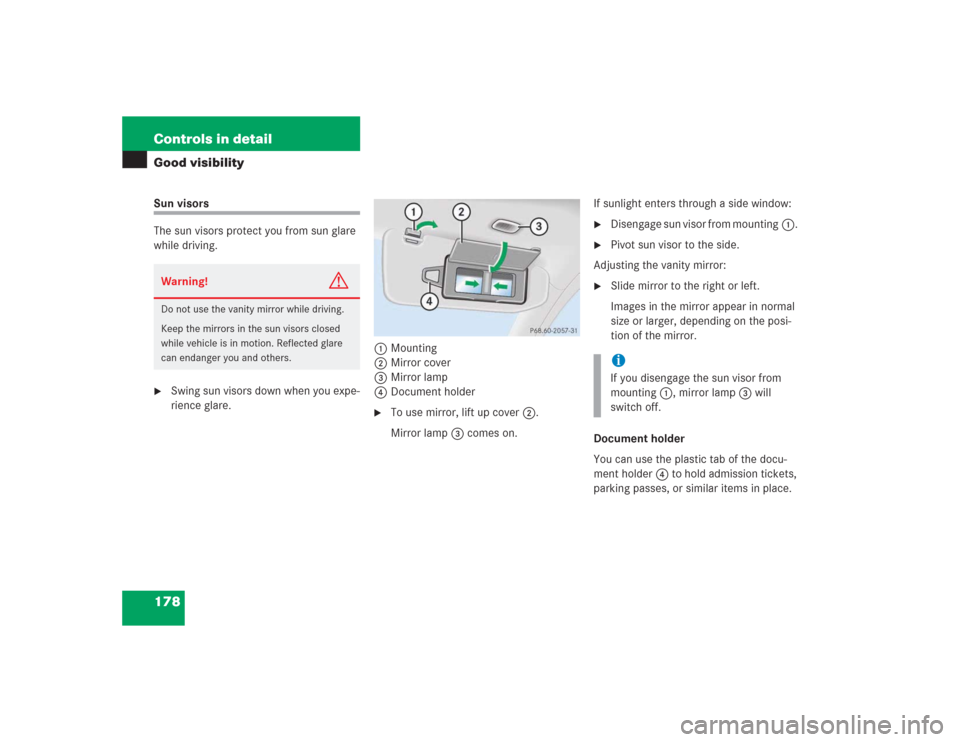
178 Controls in detailGood visibilitySun visors
The sun visors protect you from sun glare
while driving.�
Swing sun visors down when you expe-
rience glare.1Mounting
2Mirror cover
3Mirror lamp
4Document holder
�
To use mirror, lift up cover2.
Mirror lamp3 comes on.If sunlight enters through a side window:
�
Disengage sun visor from mounting1.
�
Pivot sun visor to the side.
Adjusting the vanity mirror:
�
Slide mirror to the right or left.
Images in the mirror appear in normal
size or larger, depending on the posi-
tion of the mirror.
Document holder
You can use the plastic tab of the docu-
ment holder4 to hold admission tickets,
parking passes, or similar items in place.
Warning!
G
Do not use the vanity mirror while driving.
Keep the mirrors in the sun visors closed
while vehicle is in motion. Reflected glare
can endanger you and others.
iIf you disengage the sun visor from
mounting1, mirror lamp3 will
switch off.
Page 196 of 435

195 Controls in detail
Power windows
�Power windows
Opening and closing the windows
The side windows can be opened and
closed electrically. The switches for all the
side windows are on the driver’s door. The
switches for the respective windows are
on the front passenger door and the rear
doors.
1Left front window
2Right front window
3Right rear window
4Left rear window
5Rear window override switch
(
�page 74)
Warning!
G
When closing the windows, make sure that
there is no danger of anyone being harmed
by the closing procedure.
The closing of the door windows can be im-
mediately halted by releasing the switch or,
if the switch was pressed past the resis-
tance point and released, by pressing the re-
spective switch.
If the window encounters an obstruction
that blocks its path in a circumstance where
you pressed the switch past the resistance
point and released it to close the window,
the automatic reversal function will stop the
window and open it slightly.
If the window encounters an obstruction
that blocks its path in a circumstance where
you are closing the window by pressing and
holding the switch, by pressing and holding
button ‹ on the SmartKey, or by press-
ing and holding the lock button (vehicles
with KEYLESS-GO*) on the door handle,
the automatic reversal function will not op-
erate.
When leaving the vehicle, always remove the
SmartKey from starter switch, take the
SmartKey with KEYLESS-GO* with you, and
lock your vehicle. Do not leave children un-
attended in the vehicle, or with access to an
unlocked vehicle. Unsupervised use of vehi-
cle equipment may cause an accident
and/or serious personal injury.iYou can also open or close the win-
dows using the:�
SmartKey (summer opening/con-
venience feature) (
�page 197)
�
button, in the control panel of
the automatic climate control
(�page 182)
�
buttone in the control panel of
the automatic climate control
(�page 182)
Page 197 of 435

196 Controls in detailPower windows�
Switch on ignition.
Opening the windows
�
Press switch1 to 4 at the
symbolk to the resistance point.
The corresponding window will move
downwards until you release the
switch.Closing the windows
�
Press switch1 to 4 at the
symbolj to the resistance point.
The corresponding window will move
upwards until you release the switch.
Fully opening the windows
(Express-open)
�
Press switch1 to 4 at the
symbolk past the resistance point
and release.
The corresponding window opens com-
pletely.Fully closing the windows
(Express-close)
�
Press switch1 to 4 at the
symbolj past the resistance point
and release.
The corresponding window closes com-
pletely.
iYou can still operate the windows when
the SmartKey is in starter switch
position0 or has been removed:�
until the driver’s or front passen-
ger’s door is opened
�
for no more than five minutes
Warning
G
If you press and hold the switch up when
closing the window, and upward movement
of the window is blocked by some obstruc-
tion including but not limited to arms, hands,
fingers, etc., the automatic reversal will not
operate.
!If the upward movement of the window
is blocked during the closing proce-
dure, the window will stop and open
slightly.
Remove the obstruction, press the
switchj again past the resistance
point and release.
If the window still does not close when
there is no obstruction, then hold the
switchj down. The side window
will then close without the obstruction
sensor function.