Page 13 of 435

12 IntroductionOperator’s ManualMaintenance
The Service Booklet describes all the nec-
essary maintenance work which should be
performed at regular intervals.
Always have the Service Booklet with you
when you take the vehicle to your autho-
rized Mercedes-Benz Center for service.
The service advisor will record each ser-
vice in the booklet for you.
Roadside Assistance
The Mercedes-Benz Roadside Assistance
Program provides factory trained technical
help in the event of a breakdown. Calls to
the toll-free Roadside Assistance number
1-800-FOR-MERCedes (in the USA)
1-800-387-0100 (in Canada)
will be answered by Mercedes-Benz
Customer Assistance Representatives
24 hours a day, 365 days a year.
For additional information refer to the
Mercedes-Benz Roadside Assistance Pro-
gram Brochure in your glove box.
Change of address or ownership
If you change your address, be sure to
send in the “Change of Address Notice”
found in the Service and Warranty Informa-
tion Booklet, or simply call the
Mercedes-Benz Customer Assistance
Center (in the USA) at
1-800-FOR-MERCedes, or Customer Ser-
vice (in Canada) at 1-800-387-0100. It is in
your own interest that we can contact you
should the need arise.
If you sell your Mercedes, please leave all
literature with the vehicle to make it avail-
able to the next operator.
If you bought this vehicle used, be sure to
send in the “Notice of Purchase of Used
Car” found in the Service and Warranty In-
formation Booklet, or call the
Mercedes-Benz Customer Assistance Cen-
ter (in the USA) at 1-800-FOR-MERCedes,
or Customer Service (in Canada) at
1-800-387-0100.
Page 22 of 435
21 At a glance
Cockpit
Item
Page
1
Combination switch�
Turn signals
�
Windshield wipers
�
High beam
47
48
128
2
Cruise control lever�
Cruise control
�
Distronic*
210
203
206
3
Instrument cluster
22
4
Multifunction steering
wheel
24
5
Gear range indicator, clock
22
6
Lever for voice control sys-
tem*, see separate operat-
ing instructions
Item
Page
7
Front Parktronic* (Parking
assist) warning indicator
for right front area
226
8
Overhead control panel
27
9
Glove box lock
231
a
Glove box lid release
231
b
Glove box
231
c
Center console
25
d
Starter switch
31
e
Horn
f
Steering wheel adjustment
stalk
Heated steering wheel*
37
240
Item
Page
g
Parking brake pedal
45
h
Hood lock release
272
j
Parking brake release
45
k
Door control panel
28
l
Exterior lamp switch
124
m
Headlamp washer button*
177
n
Front Parktronic* (Parking
assist) warning indicator
for left front area
226
Page 73 of 435

72 Safety and SecurityOccupant safety
Installation of infant and child restraint
systems
This vehicle is equipped with tether an-
chorages for a top tether strap at each of
the rear seating positions.
1Cover of top anchorage ring�
Remove cover1 from anchorage ring.
�
Store cover1 in a convenient place
(e.g. glove box).
�
Guide tether strap between head re-
straint and top of seat back.Head restraints must be positioned such
that the top tether strap can pass freely
between the head restraint and top of seat
back.
Make sure the tether strap is not twisted.
2Hook
3Anchorage ring
�
Securely fasten hook2, which is part
of the tether strap, to anchorage
ring3.
Warning!
G
When using a BabySmart
TM compatible
child seat on the front passenger seat, the
passenger front airbag will not deploy only if
the PASSENGER AIRBAG OFF indicator lamp
remains illuminated.
Make sure to check the indicator every time
you use the special system child seat.
Should the light go out while the restraint is
installed, please check installation. If the
light remains out, do not use the
BabySmart
TM restraint to transport children
on the front passenger seat until the system
has been repaired.
Do not place powered-on laptops, cell
phones and like electronic devices on the
front passenger seat. Signals from such de-
vices may interfere with the BabySmart
TM
system. Such signal interference may cause
the PASSENGER AIRBAG OFF indicator lamp
not to come on during self-test or be contin-
uously lit, indicating that the system is not
functioning.
iFor safety reasons, make sure the hook
has attached to the ring beyond the
safety catch, as illustrated.
Page 232 of 435
231 Controls in detail
Useful features
�Useful features
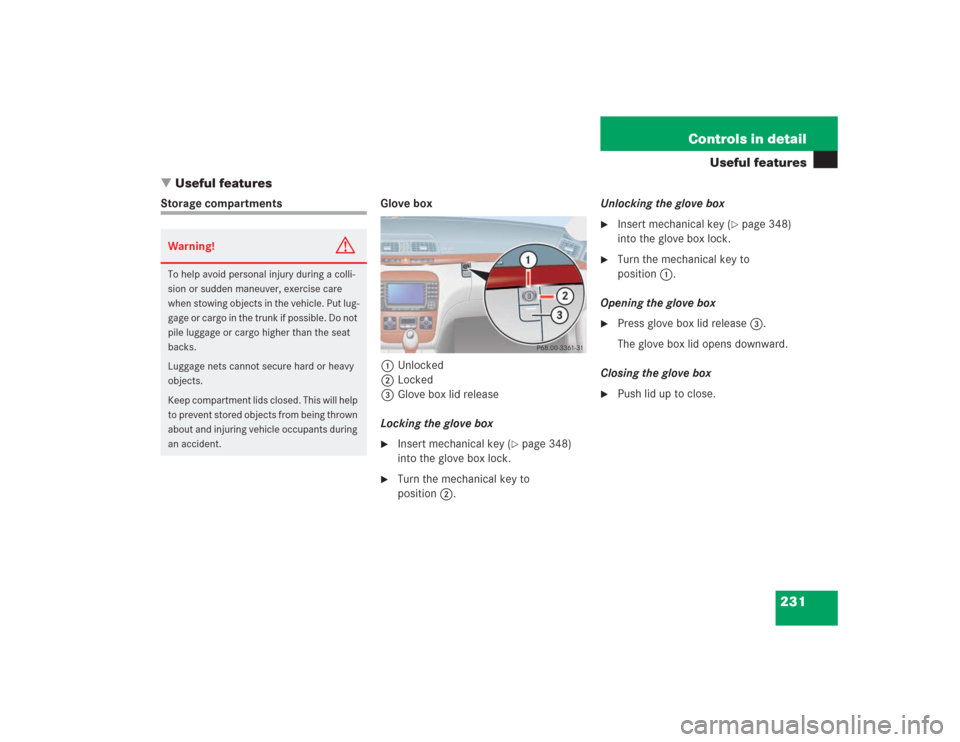
Storage compartments Glove box
1Unlocked
2Locked
3Glove box lid release
Locking the glove box
�
Insert mechanical key (
�page 348)
into the glove box lock.
�
Turn the mechanical key to
position2.Unlocking the glove box
�
Insert mechanical key (
�page 348)
into the glove box lock.
�
Turn the mechanical key to
position1.
Opening the glove box
�
Press glove box lid release3.
The glove box lid opens downward.
Closing the glove box
�
Push lid up to close.
Warning!
G
To help avoid personal injury during a colli-
sion or sudden maneuver, exercise care
when stowing objects in the vehicle. Put lug-
gage or cargo in the trunk if possible. Do not
pile luggage or cargo higher than the seat
backs.
Luggage nets cannot secure hard or heavy
objects.
Keep compartment lids closed. This will help
to prevent stored objects from being thrown
about and injuring vehicle occupants during
an accident.
Page 233 of 435
232 Controls in detailUseful featuresStorage compartment in the glove box
A storage compartment is located in the
cover of the glove box. It can be used to
store check cards, pens, a flashlight, etc.
1Storage compartment in glove box�
Lightly press the marking on the lid of
storage compartment1.
The lid opens upward.Storage compartment in the center
console
The storage compartment is located in the
lower portion of the center console.
1Storage compartment
Opening
�
Slide the mark on the compartment
cover forward.
Closing
�
Lightly press the mark on the compart-
ment cover forward. The cover closes
automatically.Storage compartment in front of arm-
rest
1Storage compartment
Opening
The compartment contains a cup holder
(
�page 236).
�
Lightly touch cover plate1.
The cover opens automatically.
Closing
�
Lightly push cover plate1 up until it
engages.
Page 346 of 435
345 Practical hints
Where will I find ...?
The vehicle tool kit includes:�
One interchangeable slot/Phillips
screwdriver
�
One towing eye bolt
�
One wheel bolt wrench with socket
wrench
�
One alignment bolt
�
One pair of gloves
�
One fuse extractor
�
One fuse chart for the main fuse box
�
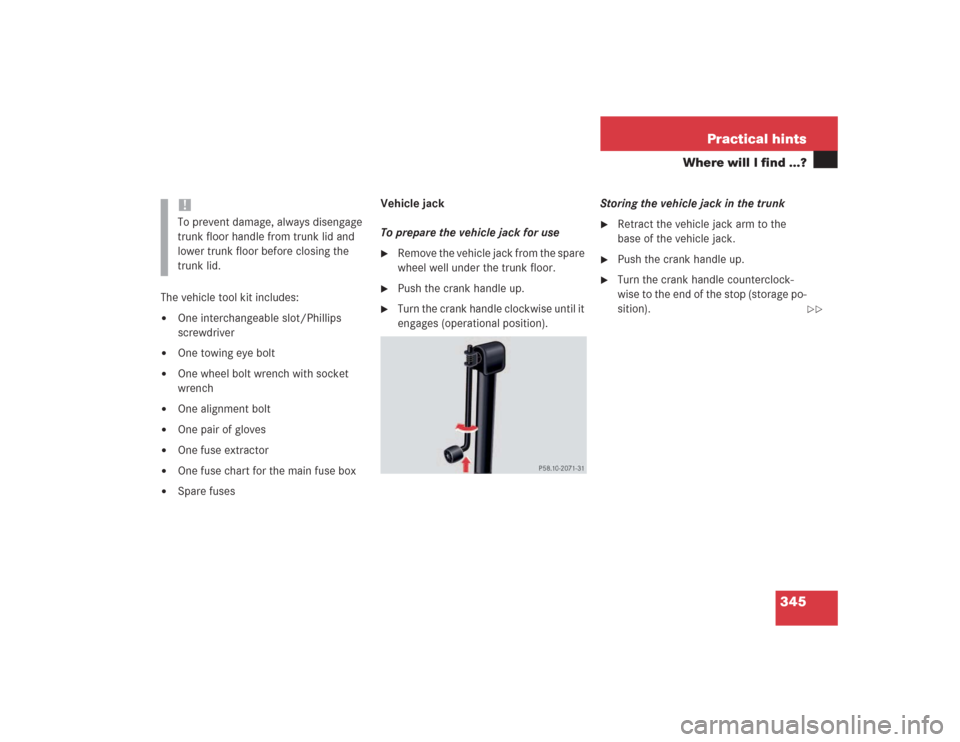
Spare fusesVehicle jack
To prepare the vehicle jack for use
�
Remove the vehicle jack from the spare
wheel well under the trunk floor.
�
Push the crank handle up.
�
Turn the crank handle clockwise until it
engages (operational position).Storing the vehicle jack in the trunk
�
Retract the vehicle jack arm to the
base of the vehicle jack.
�
Push the crank handle up.
�
Turn the crank handle counterclock-
wise to the end of the stop (storage po-
sition).
!To prevent damage, always disengage
trunk floor handle from trunk lid and
lower trunk floor before closing the
trunk lid.
��
Page 412 of 435

411 Index
Cleaning
Cup holder 301
Distronic* system sensor cover 299
Gear selector lever 301
Hard plastic trim items 301
Headlamps 177
Headliner and shelf below rear
window 301
Instrument cluster 301
Leather upholstery 302
Light alloy wheels 301
Nubuck leather upholstery 302
Parktronic* system sensor 299
Plastic and rubber parts 302
Seat belts 301
Steering wheel 301
Upholstery 302
Windows 300
Windshield 49
Wiper blades 299
Wood trims 302
Clock 23Closing
Cup holder 237
Glove box 231
Hood 273
Power windows with
KEYLESS-GO* 198
Side windows 196
Sliding/pop-up roof 199, 352
Sliding/pop-up roof with
KEYLESS-GO* 202
Sliding/pop-up roof with
SmartKey 201
Trunk lid 98
Windows 195
Windows with SmartKey 197
Closing from the inside
Trunk 100
Closing sliding/pop-up roof
In an emergency 352
Cockpit 20, 402
Cockpit management and data system
(COMAND) 402COMAND 402
COMAND* see separate operating instruc-
tions
Combination switch 128
High beam flasher 48, 128
Turn signals 47
Windshield wipers 48
Comfortable driving
Transmission program mode 170
Consumer information 399
Control and operation of radio
transmitters 266
Control system 134, 402
AUDIO menu 139
Checking oil level 274
Convenience submenu 160
Display digital speedometer 139
Distronic* menu 147
Functions 136, 138
Instrument cluster submenu 154
Lighting submenu 155
Malfunction memory menu 150
Page 418 of 435
 403
Glove box 231
Closing 231
Locking 231
Opening 231
Unlocking 231
Gloves (vehicle tool kit) 345
Good visibility 174
GPS 243, 403
H
Hand-held transmitter
Pro")
417 Index
Global Positioning System (GPS) 403
Glove box 231
Closing 231
Locking 231
Opening 231
Unlocking 231
Gloves (vehicle tool kit) 345
Good visibility 174
GPS 243, 403
H
Hand-held transmitter
Programming integrated remote
control 252
Hands-free microphone 27
Hard plastic trim items
Cleaning 301
Hazard warning flasher 128
Switching off 129
Switching on 129
Head restraint folding 119
Head restraints 109
Headlamp cleaning system* 281Headlamps
Automatic control 125
Bi-Xenon 401
Cleaning 298
Cleaning system* 177, 281
Refilling washer fluid 281
Switching off 53
Switching on 47
Headliner
Cleaning 301
Heated steering wheel* 240
Height adjustment
Head restraints 36
Steering wheel 37
Height adjustments
Vehicle level 219, 221
High beam
Replacing bulbs 353
High beam flasher 48, 128
High beam headlamps
Messages in display 330
Switching on 128
High mounted brake lamp 354Hood 272
Closing 273
Message in display 328
Opening 272
Hydroplaning 263
I
Identification labels 380
Ignition 31, 33
Switching on 43, 44
Immobilizer 83
Activating 83
Deactivating 83
Indicator lamps see Lamps, indicator and
warning
Individual seats* 118
Infant and child restraint systems 69
Installing 72
LATCH child seat anchors 73
Information
About service and warranty 10
Button for Tele Aid* 247
Infrared reflecting windshield 256