Page 122 of 435

121 Controls in detail
Memory function
�Memory function
You can store up to three different settings
per SmartKey or SmartKey with
KEYLESS-GO*.
The following settings are saved for each
stored position:�
Seat and backrest position
�
Settings for the multicontour seat*
�
Steering wheel position
�
Exterior rear view mirror position
�
Automatic climate control
These key-dependent memory settings
can be deactivated if desired
(
�page 160).The memory button and stored position
switch are located on the door.
1 Stored position buttons
2Memory button
�
Make sure the ignition is switched on
or the relevant door is open and the
SmartKey is inserted in the starter
switch.
!Prior to operating the vehicle, the driv-
er should check and adjust the seat
height, seat position fore and aft, and
seat backrest angle if necessary, to en-
sure adequate control, reach, and com-
fort. The head restraint should also be
adjusted for proper height. See also the
section on airbags (
�page 59) for
proper seat positioning.
In addition, adjust the steering wheel to
ensure adequate control, reach, opera-
tion and comfort. Both the inside and
outside rear view mirrors should be ad-
justed for adequate rear vision.
Fasten seat belts. Infants and small
children should be seated in a properly
secured restraint system that complies
with U.S. Federal Motor Vehicle Safety
Standards 213 and 225 and Canadian
Motor Vehicle Safety Standards 213
and 210.2.
Warning!
G
Do not activate the memory function while
driving. Activating the memory function
while driving could cause the driver to lose
control of the vehicle.
Page 123 of 435
.
�
Press memory button2.
�
Re")
122 Controls in detailMemory functionStoring positions into memory�
Adjust the seats, steering wheel and
exterior rear view mirrors to the de-
sired position (
�page 34).
�
Press memory button2.
�
Release memory button2 and push
one of the position buttons1 within
three seconds.
All the settings are stored with the se-
lected position.
Recalling positions from memory�
Press and hold one of the position
buttons1 until the seat, steering
wheel and exterior rear view mirrors
have fully moved to the stored posi-
tions.Storing exterior rear view mirror park-
ing position
For easier parking, you can adjust the pas-
senger-side exterior rear view mirror so
that you can see the right rear wheel as
soon as you engage reverse gearR.
For information on activating the parking
position, see “Setting parking position for
exterior rear view mirror” (
�page 162).
iReleasing the button immediately
stops movement to the stored posi-
tions.Warning!
G
Do not operate the power seats using the
memory button if the seat backrest is in an
excessively reclined position. Doing so
could cause damage to front or rear seats.
First move seat backrest to an upright posi-
tion.
iYou can store a parking position for the
passenger-side exterior rear view mir-
ror for each SmartKey or SmartKey
with KEYLESS-GO*.
Page 126 of 435
” (
�page 156).Manual headlamp mode
The low beam headlamps and parking")
125 Controls in detail
Lighting
To activate the daytime running lamp
mode, see “Setting daytime running lamp
mode (USA only)” (
�page 156).Manual headlamp mode
The low beam headlamps and parking
lamps can be switched on and off with the
exterior lamp switch. For exterior lamp
switch, see (
�page 124).
Automatic headlamp mode
The parking lamps, low beam headlamps
and license plate lamps switch on and off
automatically depending on the brightness
of the ambient light.
�
Turn the exterior lamp switch to U.
iIf you remove the SmartKey and open
the driver’s door while the parking
lamps or low beam headlamps are
switched on, then:�
a warning sounds
�
$ appears in the multifunction
display.
�
the message
SWITCH OFF LIGHTS!
appears in the multifunction display
iWith the daytime running lamp mode
activated and the engine running, the
low beam headlamps cannot be
switched off manually.
Warning!
G
If the exterior lamp switch is set toU,�
the headlamps may switch off unexpect-
edly when the system senses bright am-
bient light, for example light from
oncoming traffic.
�
the headlamps will not be automatically
switched on under foggy conditions.
To minimize risk to you and to others, acti-
vate headlamps by turning exterior lamp
switch to B when driving or when traffic
and / or ambient lighting conditions require
you to do so.
In low ambient lighting conditions, only
switch from position U to B with the
vehicle at a standstill. Switching from U
to B will briefly switch off the head-
lamps. Doing so while driving in low ambient
lighting conditions may result in an acci-
dent.
The automatic headlamp feature is only an
aid to the driver. The driver is responsible for
the operation of the vehicle's lights at all
times.
Page 128 of 435

127 Controls in detail
Lighting
Switching on fog lamps
Switching on front fog lamps
�
Make sure the low beam headlamps
are switched on.
�
Pull out exterior lamp switch to first
stop.
The green indicator lamp‡ in the
lamp switch comes on.Switching on rear fog lamp
�
Make sure the low beam headlamps
are switched on.
�
Pull out exterior lamp switch to second
stop.
The yellow indicator lamp† in the
lamp switch comes on.
Warning!
G
In low ambient lighting or foggy conditions,
only switch from position U to B with
the vehicle at a standstill. Switching from
U to B will briefly switch off the head-
lamps. Doing so while driving in low ambient
lighting conditions may result in an acci-
dent.iFog lamps will operate with the parking
lamps and/or the low beam headlamps
on. Fog lamps should only be used in
conjunction with low beam headlamps.
Consult your State or Province Motor
Vehicle Regulations regarding permis-
sible lamp operation.
iThe front fog lamps and rear fog lamp
cannot be switched on manually with
exterior lamp switch in positionU.
To activate the fog lamps, turn exterior
lamp switch to positionB and pull
the exterior lamp switch to first or sec-
ond stop (
�page 124).
Page 129 of 435
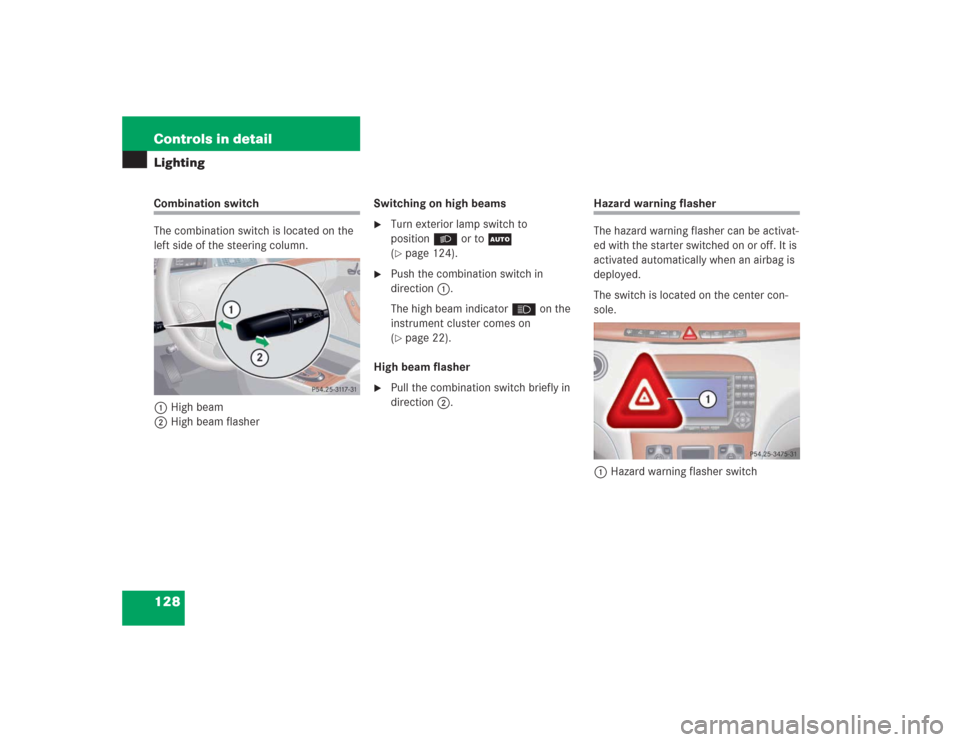
128 Controls in detailLightingCombination switch
The combination switch is located on the
left side of the steering column.
1High beam
2High beam flasherSwitching on high beams
�
Turn exterior lamp switch to
positionB or toU
(�page 124).
�
Push the combination switch in
direction1.
The high beam indicatorA on the
instrument cluster comes on
(�page 22).
High beam flasher
�
Pull the combination switch briefly in
direction2.
Hazard warning flasher
The hazard warning flasher can be activat-
ed with the starter switched on or off. It is
activated automatically when an airbag is
deployed.
The switch is located on the center con-
sole.
1Hazard warning flasher switch
Page 130 of 435

129 Controls in detail
Lighting
Switching on the hazard warning
flasher�
Press hazard warning flasher switch.
All turn signals will flash.
Switching off the hazard warning
flasher
�
Press hazard warning flasher switch
again.
Interior lighting
The controls are located in the overhead
control panel.
1Left front reading lamp
2Rear interior lamps
3Right front reading lamp
4Rocker switch for automatic control
systemActivating automatic control
�
Press rocker switch 4 to the center
position.
Interior lamps are switched on in dark-
ness, even when you:�
unlock the vehicle
�
open a door
�
remove the SmartKey from the
starter switch
The interior lamps are switched off after a
present time (
�page 158).
iWith the hazard warning flasher acti-
vated and the combination switch set
for either left or right turn, only the re-
spective left or right turn signals will
operate when the SmartKey in the
starter switch is in position1 or2.iIf the hazard warning flasher was acti-
vated automatically, press switch1
twice.
iIf the door remains open, the interior
lamps switch off automatically after ap-
proximately five minutes, when the
SmartKey is removed or in the switch
position0.
Page 133 of 435
,
i.e. clos")
132 Controls in detailInstrument clusterCoolant temperature gauge
During severe operating conditions,
e.g. stop-and-go traffic, the coolant tem-
perature may rise close to 248°F (120°C),
i.e. close to the red zone of the tempera-
ture gauge.
The engine should not be operated with
the coolant temperature above 248°F
(120°C), i.e. in the red zone of the coolant
temperature gauge. Doing so may cause
serious engine damage which is not cov-
ered by the Mercedes-Benz Limited War-
ranty.
Trip odometer�
Make sure you are viewing the trip
odometer display.
�
If it is not displayed, press the è or
ÿ button on the multifunction
steering wheel repeatedly until the trip
odometer appears (
�page 134).
�
Press and hold reset button on the in-
strument cluster (
�page 22) until the
trip odometer is reset.
Warning!
G
�
Driving when your engine is badly over-
heated can cause some fluids which
may have leaked into the engine com-
partment to catch fire. You could be se-
riously burned.
�
Steam from an overheated engine can
cause serious burns and can occur just
by opening the hood. Stay away from
the engine if you see or hear steam com-
ing from it.
Turn off the engine, get out of the vehicle
and do not stand near the vehicle until the
engine has cooled down.
iExcessive coolant temperature triggers
a warning in the multifunction display
(�page 323).
Page 134 of 435

133 Controls in detail
Instrument cluster
Tachometer
The red marking on the tachometer de-
notes excessive engine speed.
To help protect the engine, the fuel supply
is interrupted if the engine is operated
within the red marking.
S 55 AMG
The tachometer of the S 55 AMG does not
have a red marking denoting excessive en-
gine speed.
To help protect the engine, the fuel supply
is interrupted if the engine is operated at
an excessive engine speed.
Outside temperature indicator
The outside temperature is diplayed in the
instrument cluster (
�page 22). For infor-
mation on how to select the unit of the dis-
played temperature, i.e. degrees
Celsius (°C) or degrees Fahrenheit (°F),
see “Selecting temperature display mode”
(
�page 154).The temperature sensor is located in the
front bumper area. Due to its location, the
sensor can be affected by road or engine
heat during idling or slow driving. There-
fore, the accuracy of the displayed temper-
ature can only be verified by comparison to
a thermometer placed next to the sensor,
not by comparison to external displays
(e.g. bank signs, etc.).
When moving the vehicle into colder ambi-
ent temperatures (e.g. when leaving your
garage), you will notice a delay before the
lower temperature is displayed.
A delay also occurs when ambient temper-
atures rise. This prevents inaccurate tem-
perature indications caused by heat
radiated from the engine during idling or
slow driving.
!Avoid driving at excessive engine
speeds, as it may result in serious en-
gine damage that is not covered by the
Mercedes-Benz Limited Warranty.
Warning!
G
The outside temperature indicator is not de-
signed to serve as an ice-warning device and
is therefore unsuitable for that purpose.
Indicated temperatures just above the freez-
ing point do not guarantee that the road sur-
face is free of ice. The road may still be icy,
especially in wooded areas or on bridges.