Page 313 of 435

312 Practical hintsWhat to do if …?Messages in the display
The control system shows warning and
malfunction messages in the multifunction
display.
Certain warning and malfunction messag-
es are accompanied by an audible signal.
Address these messages accordingly and
follow the additional instructions given in
this Operator’s Manual.
Selecting the malfunction memory menu in
the control system (
�page 134) displays
both cleared and uncleared messages.
High-priority messages appear in the mul-
tifunction display in red color.
Certain messages of high priority cannot
be cleared from the multifunction display
using the reset button (�page 22).
Other messages of high priority and mes-
sages of less immediate priority can be
cleared from the multifunction display us-
ing the reset button (
�page 22). These are
then stored in the malfunction message
memory (
�page 150).On the pages that follow, you will find a
compilation of the most important warning
and malfunction messages that may ap-
pear in the display. High priority messages
appear on a red background.
Warning!
G
All categories of messages contain impor-
tant information which should be taken note
of and, where a malfunction is indicated, ad-
dressed as soon as possible at an autho-
rized Mercedes-Benz Center.
Failure to repair condition noted may cause
damage not covered by the Mercedes-Benz
Limited Warranty, or result in property dam-
age or personal injury.Warning!
G
No messages will be displayed if either the
instrument cluster or the multifunction dis-
play is inoperative.
Contact your nearest authorized
Mercedes-Benz Center.
iTurning the SmartKey in the starter
switch to position2, or pressing the
KEYLESS-GO* start/stop button twice
causes all lamps as well as the multi-
function display to come on. Make sure
that they are all in working order before
starting your journey.
Page 318 of 435
317 Practical hints
What to do if …?
Display
Display message
Possible cause
Possible solution
P
SHIFT
TO P
You have tried to turn off the engine with
the KEYLESS-GO* start/stop button with
the gear selector lever not inP.
�
Place the gear selector lever in positionP.
PRE-SAFE
INACTIVE
SEE OPER. MANUAL
!
If BAS or ESP malfunction messages are
displayed simultaneously, PRE-SAFE has
been deactivated as a result of these mal-
functions. All other occupant safety sys-
tems, such as the airbags, are still available.
�
Visit an authorized Mercedes-Benz Center as
soon as possible.
PRE-SAFE itself has failed. All other occu-
pant safety systems, such as the airbags,
are still available.
�
Visit an authorized Mercedes-Benz Center as
soon as possible.
Page 329 of 435

328 Practical hintsWhat to do if …?Display symbol
Display message
Possible cause
Possible solution
_
ENTRY POSITION
DO NOT DRIVE!
Seat, exterior mirrors and steering wheel
have not yet moved to their preset driving
positions.
�
Wait until the seat, exterior mirrors and
steering wheel have moved to their driv-
ing positions.
The message will disappear.
Y
HOOD OPEN!
You are driving with the hood open.
�
Close the hood (
�page 273).
I
REMOVE KEY!
You have forgotten to remove the
SmartKey.
�
Remove the SmartKey from the ignition.
REPLACE KEY!
DRIVE TO WORKSHOP!
The batteries in the SmartKey are dead.
�
Change the batteries (
�page 349).
AUTOM. LIGHT ON
REMOVE KEY!
�
Remove the SmartKey from the starter
switch.
F
KEY
CHECK BATTERY
!
The battery in the KEYLESS-GO* key is
discharged.
�
Change the battery (
�page 349).
KEY
NOT RECOGNIZED!
SmartKey with KEYLESS-GO* is not rec-
ognized while the engine is running be-
cause�
the SmartKey is not in the vehicle
�
there is strong radio-frequency inter-
ference
�
Stop the vehicle as soon as it is safe to do
so.
�
Search for the SmartKey.
Otherwise the vehicle cannot be centrally
locked nor can the engine be started again
after it has been stopped.
Page 330 of 435

329 Practical hints
What to do if …?
Display symbol
Display message
Possible cause
Possible solution
F
KEY
NOT RECOGNIZED!
The SmartKey with KEYLESS-GO* is mo-
mentarily not recognized.
�
Change the position of the SmartKey with
KEYLESS-GO* in the vehicle.
�
Operate the vehicle with the SmartKey in
the starter switch if necessary.
KEY DETECTED
IN VEHICLE
A SmartKey with KEYLESS-GO* left in the
vehicle was recognized while locking the
vehicle from the outside.
�
Take the SmartKey with KEYLESS-GO*
out of the vehicle.
KEY
DRIVE TO WORKSHOP!
The KEYLESS-GO* system is malfunction-
ing.
�
Visit an authorized Mercedes-Benz Cen-
ter as soon as possible.
.
3RD BRAKE LIGHT
CHECK LAMP!
The high mounted brake lamp is malfunc-
tioning.
�
Visit an authorized Mercedes-Benz Cen-
ter as soon as possible.
BRAKE LIGHT
VISIT WORKSHOP!
Brake lamp illumination is delayed or
lamp is permanently on.
�
Visit an authorized Mercedes-Benz Cen-
ter as soon as possible.
BRAKE LIGHT, L
CHECK LAMP!
SUBSTITUTE LAMP ON!
The left brake lamp is malfunctioning. A
back-up bulb is being used.
�
Visit an authorized Mercedes-Benz Cen-
ter as soon as possible.
BRAKE LIGHT, R
CHECK LAMP!
SUBSTITUTE LAMP ON!
The right brake lamp is malfunctioning. A
back-up bulb is being used.
�
Visit an authorized Mercedes-Benz Cen-
ter as soon as possible.
DISPLAY MALFUNCTION
VISIT WORKSHOP!
The display for the lamps or the system is
malfunctioning.
�
Visit an authorized Mercedes-Benz Cen-
ter as soon as possible.
Page 349 of 435
348 Practical hintsUnlocking/locking in an emergency
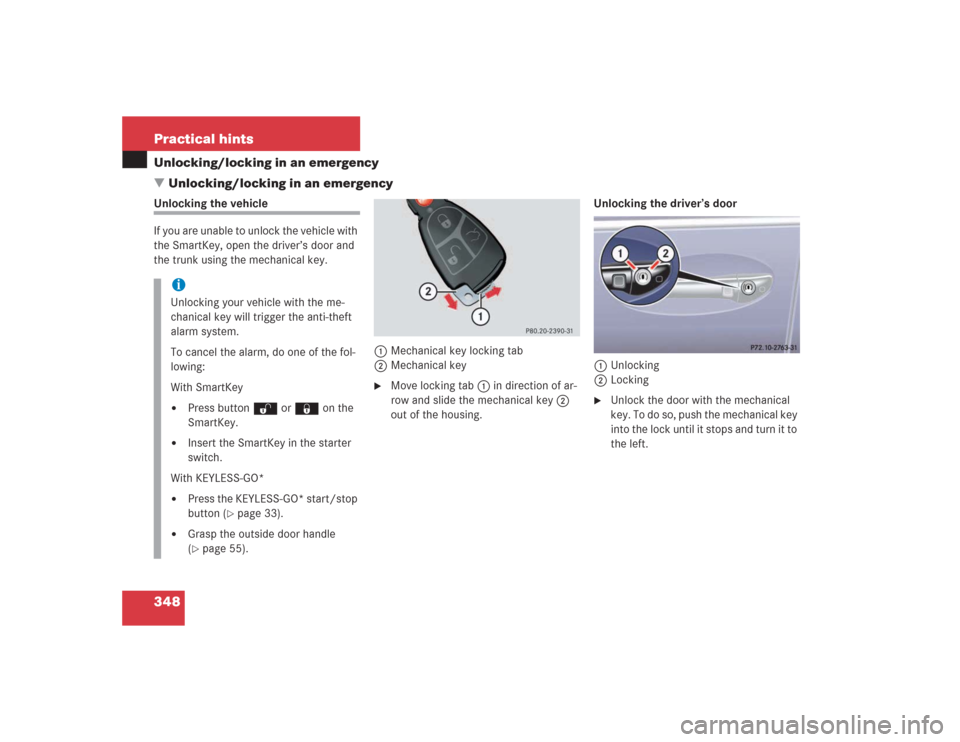
�Unlocking/locking in an emergencyUnlocking the vehicle
If you are unable to unlock the vehicle with
the SmartKey, open the driver’s door and
the trunk using the mechanical key.
1Mechanical key locking tab
2Mechanical key
�
Move locking tab1 in direction of ar-
row and slide the mechanical key2
out of the housing.Unlocking the driver’s door
1Unlocking
2Locking
�
Unlock the door with the mechanical
key. To do so, push the mechanical key
into the lock until it stops and turn it to
the left.
iUnlocking your vehicle with the me-
chanical key will trigger the anti-theft
alarm system.
To cancel the alarm, do one of the fol-
lowing:
With SmartKey�
Press button Œ or ‹ on the
SmartKey.
�
Insert the SmartKey in the starter
switch.
With KEYLESS-GO*
�
Press the KEYLESS-GO* start/stop
button (
�page 33).
�
Grasp the outside door handle
(�page 55).
Page 350 of 435
 is required to open the trunk lid.
If you are unable to unlock the trunk with")
349 Practical hints
Unlocking/locking in an emergency
Unlocking the trunk
A minimum height clearance of 6 ft.
(1.85 m) is required to open the trunk lid.
If you are unable to unlock the trunk with
the SmartKey or KEYLESS-GO*, open the
trunk with the mechanical key.
The trunk lid lock is located above the rear
license plate recess.
1Unlocking and opening�
Insert the mechanical key into the
trunk lid lock.
�
Turn the mechanical key counterclock-
wise to position1.
The trunk unlocks and opens.
Locking the vehicle
If you are unable to lock the vehicle with
the SmartKey or the SmartKey with
KEYLESS-GO*, lock it with the mechanical
key as follows:�
Close the passenger doors and the
trunk lid.
�
Press the central locking switch in the
center console (
�page 107).
�
Check to see whether the locking knob
on the passenger door is still visible. If
necessary push it down manually.
�
Slide mechanical key2 out of the
SmartKey (
�page 348).
�
Lock the driver’s door with the me-
chanical key (
�page 348).
�
Lock the trunk lid if necessary with the
mechanical key (if applicable)
(�page 105).
Replacing batteries in the SmartKey/
SmartKey with KEYLESS-GO*
If the batteries in the SmartKey or the
SmartKey with KEYLESS-GO* are dis-
charged, the vehicle can no longer be
locked or unlocked. It is recommended to
have the batteries replaced at an autho-
rized Mercedes-Benz Center.
!The trunk lid swings open upwards au-
tomatically. Always make sure that
there is sufficient overhead clearance.
Warning!
G
Keep the batteries out of reach of children.
If a battery is swallowed, seek medical help
immediately.
Page 352 of 435

351 Practical hints
Unlocking/locking in an emergency
SmartKey with KEYLESS-GO*
1Battery
2Tilt battery up
3Mechanical keyReplacement battery: Lithium, type
CR 2025 or equivalent.
�
Remove mechanical key (
�page 348).
�
Insert the mechanical key in side open-
ing and push gray slide.
The battery compartment is unlatched.
�
Pull the battery compartment out of the
SmartKey housing.
�
Using mechanical key3, apply pres-
sure to position2.
Battery1 tilts up slightly.
�
Pull out battery1 in direction of ar-
row.
�
Using a lint-free cloth, insert new bat-
tery with the plus (+) side facing up.
�
Return battery compartment into hous-
ing until it locks into place.
Fuel filler flap
In case the central locking system does
not release the fuel filler flap, you can it
manually.
1Release knob�
Open the trunk.
�
Remove the trim inside the trunk on the
right-hand side.
�
Pull release knob1 in the direction of
arrow.
The fuel filler flap can be opened.
iThe required replacement battery is
available at any authorized
Mercedes-Benz Center.
Page 362 of 435

361 Practical hints
Flat tire
�Flat tire
Preparing the vehicle�
Park the vehicle as far as possible from
moving traffic on a hard surface.
�
Turn on the hazard warning flashers.
�
Turn the steering wheel so that the
front wheels are in a straight ahead
position.
�
Set the parking brake.
�
Move the gear selector lever toP.
Vehicles with SmartKey:
�
Turn off the engine (
�page 53).
�
Remove the SmartKey from the starter
switch.Vehicles with SmartKey with
KEYLESS-GO*:
�
Turn off the engine by pressing the
KEYLESS-GO* button on the gear se-
lector lever once (
�page 54).
�
Open the driver’s door (this puts the
starter switch in position0, same as
with the SmartKey removed from the
starter switch). The driver’s door then
can be closed again.
�
Have any passenger exit the vehicle at
a safe distance from the roadway.
Mounting the spare wheel
iOpen door only when conditions are
safe to do so.
Warning!
G
Never operate the vehicle with more than
one spare wheel mounted.
The spare wheel rim is for temporary use
only. Use for over a total of 12 000 miles
(20 000 km) (aggregate of all uses) may
cause wheel rim failure leading to an acci-
dent and possible injuries.
The spare wheel should only be used tempo-
rarily and replaced with a regular road wheel
as quickly as possible.
S 55 AMG and Sport Package* only:
The spare wheel is for temporary use only.
When driving with spare wheel mounted, en-
sure proper tire pressure and do not exceed
vehicle speed of 50 mph (80 km/h).
The dimensions of the spare wheel are dif-
ferent from those of the road wheels. As a
result, the vehicle handling characteristics
change when driving with a mounted spare
wheel. Adapt your driving style accordingly.