Page 362 of 435

361 Practical hints
Flat tire
�Flat tire
Preparing the vehicle�
Park the vehicle as far as possible from
moving traffic on a hard surface.
�
Turn on the hazard warning flashers.
�
Turn the steering wheel so that the
front wheels are in a straight ahead
position.
�
Set the parking brake.
�
Move the gear selector lever toP.
Vehicles with SmartKey:
�
Turn off the engine (
�page 53).
�
Remove the SmartKey from the starter
switch.Vehicles with SmartKey with
KEYLESS-GO*:
�
Turn off the engine by pressing the
KEYLESS-GO* button on the gear se-
lector lever once (
�page 54).
�
Open the driver’s door (this puts the
starter switch in position0, same as
with the SmartKey removed from the
starter switch). The driver’s door then
can be closed again.
�
Have any passenger exit the vehicle at
a safe distance from the roadway.
Mounting the spare wheel
iOpen door only when conditions are
safe to do so.
Warning!
G
Never operate the vehicle with more than
one spare wheel mounted.
The spare wheel rim is for temporary use
only. Use for over a total of 12 000 miles
(20 000 km) (aggregate of all uses) may
cause wheel rim failure leading to an acci-
dent and possible injuries.
The spare wheel should only be used tempo-
rarily and replaced with a regular road wheel
as quickly as possible.
S 55 AMG and Sport Package* only:
The spare wheel is for temporary use only.
When driving with spare wheel mounted, en-
sure proper tire pressure and do not exceed
vehicle speed of 50 mph (80 km/h).
The dimensions of the spare wheel are dif-
ferent from those of the road wheels. As a
result, the vehicle handling characteristics
change when driving with a mounted spare
wheel. Adapt your driving style accordingly.
Page 363 of 435
.
Lifting the vehicle
�
Prevent the")
362 Practical hintsFlat tirePreparing the vehicle�
Take vehicle tool kit tray and vehicle
jack out of trunk .
�
Take the spare wheel out of wheel well
(�page 344).
Lifting the vehicle
�
Prevent the vehicle from rolling away
by blocking wheels with wheel chocks
(not included) or other sizable objects.
When changing wheel on a level surface:
�
Place one chock in front of and one be-
hind the wheel that is diagonally oppo-
site to the wheel being changed.
When changing wheel on a hill:
�
Place chocks behind the downhill sides
of both wheels of the axle not being
worked on.
�
Take the two-piece wheel wrench out
of the vehicle tool kit tray. Assemble
wheel wrench.
�
On wheel to be changed, loosen but do
not yet remove the wheel bolts (ap-
proximately one full turn with wrench).
The tube openings are located directly be-
hind the front wheel housings and in front
of the rear wheel housings.
Warning!
G
The jack is designed exclusively for jacking
up the vehicle at the jack tubes built both
sides of the vehicle. To help avoid personal
injury, use the jack only to lift the vehicle
during a wheel change. Never get beneath
the vehicle while it is supported by the jack.
Keep hands and feet away from the area un-
der the lifted vehicle. Always firmly set park-
ing brake and block wheels before raising
vehicle with jack.
Do not disengage parking brake while the
vehicle is raised. Be certain that the jack is
always vertical (plumb line) when in use, es-
pecially on hills. Always try to use the jack
on level surface. Make sure the jack arm is
fully inserted in the jack tube. Always lower
the vehicle onto sufficient capacity jack-
stands before working under the vehicle.
Page 364 of 435
363 Practical hints
Flat tire
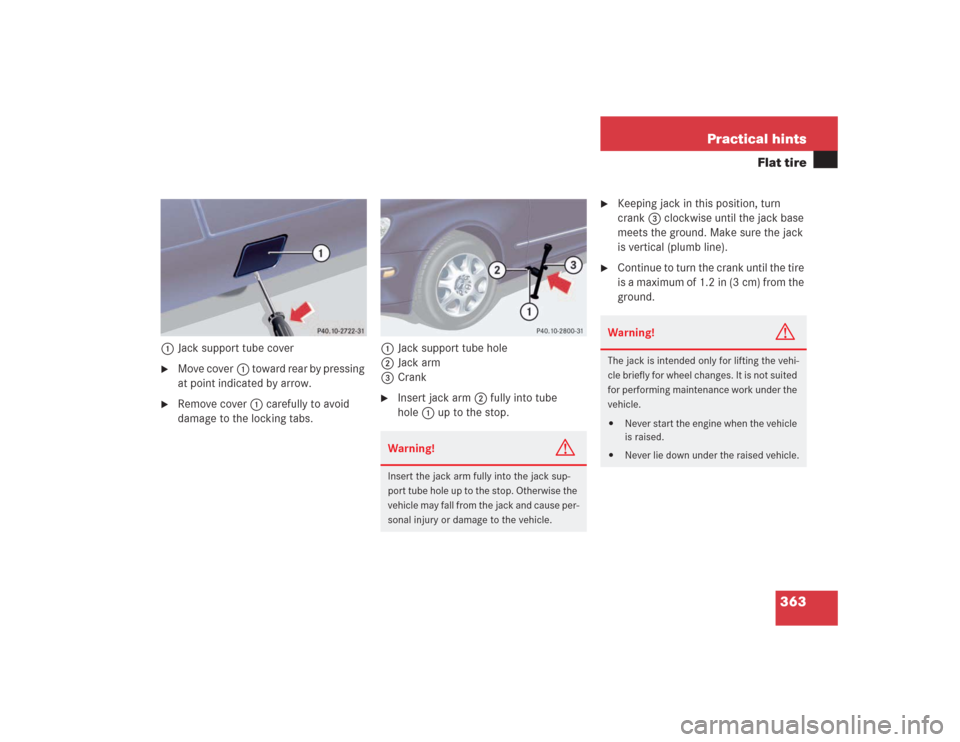
1Jack support tube cover�
Move cover1 toward rear by pressing
at point indicated by arrow.
�
Remove cover1 carefully to avoid
damage to the locking tabs.1Jack support tube hole
2Jack arm
3Crank
�
Insert jack arm2 fully into tube
hole1 up to the stop.
�
Keeping jack in this position, turn
crank3 clockwise until the jack base
meets the ground. Make sure the jack
is vertical (plumb line).
�
Continue to turn the crank until the tire
is a maximum of 1.2 in (3 cm) from the
ground.
Warning!
G
Insert the jack arm fully into the jack sup-
port tube hole up to the stop. Otherwise the
vehicle may fall from the jack and cause per-
sonal injury or damage to the vehicle.
Warning!
G
The jack is intended only for lifting the vehi-
cle briefly for wheel changes. It is not suited
for performing maintenance work under the
vehicle.�
Never start the engine when the vehicle
is raised.
�
Never lie down under the raised vehicle.
Page 403 of 435

Mercedes-Benz customer service cen-
ter, which can help you with any ques-
tions about your vehicle and provide
assistance in the event of a bre")
402 Technical termsCAC
(C
ustomer A
ssistance C
enter)
Mercedes-Benz customer service cen-
ter, which can help you with any ques-
tions about your vehicle and provide
assistance in the event of a break-
down.
CAN system
(C
ontroller A
rea N
etwork)
Data bus network serving to control ve-
hicle functions such as door locking or
windshield wiping.
Cockpit
All instruments, switches, buttons and
indicator/warning lamps in the passen-
ger compartment needed for vehicle
operation and monitoring.COMAND
(C
ockpit M
anagement and D
ata Sys-
tem)
Information and operating center for
vehicle sound and communications
systems, including the radio and navi-
gation system, as well as other optional
equipment (CD changer, telephone,
etc.).
Control system
The control system is used to call up
vehicle information and to change
component settings. Information and
messages appear in the multifunction
display. The driver uses the buttons on
the multifunction steering wheel to
navigate through the system and to ad-
just settings.
Cruise control
Driving convenience system for auto-
matically maintaining the vehicle speed
set by the driver.Distronic*
A driving convenience cruise control
system which helps the driver maintain
a pre-selected speed:
�
If there is no vehicle directly ahead,
the system operates in the same
way as conventional ->cruise con-
trol.
�
If a slower moving vehicle is ahead,
Distronic will reduce your vehicle
speed to the extent permitted by re-
duced throttle and up to 20% brak-
ing power to maintain the preset
minimum following distance.
Engine number
The number set by the manufacturer
and stamped on the cylinder block to
uniquely identify each engine pro-
duced.
Page 433 of 435

432 IndexW
Warning lamps see Lamps, indicator and
warning
Warning sounds
Distance warning function* 214
Distronic* 208
Drivers seat belts 64
Parking brake 46
Warranty coverage 379
Washing the vehicle 296
Wear pattern (tires) 291
Weights 390
Wheel change
Tightening torque 365
Wheels
Rotating 291
Tires and wheels 282
Window curtain airbags 63
Windows see Side windows
Windshield
Refilling washer fluid 281
Replacing wiper blades 359
Washer fluid 281Windshield washer fluid
Message in display 334
Refilling 281
Wiping with 49
Windshield wipers 48, 177
Fast wiper speed 48
Intermittent wiping 48
Replacing wiper blades 359
Single wipe 49
Switching on 48
Wiping with windshield washer
fluid 49
Winter driving 292
Block heater (Canada only) 293
Snow chains 293
Tires 292
Transmission program mode 171
Winter driving instructions 264
Winter tires 292
Wiper blades
Cleaning 299
Installing 360Removing 359
Replacing 359
Wiping
And washing simultaneously 49
Interval 48
With windshield washer fluid 49
Wood trims
Cleaning 302
Wrench, wheel (vehicle tool kit) 345
X
Xenon headlamps
Bi-Xenon 401