Page 280 of 435

279 Operation
Engine compartment
The coolant expansion tank is located on
the passenger side of the engine compart-
ment.
1Coolant expansion tank�
Using a rag, turn the cap slowly approx-
imately one half turn to the left to re-
lease any excess pressure.
�
Continue turning the cap to the left and
remove it.The coolant level is correct if the level
�
for cold coolant: reaches the black top
part of the reservoir
�
for warm coolant: is approximately
0.6 in (1.5 cm) higher
�
Add coolant as required.
�
Replace and tighten cap.
For more information on coolant, see
“Coolants” (
�page 395).
Warning!
G
In order to avoid any possibly serious burns:�
Use extreme caution when opening the
hood if there are any signs of steam or
coolant leaking from the cooling system,
or if the coolant temperature gauge indi-
cates that the coolant is overheated.
�
Do not remove pressure cap on coolant
reservoir if engine temperature is above
158°F (70°C). Allow engine to cool
down before removing cap. The coolant
reservoir contains hot fluid and is under
pressure.
�
Using a rag, slowly open the cap approx-
imately
1/2 turn to relieve excess pres-
sure. If opened immediately, scalding
hot fluid and steam will be blown out un-
der pressure.
�
Do not spill antifreeze on hot engine
parts. Antifreeze contains ethylene gly-
col which may burn if it comes into con-
tact with hot engine parts.
!S 600:
Only open the cap on coolant expan-
sion tank1. Never open the cap be-
tween the charge-air coolers.
Otherwise, the engine could be dam-
aged.
Page 324 of 435
.
Display symbol
Display message
Possib")
323 Practical hints
What to do if …?
During severe operating conditions,
e.g. stop-and-go traffic, the coolant tem-
perature may rise close to 248°F (120°C).
Display symbol
Display message
Possible cause
Possible solution
Ï
COOLANT
STOP, ENGINE OFF!
The coolant is too hot.
�
Stop the vehicle and turn off the engine.
�
Only start the engine again after the mes-
sage disappears. You could otherwise
damage the engine.
Warning!
G
Driving when your engine is badly overheat-
ed can cause some fluids which may have
leaked into the engine compartment to
catch fire. You could be seriously burned.
Steam from an overheated engine can cause
serious burns and can occur just by opening
the engine hood. Stay away from the engine
if you see or hear steam coming from it.
Turn off the engine, get out of the vehicle
and do not stand near the vehicle until the
engine has cooled down.
!The engine should not be operated with
the coolant temperature above 248°F
(120°C). Doing so may cause serious
engine damage which is not covered by
the Mercedes-Benz Limited Warranty.
Page 329 of 435

328 Practical hintsWhat to do if …?Display symbol
Display message
Possible cause
Possible solution
_
ENTRY POSITION
DO NOT DRIVE!
Seat, exterior mirrors and steering wheel
have not yet moved to their preset driving
positions.
�
Wait until the seat, exterior mirrors and
steering wheel have moved to their driv-
ing positions.
The message will disappear.
Y
HOOD OPEN!
You are driving with the hood open.
�
Close the hood (
�page 273).
I
REMOVE KEY!
You have forgotten to remove the
SmartKey.
�
Remove the SmartKey from the ignition.
REPLACE KEY!
DRIVE TO WORKSHOP!
The batteries in the SmartKey are dead.
�
Change the batteries (
�page 349).
AUTOM. LIGHT ON
REMOVE KEY!
�
Remove the SmartKey from the starter
switch.
F
KEY
CHECK BATTERY
!
The battery in the KEYLESS-GO* key is
discharged.
�
Change the battery (
�page 349).
KEY
NOT RECOGNIZED!
SmartKey with KEYLESS-GO* is not rec-
ognized while the engine is running be-
cause�
the SmartKey is not in the vehicle
�
there is strong radio-frequency inter-
ference
�
Stop the vehicle as soon as it is safe to do
so.
�
Search for the SmartKey.
Otherwise the vehicle cannot be centrally
locked nor can the engine be started again
after it has been stopped.
Page 356 of 435
355 Practical hints
Replacing bulbs
Replacing bulbs for front lamps
1Headlamp cover for fog lamp
2Headlamp cover for high beam halogen
headlamp bulb, parking and standing
lamp
3Headlamp cover for Bi-Xenon* (low and
high beam) or halogen (low beam)
headlamp bulb4Bulb socket for fog lamp
5Bulb socket for parking and standing
lamp
6Electrical connector for high beam
halogen headlamp bulb
7Electrical connector for low beam
headlamp bulb
8Bulb socket for turn signal lampReplacing low beam bulbs
Bi-Xenon* headlamp
Halogen headlamp
�
Switch off the lights.
�
Open the hood (
�page 272).
�
Press the tab on cover3 and remove
cover.
�
Pull connector7 off of the lamp.
�
Release the retaining springs and take
out the bulb.Warning!
G
Do not remove the cover for the Bi-Xenon
headlamp. Because of high voltage in Xenon
lamps, it is dangerous to replace the bulb or
repair the lamp and its components. We rec-
ommend that you have such work done by a
qualified technician.
��
Page 357 of 435

356 Practical hintsReplacing bulbs�
Insert the new bulb in the socket so
that the base is in the recess on the
lower left.
�
Attach the retaining springs.
�
Insert connector7 into the bulb.
�
Press cover3 onto the housing until
the tab engages.Replacing halogen high beam bulbs
�
Switch off the lights.
�
Open the hood (
�page 272).
�
Press the tab on cover2 and remove
cover.
�
Pull connector 6 off of the bulb.
�
Apply pressure on the bulb contacts
from above until the bulb releases from
the retaining springs.
�
Remove bulb.
�
Insert the new bulb in the socket with
the marking facing upward.
�
Press the bulb upward on the contacts
until it engages in the retaining springs.
�
Insert connector6 onto the bulb.
�
Press cover2 onto the housing until
the tab engages.Front turn signal lamp bulb
�
Switch off the lights.
�
Open the hood (
�page 272).
�
Twist bulb socket8 counterclockwise
and pull out.
�
Gently push bulb into socket, turn
counterclockwise and remove.
�
Insert new bulb in socket, push in and
twist clockwise.
�
Reinstall bulb socket in lamp and twist
clockwise until it engages.
��
Page 358 of 435
357 Practical hints
Replacing bulbs
Parking and standing lamp bulb�
Switch off the lights.
�
Open the hood (
�page 272).
�
Press the tab on cover2 and remove
cover.
�
Pull out the bulb socket5 with the
bulb.
�
Pull the bulb out of the bulb socket.
�
Insert a new bulb in the socket.
�
Reinstall the bulb socket.
�
Press cover2 onto the housing until
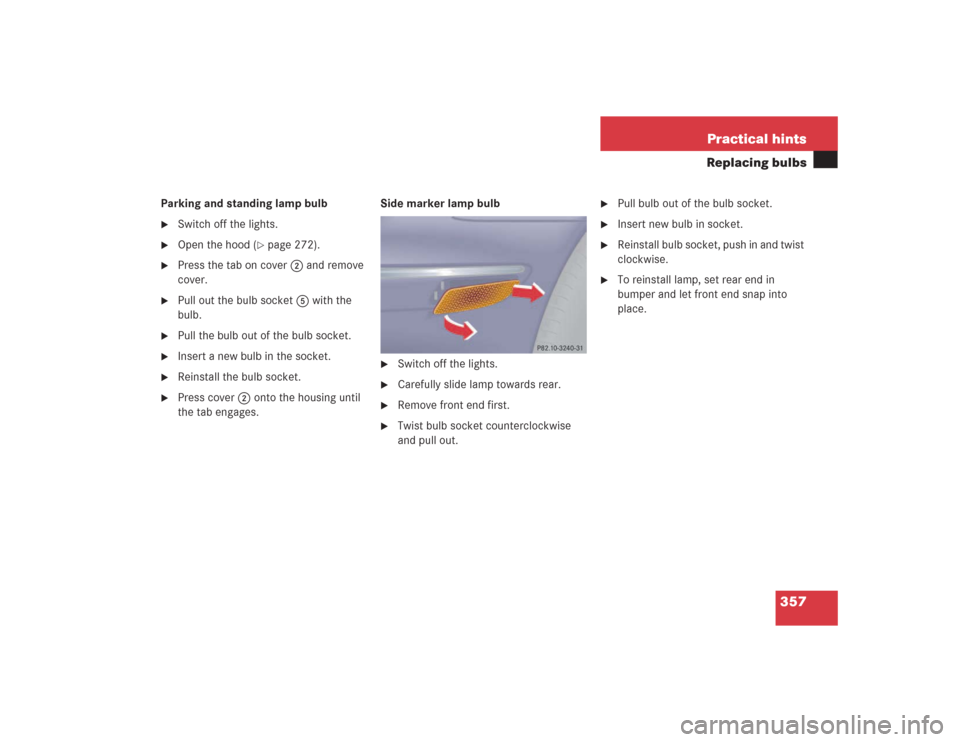
the tab engages.Side marker lamp bulb
�
Switch off the lights.
�
Carefully slide lamp towards rear.
�
Remove front end first.
�
Twist bulb socket counterclockwise
and pull out.
�
Pull bulb out of the bulb socket.
�
Insert new bulb in socket.
�
Reinstall bulb socket, push in and twist
clockwise.
�
To reinstall lamp, set rear end in
bumper and let front end snap into
place.
Page 361 of 435
360 Practical hintsReplacing wiper bladesInstalling wiper blades�
Slide the wiper blade onto wiper arm
until it locks in place
�
Rotate the wiper blade into position
parallel to wiper arm.
�
Fold the wiper arm backward to rest on
the windshield. Make sure you hold
onto the wiper when folding the wiper
arm back.
!Never open the hood when the wiper
arm is folded forward.
Hold on to the wiper when folding the
wiper arm back. If released, the force
of the impact from the tensioning
spring could crack the windshield.
Do not allow the wiper arms to contact
the windshield glass without a wiper
blade inserted.
Make certain that the wiper blades are
properly installed. Improperly installed
wiper blades may cause windshield
damage.
For your convenience, we recommend
that you have this work carried out by
an authorized Mercedes-Benz Center.
Page 418 of 435
 403
Glove box 231
Closing 231
Locking 231
Opening 231
Unlocking 231
Gloves (vehicle tool kit) 345
Good visibility 174
GPS 243, 403
H
Hand-held transmitter
Pro")
417 Index
Global Positioning System (GPS) 403
Glove box 231
Closing 231
Locking 231
Opening 231
Unlocking 231
Gloves (vehicle tool kit) 345
Good visibility 174
GPS 243, 403
H
Hand-held transmitter
Programming integrated remote
control 252
Hands-free microphone 27
Hard plastic trim items
Cleaning 301
Hazard warning flasher 128
Switching off 129
Switching on 129
Head restraint folding 119
Head restraints 109
Headlamp cleaning system* 281Headlamps
Automatic control 125
Bi-Xenon 401
Cleaning 298
Cleaning system* 177, 281
Refilling washer fluid 281
Switching off 53
Switching on 47
Headliner
Cleaning 301
Heated steering wheel* 240
Height adjustment
Head restraints 36
Steering wheel 37
Height adjustments
Vehicle level 219, 221
High beam
Replacing bulbs 353
High beam flasher 48, 128
High beam headlamps
Messages in display 330
Switching on 128
High mounted brake lamp 354Hood 272
Closing 273
Message in display 328
Opening 272
Hydroplaning 263
I
Identification labels 380
Ignition 31, 33
Switching on 43, 44
Immobilizer 83
Activating 83
Deactivating 83
Indicator lamps see Lamps, indicator and
warning
Individual seats* 118
Infant and child restraint systems 69
Installing 72
LATCH child seat anchors 73
Information
About service and warranty 10
Button for Tele Aid* 247
Infrared reflecting windshield 256